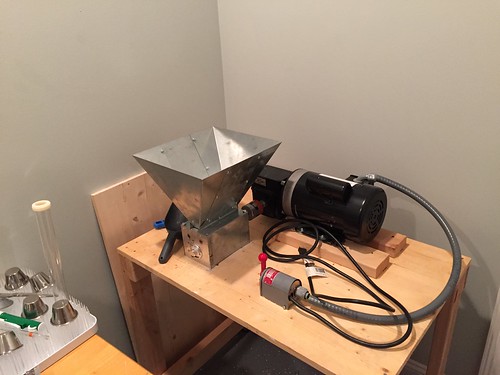
After a year of planning and gathering parts, I've spent the last couple of months putting together my take on Kal's awesome electric brewery although there's really not a heck of a lot difference between "The Original" and mine other than the plumbing. I still have a few bits and pieces to still take care of, along with finishing the room itself (drywall and floors are lower on the priority list than mashing barley for some reason!)


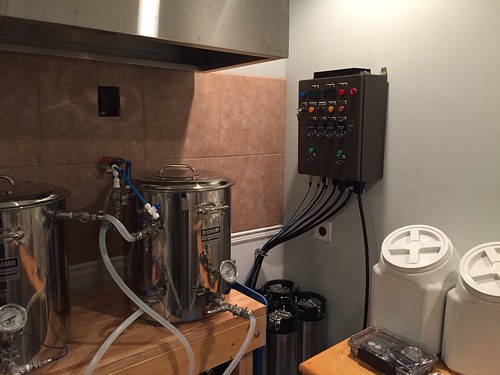
I initially started down the Brewtroller road with the intent to automate valves etc., but some of the parts I needed never seemed to come into stock at the OCSYS store so I took a step back and reevaluated what I really wanted from my system. In the end, while hooking stuff electronically has a certain "cool" factor, I decided that I didn't really need the all that extra stuff and it would be just one more "failure" point to worry about. Basically, everything was built pretty much in line with Kal's plans, so if you have any questions about the control panel etc., it goes without saying that I would recommend reading over all his stuff at The Electric Brewery. A HUGE thanks to Kal - without his excellent build information, I wouldn't be even close to where I'm today. My ampmeter is busted (or at least I think it is - it registers 0.00 almost all the time), but otherwise the control panel is an exact clone of Kal's (minus the handles which I may add later) and works great. For the control panel (a 20x16x8 box), a local water jet cutter cut the front panel for me which resulted in perfect alignment of controls - considering my anality, this was well worth the $50 minimum cost.

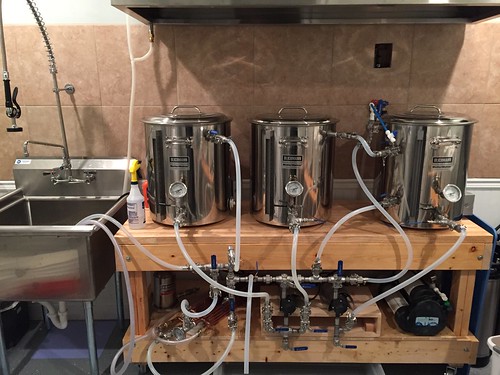
For the plumbing, I simplified things substantially over my initial plans by using 3-way "L"-type valves where possible. Of course, I did this AFTER buying a boat load of regular 2-way valves (so look for a number of those to appear in the classified section along with other bits and pieces left over). These valves are awesome and although pricier than setting up two 2-ways, I'd make this same decision again any day of the week and twice on Sundays. For those interested, the valves I got were from DirectMaterial.com (1/2" Type L). Instead of the Quick Disconnects that Kal uses on his system, I used Camlocks from BargainFittings.com (another awesome vendor BTW). One recommendation I have here is to avoid using Type C Female camlocks - the barb fitting on these is really restrictive. Instead I chose Type F and Type D camlocks and combined them with full bore high flow hose barb fittings from Brewershardware.com. The total for each connection was somewhat comparable to what quick disconnects would have cost, maybe a little more. (Yes - that's a Powerblock behind the pump - it's just holding down the pump stand until I bolt it down in it's final position).
EDIT: For those interested, the PDFs of the manifold design can be found here
So far, I've just done some basic tests with the system - basically moving slightly heated water (~120 degrees) around the system and the only change I may make is to add a way for getting water DIRECTLY to the BK from the HLT. Right now, it has to go through the HERMS coil and MLT before being pumped over the BK. However, this isn't really something I'd need to do very often (maybe for cleaning) and it would be just as easy to just disconnect one of the camlocks and connect in a new tube. Priming the pumps has not been an issue in my water tests which is a good thing, since adding in a vent valve above the pumps would have been a big PITA after getting the existing plumbing all lined up. Adding in the two valves at the very bottom for drainage has worked beautifully - although it pains me to see almost a gallon of liquid escaping from various places (thankfully most of this will be sparge water from the HERMS coil during actual brewing so it wort loss might not be horrible).
Of course, I'm not yet finished. Plenty of clean-up of the various cabling to be done and still to add (this weekend, hopefully) will be the cooling portion of the plumbing - I have a CFC from B3 to hook into the existing plumbing and test out. Finally, before I actually start brewing for real on this system, I need to build out the ventilation. I'm going to construct a hood out of 2x6's and FRP board like the one in Nattybrew's build and I already have the vortex-type fan ready to go. I just need to drill 6 inch holes in the cinder block & brick wall for the exhaust and make-up air - I'm not looking forward to that!
The very last thing will be coming up with a name for my brewery - I'm not at all creative in that aspect, and nothing I've thought of over the few years I've been brewing have stuck with me. I'm sure I'll think of something eventually, but right now, it's just a "Brewery Without A Name".
I initially started down the Brewtroller road with the intent to automate valves etc., but some of the parts I needed never seemed to come into stock at the OCSYS store so I took a step back and reevaluated what I really wanted from my system. In the end, while hooking stuff electronically has a certain "cool" factor, I decided that I didn't really need the all that extra stuff and it would be just one more "failure" point to worry about. Basically, everything was built pretty much in line with Kal's plans, so if you have any questions about the control panel etc., it goes without saying that I would recommend reading over all his stuff at The Electric Brewery. A HUGE thanks to Kal - without his excellent build information, I wouldn't be even close to where I'm today. My ampmeter is busted (or at least I think it is - it registers 0.00 almost all the time), but otherwise the control panel is an exact clone of Kal's (minus the handles which I may add later) and works great. For the control panel (a 20x16x8 box), a local water jet cutter cut the front panel for me which resulted in perfect alignment of controls - considering my anality, this was well worth the $50 minimum cost.
For the plumbing, I simplified things substantially over my initial plans by using 3-way "L"-type valves where possible. Of course, I did this AFTER buying a boat load of regular 2-way valves (so look for a number of those to appear in the classified section along with other bits and pieces left over). These valves are awesome and although pricier than setting up two 2-ways, I'd make this same decision again any day of the week and twice on Sundays. For those interested, the valves I got were from DirectMaterial.com (1/2" Type L). Instead of the Quick Disconnects that Kal uses on his system, I used Camlocks from BargainFittings.com (another awesome vendor BTW). One recommendation I have here is to avoid using Type C Female camlocks - the barb fitting on these is really restrictive. Instead I chose Type F and Type D camlocks and combined them with full bore high flow hose barb fittings from Brewershardware.com. The total for each connection was somewhat comparable to what quick disconnects would have cost, maybe a little more. (Yes - that's a Powerblock behind the pump - it's just holding down the pump stand until I bolt it down in it's final position).
EDIT: For those interested, the PDFs of the manifold design can be found here
So far, I've just done some basic tests with the system - basically moving slightly heated water (~120 degrees) around the system and the only change I may make is to add a way for getting water DIRECTLY to the BK from the HLT. Right now, it has to go through the HERMS coil and MLT before being pumped over the BK. However, this isn't really something I'd need to do very often (maybe for cleaning) and it would be just as easy to just disconnect one of the camlocks and connect in a new tube. Priming the pumps has not been an issue in my water tests which is a good thing, since adding in a vent valve above the pumps would have been a big PITA after getting the existing plumbing all lined up. Adding in the two valves at the very bottom for drainage has worked beautifully - although it pains me to see almost a gallon of liquid escaping from various places (thankfully most of this will be sparge water from the HERMS coil during actual brewing so it wort loss might not be horrible).
Of course, I'm not yet finished. Plenty of clean-up of the various cabling to be done and still to add (this weekend, hopefully) will be the cooling portion of the plumbing - I have a CFC from B3 to hook into the existing plumbing and test out. Finally, before I actually start brewing for real on this system, I need to build out the ventilation. I'm going to construct a hood out of 2x6's and FRP board like the one in Nattybrew's build and I already have the vortex-type fan ready to go. I just need to drill 6 inch holes in the cinder block & brick wall for the exhaust and make-up air - I'm not looking forward to that!
The very last thing will be coming up with a name for my brewery - I'm not at all creative in that aspect, and nothing I've thought of over the few years I've been brewing have stuck with me. I'm sure I'll think of something eventually, but right now, it's just a "Brewery Without A Name".