Rubbermaid Cooler Thermometer

Homebrew Talk - Beer, Wine, Mead, & Cider Brewing Discussion Forum

Help Support Homebrew Talk - Beer, Wine, Mead, & Cider Brewing Discussion Forum:

This site may earn a commission from merchant affiliate links, including eBay, Amazon, and others.

Arkador

Well-Known Member
Joined
Apr 16, 2009
Messages
1,700
Reaction score
20
Location
Fort Worth, TX
I want to add a Bilchman Brewmometer to my 10 gallon Gatorade (Rubbermaid) cooler.

I got the cooler used, so there is already a hole which appears to be about 1/2 inch in the center front of the cooler. I am concerened that the weldless brewmometer does not have enough threads to span the thickness of the cooler. Do I need to add a bulkhead to the cooler to add either the 1/2inch NPT or weldless version of the Bilchman Brewmometer?

Weldless Brewmometer
BrewMometer%20-%20weldless.JPG


1/2 Inch NPT Brewmometer
430290.jpg


Bulkhead
bulkhead.jpg


I have read THIS thread, but want something a little more professional

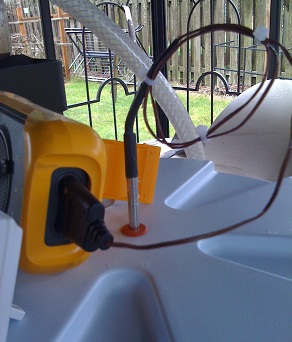
Just read https://www.homebrewtalk.com/f11/remote-probe-thermometer-wort-proofing-26905/

And will concider this method, after seeing some of the issues with the probe thermometers in the wall of a cooler..... What is the best way to close the hole in the side of the cooler?
 
The bulkhead looks like the most viable option. Using the bulkhead and threading the thermometer into it, youd have a sturdy and leak proof solution.

Dunno how well a silicone caulk is going to plug the hole.... Id have used a stopper.
 
Dunno how well a silicone caulk is going to plug the hole....
Yeah, that's the problem. Nothing really adheres well to the plastic that these coolers are made from. Silicone won't do you much good as soon as it loses its adhesion to the wall, which doesn't take much.

I've used silicone with good results when smeared on a bulkhead fitting as an added level of waterproofing, but the one time I tried to seal a probe in a small hole in the cooler wall, it was leaking after just a couple uses.

If you wanted to install one of those weldless thermometers, you can enlarge the hole in the OUTER shell of the cooler so that you are sealing the thermometer directly against the INSIDE shell of the cooler. I did this on both my coolers when installing sight glass + thermometer probe.
 
Caulk shrinks, this will likely leak very easily.
+1 to enlarging the outer hole and sealing against the inner wall.
 
For a pre-chiller I made, I put a copper union through the wall. I used marine silicone on the inside, and PL Premium on the outside of the cooler. PL Premium has 4 tons of bonding force, that thing is NOT moving. The cooler will break before the bond does.
 
PL Premium has 4 tons of bonding force
That doesn't mean a thing if it doesn't actually bond to the surface. I made the mistake of using some 2-ton epoxy on similar plastic once, and it fell apart by itself the next day. You may get just enough adhesion to get the job done, but it typically takes some pretty advanced adhesives to actually make a solid bond.
 
If you need to do a "through the wall" set up, here is an option.

http://morebeer.com/view_product/17506/102308/Bulkhead_for_Coolers_with_1_2"_FPT_x_1_2"_FPT


In my case, I use a 5gal cooler. This allowed me to install a long thermowell through the lid for my thermocouple probe!

One advantage, you can reset the depth of the probe for reading throughout the grain bed. You will be surprise on the results. The temperature differential in my MLT between the top and the bottom of the grain bed was significant...

TC_Probe.jpg


I got the thermowell from Brewers Hardware

http://www.brewershardware.com/Straight-Wall-Thermowells/

Hope this helps.

Cheers! :tank:
 
That doesn't mean a thing if it doesn't actually bond to the surface. I made the mistake of using some 2-ton epoxy on similar plastic once, and it fell apart by itself the next day. You may get just enough adhesion to get the job done, but it typically takes some pretty advanced adhesives to actually make a solid bond.

It has held for 3 years, I doubt it is going anywhere now. That's why I specified that name, not just a random adhesive.

http://www.lepageproducts.com/products/detail.asp?catid=22&subid=108&plid=284
 
I water tested the silicon patch. It is not bonding only to the surface. The wall is nearly an inch thick, and is not smooth inside the hole, so it has alot more to grip onto than the plastic wall. I will see how it works for now, and probably change it out after a batch or two. I was considering just getting a stainless bolt, 2 washers, and silicon orings, and using that as a plug, that I know will last.
 
Back
Top