Arduino - Networked Temperature Monitor

Homebrew Talk - Beer, Wine, Mead, & Cider Brewing Discussion Forum

Help Support Homebrew Talk - Beer, Wine, Mead, & Cider Brewing Discussion Forum:

This site may earn a commission from merchant affiliate links, including eBay, Amazon, and others.
The RPi is a fully enabled (I'm using Adafruit's I2C-enabled Debian distro) Linux computer that is very easy to configure as a full LAMP (Linux/Apache/Mysql/PHP or Python) webserver, and at $35-$40, it's the same price or less than an ethernet shield. With the addition of an inexpensive USB wireless ethernet dongle it's a very effective wireless server, something that, while doable with the right arduino shield, is still pretty pricey.

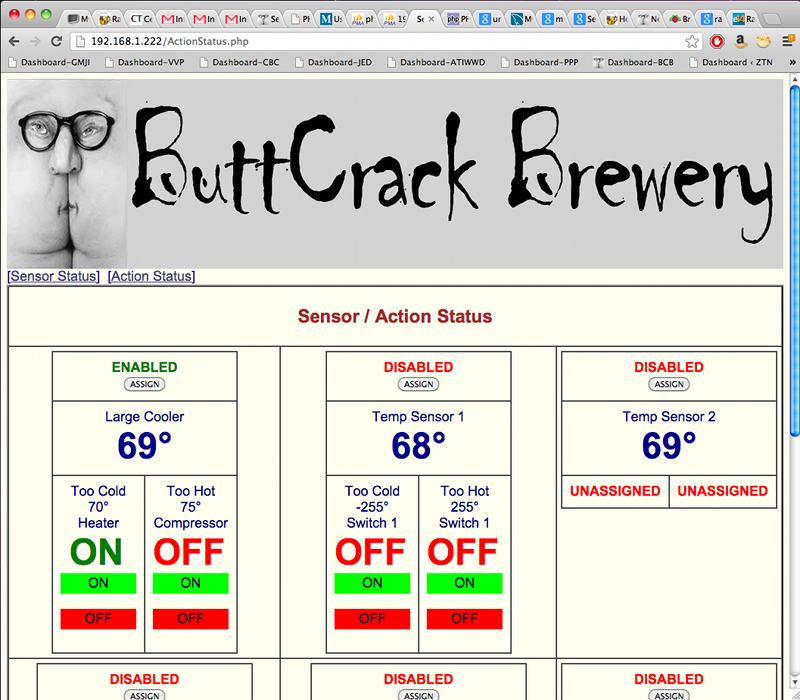
With the RPi doing the web-intensive stuff, and the Arduino doing the I/O intensive operations, it should be pretty easy to set up a complete brewing/fermentation/storage system that can be accessed locally or remotely.

Plus, I'm a beer/wine/computer geek, a truly dangerous combination :D
 
Followed you over from the RPi thread, and subscribed to this one as well. Have you taken a look at the Gertboard they're coming out with? Looks like it handles the level shifting, the ADC (DAC as well, but less necessary), and provide a slot for another controller to handle the I/O intensive stuff. Debating that vs. a separate Arduino for the I/O intensives - any thoughts, as someone who has had hands on at least one of those options?
 
Yeah, I took a look at it, and for me at least, it has more than I need and less than I want. :drunk:

One addition I'm planning on is the 5" touchscreen that I showed earlier as a local display/control, and that needs a companion shield.

I'm also planning on using DS2406+ OneWire switches to turn 25-40 amp SSRs on/off for my pumps, and if I can get the Arduino PID library working, for my RIMS (yeah, I know, I over-engineer everything). The 120/240VAC lines are all located on the back side of Barney, and isolated from the low-voltage stuff.

As an aside, I got the wireless dongle working on the RPi side, my only complaint right now is that I have to broadcast my wireless SSID in order for the dongle to work :mad:
 
I wound up picking up one of the Netgear wireless dongles (nice and small, don't really stick out much at all), and got it working pretty easily with the RPi distro - had issues getting it to work easily under the Adafruit, so I switched over the RPi native and got it working pretty easily after that. Was easy enough to install the I2C libraries and such that the Adafruit distro has native after that. Suprised that you have to broadcast SSID to get it to work - I usually broadcast mine anyway for visitors, but I should give it a try with SSID hiding and see if it still works . . .
 
I wound up picking up one of the Netgear wireless dongles (nice and small, don't really stick out much at all), and got it working pretty easily with the RPi distro - had issues getting it to work easily under the Adafruit, so I switched over the RPi native and got it working pretty easily after that. Was easy enough to install the I2C libraries and such that the Adafruit distro has native after that. Suprised that you have to broadcast SSID to get it to work - I usually broadcast mine anyway for visitors, but I should give it a try with SSID hiding and see if it still works . . .

I picked mine up from Adafruit. I got the larger one, since it's got a bigger antenna, better reception. It was driving me NUTS until I figured out that it was searching for the SSID, even after I told it what it was in /etc/network/interfaces :mad:

I turned off my SSID broadcast after reading some reports of roaming sniffers that attempt to find unsecured wifi spots to exploit. I also don't have any of my important systems on wireless. :D Same reason that my firewalls and computers don't respond to pings unless I know the address.
 
jimmayhugh said:
I picked mine up from Adafruit. I got the larger one, since it's got a bigger antenna, better reception. It was driving me NUTS until I figured out that it was searching for the SSID, even after I told it what it was in /etc/network/interfaces :mad:

I turned off my SSID broadcast after reading some reports of roaming sniffers that attempt to find unsecured wifi spots to exploit. I also don't have any of my important systems on wireless. :D Same reason that my firewalls and computers don't respond to pings unless I know the address.

The key point there being "unsecured" - if you have no encryption on it, you're asking for trouble. But any wardriver that i ever heard of will be able to tell that there's a wifi signal there if you're broadcasting the SSID or not, and if they are capable of pulling the encryption keys from the signal, then figuring out the SSID would be a trivial exercise for them (just like spoofing a MAC address is trivial). Key point is to make sure you use the strongest encryption your WAP will allow. Of course, the only way to make a system totally secure is to not put it on a network . . .

Since mine will be living not far from my WAP, i didn't need the Extra range the larger antenna would have bought me. Also, Adafruit was sold out of their adapter (along with most of the rest of their RPi inventory) when i was ordering.

Not broadcasting SSID doesn't really increase the protection of a wireless network. It can actually decrease it due to how a client aloways attempts connection no matter where it is. However, combining that with encryption and MAC filtering will handle about 99% of threats (which are basically script kiddies). An expert can break through a hidden SSID (easily) and MAC filtering (also easily). Encryption, however, can be hard, particularly if you use WPA/WPA2 and make sure your key is long. All lowercase is fine so long as it is >=15 characters. It would take an average cluster that can handle 5 million key attempts per second over a million decades (yes, that's over a million decades) to crack a 15 character encryption key. Of course, make sure that the key isn't easy enough to be crackable with a dictionary or typical heuristics.
 
Moving on...

I've dropped my attempts at using I2C communications between the Arduino and RPi. I'm now looking at the Arduino SoftSerial library as an alternative.

Be aware that a level shifter is a very good idea when hooking up the 5v Arduino with the 3v3 RPi. While I made my own circuit with mosfets and resistors, the 4-bit I2C-Safe and 8-bit Bi- Directional level converters are the way to go.

More to come...
 
Got the communication between the Arduino and RPi working, so now I can monitor and control the One-Wire devices (4 ds18B20 and 2 ds2406+ devices so far) on the Arduino from the RPi.

Next step is to wire up the DS2406+ switches to the SSRs, and try some real-world tests.

Once I've got that working, it's on to the remote wireless interface. I'm anticipating using Apache, MySQL, and PHP to create a local website that can be used by a laptop, iPad, etc.

We'll see how it goes... :p
 
Got the communication between the Arduino and RPi working, so now I can monitor and control the One-Wire devices (4 ds18B20 and 2 ds2406+ devices so far) on the Arduino from the RPi.

Next step is to wire up the DS2406+ switches to the SSRs, and try some real-world tests.
Nice! Run into any gotchas while doing it?

Once I've got that working, it's on to the remote wireless interface. I'm anticipating using Apache, MySQL, and PHP to create a local website that can be used by a laptop, iPad, etc.

We'll see how it goes... :p
When I did the LAMP setup on my RPi, I used the info towards the bottom of this
link to install the Apache/MySQL/PHP stuff, and it worked like a charm. Let us know how it goes!
 
Nice! Run into any gotchas while doing it?

Never did get the I2C to work correctly, but I've found some new info, so I may revisit that. I really like the idea of one RPi controlling multiple slave Arduinos. Might also consider an RS-485 multi-drop setup for distant slaves, the possibilities are endless. :ban:

Right now I'm using the RPi's /dev/ttyAMA0 port and the Mega's Serial1 port to communicate at 115200baud. Getting the settings on the RPi to properly buffer the Arduino's responses to prevent data loss was the biggest problem, but I'm pretty sure I've got that nailed down for now.


When I did the LAMP setup on my RPi, I used the info towards the bottom of this
link to install the Apache/MySQL/PHP stuff, and it worked like a charm. Let us know how it goes!

I've been playing with Linux and x86 derivatives of Unix for a LONG time (since before Red Hat 1.0), so setting up the LAMP server was a no-brainer, especially with the Debian derivative that the RPi uses. That is an excellent write-up for anyone getting into it for the first time.
 
OK, got the serial interface nailed down. I had to implement a hardware flow control to prevent data loss during temp and switch updates. Ended up waiting for some parts, which slowed things down, Have tested with PHP and C programs, and am now digging into AJAX to develop the web interface.

I'm currently monitoring 4 temp probes and three switches, but there's plenty of room to expand.
 
Update on the networkable Raspberry Pi/Arduino fermentation/RIMS/pump/whatever controller.

I'm currently using the Mega2560 board, as it has multiple serial ports available, making Arduino debug easier, but the system should work fine with the Uno using the SoftSerial library.

115200 baud serial interface is working between Arduino and RPi.

The Arduino is constantly checking and updating the status of all of the OneWire chips, currently 4 DS18B20 Temperature Sensors, and 3 DS2406+ Switches.

Requests from the web pages are queued-up and serviced via a daemon that uses the serial interface.

I wrote some php web scripts to get the DS18B20 temps, and to turn the DS2406+ switches on and off, and interrogate their status, and all seems to work as planned. :D

AJAX and jQuery are a little slower going, as this is all new to me, and I apparently ain't as smart as I used to be. :drunk: If there are any web gurus that want to offer some help, I'd be obliged.

More as things develop...
 
I got the jQuery working, so now I have a rudimentary web page up that monitors the temp sensors and allows me to turn the switches on and off from my intranet. It should also automagically detect new chips when added (currently up to 20).

Now I'll start working on the SSR interface.

Quick Video here.
 
Got the communication between the Arduino and RPi working, so now I can monitor and control the One-Wire devices (4 ds18B20 and 2 ds2406+ devices so far) on the Arduino from the RPi.

Next step is to wire up the DS2406+ switches to the SSRs, and try some real-world tests.

Once I've got that working, it's on to the remote wireless interface. I'm anticipating using Apache, MySQL, and PHP to create a local website that can be used by a laptop, iPad, etc.

We'll see how it goes... :p

Have you thought about using something like COSM to display and storage of your data rather than going through all of the hassle of creating your own backend server?
Sorry if this was already asked in a previous page..

Something like
https://cosm.com/feeds/71920

Is incredibly easy to push data to COSM with Arduino, you'd have to rewrite their connection code to connect and send data with your ethernet shields API(They use the Wiznet library code)

And, its free.
 
Yeah, I have an account with them, and I wasn't all that thrilled with it. I prefer to have all of my data at hand, not "out there" somewhere. Plus, this is what I'm used to working with.
 
As I mentioned earlier, I had a rudimentary screen that monitored and updated the temperature probes and switch's status:

SensorSwitchStatus.png


Now I can also assign two switches to operate in conjunction with one of the temperature probes, set the trigger temps, and provide a delay in turning on the associated SSR, to allow for older compressors and the like:

ActionData.png


Coming up is a screen to show the status of the temp/switch combos (I call them Action Arrays).
 
Have you thought about using the XBee modules to communicate between the RPi and the arduinos? That would make it easy to setup multiple slave arduinos around the house/garage without the hassle of running wires everywhere.

Also why are you using the 1-wire switches? Can't you just use a GPIO on the arduino to control an SSR?

BTW this is a great thread. I am working towards a similar setup eventually. Right now I am making a standalone temp controller for my electric meat smoker. It will be based off of the hardware on the arduino nano. I am also using a thermistor for that project instead of the 1-wire sensors.
 
Have you thought about using the XBee modules to communicate between the RPi and the arduinos? That would make it easy to setup multiple slave arduinos around the house/garage without the hassle of running wires everywhere.

I've looked at the XBee some, but it just doesn't thrill me. I use Powerline Adapters, so I can have an ethernet hookup anywhere I have an electrical outlet.

The RPi is very easy to make wireless with a variety of dongles, and I'm looking at using a TP-Link TL-WR307N and OpenWrt as a wireless option. Then I can use standard Ethernet Sockets to communicate.

Also why are you using the 1-wire switches? Can't you just use a GPIO on the arduino to control an SSR?

You'd be limited to the number of SSRs you could control, and the distance from the Arduino to the device. With the OneWire mini-lan I can monitor/control as many devices as I have RAM space. I've breadboarded up to 20 thermometer/switches, and have controlled devices with a 50ft telephone cord. The real limiting factor is the time it takes to poll all of the devices, but I'm currently waiting for an Arduino Due to see how that stacks up.

BTW this is a great thread. I am working towards a similar setup eventually. Right now I am making a standalone temp controller for my electric meat smoker. It will be based off of the hardware on the arduino nano. I am also using a thermistor for that project instead of the 1-wire sensors.

Yeah, this started out as a simple monitor, and kind of took on a life of its own. :drunk:

I am having fun with it though.
 
Right now I am making a standalone temp controller for my electric meat smoker. It will be based off of the hardware on the arduino nano. I am also using a thermistor for that project instead of the 1-wire sensors.

IMO a smoker is a good application for a thermocouple. I think you will have problems calibrating a thermistor over a sufficiently wide temperature range. If you search on the Texas Instruments website there are quite a few applications notes on how to compensate thermocouple measurements.
 
alien said:
IMO a smoker is a good application for a thermocouple. I think you will have problems calibrating a thermistor over a sufficiently wide temperature range. If you search on the Texas Instruments website there are quite a few applications notes on how to compensate thermocouple measurements.

Nope. Thermistors work great over a very wide range of inputs. I tried a few of the different thermistor examples in the arduino playground and I found #4 to be the most accurate. I used the numbers from the datasheet for my thermistor to calculate the steinheart coefficients and I was within 1/2 a degree F in both an ice bath and at boiling. I also modified the algorithm so that it is reading the thermistor supply voltage every time I take a reading so I am accounting for the band gap and supply variances. I used to work for a company that made embedded wireless sensors for building automation and we made both thermistor and thermocouple temp sensors. The thermistors gave a more accurate reading and are less susceptible to noise induced on long cable runs. Plus the circuitry for thermocouples is much more complicated and you have to add a thermistor or RTD for cold junction compensation. Plus thermocouples by themselves are only accurate to +/- 2F between freezing and boiling and that error grows as you get hotter.
 
I stand corrected. Thermistors are certainly easier to interface and perhaps more accurate than I thought over the sorts of temperature ranges that we are talking about. But as you admit, their response is far from linear. I venture to suggest that most people do not trouble to calculate an exponential model in order to smoke meat. :)
 
I have a question that i think people in this thread are well situated to answer, since alot of you seem to have knowledge on temperature sensors.

I recently got my fermentation temp monitor setup with an Arduino Uno and a DS18B20, pushing data onto COSM.
But, the data troubles me because it almost seems too good?

https://cosm.com/feeds/83208

Thats my feed, all 4 are just duplicates of the same sensor at this point until i get a chance to make more.

The sensor is taped under some paper towel and a small bit of foam i could find to the side of my bucket above water level. Its in a swamp cooler with water, leaving around 8 inches of wort in the bucket above the water line where this is taped.

For my sensor to make it water proof i put a small coating of hot glue on the pins and around the chip, just enough to cover it, then put a piece of shrink wrap tubing around it, and sealed the end of the shrink wrap tube by clamping it down with the soldering iron between which melted the two halves together.

But as i was saying, it almost seems too good? I have my house heater set to keep the house @ 62, and the closet where the fermenter is gets readings around 61-62 degree's according to my Thermapen....
I guess I just expected a lot more drift in temperature? Its been 64.4 as you can see for almost the entire day. Makes me wonder if i insulated it too well while waterproofing it? Or is the thermal mass of 5g of beer + the probably 3-4g of swamp cooler water enough to keep the temperature that steady?

Also on another note, is heat shrink tubing beer safe? Can i submerge the temperature sensor into the wort during fermentation? I understand the temperature on the side should be nearly identical which is why im doing that for now, but if its safe i've already devised a way to get the probe in there without issue. Ive found that most heat shrink tubing is made from the same plastic that they use to wrap food containers like in the meat section, but cant find anything about its safety with liquids.
 
DS18B20s are great because of the lack of line noise and the easily readable digital output. Even so I'd expect a bit of wobble. Perhaps check if you are reading all 12 bits of data?

As for heat shrink, I would be putting the sensor inside a thermowell of some kind along with heat sink compound to ensure a good thermal contact. Brewers Hardware sell the proper stainless ones. A bit of thin copper tubing with the end crimped or soldered also works.
 
I love microcontroller projects. But I'm left with one lingering question.
If you don't go into the garage, how do you extract the beer from the refrigerator?:confused:
 
DS18B20s are great because of the lack of line noise and the easily readable digital output. Even so I'd expect a bit of wobble. Perhaps check if you are reading all 12 bits of data?

One of the things that I looked at while writing my code was the time it took to get a result from the DS18B20. While you can get 12 bits of precision from the chip with 0.0625°C of resolution, it takes up to 750ms to get that resolution from the chip. You can get 9 bits of precision in just under 100 ms with 0.5°C of resolution. The kicker is that the error is ±0.5°C over most of the range, and ±2°C over the chip's entire range. Since I don't feel the need to have extreme precision, there was no point in waiting 7 times as long for a floating point result that I'll end up storing as an unsigned integer value :drunk: .

My personal opinion: If you are using a single probe to measure the temperature of a carboy or bucket of wort, tenths and hundredths of a degree don't matter much.
 
Got the Action Update screen done. :rockin:

Now I can assign up to one thermometer probe and two switches to an action, and monitor and control the action from the website:

ActionUpdates.png


Next up is the control software in the arduino Mega2560 to turn the switches on and off based on the values in the action.
 
My personal opinion: If you are using a single probe to measure the temperature of a carboy or bucket of wort, tenths and hundredths of a degree don't matter much.

Agreed, almost certainly the calibration error is larger than 0.5 oC. Personally I don't need to know the temperature sooner than 750 ms. ;) By the way I think that's conversion time not signalling time, so you could signal all 20 probes and come back 750 ms later and collect all 20 outputs. (As far as I understand.)

The update screens look very cool. :tank:

I believe that you are correct about conversion vs signaling time, but the code that I have works, so I am loath to change it.

I'm sure that someone with more webpage design experience than could make a much prettier page, so if someone wants to provide a "cooler" display page, I'll be posting all of the code pretty soon.

To that end, I've now got the actions working, so you can set "too hot" and "too cold" set points, and a delay if needed for turn-on for either. I'm also saving the action setting in EEPROM, so if there's a power failure, the action settings will be restored. I'm in the process of making several new switch sets so I can test multiple actions.

Now I just need a cool name for it. :confused:
 
OK, I've done a write-up, and posted the code at my web site. I'm sure that I'll be tweaking and modifying the page and code over the next few weeks, but I think it's usable for anyone that would like to take a look.

Comments are welcome... :eek:
 
For those of you that would rather use a thermocouple, here is a paper outlining the use of another 1-Wire device to connect the thermocouple to the mini-lan.

More on this as time allows and samples arrive.
 
I now have a MySQL database running in the RPi that stores the action configurations and allows you to name the various temperature probes and switches. When you set it up in the Action Configuration page:

ActionDataWithMySQL.png


It will then show up on the Action Status Page:

ActionStatusWithMySQL.png
 
I just found a slick LITTLE board here that I'm integrating into my setup. It uses a 32-bit ARM Cortex M3, has a buttload of Flash and RAM, and uses 3v3 I/O, so there's no need for level converters. It can run in overclocked mode at 96MHz, is compatible with many Arduino Libraries, and has its own integration into the Arduino IDE. Best of all, it's only $19.

Playing with it as I write this. :ban:

Required some minor changes to the 1-Wire library, otherwise spooled right up and started runnng. :rockin:
 
Seems that the EEPROM isn't really the same as EEPROM in the Arduinos. It's explained here, but the essence of the problem is that the EEPROM space is overwritten every time new code is uploaded to the Teensy. Since this was where I was storing my sensor / action arrays for power-up restore, all of that information is lost if you upload new code. :mad:

The solution was fairly simple: If you upload new code to the Teensy, you can restore the settings from the database on the RPi. I've added a "Restore" button to each action on the web site, and clicking on that restores the action from the RPi database, and reloads it into the EEPROM. I'm also going to add a "Restore All" button after some more testing.

I'll upload the code when I'm satisfied with it.
 

Latest posts

Back
Top