ebay aquarium temp controller build

Homebrew Talk - Beer, Wine, Mead, & Cider Brewing Discussion Forum

Help Support Homebrew Talk - Beer, Wine, Mead, & Cider Brewing Discussion Forum:

This site may earn a commission from merchant affiliate links, including eBay, Amazon, and others.
Don't they all have condensers? I know some are exposed on the rear and others are built into the sides and top.

Some small dorm room coolers use Peltier thermoelectric cooling. From what I have read in other HBT threads on building fermentation chambers, while they may work for ales they don't seem to reach lagering temps.

There are dozens of threads on fermentation chamber builds. What you end up with depends on what you need both in function and in size / looks, as well as price.
 
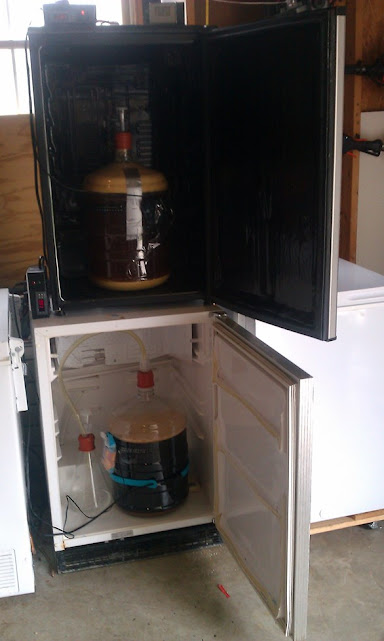
I used a 7.5 cubic meter freezer and STC-1000 for the first time over the past few weeks, after brewing an English bitter. It allowed me to keep a steady 65 degrees during fermentation, and last night I used it to cold-crash the beer in preparation to racking it into a korny keg. The freezer is in the garage, and as temperatures were below freezing last night, I just connected a small, covered lamp to the "hot" side and placed the lamp inside the freezer to keep the beer cold - but not solid! It held at a steady 34 degrees F.

I also plan to use it to keep my beer at the proper temperature for carbonating and serving. It has worked flawlessly so far and seems perfect for the small scale (one beer/one cooler) operation that I have going. If in the future I want to purchase another cooler in order to expand out a bit, I'll definitely get another one of these controllers.

I am thinking of getting another one to monitor mash tun temperatures. Does anyone know what the upper temperature limits are for this device?

Best,

Steve

English bitter.jpg
 
marshallwms said:
Some small dorm room coolers use Peltier thermoelectric cooling. From what I have read in other HBT threads on building fermentation chambers, while they may work for ales they don't seem to reach lagering temps.

There are dozens of threads on fermentation chamber builds. What you end up with depends on what you need both in function and in size / looks, as well as price.

Whoa, thanks for the vocabulary lesson. I felt like something like this existed, but didn't know the name or that it was used in everyday stuff.
 
Just built my third controller. One for the keezer (one switched outlet, one always on) and two dual-stage controllers for my fermentation chambers. Thanks so much for this thread!

Twofer.jpg
 
Is there a way just to search and see all the pictures in a given thread?

I've read that some have used a 4x4x2 junction box - I'm trying to determine if the controller will fit in the face (4x4) side or if it has to be fitted to one of the sides due to the depth?
 
Is there a way just to search and see all the pictures in a given thread?

I've read that some have used a 4x4x2 junction box - I'm trying to determine if the controller will fit in the face (4x4) side or if it has to be fitted to one of the sides due to the depth?

It's way more than 2" deep. No question. EDIT: It's 3.34 inches deep.
 
This document is great. It is clear, concise, has pictures; hard to go wrong building a single dual-stage controller if you follow these directions.

I followed these directions and the parts list was very good. I made a slight change at the end and put the face of the controller on the large side of the box instead of the narrow side. It fits barely but without the wiring protector at the back of the controller. No biggie since the box is all plastic.
 
To cut the square holes for my Love TSS2 and a Leviton duplex outlet, I used a Dremel Multi-Max with a flush cutting blade.

No pilot holes required. But a steady hand is a necessity ;)

Cheers!
 
The plastic box I bought at radioshack, I was able to cut with a utility knife, after cutting pilot holes. not one one go, but by 'shaving' the hole bigger until I fit.
 
Just ordered one. The only thing I know about electricity is that is invisible and it can kill you. I am a little nervous, but the many replies about how easy it is compels me to give it a try.
 
BamaProud said:
Just ordered one. The only thing I know about electricity is that is invisible and it can kill you. I am a little nervous, but the many replies about how easy it is compels me to give it a try.

If you can follow instructions and double check you should be fine.
 
I picked up a heating pad from Walgreens pharmacy.($16.00) It has a 2 hr auto shutoff. Does anyone anticipate this being an issue? I am in west TN so it doesn't get extremely cold for long periods of time.
 
Bama, it should be fine. You're not bringing it up to temp, but rather maintaining an existing temperature which takes less time. Where do you keep your fermenter? As long as it's not outside, I can't imagine the 2 hour shutoff being an issue.

Even if it is, add a degree to your temp differential, and it should solve it.

Its in my garage. I just did a test; empty 14 cubic foot chamber @ 60 degree room temperature climbed about a degree in the 2 hours before it automatically turned off.

I was expecting more...but I would imagine if everything in the chamber was already around my target temperature(including 15-20 gallons of liquid) maintaining temperature is a different story.

Thanks for the reply, just trying to figure all of this out.
 
Not giving up on this. If you chill it to your pitching temp, it still might be ok. Your test was trying to raise something from 60 which is a little low for ale temps. That said, I don't use a heating pad; I use a fermwrap. Did you wrap it around your liquid vessel, or just leave it near the carboy/bucket? Mini fridge, chest freezer, or what's your fermentation space?

Light bulb cans, and ceramic heater, and even hair dryers work well for many people here. Experiment and find out what works best for your set up.
 
Allright guys and gals, As usual, electronic builds don't go easy as they initially sound for me. I thought I followed this wiring diagram exactly..but I got an "EE" alarm/error when I plugged the unit in(no appliances/devices plugged in). The Operating instructions say the EE error is a sensor open circuit or short circuit.

Here's my wiring, I hope someone can make sense of it and help me out.

2013-04-06013903_zpsc6df7f87.jpg


2013-04-06013903_zpsc6df7f87.jpg


2013-04-06013753_zps71c1dce0.jpg


I broke the tab on the gold side, left it intact on the silver side. Just like post 1477 details.
 
Allright guys and gals, As usual, electronic builds don't go easy as they initially sound for me. I thought I followed this wiring diagram exactly..but I got an "EE" alarm/error when I plugged the unit in(no appliances/devices plugged in). The Operating instructions say the EE error is a sensor open circuit or short circuit.

Here's my wiring, I hope someone can make sense of it and help me out.

Well that's an easy one. There's no temp probe attached. It goes on terminals 3&4. Did your controller not come with the temp probe? Should look like-
ntc_temp_sensor.jpg
 
Allright guys and gals, As usual, electronic builds don't go easy as they initially sound for me. I thought I followed this wiring diagram exactly..but I got an "EE" alarm/error when I plugged the unit in(no appliances/devices plugged in). The Operating instructions say the EE error is a sensor open circuit or short circuit.

Here's my wiring, I hope someone can make sense of it and help me out.

2013-04-06013903_zpsc6df7f87.jpg


2013-04-06013903_zpsc6df7f87.jpg


2013-04-06013753_zps71c1dce0.jpg


I broke the tab on the gold side, left it intact on the silver side. Just like post 1477 details.
Also, you can have the ground wire going to the neutral tab. There should be a separate lug on the outlet for the green ground wire.
 
Allright guys and gals, As usual, electronic builds don't go easy as they initially sound for me. I thought I followed this wiring diagram exactly..but I got an "EE" alarm/error when I plugged the unit in(no appliances/devices plugged in). The Operating instructions say the EE error is a sensor open circuit or short circuit.

Here's my wiring, I hope someone can make sense of it and help me out.

2013-04-06013903_zpsc6df7f87.jpg


2013-04-06013903_zpsc6df7f87.jpg


2013-04-06013753_zps71c1dce0.jpg


I broke the tab on the gold side, left it intact on the silver side. Just like post 1477 details.

you have to have green earth/ground wire going to the green screw under your finger in the first picture.
its hard to tell from those pictures if everything else is wired correctly.
 
Allright guys and gals, As usual, electronic builds don't go easy as they initially sound for me. I thought I followed this wiring diagram exactly..but I got an "EE" alarm/error when I plugged the unit in(no appliances/devices plugged in). The Operating instructions say the EE error is a sensor open circuit or short circuit.

Here's my wiring, I hope someone can make sense of it and help me out.


I broke the tab on the gold side, left it intact on the silver side. Just like post 1477 details.

I don't even see that you have wired in the temp sensor to 3 & 4 on ST-1000
 
I should have posted that. I took the pictures before I wired the temp probe. Its wired now.
The unit powered on, alarmed and displayed EE.
 
I would remove the probe wires, retwist them, and reinstall. Make very sure there are no stray strands that could cause a problem and are securely tightened. The other wiring needs to be modified as outlined above - move the green ground wire to the green screw on the outlet. That wiring will not cause an EE error. Only the probe should do that. If you are concerned, remove the wires from 5, 6, 7, and 8 that go to the outlet.

It is possible you have a defective (shorted) probe. If so it would be the first I have heard of. I am building my 6th controller and have never had a problem.
 
Thanks guys, I got it working properly now. Ran it through several cycles using hot and cold water connected to lamps. My only problem is now, the heating pad that I planed doesn't come back on when power is restored...you have to press a button. So I need a new heating source...or should cut the cord and bypass the switch? Is that safe?
 
Cutting the cord can work fine, but you do need to be careful when you put it back together. I stagger my cuts so that one side is longer than the other, then strip and wrap the wires around each other, then tape each side carefully with electrical tape. Then I wrap both together with more tape. If you are going to be moving it around some, you might want to solder them after you wrap the wires together so it has more strength.

Of course, if you can return it, there are other items you can use - anything that gets warm will work. I use an old 40W soldering iron in an old holder. Others use lightbulbs in ceramic holders. A 60W bulb should do fine. You can wrap aluminum foil around the bulb to keep the light away from the beer. You should use a fan to circulate the air around the fermentation chamber to keep temps fairly even inside of it. Make sure you tape the probe to the fermentation vessel, and insulate it from the air. It is the wort you want to keep at the temp you have set, not the air around it.
 
I made the heating pad work by simply putting a zip-tie around the on-button keeping it depressed.

I have the probe in a 1 gallon jug of water/bleach mixture.

I do not have a fan of any kind, but the heating pad is on the bottom(heat rises) I was hoping convection would circulate the air a little. Anyone else not use any kind of fan? Problems?
 
I made the heating pad work by simply putting a zip-tie around the on-button keeping it depressed.

That sounds like it should work just fine.

I have the probe in a 1 gallon jug of water/bleach mixture.

The is a problem with that. The fermentation process is exothermic - it generates heat. So the wort heats itself as it ferments, slowly heating the air, and eventually you gallon jug. You want to keep the wort at a stable temperature. Taping the probe to the center of the fermentation vessel, and insulating that from the surrounding air does a good job of that. There are a couple of very long discussions of this earlier in this monster of a thread.

I do not have a fan of any kind, but the heating pad is on the bottom(heat rises) I was hoping convection would circulate the air a little. Anyone else not use any kind of fan? Problems?

Most of us use a computer cooling fan (12 V DC generally) powered by an old phone charger wall wart. I have an always-on outlet on my controller. Cheap, simple, very low power, and effective.
 
How long did this contrller last. Without a relay or contactor it seems to me that a refigerator would draw to much current for the contacts on the controller. I have to redlion that im trying to dwngrade. If these hold up. Prolly would b agood candidate
 
The relays are rated for 15 amps at 110V. I have been using one for a month now with no problem on my Kenmore fridge that I use as a fermenting chamber.
 
For those of you adding lamps or LEDs to signify cooling/heating, where in the circuit are you adding them? Parallel or in series? Before or after the receptacle? Thanks! Almost done with my STC-1000 build. Will share pics upon completion.
 
Back
Top