Weldless fittings

Homebrew Talk - Beer, Wine, Mead, & Cider Brewing Discussion Forum

Help Support Homebrew Talk - Beer, Wine, Mead, & Cider Brewing Discussion Forum:

This site may earn a commission from merchant affiliate links, including eBay, Amazon, and others.

Dude

Supporting Member
HBT Supporter
Joined
Jan 15, 2005
Messages
8,768
Reaction score
143
Location
Ramstein-Miesenbach
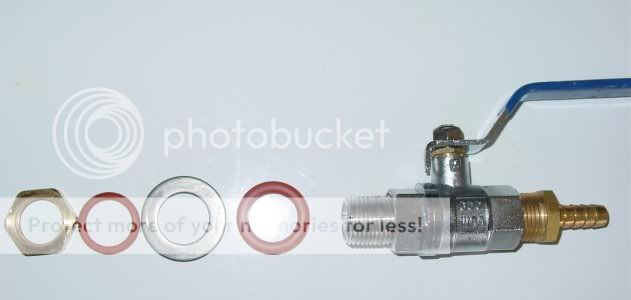
Okay, this is what I just took off of my converted keg:
weldless.jpg


I took it aprt and laid the parts out exactly how it was put together. On this pic, the kettle wall goes in between the first o-ring and the bulkhead fitting. This doesn't look right to me. Does everything look right to you guys? I bought this thing pre-assembled from my HBS, and it leaks like a damn sieve. I mean it is dripping water steadily, almost a stream of drips every second or so. I took it apart, re-tightened, still leaked. Loosened it, still leaks. I'm going to throw it across the street and buy a zymico weldless bulkhead instead, unless you expert troubleshooters can tell me if it is missing a piece or something. This looks like the one they sell on morebeer's site, FWIW. Any known problems with those?
 
Was there teflon tape that you removed? If not, I would expect leakage through the threads. Whether or not having an o-ring on other side would be sufficient to stop that, I'm not sure. On my coolertun I only have an o-ring on the inside, and with teflon tape that prevents any leaking.
 
Lounge Lizard said:
Shouldn't the rubber closest to the ball valve go next to the kettle wall?

I thought that too, but it looks to me like you should have another SS washer against the bulkhead fitting then too. Otherwise the washer still won't sit flat against the keg wall.

EDIT: BTW, no teflon tape was removed from any of the connections.
 
I'm not very good at this stuff, but from the pic on the Northern Brewer web site it looks your parts are reversed.
 
"Nothing against the outside of the keg wall, from what I can see. no idea where the second smaller o-ring is. I'm stumped."


You can't see it because it is probably in the milled out part of the big brass nut. From the picture, it looks like you had the parts in the correct places. Maybe teflon tape is all that you need....
 
El Pistolero said:
Look at this:

Those aren't the pieces I have though. If you are suggesting that I might be missing pieces, the pic I showed from B3 has all the same pieces from MY pic. That's why I displayed that pic. I'm not sure what that extra stainless tube is for.

I dunno guys....like I said, I'm going to throw it as far as I can across the street and get a zymico. ;)
 
Dude said:
Why would you put an o-ring there though? It has no purpose in that spot.
The order has to be messed up somehow.


Al that I can figure, is that they don't want any metal to metal contact points on the inside of the keg, without some way of making a water tight seal. The only metal to metal contact point left is the brass nut on the nipple.

It's possible that water is working its way around the threads and past the o-rings. Try some teflon tape....
 
The two o-rings go against the metal, IMHO. Try this:

nut->o-ring->kettle->o-ring->washer->ball valve with teflon tape on the threads.

This way the nut and the washer are applying pressure to the two o-rings, which seals the leaks. That's the way it works on the zymico thingy I installed day before yesterday anyway.
 
El P has the correct order.

If you look at the picture EL P posted you seem to be missing that coupler piece that goes on the inside of your kettle. Go get yourself the coupler, secure it on with RED locktite, then put teflon tape an any thread that will be on the outside of your kettle and you should be fine.

Mine goes. . . coupler : threaded piece : washer : o-ring : kettle wall : o-ring : nut : valve : hose nipple

If I were you I would also go back to the LHBS and ask them for the piece you seem to be missing and if they dont have it return the assembly and get yourself a new one. Of all the weldless fittings I have looked at I have never seen one (besides yours) without that coupler.

BTW if ya need to add another washer or 2. on my valve it's fine and I didnt need to add one but on the sight glass I just added to my kettle I needed to add a 3rd washer just to get a nice snug fit against the kettle wall.

If ya want I'll take it apart and post a picture for ya. I'm not sure my thoughts translated out very well in type
 
El Pistolero said:
The two o-rings go against the metal, IMHO. Try this:

nut->o-ring->kettle->o-ring->washer->ball valve with teflon tape on the threads.

This way the nut and the washer are applying pressure to the two o-rings, which seals the leaks. That's the way it works on the zymico thingy I installed day before yesterday anyway.


That's what I thought too at first, but my final answer is what I posted above.... Okie from Muskogee ... dokey? lol
 
FWIW, the weld-b-gone kettle conversion kit is slightly different and has worked well for me.... it has a straight connector screwed onto a nipple with a washer on it that goes inside the keg. no o-ring on the inside. then the o-ring on the outside and the locknut with a machined grove in it that completly covers the oring is screwed on.... then the ball valve goes on the end of the nipple that is left. From what you have there... you could do the same i bet if you take the nipple out of the ball valve and get a straight connector. The use the lock nut on the outside..... I'll look for a pic if i can find one.
 
Hmmm...... you sure thats not a Zymico? ..... looks pretty damm close... here is what I have..... its a Zymico... or Kewler Kit... It did leak... not a lot though, just a little. I have some teflon tape to use, remember you suggested it to me?

2560-100_0388.jpg
 
YA actually Dude.... if you look at the picture here on the Zymico page they have a decent picture...

http://www.zymico.com/weld-b-gone/

its got a pic from the inside and one from the outside. No o-rings on the inside and just the one on the outside (actually gets hidden in the groove on the lock nut.

EDIT: Also the pic that El P posted is good too but one thing is that that pic is how it looks when you get it but they give you one extra o-ring so you have a spare. You only use one when you put it together. On the zymico weld-b-gone kettle kits it goes

straight connector->nipple->washer->kettle wall->o-ring->locknut->ball valve.

Also use teflon tape wrapped around like 4 times at the connection of the connector to the nipple and from the nipple to the ball valve. I had to tighten the living f**k outa mine but it does NOT leak.
 
Think I got it.

From the outside to inside, I went:

Washer--small o-ring--kettle--big o-ring--locknut

Tried it a few different ways and this way was the best, IMHO. At any rate, I don't think it is leaking now. Of course the real test will be when it heats up. Next brewday.

Thanks for the help guys.
 
Dude, I'd go to the hardware store and find a second washer to match the one you have. Install everything the way you have it above, but with your second washer between the big O ring and the nut. That nut will tear up your O ring if you have to take this thing apart more than a couple times. Plus the O ring can squeeze out past the flats of the nut and allow liquid to wick down the threads of the fitting. The washer has a larger surface to compress the O ring and create a seal.
 
Back
Top