
Let me start off by saying that this came about after being directed to HBT and admiring all of the fine workmanship and ingenuity found here. It also came about because I have wanted to build a smoker for quite some time now, and have finally settled on a design. That design saw the use of a trailer (she's gonnna be big). My wife and I have been brewing for 8 years now, and are ready to step up to all grain. After speaking with everyone in our homebrew club, they all said if they did it over again they'd go with some sort of RIMS system from the get go. So, why not take advantage of their input, NOT collect a bunch of equipment that I would not be using down the road, and just start form there?!? So I came here and went through all of the build threads, and came up with a list of must haves, and nice to haves. My father is a mechanical engineer, and this was right up his alley (I am but a lowely telecom tech writer). Dad took my list of requirements displayed below, and came up with the drawings. I signed off on those, and also signed off on him starting on the rig. Alas, I have no construction shots, sorry. However, the big thing was that this rig is going to be transported on the same trailer the smoker is mounted to. I wanted all of the nice expensive bits to be easily stripped off of the rig, so it can double as a 3 burner stove for bbq comps/tailgating/camping, etc.
Now, I live in Philly. My parents live in Rochester NY. I'm lucky enough that my boss is letting me work remotely for a couple of weeks while we work on the smoker, but adding in the brew rig might have been pushing it, so I let Dad go to town. Through the smoker project, he's teaching me how to weld, and we get a cool father son project as a result. So I packed up this past Friday, and made the trek up to Rochester. All I can say is this is kickass!! Yes, I saw the CAD drawings, and signed off on them, but I guess I just didn't expect this!!
The requirements were:
1. No taller than 30. Anything taller, and my wife will need a step stool to see inside the brew pot (unfortunately this is not a joke).
2. Be able to store pots under the top of the stand (and under the burners).
3. Be able to easily remove pump bracket assembly that will hold two pumps. Need shroud for pumps as well.
4. Adjustable height for the burners
5. Starters for the burners (either pilot light or electric start).
6. Panel (removable) for pump switches. Would like to plug the pumps into the panel when using it, plug the panel into an outlet. Be able to remove the panel and unplug the pumps easily as well.
7. Needle valves for burners, so it can have the flame regulated per burner.
8. Bracket to hold water filtration system, fold flat when not in use.
9. Bracket to hold hop rocket (hop back), fold flat when not in use.
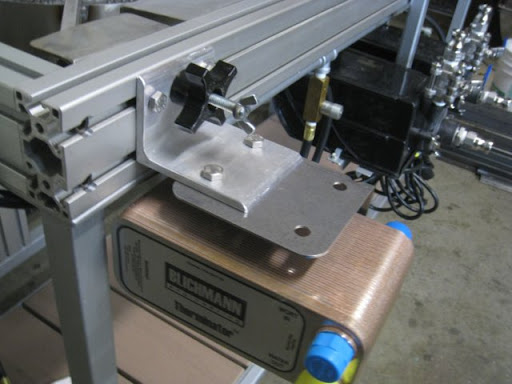
10. Bracket for Plate Chiller, easily removable.
11. Heat shield toward the front of the burner area to protect thermometer and sight glass from heat on each pot.
12. Have nothing sticking outside the dimensions of the brew stand frame (to facilitate a cover for the rig, that wont need to be customized outside of an upside down box).
Again, everything needed to be easily removable so it can double as a 3 burner stove for bbq events/tailgating/camping, etc. So with that in mind, here's what we came up with. You can't help but notice where we've taken inspiration from other builds and incorporated some aspect of it here.
Here is a shot bare. The pumps are in the front, and that's about it.
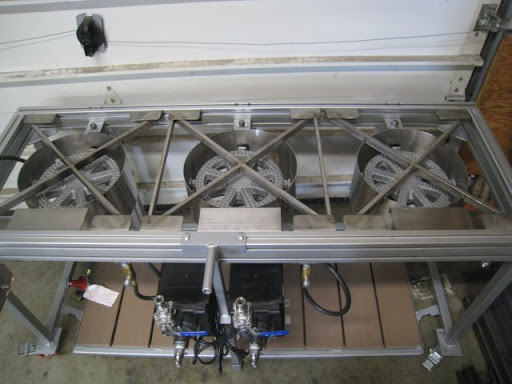
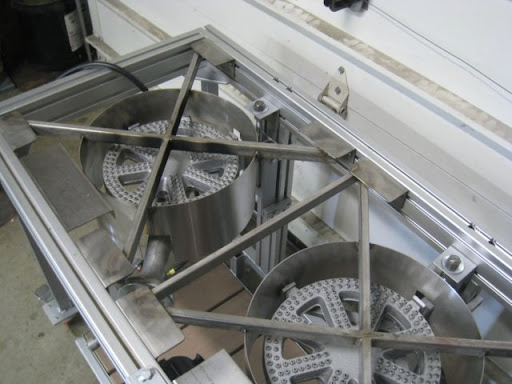
The top collar is extruded aluminum, with stainless grates on the top. The extruded aluminum allows for countless mounting points. This is/will be key.
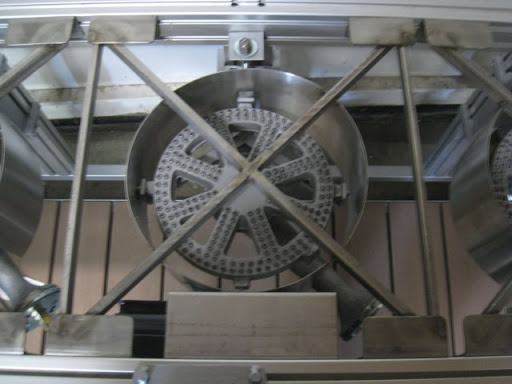
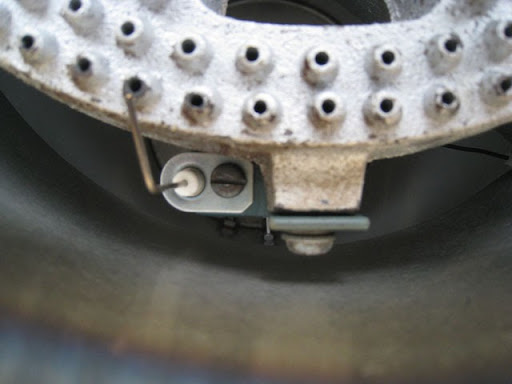
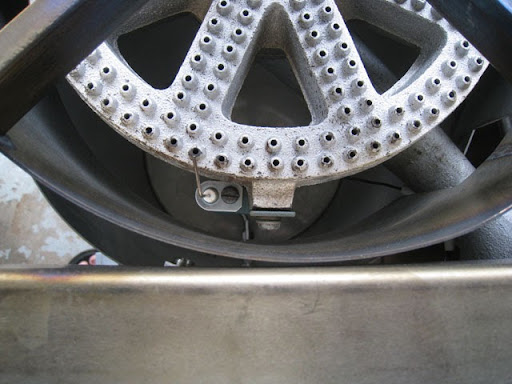
This is a shot of just one burner. The piece in the front is a heat deflector for the sight glasses and thermometers. You'll notice a nut on the back rail. Turning this nut raises or lowers the actual burner. Without knowing how close I wanted the burner to the bottom of the pot, and not knowing how much different that would be for a normal fry pan, I wanted it to be adjustable. This works like a charm, with the burner assembly riding along another post of extruded aluminum, as shown in the pick below.
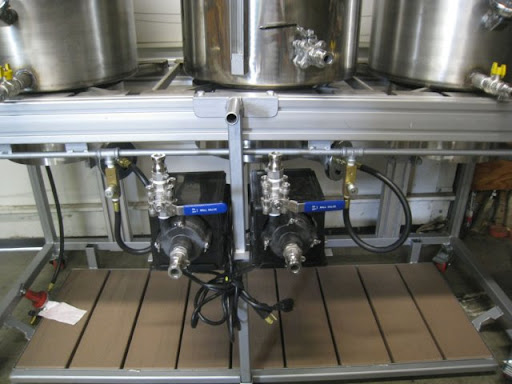
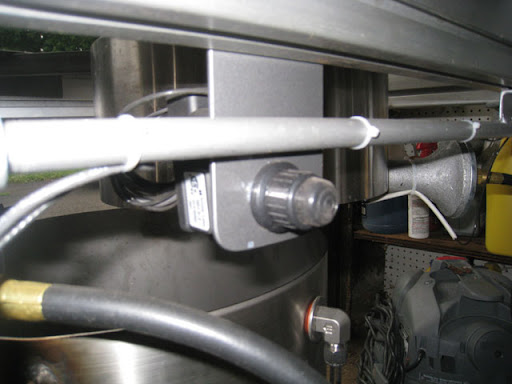
In the shot below, you can see the pump assembly. Follow the post up to the top of the extruded collar. The pumps sit on a platform that is welded to the post. The top of the post is a piece of angle iron, that has two pins that ride in the channel of the top of the extrusion. The bottom of the post sits in a cup that is attached to the bottom shelf. All i have to do to remove the pumps is to lift up on the handle, and pull them away. Also, just behind the pumps is the gas rail, that has flow controls for each burner. They rail is fed by a 0-40 psi regulator, and the flow controls work great. Still to attach are the starters. We're using just a normal bbq push start, so you don't have to have your hand in there with a fire starter to get her lit.
Again, the extrusion is great for mounting points. Just need to rig up a bracket, and it's easy on, easy off.
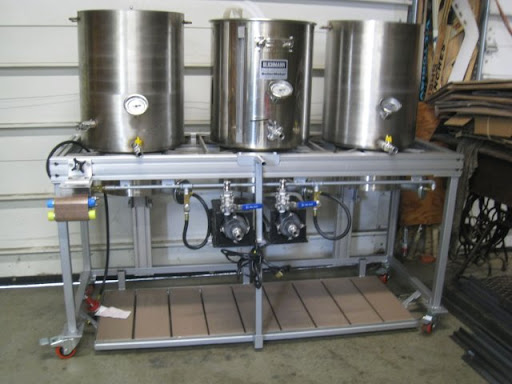
And here's a shot with the pots on top.
Again, these do fit underneath. Everything can be stripped off of the rig quite easily. The unit that houses the switches will also hang on the front of the rig, with pins holding it in place that sit in the top rail of the extrusion. Still need to pick up some lids so we can put the returns in them for transferring liquids among vessels. The brackets for the Hop Rocket (hop back) and the water filter are drying right now (paint). Will have those ready to go in a day or two. And I need to get to HD and pick up a contractor pack or two of hose clamps. Need to cut the hoses to length and attach the cam and groove fittings. Then we can get on to a wet test.
Now, I live in Philly. My parents live in Rochester NY. I'm lucky enough that my boss is letting me work remotely for a couple of weeks while we work on the smoker, but adding in the brew rig might have been pushing it, so I let Dad go to town. Through the smoker project, he's teaching me how to weld, and we get a cool father son project as a result. So I packed up this past Friday, and made the trek up to Rochester. All I can say is this is kickass!! Yes, I saw the CAD drawings, and signed off on them, but I guess I just didn't expect this!!
The requirements were:
1. No taller than 30. Anything taller, and my wife will need a step stool to see inside the brew pot (unfortunately this is not a joke).
2. Be able to store pots under the top of the stand (and under the burners).
3. Be able to easily remove pump bracket assembly that will hold two pumps. Need shroud for pumps as well.
4. Adjustable height for the burners
5. Starters for the burners (either pilot light or electric start).
6. Panel (removable) for pump switches. Would like to plug the pumps into the panel when using it, plug the panel into an outlet. Be able to remove the panel and unplug the pumps easily as well.
7. Needle valves for burners, so it can have the flame regulated per burner.
8. Bracket to hold water filtration system, fold flat when not in use.
9. Bracket to hold hop rocket (hop back), fold flat when not in use.
10. Bracket for Plate Chiller, easily removable.
11. Heat shield toward the front of the burner area to protect thermometer and sight glass from heat on each pot.
12. Have nothing sticking outside the dimensions of the brew stand frame (to facilitate a cover for the rig, that wont need to be customized outside of an upside down box).
Again, everything needed to be easily removable so it can double as a 3 burner stove for bbq events/tailgating/camping, etc. So with that in mind, here's what we came up with. You can't help but notice where we've taken inspiration from other builds and incorporated some aspect of it here.
Here is a shot bare. The pumps are in the front, and that's about it.
The top collar is extruded aluminum, with stainless grates on the top. The extruded aluminum allows for countless mounting points. This is/will be key.
This is a shot of just one burner. The piece in the front is a heat deflector for the sight glasses and thermometers. You'll notice a nut on the back rail. Turning this nut raises or lowers the actual burner. Without knowing how close I wanted the burner to the bottom of the pot, and not knowing how much different that would be for a normal fry pan, I wanted it to be adjustable. This works like a charm, with the burner assembly riding along another post of extruded aluminum, as shown in the pick below.
In the shot below, you can see the pump assembly. Follow the post up to the top of the extruded collar. The pumps sit on a platform that is welded to the post. The top of the post is a piece of angle iron, that has two pins that ride in the channel of the top of the extrusion. The bottom of the post sits in a cup that is attached to the bottom shelf. All i have to do to remove the pumps is to lift up on the handle, and pull them away. Also, just behind the pumps is the gas rail, that has flow controls for each burner. They rail is fed by a 0-40 psi regulator, and the flow controls work great. Still to attach are the starters. We're using just a normal bbq push start, so you don't have to have your hand in there with a fire starter to get her lit.
Again, the extrusion is great for mounting points. Just need to rig up a bracket, and it's easy on, easy off.
And here's a shot with the pots on top.
Again, these do fit underneath. Everything can be stripped off of the rig quite easily. The unit that houses the switches will also hang on the front of the rig, with pins holding it in place that sit in the top rail of the extrusion. Still need to pick up some lids so we can put the returns in them for transferring liquids among vessels. The brackets for the Hop Rocket (hop back) and the water filter are drying right now (paint). Will have those ready to go in a day or two. And I need to get to HD and pick up a contractor pack or two of hose clamps. Need to cut the hoses to length and attach the cam and groove fittings. Then we can get on to a wet test.

") Smoke/brew days are pretty good around here!
Smoke/brew days are pretty good around here!
