2 Zone Fermentation Chamber Build

Homebrew Talk - Beer, Wine, Mead, & Cider Brewing Discussion Forum

Help Support Homebrew Talk - Beer, Wine, Mead, & Cider Brewing Discussion Forum:

This site may earn a commission from merchant affiliate links, including eBay, Amazon, and others.

zacc

Well-Known Member
Joined
Aug 15, 2010
Messages
64
Reaction score
16
Location
california
After getting tired of changing out frozen bottles in my old chamber I decided it was time to upgrade. Besides not using frozen bottles I also wanted the new chamber to have two different temperature zones and have a much higher capacity than my old chamber.

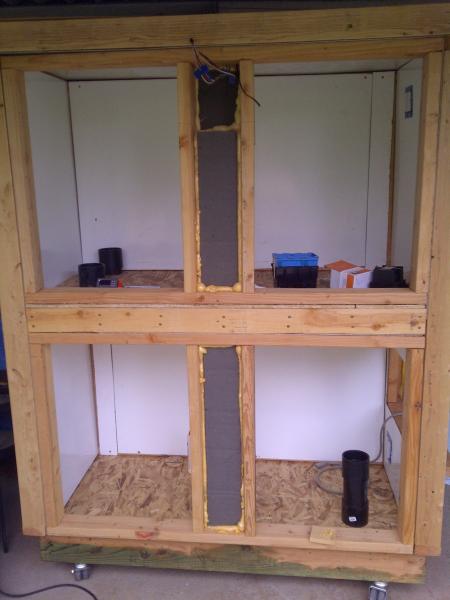
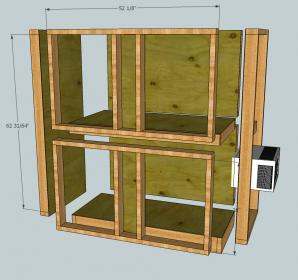
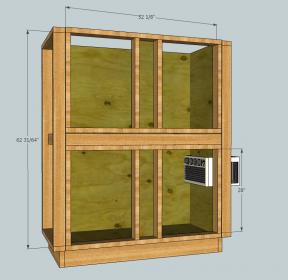
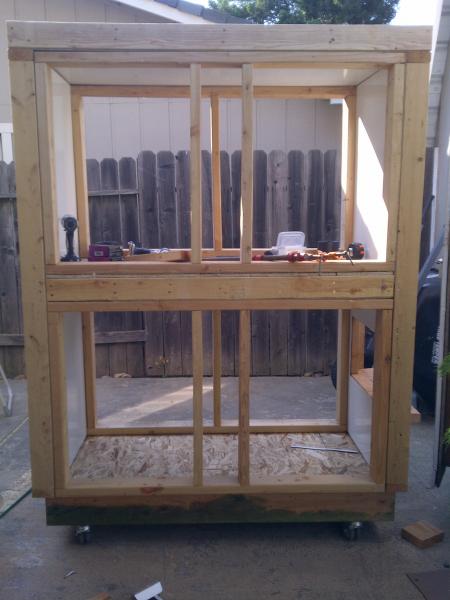
I did quite a bit of research on different designs and eventually incorporated ideas from several other brewers build into one design. Before starting the build I designed the plans in google sketchup. The frame is made out of 2x4 and insulated with 2" Iso foam, sprayfoamed around the edges and then filled the remaining 1.5" with batt insulation.

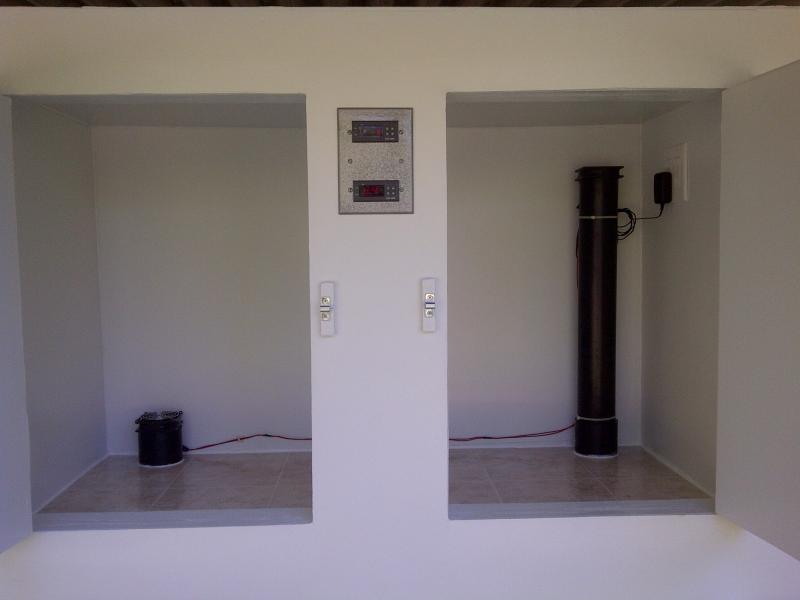
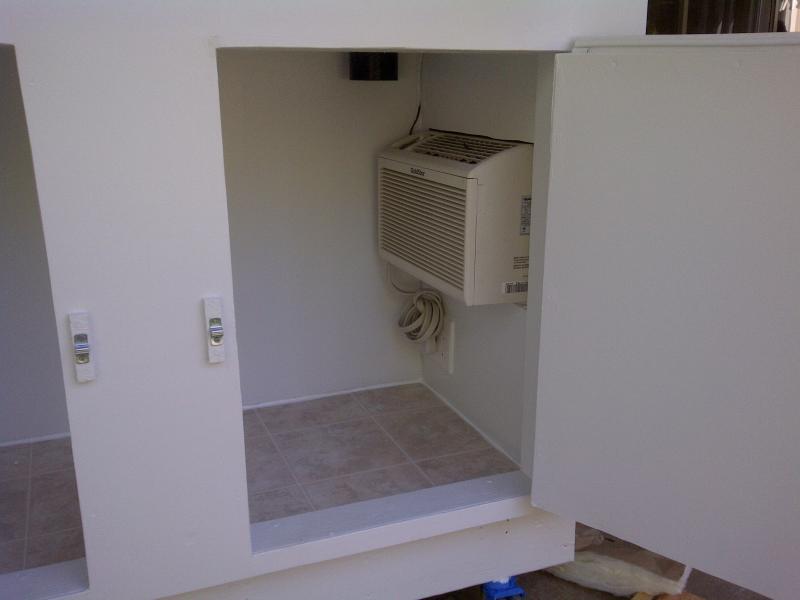
The top chamber is for fermenting ale and the bottom is for lagers, cold crashing, and aging. I'm using the ebay temp controllers which provide the ability to control heating and cooling. I'm using a 5000btu a/c unit to chill the bottom unit and pc fans to circulate cool air from the bottom to the top. I haven't decided what I will use to heat the chamber but I wired the controller to an outlet in each section so I can plug something in later like a small space heater.

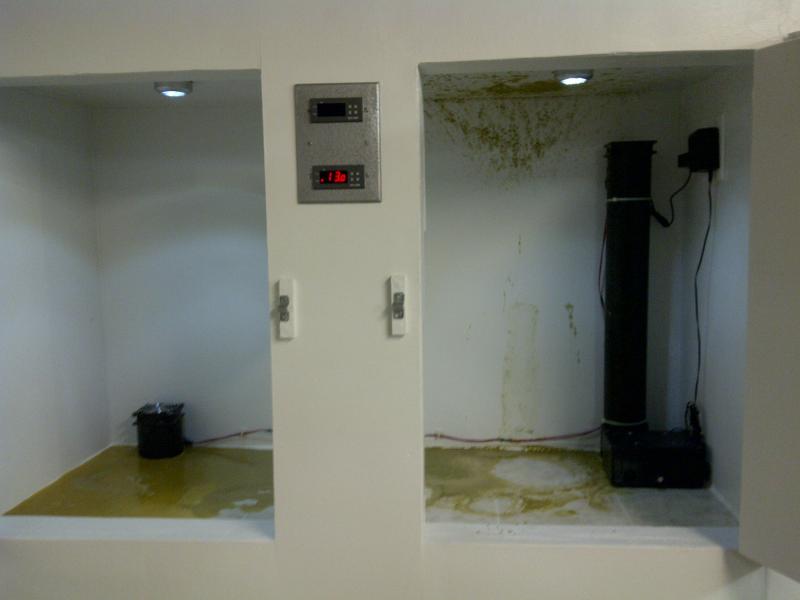
I took care to keep the inside of the chamber well sealed to prevent any mold issues down the road. The inside is painted with an exterior grade mildew resistant paint, I put linoleum on floors and used silicon caulking around all the corners. In addition I'm using a eva-dry unit to absorb any extra moisture.

I brewed the inaugural batch yesterday and it's holding steady at 68. I have the bottom set to about 50 right now and all together have around 30 gallons in the chamber with plenty of room left. The last picture shows the ferm chamber in its new home :rockin:!

This was a fun build and turned out great. There are a few things I would change if building it again but overall I am very happy with how it turned out. I got a lot of ideas and inspiration from reading other build threads so hopefully I can pass on some knowledge I've learned during this build.
Ferm chamber-skinned.jpg


FC-12-05-12-00261.jpg


FC-12-06-2012-FrontProgress.jpg


FC-12-07-22-Finished.jpg


Brewery-12-07-26.jpg
 
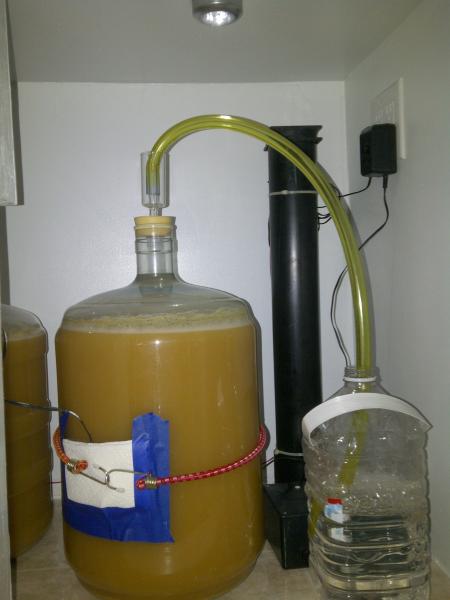
Here's a few closer pics of the inside and one of the inaugural batch fermenting away! I've got my stir plate in there as well, although nothing is on it atm. I can easily fit 4 carboys in the top section alone.

FC-12-07-22-Finished Top.jpg


FC-12-07-22-Finished Bottom.jpg


FC-12-07-30-inaugural brew.jpg
 
What a great looking build. Nicely done. What is the ambient temperature of your brewing space, and how often does your AC unit cycle on to maintain the 68 F in the top chamber?
 
What a great looking build. Nicely done. What is the ambient temperature of your brewing space, and how often does your AC unit cycle on to maintain the 68 F in the top chamber?

It's been pretty warm here in Northern California lately so my brew space has probably been getting up to low-mid 90's.

The AC unit was kicking on frequently when i first plugged it in but once I got some kegs and carboys in there to build up the thermal mass it's been only turning on maybe for 1-2 minutes every 20 minutes.

The top is cooled by two 80mm fans that cycle cold air from the bottom and return hot air from the top. Right now they have been running more than I would like to maintain fermenting temps up top but I think that is mostly due to the low watt cell phone charger i'm using to power the fans. Once I find a better power supply I should be able to get more speed and better air movement with them, if it's still low I will upgrade them to 120mm fans.

I have only had it finished for about a week and haven't had much time to really push it to see what the max performance can be. But where I have it set at now is right around where i see myself keeping it most of the time and even with the hot weather it's holding strong!
 
Wow, nice build! I was just drawing up a similar build this morning. I'm planning on using refrigeration vs air conditioner though so I can get one part cold enough to force carb. How many fermentors/cornies will that hold?
 
Wow, nice build! I was just drawing up a similar build this morning. I'm planning on using refrigeration vs air conditioner though so I can get one part cold enough to force carb. How many fermentors/cornies will that hold?

I should be able to get it pretty cool with the AC unit, just might need to add a fan to blow over the coils to keep them from freezing up.

I'd estimate it can hold about 5 carboys or 12 cornies per section.
 
Would you be willing to put your sketchup plan online somewhere?

Sure thing, you should be able to download it here.

I didn't put all of the details in the model, such as doors, top, electrical etc. I mainly just wanted to get a better plan on how to frame it. I framed each section independently like the image below shows.

Some of the dimensions I used were based on where I was going to be keeping it. For example I used 4x6 on the bottom and gave it that lip so it would fit closer to the wall in garage. I used the chosen depth to make sure I could still fit 2 cars in the garage.

I also didn't originally plan on putting casters on it. Once I started putting it together I realized that even empty it was going to be tough to move it without them. With the casters added it barely cleared my garage door. If I were to do it over I would probably use 2x4's for the base and maybe even shorten each section by a few inches.

I took a lot of time to ensure the chamber would last a long time. I've read about a lot of people who build something like this and end up throwing it out after a few years due to mold or other problems. The frame on this is definitely sound, my biggest concern was moisture. Between how well I sealed everything up and the moisture absorber I don't think I will have any problems. I also made sure the A/C unit could easily be removed and replaced if needed. This thing should be chilling for many years to come :mug:!

Ferm chamber-pieces.jpg
 
How about something like this? I have this same unit and I used it for years to power two fans on a salt water reef aquarium lighting system. It has 6 voltage settings.
http://www.parts-express.com/pe/showdetl.cfm?Partnumber=120-536

That looks like it would work great but it's a little fancier than what I'm looking for. I'm more looking for an old 12v wall wort, although the versatility of something like that would come in handy for other situations. I've dug through my old electronics and haven't found any spares that have the right output yet though. Gonna probably just order one from amazon, saw one that will work for about $6.
 
Sure thing, you should be able to download it here.
I've read about a lot of people who build something like this and end up throwing it out after a few years due to mold or other problems.

Thanks so much for the sketchup!

That's basically where I'm at. I made a simple glued-up pink 2" closed-cell foam chamber with a hand-sawn and glued plywood platform with areas for the ice jugs underneath and the whole computer fan and light bulbs on a two-stage RANCO. Problem is that I do get quite a lot of condensation from the jugs during the summer months, which leaks out because the thing isn't sealed at all, and I am getting a good dose of mildewy smell. I think it might have even contributed to an infected witbier I made last month.

It was never meant to last as long as it has, and your solution would be an awesome upgrade, especially with allowing lagering. Keep us updated! :mug:
 
That looks like it would work great but it's a little fancier than what I'm looking for. I'm more looking for an old 12v wall wort, although the versatility of something like that would come in handy for other situations. I've dug through my old electronics and haven't found any spares that have the right output yet though. Gonna probably just order one from amazon, saw one that will work for about $6.

If you have an extra molex setup you could use this. Being the computer nerd first, I have a few adapters flying around the house that I could use. Other than that, its an awesome build!!
 
Last edited by a moderator:
Thanks so much for the sketchup!

That's basically where I'm at. I made a simple glued-up pink 2" closed-cell foam chamber with a hand-sawn and glued plywood platform with areas for the ice jugs underneath and the whole computer fan and light bulbs on a two-stage RANCO. Problem is that I do get quite a lot of condensation from the jugs during the summer months, which leaks out because the thing isn't sealed at all, and I am getting a good dose of mildewy smell. I think it might have even contributed to an infected witbier I made last month.

It was never meant to last as long as it has, and your solution would be an awesome upgrade, especially with allowing lagering. Keep us updated! :mug:

No problem, glad to share them.

It sounds like your in the same boat as I was when I decided to build this. I looked into a lot of options before deciding on this build. It would of been a lot easier to just get a few chest freezers but that would have taken up a lot more space and I couldn't have put them in the garage and still fit 2 cars in. Ultimately I decided to have all the features I wanted and to fit in the space I had in mind I was going to have to build something custom.
 
About a year or so ago I bought a riding mower. They delivered it in a crate. I let it rot outside then tore it down to haul off. About a week later I found out about building these things... To think I almost put the crate in the garage to build a pay house for the kids. The moral of this story is do not be like me :) Looks cool I am jealous since I ferment in an unused bathroom in the basement that I cannot manage the temp well.
 
I like your brewstand too! Can you post some pics of it with explanations? Thanks!

Sure thing, here's some more pics.

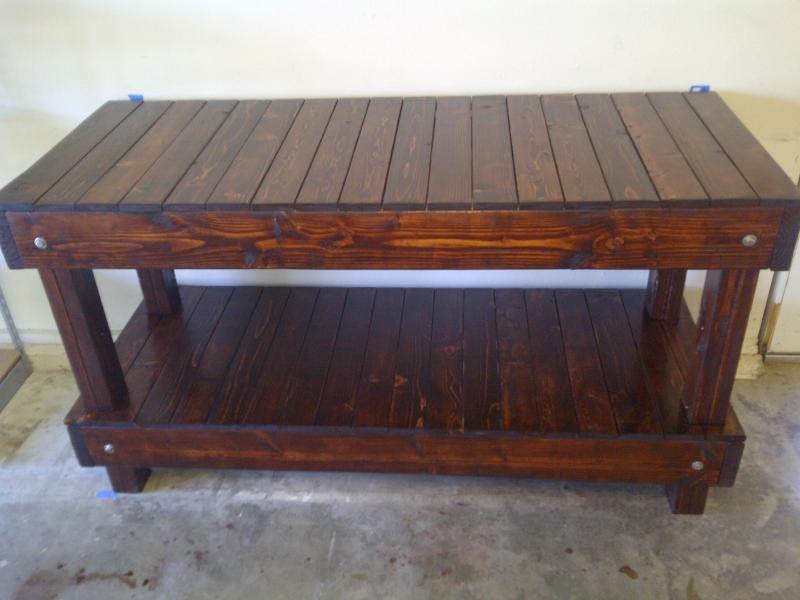
The stand itself is Kal's design. I have a counter flow chiller mounted under the stand and my pump and shop vac on the bottom shelf.

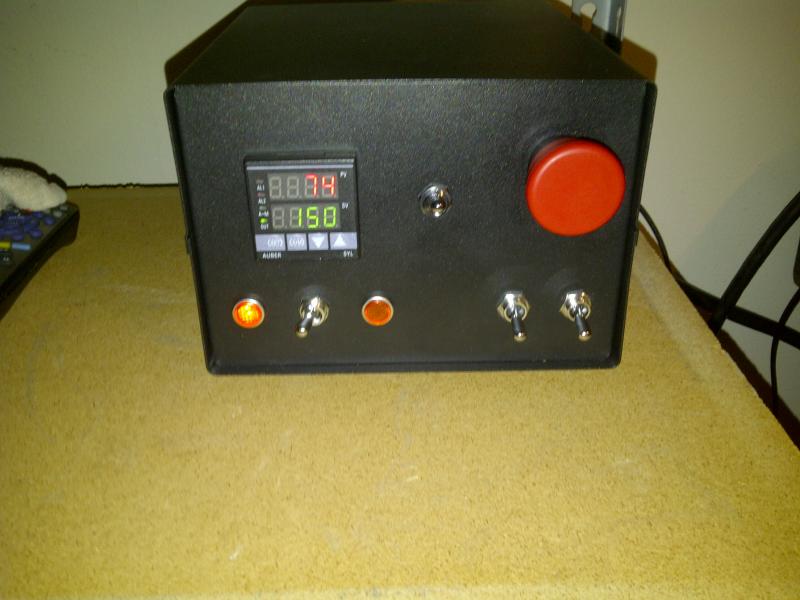
On the left is the control box for the electric brewery. It's a great little box inspired by jsguitar's build.

Next to the controller is my barley crusher, powered by an old garage door opener motor.

Above the stand is my steam hood. It's made of 1x2 and spray painted fluorescent light covers. The vent is powered by a 449 CFM Vortex fan.

Oh, and to the far left is my swivel mounted TV with satellite hook up, perfect for watching the game while brewing :mug:!

EB-11-09-05.jpg


EB-12-08-03-0685.jpg


EB-11-09-21-Control Box_First power on.jpg


EB-12-08-03-0688.jpg
 
Last edited by a moderator:
That looks like it would work great but it's a little fancier than what I'm looking for. I'm more looking for an old 12v wall wort, although the versatility of something like that would come in handy for other situations. I've dug through my old electronics and haven't found any spares that have the right output yet though. Gonna probably just order one from amazon, saw one that will work for about $6.

Got a 12v power supply from amazon and the fans are now roaring at normal speed. It was working before, the fans were just taking longer than I would have liked to cool the top section during the first few days of fermentation. Should be a lot better now, will find out after I brew tomorrow.

Overall though it's holding temp great! Been over 100 the last few days and both sections are holding strong!
 
Last edited by a moderator:
How cool can you maintain? Can you ferment at 50F?

I haven't tried to see how cool I can push it yet but 50 is definitely doable. Right now I have the bottom chamber set at about 54. It's been around 100 for the past week or so here, and it's having no problem holding temperature.

I'll have to plug it into my Kill A Watt later to see exactly how much power it is using.
 
This is why I love coming to these forums. To see the creativity and ingenuity of others. Simple concept, amazing build!

You need to name it. Call it a ZaccBox or something.

I've gotten a lot of good ideas from people here so glad to share some of mine. Yeah I should come up with a name for it...

It has really been put to the test over the last couple weeks. It was 104 yesterday and will be 105 today!
 
Great job Zac.....


If you dont mine what was your estimated cost to build this or why did you choose this over a chest freezer?

Again great job on the stand fermentor and the vent.

prost
 
Great job Zac.....


If you dont mine what was your estimated cost to build this or why did you choose this over a chest freezer?

Again great job on the stand fermentor and the vent.

prost

insulation - 100
lumber - 100
temp controllers - 50
outlets & wiring - 20
ac unit - 25
paint & caulking - 50
linoleum & glue - 30
screws, glue, and misc hardware - 30
Door hardware and seal - 25
misc other supplies - 20

Total cost was around $450+

I think I might be forgetting a few things but this is close. This was a lot more than I originally intended and I'm sure I could have built something a lot cheaper if I tried. I decided with all the time I was putting into it though it was worth the extra money to make it last.

I looked into a lot of options before deciding on this build. It would of been a lot easier to just get a few chest freezers but that would have taken up a lot more space and I couldn't have put them in the garage and still fit 2 cars in. Ultimately I decided to have all the features I wanted and to fit in the space I had in mind I was going to have to build something custom.
 
You have skills. If I can't find a used freezer soon , I'm cutting wood but I think half this size would work for my needs.
 
I had a major explosion in the ferm chamber this weekend. Brewed an IPA Saturday and racked it directly onto a 1056 yeast cake from a pale ale brewed the previous weekend. I do this all the time and always use a blowoff and havent had any issues. This time the fermentation was so active that it actually clogged the 1/2" ID blowoff tube! Next time I'll have to leave more headspace than normal when racking a big beer like this onto a yeast cake.

I am extremely glad I used high quality paint and sealed up all the corners. I had a small pool on the left side but not a drop had leaked out anywhere! Cleanup wasn't bad at all though and it looks brand new again!

FC-12-08-12-Explosion.jpg
 
NotTechnicallyLegal said:
Resurrecting the thread, did you ever get any results from your kill-a-watt about the power consumption?

Yeah I have actually had my kill-a-watt plugged in for several months now. It looks like the average is about 1kwh per day. this is less than my old kegerator used.
 
Yeah I have actually had my kill-a-watt plugged in for several months now. It looks like the average is about 1kwh per day. this is less than my old kegerator used.

Nice, that's less than $3/month. Not bad at all. Got some temp controllers on the way for a build like this.
 
PintoBean said:
Nice, that's less than $3/month. Not bad at all. Got some temp controllers on the way for a build like this.

I'm about one afternoon away from finishing my own 2 zone chamber. I used this thread to help with the basic structure and then went a little crazy with the innerds. I should have some time to post up the build in the next fee days. Stay tuned.

This is what it looks like now:

image-1176331644.jpg
 
I'm about one afternoon away from finishing my own 2 zone chamber. I used this thread to help with the basic structure and then went a little crazy with the innerds. I should have some time to post up the build in the next fee days. Stay tuned.

This is what it looks like now:

Very nice looking! Look forward to seeing the full build! I like the way you did your doors. The doors are the one thing I would change on mine.
 

Latest posts

Back
Top