Heating element for boil kettle

Homebrew Talk - Beer, Wine, Mead, & Cider Brewing Discussion Forum

Help Support Homebrew Talk - Beer, Wine, Mead, & Cider Brewing Discussion Forum:

This site may earn a commission from merchant affiliate links, including eBay, Amazon, and others.

z987k

Well-Known Member
Joined
Feb 13, 2007
Messages
3,513
Reaction score
37
Location
Anchorage
electric heating of the boil kettle:
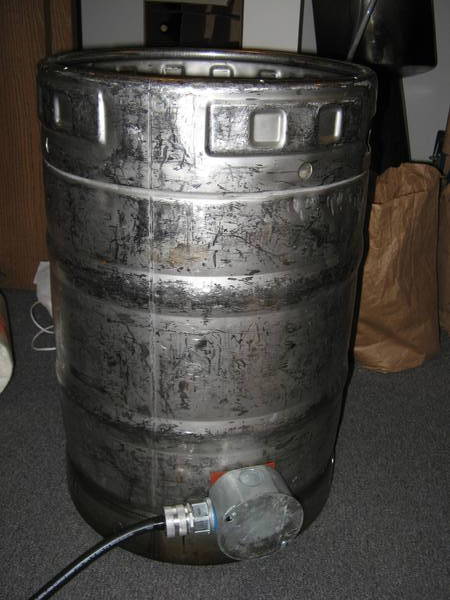
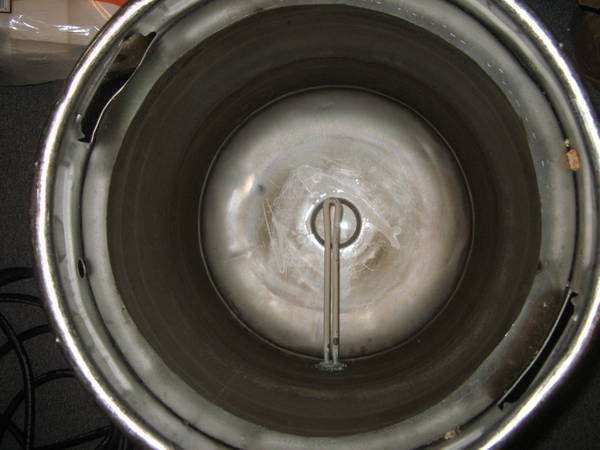
Well I was told today that a propane burner is no longer allowed..... so I'm in need of making an electrically powered boil kettle. I'm thinking something modeled closely off of this: http://home.chattanooga.net/~cdp/boilnew/boilnew.htm

Couple of questions for anyone who has done this, what size element are you using? I'm limited to 4000W @ 240 as I have a spare 240 outlet on a 20A breaker (no idea why so low current on 240). Is that big enough to boil say 10gallons in a reasonable amount of time?

Next what is the importance of the low or extra low density element? The page I linked above mentions that it will help prevent scorching, but is this really a problem?

Just wanted to add. I did some math, and someone please correct me if I'm wrong, but to heat 10 gallons of water (I'll be using less) 40*C (approx difference in temp of all the wort out of mash tun and boiling temp) using a 4000W element:
37850g H2O * 4.1855J * 40C = 6336847 / 4000W = 1584s / 60 = 26.4min
Seems like a good amount of time, especially considering that is assuming no heat loss and 100% eff.
 
Well I am in the process of building an electric boil kettle as I type this message. I got some helpful information from brewbeemer on electric element performance. He actualy gave me a website that had a calculator. I calculated for a 13 gallon boil, and a raise in temp of 70 degrees. This doesn't sound like much, but hear me out. Wort from the sparge will be hitting the boil kettle at 150 to 170F. Boil starts at 212F for water and not much higher for wort, this would only equate to a little over 70 to 72 degree rise. The calculator gave me a number of around 4870 for thirty minutes to boil. I hope this helps. S.
 
If you wanted to spped up the time to bring it to a boil, you could build a heat stick powered off a 110v circuit, use it for your mashout and other things, then stick it in the wort while bringing it to a boil with the 240v circuit. Once boiling, just remove the heatstick and boil with the 240v system.

Linc
 
can anyone comment on the high density elements actually scorching the wort? From what I've read no one has ever actually experienced this, but most everyone warns against it.
 
can anyone comment on the high density elements actually scorching the wort? From what I've read no one has ever actually experienced this, but most everyone warns against it.

There are a couple of older, or maybe not older, but more experienced brewers warn against it, because the surface gets so hot, due to higher density , it carmelizes the wort. Higher density elements are smaller for there rated wattage because they get hotter. In the HLT high density is not so bad. In wort they are not so good. A low density element is so big because wattage per square inch is more spread out, so the element does not have to get as hot to do the same work. This make any sense? I h
 
so I picked up an element today, it's the ultra low density 4500W @ 240 element. It also says that it has an alternate rating of 3500W at 208V opposed to 240V. Now my question is, how does it achieve this? First, I'd be willing to be I don't even get 240V, more around 220 so naturally either A) it would have to pull more amps to hit 4500 or what I would think it would do, not quite get to 4500W. Now according to my calculations, if you were only feeding it 208V it would need 21.6A to get the 4500, but what I'm sure it does is just give me like 3900W not 3500. Could someone explain to me how they come to this conclusion.

Basically what I'm getting at, is the coil can't possible have two different resistances.

Thanks
Zach


Zack, you are correct. There are not two resistances, only one. This is why the wattage goes down at 208V. The difference in their rated vwattage and actual wattage is going to be in efficiency at voltage. Some resistive materials have varying properties at differing voltages. This causes the resistance to vary, but only minutely. If you apply Ohm's law you can figure out the original resistance and then calculate the wattage at a lower voltage. I would bet that they are not far off of what is labeled.

So here,voltage / wattage = amperage (4500/220=20.45) now voltage /amperage=resistance (220/20=11). So the element has a 11 ohms of resistance. Now let use calculate wattage at 208V. Volts/resistance = amperage (208/11=18.9), Volts *amps=watts (208*18.9=3931). So they are figuring a 10 percent loss in wattage at 208 from the calculated 100 percent efficient theoretical. There is no way for sure to tell why they de-rated wattage 10 percent except for material variance. So there you have it. I am sure at this point, it is as clear as mud. S.

That was a lot of thought for a drunk bastard. Hmmm. . . . .. . .. .
 
ok that clears it up, I didn't realize the material was less than 100% efficient at lower voltages.
 
So yesterday, I did the build. 1 3800W element at 250V. It ended up the outlet that I found in the apartment was dead when I took a voltmeter to it, and god knows where the wires run, because it's not back to the panel. So I ran some new 12's through the same conduit as the dryer and put an outlet next to where the dryer is hard-wired in.
Then I have about 40' of #12 drop-cord from there to my deck outside.

img_1859.jpg

Here's the keggle from the outside, notice I went ahead and did a box behind where the element it through the kettle. I drilled a 1" hole, but it came out a tad big, which called for getting some gasket material and high temp food grade silicone from HD. The gasket material is the stuff you find in the faucet repair area and comes in squares. Very cool.

img_1857.jpg

Inside the box, notice it is grounded, very important.

img_1855.jpg

Inside the keggle itself, this element brought it to a boil extremely fast. Much faster than my 65k BTU turkey fryer. Currently there is no insulation on the outside, which will change soon, especially when the weather gets cold. Also there is no ball valve, something else that will change soon.

Something else I would like to do is turn down the boil, either with a rheostat or stove type controller, whichever is cheaper when I find it wins.

I'll probably be making another one for an HLT, but maybe 1500 @ 120 since I don't have another #12 40' drop-cord laying around... and I don't want to pull another 240 off the panel... it's full.
 
Back
Top