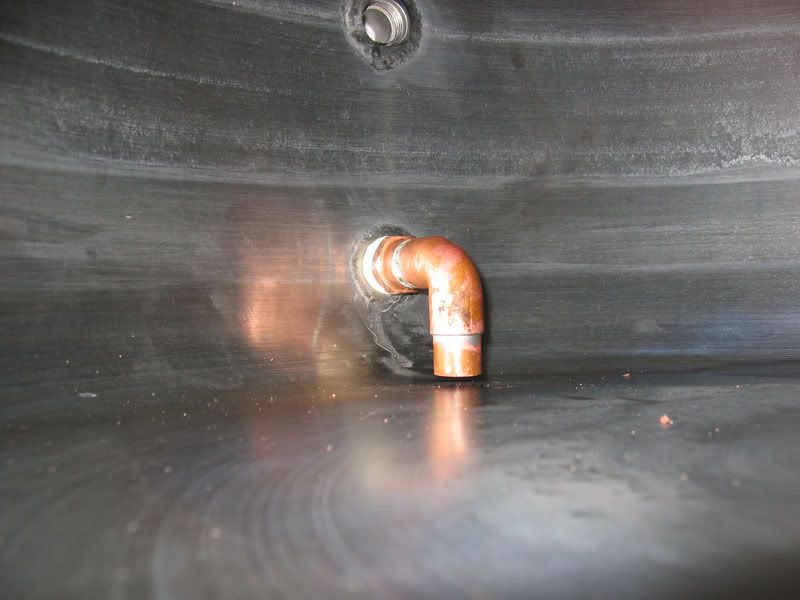
Advantage of Ball Valve on Brew Pot

Homebrew Talk - Beer, Wine, Mead, & Cider Brewing Discussion Forum

Help Support Homebrew Talk - Beer, Wine, Mead, & Cider Brewing Discussion Forum:

This site may earn a commission from merchant affiliate links, including eBay, Amazon, and others.

CRStew88

Member
Joined
Jan 20, 2013
Messages
8
Reaction score
0
Looking for some information, as I am getting my homebrewing started and trying to get some half-decent equipment.

Ive been looking at the different brew pots available, in the 5-10 gallon range, and noticed that one difference that stands between many of the less and more expensive ones is the ball valve on the more expensive ones.

Can someone please let me know the function of the valve, if you think its worth the money, and if there are other accessories I would need to take advantage of this feature...

Much appreciated, thanks
 
the ball valve is to drain it without using an auto-siphon or some equivalent. it'll cost about $20 for parts. can you install it yourself? if so, do it. if not, pay someone else to do it. that's the difference. i'm not very handy, and have a few tools, and i did it myself
 
A ball valve is practically a requirement for the bigger brew pots. My brew partner and I depended on siphoning for our first brew day. The day after our first brew day I ordered a weldless ball valve kit. The siphoning was a freaking nightmare. Never again.

I prefer the weldless ones. They're cheaper and with some experience you'll be able to avoid leaks. I've seen some really ugly welded ones out there. If I were to go with non-weldless fittings, I'd solder the connectors in instead of welding them. Cheaper and it looks as nice as any welder could do.
 
You really don't want to post the same questions on multiple threads. But when I started I used an auto siphon. If somewhere down the road you see the need for a ball valve you can add it to your pot. When I do small batches I just siphon because that pot doesn't have a valve. On my larger batches it is valves and pumps because I have them. I know guys that brew the same larger batches and use siphons because they don't have valves. It's not really a big deal either way.
 
5 gallon batches weren't too bad without a valve but 10 gallons became a chore. A Brewer's Edge Kettle valve kit has held up well for about 25 batches. It sits about 4" from the bottom of the pot placed on a propane burner. A step drill is best but a careful hand and a dremel work.
 
Looking for some information, as I am getting my homebrewing started and trying to get some half-decent equipment.

Ive been looking at the different brew pots available, in the 5-10 gallon range, and noticed that one difference that stands between many of the less and more expensive ones is the ball valve on the more expensive ones.

Can someone please let me know the function of the valve, if you think its worth the money, and if there are other accessories I would need to take advantage of this feature...

Much appreciated, thanks

To quote your words.

A kettle without a ball valve is half-decent. A kettle with a ball valve is moving toward decent.

I have ball valves on all HLT, Mash Tun, and Boil Kettle. It allows me to drain them of the contents without having to siphon. For all grain brewing, have a valve is indespsible.

I have installed the Brewer's Edge Ball Valves in all of my applications. The HLT and the Mash Tun are Bayou Classic Kettles. It was easy to drill these and install the valves. I also have a smaller kettle that I installed a valve on. Again, this drilled easily. However, I was not able to even drill my Boil Kettle. I took it to a local machine shop and had them drill the hole. Cost me $15.00 to have them drill the hole (15 minutes at $60.00/hour). I thought that this was a rather good price, and consider this a bargain.

So, if you can, get a step drill and drill the holes yourself. If the stainless steel is too hard for you to drill, take it to a machine shop and have them drill the holes where you want them. It is well worth the expense.

Mark
 
If I do this, I am likely to just buy a kettle that has the ball valve preinstalled rather than getting the ball valve separately.

When you drain from the valve, do you attach any vinyl tubing to better direct the flow in the next vessel, or just right out of the valve.

Also, is there any risk that the brew valve gets clogged with any trub or sediment when draining?
 
Absolutely you want to use silicone tubing (silicone is best for food grade high temp tubing, though there's also a few other options out there) coming off the valve - basically, you're setting up a siphon. Without that tube - specifically without that tube opening lower than the bottom of your pot - you'll never drain the fluid below the ball valve in your kettle.

As to clogging the tube, if you have any particles in there that are large enough, sure, you could clog it up. That's why people typically whirlpool before they drain - it gets most of the trub piled up out of the way of the dip tube, so it can't be sucked into the tube.
 
stratslinger said:
Absolutely you want to use silicone tubing (silicone is best for food grade high temp tubing, though there's also a few other options out there) coming off the valve - basically, you're setting up a siphon. Without that tube - specifically without that tube opening lower than the bottom of your pot - you'll never drain the fluid below the ball valve in your kettle.

As to clogging the tube, if you have any particles in there that are large enough, sure, you could clog it up. That's why people typically whirlpool before they drain - it gets most of the trub piled up out of the way of the dip tube, so it can't be sucked into the tube.

Just to add to this response: You will probably want a dip tub on the ball valve inside the kettle. Then the hose on the outside will create a siphon action and you can drain your kettle below the ball valve. You will be able to drain until it starts to suck air.

Mark
 
I have drilled 4 stainless kegs to install ball valves. A metal cutting holesaw with a built in drillbit guides the holesaw. I used a 7/8" bit for 1/2" ball valves. The bit cost about $8, and goes through those kegs in less than a minute. I'll bet that I could do 20 before it gets dull. Use a variable speed drill motor. It needs to run slowly. A little water on the cutting interface helps.
I cut the tops with a small grinder with a metal cutting blade (carbide) and finished with a jigsaw after scoring a groove. A plasma cutter works great but not many people own one.
 
For 10 gallon batches I went with a 15 gallon SS pot with dip tube that picks up on the outer edge. This keeps most of the trub out of my pump. I spent the extra $ and got a 3 piece ball valve. Spend the money on the 3 piece. No matter how much you run cleaner through the valve, you won't get it all out. Having a valve you can take apart really helps keep your system clean and lowers your risk of infection. Spend the extra $5
 
For 10 gallon batches I went with a 15 gallon SS pot with dip tube that picks up on the outer edge. This keeps most of the trub out of my pump. I spent the extra $ and got a 3 piece ball valve. Spend the money on the 3 piece. No matter how much you run cleaner through the valve, you won't get it all out. Having a valve you can take apart really helps keep your system clean and lowers your risk of infection. Spend the extra $5

2-piece ball valves can be taken apart as well. I stick mine in a vise and then use a big set of pliers to twist the two pieces apart.
 
I'm looking at buying a kettle that already has the ball valve installed for simplicity on may part. I will try to ask the vendor before buying how many pieces they are.

What is this dip tube that people are talking about? I'm assuming some kind of tubing on the inside of the kettle attached to the kettle? Any explanation or resource would be appreciated.

Though I am just getting set up, I will likely start with 5gal batches, but could see myself wanting to go to larger in the near future, so am probably going to invest in a 10-15gal kettle. Any suggestions?
 
Two suggestions.

For kettle volume I would recommend that you go bigger, that is, a15 gallon kettle over a ten. I have a 15 and regularly start out with 8 gallons for a 5 gallon batch. The extra head space virtually eliminates boil overs.

Second, the dip tube is a piece of tubing that conducts your wort from the center of the kettle, or the side, into the ball valve. The ball valve will sit about a inch above the kettle bottom. You usually can't put it at the bottom because the outside of the kettle curves where the sides meet the bottom. This means that you usually can't completely drain the kettle without tipping it. The dip tube sits closer to the bottom allowing you to pick up more wort through the siphon action. Look at a picture of a Blichmann BoilerMaker. There will be a metal tube inside connected to the ball valve. This is the dip tube. Mark
 
I brew 11 gallon batches all the time without a valve and have no problems. It just depends on how handy you are at making stuff work!

I have to move my 11 gallons of wort from the burner and move across my deck 20 feet away to the faucet to connect my wort chiller. so I move the kettle 6" down to a mechanic's creeper and then wheel the kettle over to chill and then wheel it back to siphon to the fermenters on a table off the deck so that I have 6' of fall which helps it siphon super fast with a 1/2" siphon.

The way my setup is having a ball valve would save me zero time and just places something on the kettle that makes it harder to clean the kettle and possible leaks.

To each their own I say.

Why not buy 20 feet of hose?
 
What is this dip tube that people are talking about? I'm assuming some kind of tubing on the inside of the kettle attached to the kettle? Any explanation or resource would be appreciated.

Though I am just getting set up, I will likely start with 5gal batches, but could see myself wanting to go to larger in the near future, so am probably going to invest in a 10-15gal kettle. Any suggestions?

diptube3.jpg


A dip tube allows you to get as much of the wort out of the kettle as possible.

If you can see yourself wanting to go to 10 gallon batches, then just invest in a 15 gallon pot now.
 
Why not buy 20 feet of hose?

That works fine in the winter but if brewing in the summer when it's hot the further my chiller from the faucet the warmer the water will be that is circulating though my wort as it runs through 20 extra feet of warm hose. :shrug:
 
Thanks all, that was exactly what I was thinking the dip tube was. Certainly does make sense to get a larger kettle now rather than updating.

While I have your attention... is it necessary to have a separate mash tun and lauter tun? If I start out with extract brewing (don't want to but figure its the best starting point?), can I not just mix all in one vessel before fermentation? I can see how this might change with all-grain brewing and having to discard the malt husks.
Some insight into this would be much appreciated.

No. Typically homebrewers do not have separate mash tuns and lauter tuns. The big commercial brewers do, but not us.

There's two basic ways that homebrewers do all-grain: the 3-vessel method and the single-vessel BIAB (Brew In A Bag) method.

The three-vessel method usually is comprised of:
1) A Hot Liquor Tank (HLT), which is used for heating up the water used to initially soak (AKA "mash") the grains, and is also used to heat up water for rinsing (AKA "sparging") the grains.
2) A Mash/Lauter Tun (MLT) which is used to mash the grains and then allow the grains to be sparged. The resulting water of both processes go into the...
3) Boil Kettle (BK), which allows the wort to be boiled and then either chilled in the boil kettle or moved to an external chiller and then onto the fermentor(s).

The BIAB method uses a mesh bag to hold the grains in the solitary vessel while mashing, and then once the mash is finished the bag and grains are removed from the vessel, and then the wort is boiled up. I think most BIAB'ers go with a "no sparge" method, but there is a way to actually rinse the grains in order to get more sugars out of the grains.
 
That works fine in the winter but if brewing in the summer when it's hot the further my chiller from the faucet the warmer the water will be that is circulating though my wort as it runs through 20 extra feet of warm hose. :shrug:

How hot is it where you are that your tap water changes temp that drastically over 20' of hose??
 
What he said... I run my cooling water through about 50-75' of hose before it ever hits my chiller, and I've never had trouble getting to pitching temps. I mean, to each his own, but make sure this things you're considering your limiting factors are truly limiting factors.
 
Back
Top