Counterflow Wort Chiller Build (and use)

Homebrew Talk - Beer, Wine, Mead, & Cider Brewing Discussion Forum

Help Support Homebrew Talk - Beer, Wine, Mead, & Cider Brewing Discussion Forum:

This site may earn a commission from merchant affiliate links, including eBay, Amazon, and others.

Tiber_Brew

It's about the beer.
HBT Supporter
Joined
Apr 21, 2010
Messages
2,541
Reaction score
281
Location
Upper Peninsula
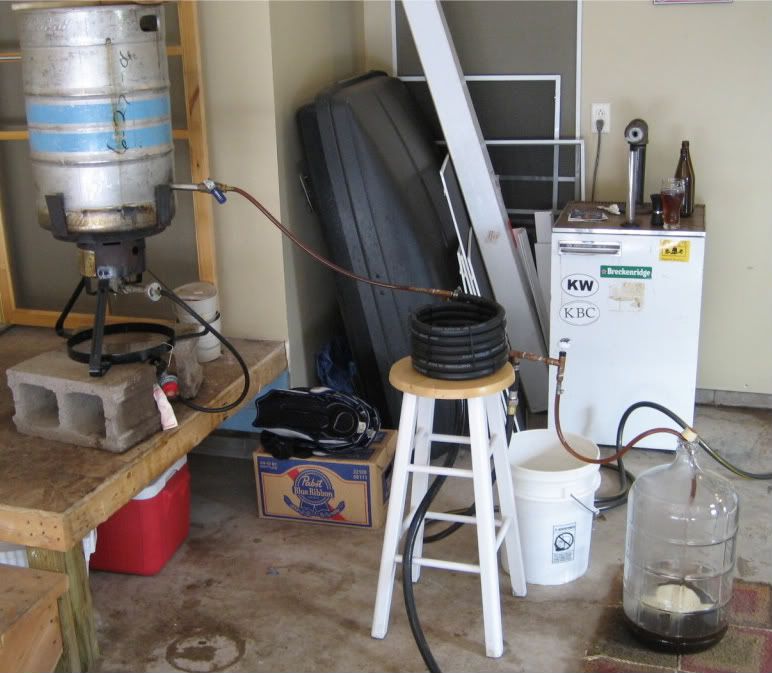
I built this in 2008, but I had pictures, so I figured I'd post them thinking I might give somebody ideas, hope, or motivation. A friend of mine (a brewer at one of the local brewpubs) thought he could use one after I was telling him about my plans, so we built two.

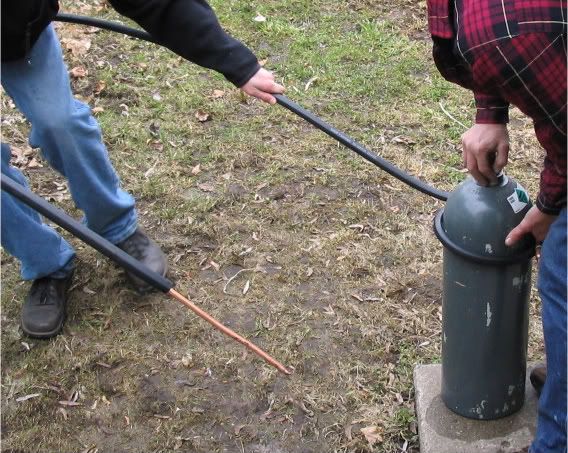
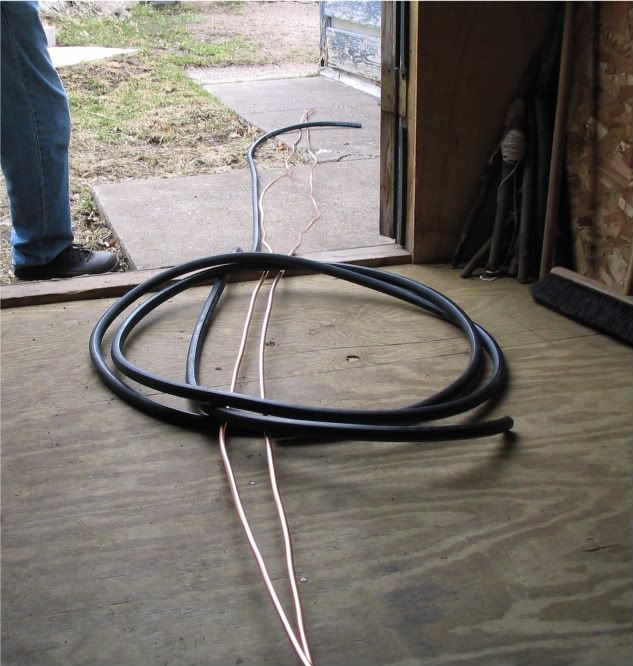
I live way up in the Northern Upper Peninsula of Michigan, and my ground water is usually pretty cold (around 43F in winter, 55F or so in summer), so this chiller is significantly shorter than most at 15 feet.

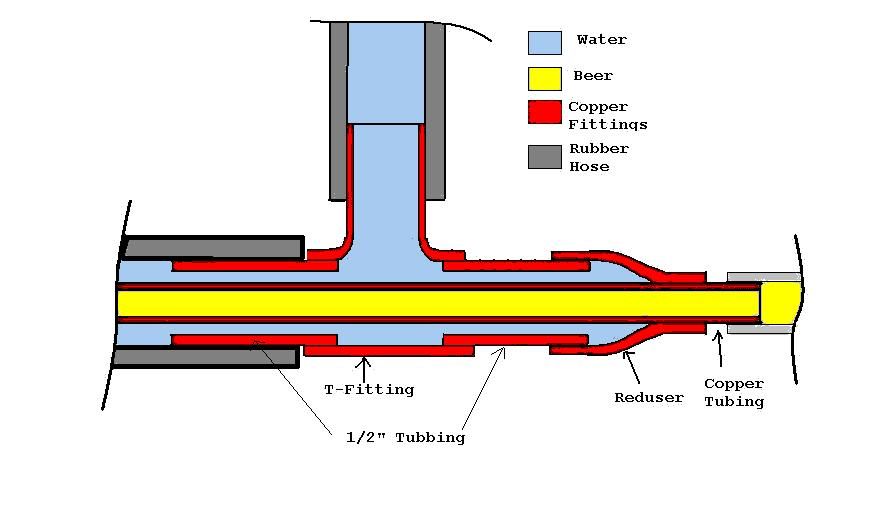
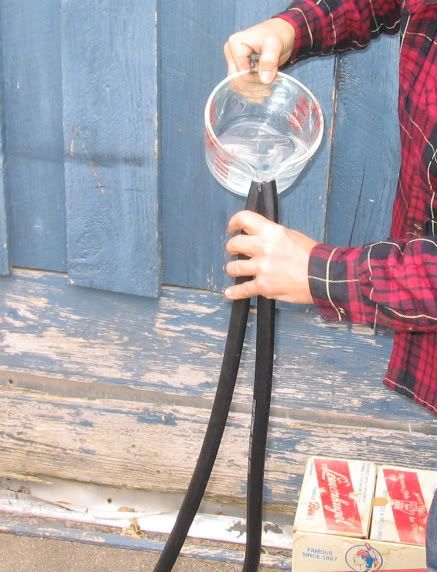
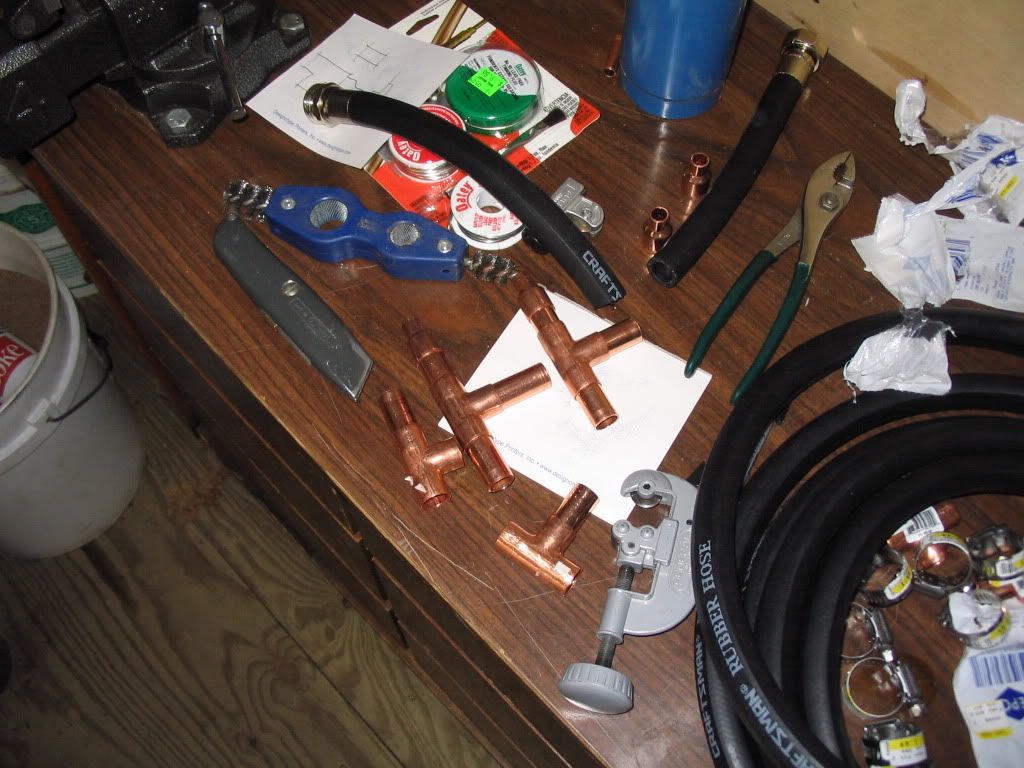
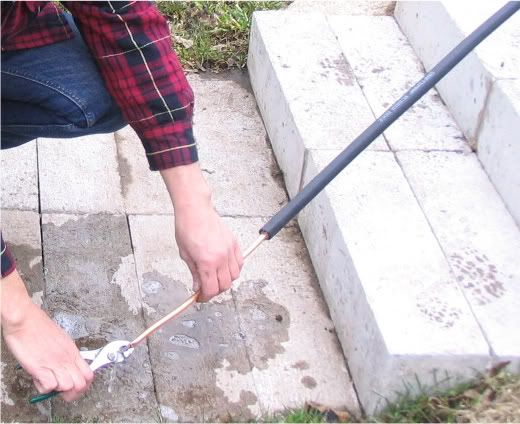
Measure and cut the 3/8" flex copper and rubber hose. Don't use the cheap plastic crap from Walmart. I got good quality rubber hose from SEARS.

WortChiller001.jpg


Then we poured some soapy water into the hose so that the copper tubing would slide in easier. Save the jokes.

WortChiller009.jpg


WortChiller010.jpg


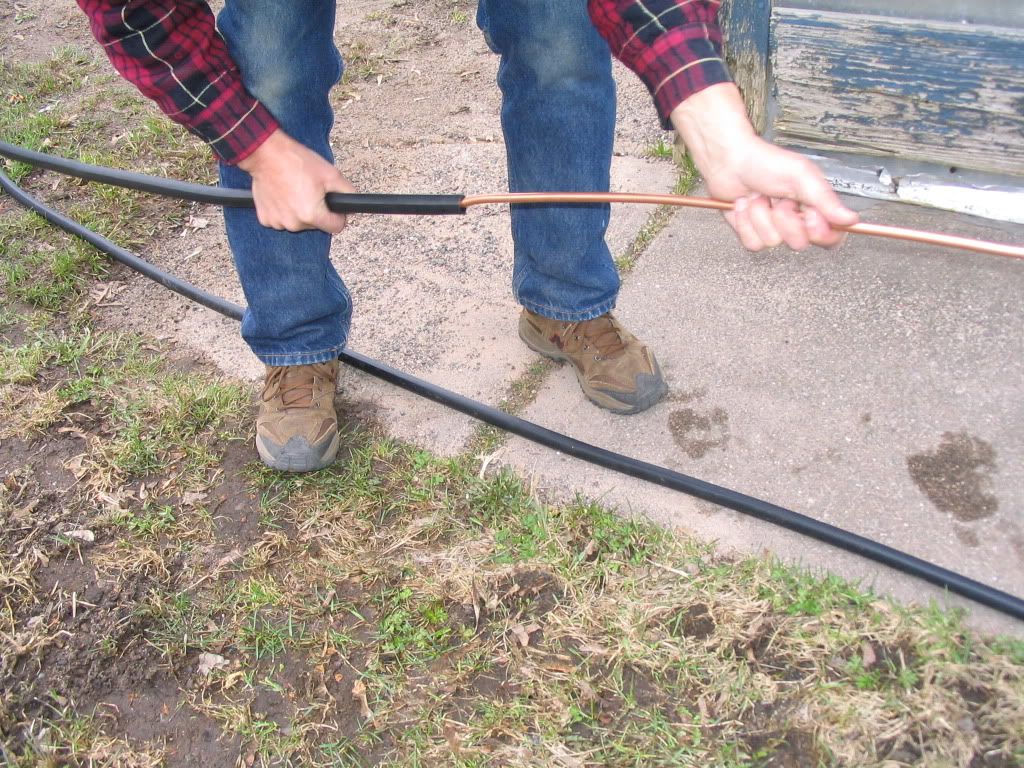
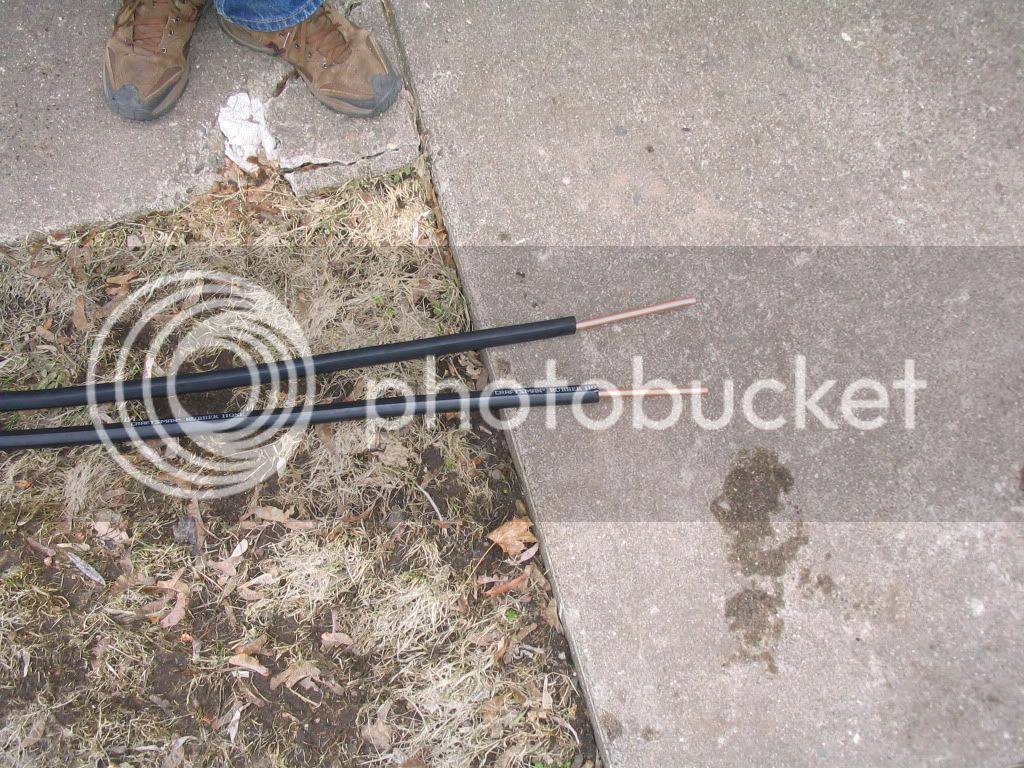
Here you go. Copper tube inside rubber hose.

WortChiller012.jpg


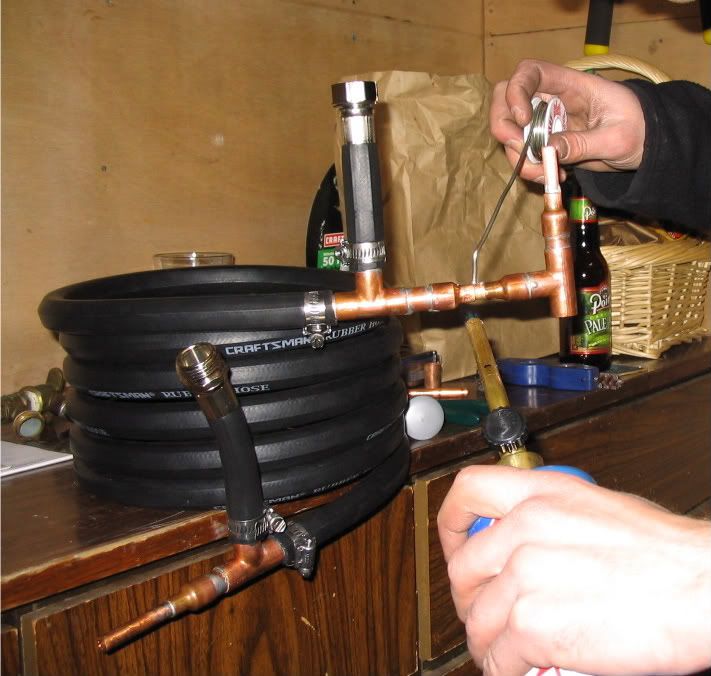
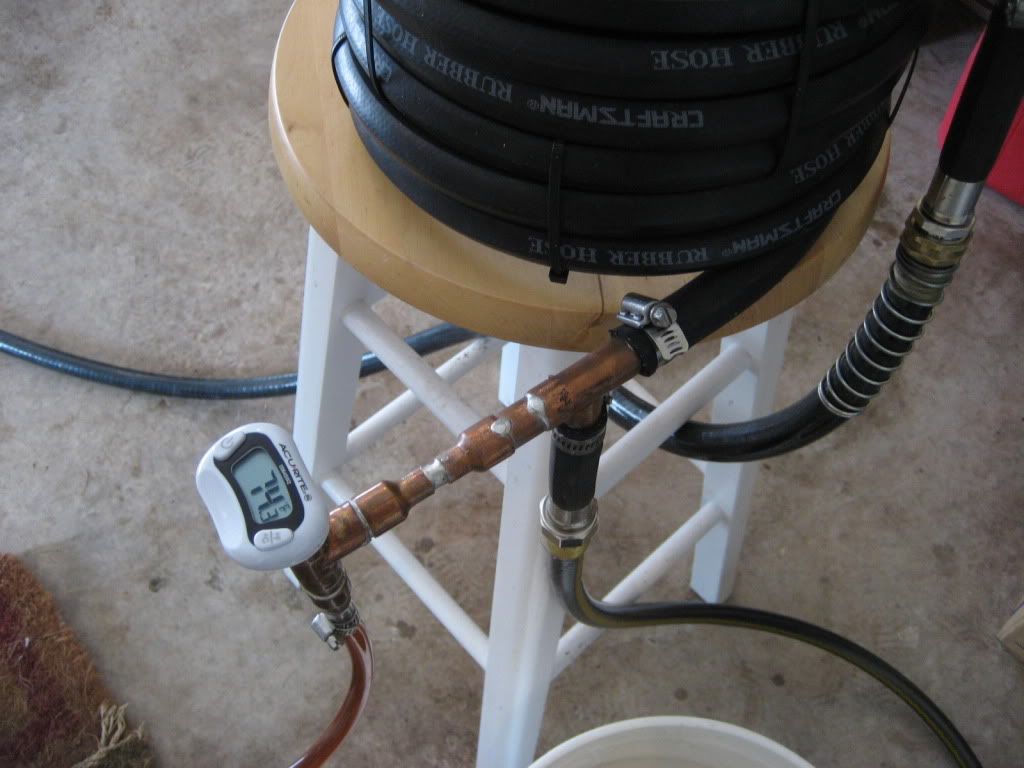
Now time to cut, clean and dry fit the copper fittings. Two 1/2" Tees, two 1/2 to 3/8 reducers, and some 1/2" pipe.

WortChiller006.jpg


Solder the fittings together. I used lead free solder even though the beer won't be touching these joints just to be safe.

WortChiller019.jpg


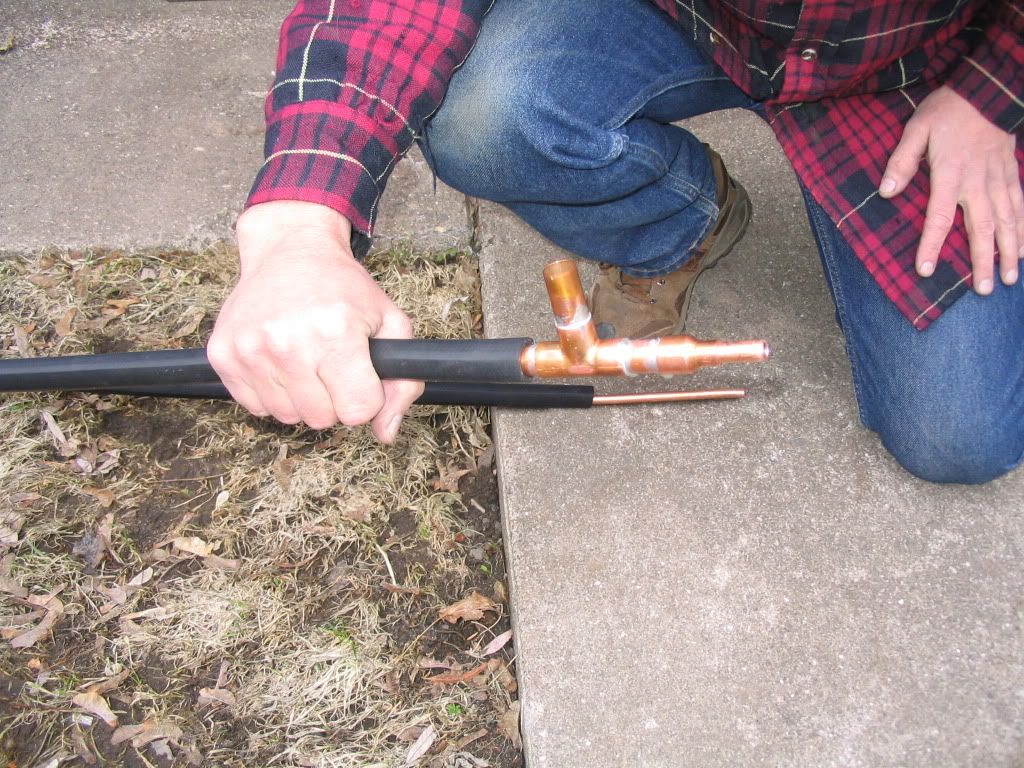
Test fit the pieces onto the hose and tubing. Good fit. Set aside for later.

WortChiller020.jpg


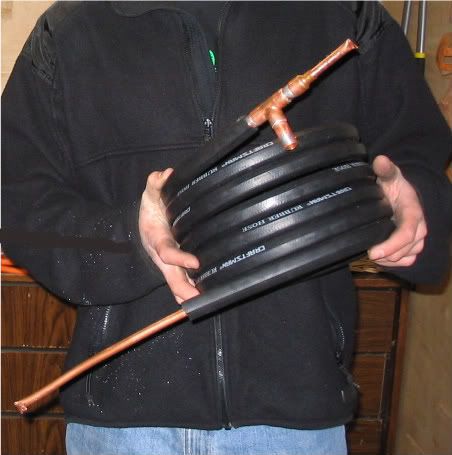
Now time to coil the hose and tubing. First we poured some water into the copper tubing and folded the ends of both sides to seal it in. This will help keep the tubing from kinking while we wrap it into a coil.

WortChiller037.jpg


WortChiller038.jpg


[Continued on next post...]
 
Next, we wrapped it around my CO2 tank. Seemed appropriate, and it was about the right size diameter I was looking for.

WortChiller035.jpg


You end up with something like this

WortChiller040.jpg


Now secure the fittings onto the hose via SS band clamps. I also added on a section for the thermometer. That's optional, but I like monitoring the beer output temp. You can see it's another couple of reducers, a tee, and some 1/2" pipe and 3/8" tubing. A cork or rubber stopper will hold the thermometer in place and keep the beer from leaking out.

WortChiller046.jpg


Here I'm running sanitizer through it before I put it to use. What isn't shown, is that I ran lots of hot water, PBW, cold water, and more sanitizer prior to this shot a few days earlier.

Honeymoon553.jpg


Here it is in action. I just use an old stool to hold it up.

Honeymoon586.jpg


And here's another look

Honeymoon596.jpg


Cheers!
 
Love what you did man, but I have a question, why Copper instead of Stainless? Thinking Longevity and Sanitation might be drawbacks here. =/
 
Love what you did man, but I have a question, why Copper instead of Stainless? Thinking Longevity and Sanitation might be drawbacks here. =/

The copper is a much better heat conductor and there's no problem with either longevity (durablility) or sanitation IMO. There's really no downside to using coppper for this type of application.
 
nicely done, love the addon for the temp probe. Those look like hockey shin pads in one of the photos...hockeyplaying homebrewer...just like me :rockin:
 
Love what you did man, but I have a question, why Copper instead of Stainless? Thinking Longevity and Sanitation might be drawbacks here. =/

The copper is a much better heat conductor and there's no problem with either longevity (durablility) or sanitation IMO. There's really no downside to using coppper for this type of application.

Cost is also a factor for some. In addition to costing less, copper is (like Catt22 said) a better conductor, and I'm not aware of any longevity or sanitation issues with copper. I've seen plenty of breweries that use copper kettles, mash tuns, HLT, etc., too. :confused:

Hey, if you got some info I should read, post it up! I'll be happy to read it!

Thanks for comments, guys!

TiberismycoppersafeBrew
 
Very nice, compact and clean. I used to live in Wyoming and we had super cold tap water too, could chill boiling wort down to pitching temps really fast w/ no prechiller required.

Cheers.
 
Very nice, compact and clean. I used to live in Wyoming and we had super cold tap water too, could chill boiling wort down to pitching temps really fast w/ no prechiller required.

Cheers.

Thanks, KingKeg.

I hear ya on the cold tap water. It's pretty nice, and if I ever have to move out of the north, I'll miss that. I can chill from boiling to lager temps without turning the faucet past 3/4 open. And my chiller is 15 feet long. I borrowed a friend's CF chiller a while back that was 30' long, and I hardly even had the faucet cracked open. I knew then I would have (get) to build my own.
 
Either I'm missing something, or I think you omitted a step. Is there a 3/8" copper pipe inside a 1/2" pipe? If not, what is the beer and water running through?
 
The black hose is a water jacket that is circulating cold water around the wort flowing thru the copper tubing. Awesome way to get the temp down fast!
 
The water runs between the copper and rubber and the beer runs in the copper. The direction of flow are opposite to maximize heat transfer.
 
Good work. Thanks for posting this.

Here is a quick drawing to explain how it fits together. I think.
Chiller.jpg


Edit: Pic edited as per post by designer.
 
Good work. Thanks for posting this.

Here is a quick drawing to explain how it fits together. I think.
Chiller.jpg

That's a useful picture for those who can't visualize it. And, yes, that is how mine works!

Thanks for posting that!

ETA: the reducers and rubber hose fit onto a short section of 1/2" Cu pipe, not directly on the tee. Otherwise, it's pretty accurate.
 
Thanks, the pic helped a lot. I thought the copper tube coming out of the rubber hose was the same tube inserted earlier. I see much clearer now.
 
I fixed the pic. Doing the drawing helped me see it too. Thanks again.

I wish I had the fittings "IN HAND" to get it spot on. Still I hope it helps.
 
I added the temp prob as best I could looking at the pics. I assume the large T helps the beer get around the prob and isolate it from the temp of the cold water. Good thinking.
Chiller2.jpg


Edit: Pics udated. Do a Ctrl-F5 to refresh your browser and Proxy server.
 
The thermometer doesn't go into a reducer in my case. I drilled a small hole in a rubber stopper, poked the thermometer through it, then stuck the stopper in the top hole on the tee.

Everything else looks pretty accurate to my build.

Nice work on creating the picture!
 
Awesome tutorial!

I'm going to build one in the next couple of days and test it out on an AG Blind Pig. The only alterations I'll be making are using 25 ft of Cu tubing (I live in CA where my tap water is about 74 F, I'll be using a prechiller in an ice bucket) and for the temperature probe area, I'm going to throw in a 3/8" tee with a 1/2-3/8" reducer going up and a small piece of 3/8" tubing going down. I'm going to jam the stopper/thermometer directly into the 1/2-3/8" reducer.

Wish me luck and thanks again!
 
Quick question what is your routine for keeping it clean after use and sanitizing prior to use? It seems to me that cold break proteins could potentially get stuck inside.
 
I just made this too. All I need to do is make a hop stopper for my brew pot, and I will be putting it all to use. Let me know how it goes.
 
Awesome tutorial!

I'm going to build one in the next couple of days and test it out on an AG Blind Pig. The only alterations I'll be making are using 25 ft of Cu tubing (I live in CA where my tap water is about 74 F, I'll be using a prechiller in an ice bucket) and for the temperature probe area, I'm going to throw in a 3/8" tee with a 1/2-3/8" reducer going up and a small piece of 3/8" tubing going down. I'm going to jam the stopper/thermometer directly into the 1/2-3/8" reducer.

Wish me luck and thanks again!

Hopefully, luck will have nothing to do with it, my friend. ;)

With enough beer and patience, a good HB DIY project has to be a success! :mug:
 
Quick question what is your routine for keeping it clean after use and sanitizing prior to use? It seems to me that cold break proteins could potentially get stuck inside.

I'm interested in knowing this too.

Beforehand, I just take the Iodophor left over from sanitizing my carboys, pour it into a 5 gal bucket, then siphon it through the chiller into another bucket. Keep that sanitizer handy throughout the brewing process. I then put the caps (soaked in sani) on to each end and set aside until post boil. Uncap, attach sanitized hose, run the first cup or two of hot wort through the chiller (to chase any left over sani out of it), then turn the water on and fill up my carboys.

When I'm done using it, I hook it up to my sink with some adapters I made from random stuff from the hardware store. I put it on full blast at the hottest temp I can for about 5 - 10 minutes. That chases any organics and residue out quite well. I then rotate it fully to get any excess water out (so it doesn't grow nasties). Cap it, store it for next time, repeat. Always performs, never ever had a problem. I simply love this thing, and it was so easy and cheap to build. One of the best DIY's I've done.

Cheers!
 
Just finished it. I had trouble pushing the 3/8" tubing backwards through the 1/2-3/8" reducer. There was a little ledge on the inside of the reduced. I just put a drill bit through it to knock off the ledge. One of my joints has a little pinhole leak that I need to fill. Other than that, fabrication went down without a hitch.[/URL]

I also converted my immersion chiller into a pre-chiller by putting hose adapters on it. I'm really looking foward to using my new rig tomorrow.

Looks great! Nice job with that. I see you kept your coil tight with zip ties as well. I forgot to mention that in my write up, but my pictures show them there. Maybe I should edit that to include them.

I also had the same problem with the reducers, but a round file took care of that.

Also, if you have a leak, I might heat up your solder, pull apart, re-clean and reapply flux and try again. It would be more trustworthy than a solder patch.

Let us know how it works once you break it in!
 
Nice build, minus the gear clamps. Replace them with some Oetiker ear clamps and you'd have a much prettier design.
 
Used my new counterflow wort chiller last night. It worked pretty good, but not well enough to make me totally satisfied. Even using the prechiller, I had to really throttle the wort flow in order to get it cool. Flow was throttled so much that it took about 30 minutes to cool a 5 gallon batch to about 75 degrees.

I think my setup has two major problems.
1.) I hooked it up to my sink and I think maybe my sink doesn't provide enough pressure to overcome the headloss through the prechiller and wort chiller while providing enough flow. It did have a nice solid stream out of the discharge though.
2.) I need a better what to cool my prechiller. I used about 20 pounds of ice and it still all melted prior to being done.

Next batch, I'm considering sticking my prechiller in a bucket of water and freezing it solid. If the freezing water doesn't crush the tubes, it ought to super charge my prechiller. Also, I'll hook it up to my hose to see if I can get more flow.

All and all it's way more convenient and sanitary than my immersion chiller. Its performance just suffers from my high tap water temperature.
 
Don't freeze the coil in a solid block of ice. Water will form around the coils and warm up and you'll be left with no way to break up that stratification. In an icewater bath, you can just move the prechiller around a little.

Also, are you running it in the proper counterflow orientation? The chilling water should enter at the same fitting that the cooled wort is exiting.

Hmmm, that makes sense. Yeah, it's definitely counterflowing. Maybe I just need to freeze more giant bowls of ice. Maybe I need to move somewhere with lower taxes and colder tap water--emphasis on cold tap water.
 
Come on over to the northern midwest! Cold tap water, lots of good beer, nice people, lower taxes...

;)

I hope you find a way to make your chiller work. How many feet long is your pre-chiller? Are you agitating the ice water bath? Is the pre-chill water container insulated at all?

TiberhangintheremyfriendBrew
 
It's just shy of 20 ft. Ice bucket isn't insulated, but I was agitating it. Agitating makes a huge difference. Maybe a little dry ice in my ice bucket will help. We'll see in a couple weeks.
 

Latest posts

Back
Top