1BBL Single Vessel All Grain Steam Kettle Conversion

Homebrew Talk - Beer, Wine, Mead, & Cider Brewing Discussion Forum

Help Support Homebrew Talk - Beer, Wine, Mead, & Cider Brewing Discussion Forum:

This site may earn a commission from merchant affiliate links, including eBay, Amazon, and others.

MaxOut

Well-Known Member
Joined
Jan 8, 2011
Messages
752
Reaction score
88
Location
Hughesville
I frequently search the web for items that can be used to improve my current brew rig and recently have been looking for a larger kettle to boil in. I have plenty of mash lauter tun capacity but need more boil capacity. I frequently brew the same recipe over and over to keep my pipeline flowing with a house flavor “444 Triple Lager”. I have this recipe down and would like to brew it less often and in larger quantities so I have time to try other small recipes. Well in my searching I found an add on Craigslist for a 40 gallon jacketed steam kettle on wheels that ran on propane advertised as “the ultimate crab or lobster cooker for the man cave”. I tried to contact the seller for over a week and the add was nearly a 5 weeks old I figured it was sold and the seller was not interested in returning calls. Well out of the blue my phone rang and it was the seller. I went the next morning to meet him and purchased the kettle. When I arrived to pick up the kettle it was much larger than I had imagined and was quite a bear for three of us to lift up into my box truck. Long story short I got it home, cleaned it up and connected it to my propane at my brewery and fired it up. At this point I went on line to look for a manual or schematics so I could figure out how to interface with the existing controls. When I pulled up the model number things started to make more sense….GL60N…60 Gallon Not the 40 Gallon Advertised. Much bigger than I originally intended to purchase but now it’s got me thinking…Hmmm. Should I sell this and continue to look for another boil kettle or entertain the idea of a single vessel 1BBL all grain all in one system from grain to glass?

I’ve searched the forums and see some threads on using jacketed steam kettles to brew in but have not found a complete thread with details on how this is done or can be done. I have a few ideas but wanted to run it through HBT to get some opinions…


Please go easy on me this is just a theory at this point and looking for consrtuctive criticism. Thanks In advance
:mug:

This is what I’m thinking-

Make a large perforated stainless steel basket that fits inside kettle to hold grain (kinda like BIAB). Use my instant hot water heater to supply strike water and sparge water (goes to 180 degrees). Integrate kettle gas valve to existing BCS, add thermister to long custom rod that can be positioned in the mash where desired through hole in lid and regulate mash temp with kettle. Mount a wort pump and a plate chiller to the kettle. Install inlet through lid for recirculation return and weld tri clamp adapter to existing dump valve. Rig chain fall above kettle to lift basket after mash and elevate above wort during sparge. After sparge remove grain basket and bring to boil adding hops in a large hop spider. Remove hop spider after boil and recirculate through plate chiller to cool. Pitch yeast close lid and add airlock. Add valves to front and rear in existing ports to allow water through jacket to help cool/heat wort as needed to maintain fermentation temps. Water in jacket will be in a closed loop to avoid contamination and deterioration of jacket. I will add a high tem gasket to the lid of the kettle and a latch to lock it down during fermentation. Dump yeast and trub with dump valve and siphon beer into kegs.

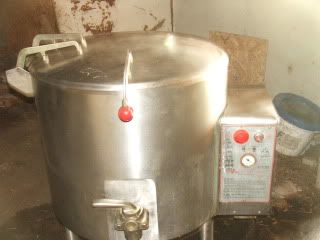
Included a couple pictures of the steam kettle for visualization. I’m going to run some water tests with the kettle to determine some base line capabilities. At this point I’m not even sure this thing will boil water? OK fire away……:)

IMG_1353.jpg


IMG_1355.jpg


IMG_1356.jpg
 
Mind if I ask how much you grabbed it for?

I have a few sources for cheaper used equipment but they are mainly for restraunts, so it is more out of curiosity.
 
Go one more step and make a brewery using it.
two 50 gallon rubber-made barrels and some tubing. One for a HLT and the other for MT.
you got it. after the boil and cool down use the HLT for a fermenting bucket
 
I have a 40 gallon unit similar to yours. Mine is electric, and it will boil water in no time! I plan on using a separate MT, using the kettle for the boil only.
 
Sounds like a pretty good plan. Nice find BTW. Very cool it's 20 gallons over what you thought. I bought (3) kettles about a year and half ago that were advertised as 45 gal and they were only 40. It worked out though becasue I like to split up the batch into two boils so that I have some variety. A whole barrel of the same beer gets old after a while.

The only issue I see so far is how you plan to sparge. I like to biab hybrid idea, but two things I see as a concern. First off, your basket will have to be somewhat heavy duty. I don't know your recipe, but we're talking in the ball park of 70 pounds of grain plus the water that the grain will absorb. So you'll have around 150 lbs of saturated grain give or take. Assuming the basket can handle the wieght, I'm not sure about the sparging method. I'm worried that you won't get a good effeciency this way. However, I've never done a BIAB batch so maybe I'm wrong. I do a batch sparge with my setup using a slotted copper manifold and get between 80-85% efficiency depending on how much grain I use. I guess a few extra pounds of grain won't be that big of a deal and it will save you having to lauter and pump the wort back over after the sparge.

One other thing, since you are brewing a lager, don't you want to get as much break material out as possible? I don't brew lagers but I've read that this is the case. It will be hard to get the break out unless you are going to filter the wort before or after the plate chiller.

Anyway, keep us posted on the progress. I love the idea of an all in one vessel.
 
Texan said:
Mind if I ask how much you grabbed it for?

I have a few sources for cheaper used equipment but they are mainly for restraunts, so it is more out of curiosity.

Sure no problem...

$350.00 and $50.00 for the big paddle. I put new casters on it, re-wired the control and added a new power cord. So I have a total of $450.00 in it. I feel like its a great price for what it is considering the original sale price was over 18K. I figure if I decide not to use it for brewing I should be able to sell it.
 
Boar Beer said:
Go one more step and make a brewery using it.
two 50 gallon rubber-made barrels and some tubing. One for a HLT and the other for MT.
you got it. after the boil and cool down use the HLT for a fermenting bucket

Good ideas. I remember seeing someone on this board using the white Rubbermaid barrels as mash tuns. Were they yours? Interesting. At this point I really want to explore the possibility of a single vessel system. Thanks for the input I will keep in mind if my goals change. Cheers!
 
onthekeg said:
I have a 40 gallon unit similar to yours. Mine is electric, and it will boil water in no time! I plan on using a separate MT, using the kettle for the boil only.

Sound promising. What PSI is yours running at to boil? Have you boiled wort yet? I will be testing mine later this week and will post test results. Post pictures of yours if you have any. Thanks!
 
BBL_Brewer said:
Sounds like a pretty good plan. Nice find BTW. Very cool it's 20 gallons over what you thought. I bought (3) kettles about a year and half ago that were advertised as 45 gal and they were only 40. It worked out though becasue I like to split up the batch into two boils so that I have some variety. A whole barrel of the same beer gets old after a while.

The only issue I see so far is how you plan to sparge. I like to biab hybrid idea, but two things I see as a concern. First off, your basket will have to be somewhat heavy duty. I don't know your recipe, but we're talking in the ball park of 70 pounds of grain plus the water that the grain will absorb. So you'll have around 150 lbs of saturated grain give or take. Assuming the basket can handle the wieght, I'm not sure about the sparging method. I'm worried that you won't get a good effeciency this way. However, I've never done a BIAB batch so maybe I'm wrong. I do a batch sparge with my setup using a slotted copper manifold and get between 80-85% efficiency depending on how much grain I use. I guess a few extra pounds of grain won't be that big of a deal and it will save you having to lauter and pump the wort back over after the sparge.

One other thing, since you are brewing a lager, don't you want to get as much break material out as possible? I don't brew lagers but I've read that this is the case. It will be hard to get the break out unless you are going to filter the wort before or after the plate chiller.

Anyway, keep us posted on the progress. I love the idea of an all in one vessel.

Thanks for the great comments. The basket I'm planning would be constructed out of a left over sheet of 14 gage perforated stainless with 1/2" stainless rod for structural support. I've also considered a custom sized muslin bag to line the entire kettle that could be pulled out after the mash rinsed and reinstalled with a weighted ring during boil to remove hop debris after boil before cooling. I have two ideas for sparging first would be no sparge second is to lift basket so its submerged in about 2" wort and shower sparge water evenly over basket rinsing grain. Never tried either method but as you said a couple pounds of grain can make up for loss efficiency if needed. A filter is a good idea. I like the one Brewers Hardware sells and may use a similar deign to make one larger and more robust that could handle a large hop bill. I'm also thinking after I cool I will do a rest and dump any settled trub on bottom of kettle before pitching the yeast if needed. Thanks again I will keep posting progress.
 
bribo179 said:
How will you cool that to pitch temp?

I have a plate chiller and considering an immersion chiller as well that stays in place during fermentation to help control fermentation temps.
 
I have a plate chiller and considering an immersion chiller as well that stays in place during fermentation to help control fermentation temps.

I think if I was going to leave it in the fermenter the whole time I'd rather have SS than copper. If you don't want to DIY it, you might check out the ferm cooler that brewhemoth has for their conicals.

Also, I think your plan for a huge, custom muslin bag is a bad idea. They have pretty big pores for one thing and they are not very strong. I've often thought about getting a few nylon paint strainers and sewing them together to make a big hop spider. I think it would make a better, stronger filter. You could lift up the bag partially before you start running through the plate chiller and recirculate through the bag for added filtering as you cool and to pull out a little more hoppy goodness. If it worked out right, you shouldn't even have to do a bottom dump.
 
BBL_Brewer said:
I think if I was going to leave it in the fermenter the whole time I'd rather have SS than copper. If you don't want to DIY it, you might check out the ferm cooler that brewhemoth has for their conicals.

Also, I think your plan for a huge, custom muslin bag is a bad idea. They have pretty big pores for one thing and they are not very strong. I've often thought about getting a few nylon paint strainers and sewing them together to make a big hop spider. I think it would make a better, stronger filter. You could lift up the bag partially before you start running through the plate chiller and recirculate through the bag for added filtering as you cool and to pull out a little more hoppy goodness. If it worked out right, you shouldn't even have to do a bottom dump.

Absolutely using stainless for everything 100%. I will construct my own chiller as the chiller Brewhemoth offers is too small and i need to have flexibility in the design to configure the connections through the camlock ports I will put in lid. I have no experience using a muslin bag and what your saying makes sense. I'm leaning towards the basket for mashing, external filter chamber to help filter trub during recirculation and post boil prior to cool. I may still use the muslin bag idea like you suggested just during the boil as an extra level of filtering. If at the end of he day I have a little hop trub in the fermenter it's no big deal It will settle to the bottom and get left behind when I siphon into secondary or keg. I always brew a little heavy so I don't have to be real picky about getting every drop and you probably can't see in the pictures but the kettle has a sloped bottom towards the drain kinda like a conical and should focus the trub and debris towards the valve minimizing the wort left behind. Keep your thoughts coming!! I love the input as I have no experience with brewing this big and the hurdles I will encounter.
 
thats to protect the investment ;)

Nice!


You got it ;) 17MM Savage BSEV plinker just for fine tuning long range skills on the cheap. I keep the real heat concealed.:D

I grow my veggies, brew my beer and hunt my meat...some might consider me a redneck but I just like fresh food and drink.:mug:
 
BBL Brewer -
This is what I'm considering for the chiller coil.
I'm pretty sure I can just keep the coil the same diameter it comes coiled in. I all ready have tubing to camlock adapters to attach to lid. I will use a slotted bar to evenly space coils out and make the chiller semi ridged. I am thinking about putting a 4" tri clamp manhole in the lid for attaching chiller and to view inside during mash. I'll use a 4" tri clamp cap to cover when not in use and to put fittings in like the Brewhemoth does with their chiller. Thanks for the inspiration!!

I plan on keeping this kettle next to my existing brew rig so I can utilize the BCS, pumps and heat exchanger as needed. The gas valve is 110 in the kettle and will be easy to interface with the BCS. I need to get the testing underway so I can decide weather to move forward or scrap the idea.
 
Sound promising. What PSI is yours running at to boil? Have you boiled wort yet? I will be testing mine later this week and will post test results. Post pictures of yours if you have any. Thanks!

Here is a picture of my unit when I brought it home last summer. I haven't brewed with it yet, but the school I bought it from used it up until they closed 2 years ago. The cook spoke highly of the unit and said they could brown 50lbs of hamburger in about 30 minutes.
DSCF2701.jpg
 
BBL Brewer -
This is what I'm considering for the chiller coil.
I'm pretty sure I can just keep the coil the same diameter it comes coiled in. I all ready have tubing to camlock adapters to attach to lid. I will use a slotted bar to evenly space coils out and make the chiller semi ridged. I am thinking about putting a 4" tri clamp manhole in the lid for attaching chiller and to view inside during mash. I'll use a 4" tri clamp cap to cover when not in use and to put fittings in like the Brewhemoth does with their chiller. Thanks for the inspiration!!

I plan on keeping this kettle next to my existing brew rig so I can utilize the BCS, pumps and heat exchanger as needed. The gas valve is 110 in the kettle and will be easy to interface with the BCS. I need to get the testing underway so I can decide weather to move forward or scrap the idea.

Looks like a pretty good price for 100'. About the same price I paid for 100' of same diameter copper almost 2 years ago ( I made a jamil style immersion for my set up). Hopefully you can use the existing coil size. I needed tighter coils and it was a challenge finding something the right diameter to coil it around. I ended up using the floor tom for my drum kit :rockin: If your water is cold enough, you might not even need the plate chiller. In the winter when tap water is in the 40's here I can bring down 30 gallons in 30-40 minutes. Since you already have one though, won't hurt to use it unless it becomes a pain.

Let us know how the test run turns out.
 
Found some time yesterday afternoon to do a preliminary test on the kettle and it looks like it has plenty of capacity to brew beer!!

I started by preheating kettle empty to 100*F with lid closed. I added 30 gallons of water @ 135*F, opened the lid and cranked the kettle up to 10 PSI. I was boiling vigorously in 20 min. I was very satisfied with the water test and could not believe I got a 77*F rise on 30 gallons in 20 min!!

My friend who has an HVAC shop came by yesterday after the kettle test and we started brainstorming some ideas on the basket and modifications to the lid. I’m feeling confident a single vessel 1BBL brew system is feasible so I will venture further. I will be working up some drawings and parts list soon and will update the thread as I move along. Included some boil shots.


By the way the hot water I heated went to good use I mopped the shop floor and washed two vehicles. :rockin:

IMG_1362.jpg


IMG_1359.jpg
 
I'm not trying to be a pain. But KISS it and just get two 55 gallon Rubbermaid barrels with lids for 70 bucks each. Put a weld less drain fitting on the bottom and you got a MT and a HLT. You have the pumps. You can easily do 150 lb of grain which should cover most any brew you could make.

Love your kettle. Which ever way you go your going to have some fun
and if your not careful you might need to go pro

http://www.zorotools.com/g/Waste Containers Bases/00059069/

This is the build
We now have (7) 1bb Blichmann fermentors and sell all we can make.
https://www.homebrewtalk.com/f51/squam-lakes-brewery-pictures-144764/

HLT  55 gallon Rubbermade.jpg
 
I'm not trying to be a pain. But KISS it and just get two 55 gallon Rubbermaid barrels with lids for 70 bucks each. Put a weld less drain fitting on the bottom and you got a MT and a HLT. You have the pumps. You can easily do 150 lb of grain which should cover most any brew you could make.

Love your kettle. Which ever way you go your going to have some fun
and if your not careful you might need to go pro

http://www.zorotools.com/g/Waste Containers Bases/00059069/

This is the build
We now have (7) 1bb Blichmann fermentors and sell all we can make.
https://www.homebrewtalk.com/f51/squam-lakes-brewery-pictures-144764/

Love your setup and watched you build on here. 7 BBL in fermentors :rockin:!

I all ready have an HLT (Instant Hot Water Heater) that can supply a continuous stream of up to 180*F water on demand so I could in theory just get one Rubbermaid can to use as a MT.

My problem is I am running out of space in my shop for brewing gear and want to keep everything as compact as possible besides I’m not really known to adhere to the KISS method.:) Adding this kettle will fit in my current space but two more Rubbermaid cans will require expanding into the rest of the shop. I will not brew large batches often and for slightly more than the cost of two cans and fittings I should be able to construct the basket and install the chiller.

You’re not a pain and I posted this here for ideas and appreciate them.:mug: I just am intrigued by the thought of having a single vessel system and want to follow through to see if it is possible. Either way I can resort to the Rubbermaid cans as an alternative proven option.

I have a couple questions on your setup-
Where did you get that pump? Do you use it for metering volumes?

I assume you recirculate during mash to regulate temps? How well do the Rubbermaid cans hold temp? Any off flavors from the cans?

Thanks in advance for you response.
 
Here is a picture of my unit when I brought it home last summer. I haven't brewed with it yet, but the school I bought it from used it up until they closed 2 years ago. The cook spoke highly of the unit and said they could brown 50lbs of hamburger in about 30 minutes.
DSCF2701.jpg


Nice! A beast!
 
Well it’s been a while but I have finally made some progress. I had a friend who was going to TIG weld a tri clover fitting to a plate to replace the valve but he has been really busy. I got tired of waiting and used it as an excuse to purchase a small TIG welder I had been looking at to complete the job myself. I added a sight glass so I could monitor the clarity and flow of the wort. I added a 3 piece valve to the lid and camlocks on the inside and out to give me some flexibility. My goal is to utilize my existing pumps and hoses to reduce the costs and I am already using camlocks.

Now that the plate was complete and returns on lid I could do some real testing with real wort. Here are a few quick shots of the mods I made to the valve and the lid.

IMG_1635.jpg


IMG_1636.jpg


IMG_1634.jpg
 
My next concern was chilling a large volume of wort to Lager temps with my heat exchanger in my HLT and decided it would not be sufficient. I got a 40 plate chiller and will use the heat exchanger as a post chiller to get me to Lager pitching temps. With the heat exchanger clogging was never an issue but a plate chiller is a different story. So I decided to make a hop spider to reduce the amount of particles entering the chiller. I had some 1/4" stainless steel rod, a stainless garbage disposal stariner and came up with this simple solution similar to many Ive seen here..I bent a small section of rod to place in the hop bag to keep it open and on the bottom.

IMG_1527.jpg
 
I love the valve with sight glass.....frickin sweet. For the hop spider though, don't you think a bigger bag would be better? Might lower your utilization having all the hops bundled up tight like that.
 
I love the valve with sight glass.....frickin sweet. For the hop spider though, don't you think a bigger bag would be better? Might lower your utilization having all the hops bundled up tight like that.

Or just use multiple hop spiders/ hop sock...you've got plenty of room for it.
 
Or just use multiple hop spiders/ hop sock...you've got plenty of room for it.

I recirculate during the boil and the lid return pumps into the hop spider. This will help allot with utilization. I did a BBL brew and will post details and update the "MaxOut Brewstation" thread. I tasted the wort post boil and the hop profile seemed good. I am not going to be converting this to a "All In One System" until this fall. Thanks for the ideas!
 

Latest posts

Back
Top