Automated HERMS system

Homebrew Talk - Beer, Wine, Mead, & Cider Brewing Discussion Forum

Help Support Homebrew Talk - Beer, Wine, Mead, & Cider Brewing Discussion Forum:

This site may earn a commission from merchant affiliate links, including eBay, Amazon, and others.
After some more wiring, testing, soldering etc, we are nearly 100% done with the build and ready to start testing!

Their is good news/bad news so lets start off with the good news....

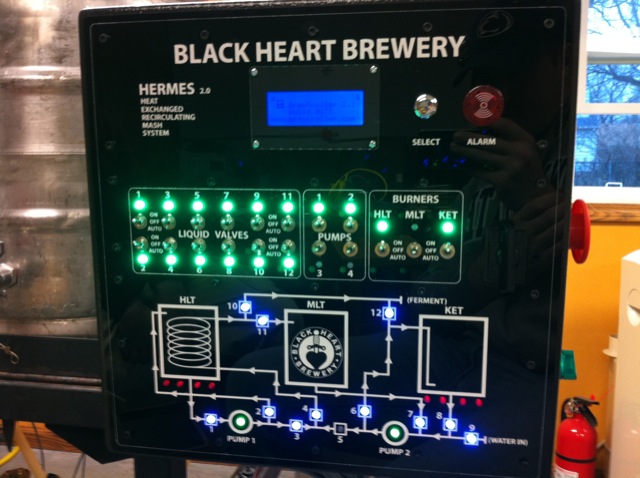
We wired all the status lights on the control panel, Here is everything lighting up and working correctly! pretty cool looking.
25.JPG


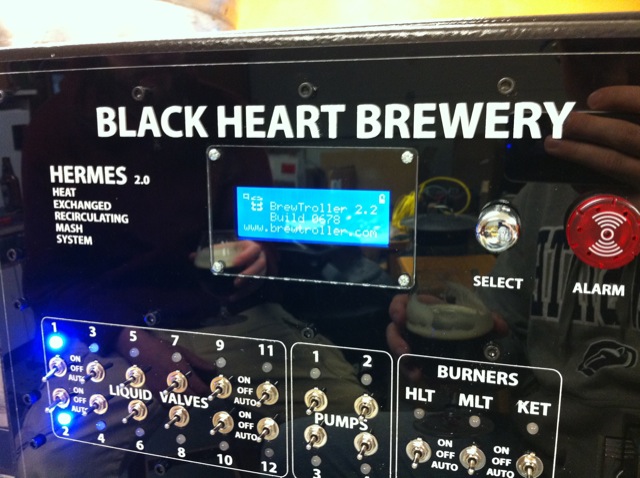
And here we are testing BrewTroller, which appears to be working great so far.
26.JPG


The good news is that nearly ALL of the valves, switches, and status lights work correctly, that being said, some are still being a little bit fidgety.

First issue is valve 5 works... but after it opens it sounds like its trying to close and open again or like it doesnt know its open... like a broken automatic door that closes, opens slightly, then closes again... this only happens when we open the valve, and we tested the contacts for shorts, used a different wire and switch etc, its definitely the valve... Also, the valve 5 status LED isnt working, but we havent fully investigated that yet as the valve is acting funny regardless.

Second issue, when programing the valve configurations, the brew troller is unable to auto control valve 8. We can manually turn on valve 8, but testing reveals that the signal from the BT never reaches the relay board, let alone the switch. Not sure how to further trouble shoot this.

Third issue, the temperature probes are not working at all. We have multiple probes from brewers hardware, we have had them working with an arduino and a 1-wire code before. All connections have been tripple checked. When plugging the sensors, or just one sensor, into the BT4.0 1-wire board the LED on the USB board turns off and when rebooting with the 1-wire board in and connected to the sensors it only displays the LCD I2C address and never makes it into the BT menu. Also, after sensor is plugged in the controller becomes non responsive. When removed, it starts working again. We tripple checked for shorts etc, tried different combos of sensors yet got the same results each time.

Those are all of the Brew Troller related issues...

One other issue we had was with one of our pumps in the manifold. One pumps great, the other not so much. Funny part is, the pump thats not working great is our water pump that has only been used on the HLT. So, fairly certain that its not clogged but we havent checked. It is making a higher pitched noise than the other pump which is making a lower pitched rumble when pumping. Both pump, however one is a trickle.

If anyone can help us trouble shoot any of these issues it would be a big help. Thanks!
 
Also, here is the illustrator file for our control panel layout, including guide lines etc.

http://db.tt/CDhctmA

Please note, you must format the line color and width when doing laser cutting etc. All lines left thicker to make it easier to print out a template, I recommend using 2 sheets of tabloid paper if your printer can handle it... or else you may have to use 4x 8x11 sheets.
 
The pump, are you testing it dry? One of my pumps screams when run dry, while another sounds fine (NEVER RUN THEM DRY!). Try circulating some fluid through it and see if the high pitched noise fades away.

The rig is looking GREAT! Very nice work on the controls.

BK
 
Thanks, we spent a long time designing and planning everything. We are happy with the progress so far.

The pumps were never run dry. We tested with about 3-5 gal in each vessel. Really not excited to try disassembling everything to find the problem but it may be the only way to go...
 
It seems to me that with 12 motor operated valves in the rig, it's probably worth having a spare on hand. I would hate to have one fail and have it hold up brewing.

Can't wait to hear how the first few batches go, after you get the kinks worked out. Love this rig.
 
The only pics of a Brewtroller I've ever seen are the ones you've posted (and thanks again - this thing is sheer controller porn). You're testing for a signal at the switch, but how about the screw terminal? Any chance insulation from the wire is crimped in the terminal so it's not making contact?
 
The more s**t you have the more s**t goes wrong. My system is automated but not with a computer and I still have a few glitches to deal with every once in a while.

Last month my 12vdc power supply blew a fuse rendering my float switch useless... Luckily I keep spare power supplies laying around.
 
The more s**t you have the more s**t goes wrong. My system is automated but not with a computer and I still have a few glitches to deal with every once in a while.

Last month my 12vdc power supply blew a fuse rendering my float switch useless... Luckily I keep spare power supplies laying around.

Yes... If we had 3 gravity fed kettles with analog temp gauges and manual valves and a plate chiller I'm sure brewing would be a no brainer. However thats not what we are trying to do, make it low tech and simple.

The whole purpose of a semi-automated brew system thats computer controlled is the fine detail in which we will be able to analyze the brewing process and tweak temperatures and times to be able to brew better and more consistently. Then, instead of worrying about HOW the equipment works we will be concerned with what is going into the beer and be able to make subtle changes like move the mash temp up a degree or two, and be able to measure the results, knowing they are accurate.

For about $100 in parts or so we could convert the entire system to manual operation tomorrow with some teflon tape.... but again, thats not the point is it?
 
We had some initial issues but were able to straiten everything out. The first batch was a success with about 80%+ efficiency. We have yet to brew in auto mode and are brewing in manual mode until we feel confidant in the system configuration and pumps etc.

Brewing the next batch on thursday, in the mean time, transferring and kegging beer is keeping us busy. More updates to come soon.
 
Right on!

I'd love to see video of that in auto mode. Hell, I'd even settle for pictures. :)
 
Blackheart,

First off, thank you so much for sharing your information. You two plus as well as alot of other folks here on the boards are just awesome. The wealth of information is amazing. Alot of specifics were provided for the fluid and gas sides of this build. I was wondering if you could provide some information on the electrical side. I've been looking through digi-key to try and piece together some of the items in your control box and I'm at a loss. I'm a 10 year naval officer (nuclear submarines) with degrees in mechanical and aerospace engineering. Needless to say my weak point is the electrical side. I understand the theory but I don't really know what parts are available out there and how they interact. I realize that you have some schematics out there and they help out with the flow paths but could you explain/link some of the specific pieces so that I could do some more research.

Thanks in advance and I hope the brewing has been good lately!

Think of electricity like water and you will doing just fine. You dont need to know how all the parts work, just what they do and what they need to do their jobs.

As far as parts go, their are a few systems, like brew troller, that have almost all of the pieces you need already. Also check out theelectricbrewery.com who has a step by step guide, with parts lists and links etc. Between those two places you should have everything you need.

You should be getting most of your parts from Automation sites as this stuff is closer to factory automation than general electronics.

Basic idea of all of this electricity stuff is to send the correct voltage to the devices you want to turn on/off when you want them to turn on/off. So you need your supply of voltage, usually 120v ac, 24v ac, 12v dc, etc. If you have electric heating elements it could be 220v ac etc.

To get 220v and 120v ac is easy as you already have the outlets. The 24v and 12v etc require a power supply or transformer to lower the voltage.

Once you have the voltage, use relays as "valves" to control the flow of voltage. Typically you will have a positive and negative voltage for everything. You only need to splice in a relay into the pathway of one of the wires to control the flow of electricity to a device.

In my case, I am using the brewtroller. This sends out 12v signals to power relays that then allow whatever voltage is connected to them to flow or not flow. This isolates the sensitive and low powered electronics from the high voltages they control.

From there you just add on and expand. Add LEDs to display output status. Add switches to manually over ride the computer control etc. Much of the wiring is identical. So if you can understand how to control one device then you can apply that to the other devices.
 
When I win the lottery, I'm going to duplicate something similar. Thanks for doing all the hard work for me. Hell, I might just build it and put it on my resume :) Write off as a business expense!
 
Does any one know anything about the relays used in this system? i would like to know the specs of the relays on the din rail. and maybe some suggestions on what to buy. Im trying to build Kals Electric Brew system with brewtrollers automation.
 
Thank you Maltose.
That would explain why i can not find relays that look like terminal blocks. my electrical knowledge is very basic. But i guess i'm back to reading more. i have to figure out how to use the relay board. because i don't understand how to take 12v dc to start an ac pump.
 
It doesn't. He is using the one relay to control the second relay. So the relay that is controlled directly by the brewtroller is supplied with 24v that in turn is connected to one that controls 110v going to the pump.
 
I just joined and saw this post was from 2009.

Were is you system now and are you selling them or other brewing systems.

If so send me links and pricing.

Thanks

WWB
 
I'd like to hear how Blackheart is coming along. Hopefully profitable and kicking heiny! :)
 
Hello, so how do you sanitize your Herms coil that was just filled with unboilded wort prior to chilling, are you running a boiling wort loop prior? Thanks for the advice.---- sorry this was answered above.
 
While boiling we recirculate through the HERMS in the exact same way that we plan on chilling. Right before reentering the kettle the wort can be diverted to a hose connected to the fermentor. We circulate to reduce trub and create a whirlpool and maintain constant temp a few times. When the boil is finished we add ice and cold water to drop the temp. When the temp is low enough we stop recirculating and open up a sealed port next to the kettle inlet. We sanitize the opening and connect a clean hose to it. Now when we recirculate the chilled wort is diverted into the fermentor.
 
hi blackheart, im just a rookie brewer yet to brew his first beer, but am already looking into the future by researching herms systems. First off let me say I am very impressed with your system and build log. I really enjoyed reading through all 40 pages in under 12 hours. (what can I say , when i'm interested, I am interested ^_^) I am considering building the same system in the future, except for having the gas be propane fed from a tank. Having a part list together with the schematics would make doing so a lot easier. Could you help me out with the links to the schematics and a part list for your fully finished hermes 2.0 system? That way I can start playing around with designing the frame and calculate the costs of the whole thing so I have a goal to shoot for using profits from what I will be producing from the starting kit I am going to get soon. :)

thanks,
master_haze
 
Most if not all of the info you need to build the exact same brew system is in this thread. I know of a few people who have built a near exact clone of the system. The take away from my brewery project should be to make an improved or enhanced version, not just a parts list to shop with. Almost everything was parts ordered from standard brewing suppliers like Northern Brewer, Midwest brewing supplies, Brewers Hardware, and BrewTroller.

As I've said before much of my systems design is based on the idea that I had no year round access to running water and a drain. Therefore reusing the HERMS coil as a cooling device, and hence my plumbing designs, are all predicated on that.

I used a number of other parts, like compression fittings, tank level tubes, kegs as kettles, etc that I would not use again if I were building it new.

If I were building it from scratch I would do the electronics and most of the frame the same but use a higher quality SS strait walled kettle with a bottom drain if possible and all welded fittings. I would also use a standard counter flow chiller and might even look into rims or a mini kettle to do the HERMS heat control for the mash instead of an entire kettle.

I also looked into using a tankless water heater for a house as a hot water source that I could then fine tune with a RIMS system to brew faster.

The point is, much of the info I have is up here, and even still I would try to do what works best for you. On Google Sketcup 3d Warehouse their is an accurate 3D model of the brew system with all the dimensions you would need to build the frame.

I am considering selling my entire setup as I may soon not have the space to brew. Currently I do not have the time or cash to do so.


Here is a picture I am working on that I took of the brew system a few weeks ago.
brewery-61174.jpg
 
Blackheart Brewery, thank you so much for posting all of this info on your build here. You did an amazing job. I have learned so much from your threads, and have made so many changes to my build from what I have learned on your posts.

I am currently trying out the 30 day free trial with Adobe Illustrator to create a panel cover to to send to Ponoko. I am having a lot of trouble with Illustrator and can't figure out to change the drawings. I am trying to change the plumbing and valves, but Illustrator seems to be hard to use for a noob. Going to have to dig into some how to guides.

Thanks again for passing on the info on your build. Helped me a lot!

Jamie
 
Not sure if I actually merged the lines together or if they are just grouped. You might be able to right click and ungroup them. If not just delete what you want to change and redraw it. I spent all of a few hours drawing that with zero illustrator skills.
 
Black heart. First, thank you for this amazing thread. While I attempt to build my "second brew stand first" I looked at your last post mentioning a few things you would do differently such as not cool the through the herms, and use kegs... Could you please explain your reasoning? I'm currently looking for the perfect build, but after much research, I do not want to build something only to want to start another project, or try to adjust the system I just finished. I would rather build my " second system first" once again thank you for everything posted. What a great source of information. I've learned south just from this single thread.


Sent from my iPhone using Home Brew

You have multiple options for almost every component, brass or stainless steel, 1/2" or 3/4", etc etc. I would over-build everything you can afford to. It took us weeks of tinkering to address flow issues, stuck sparges, bad valves, leaking fittings etc.

Using TC fittings or a similar universal fitting is a must IMO. This means at the cost of some tubing I can re-plumb my entire system and connect anything to anything else, regardless of input or output. This is what we ended up doing when we used the kettle to heat water and pump 2 as a keg washer. We just connected an extra hose to the pump output. I could easily add another valve and make a permanent connection in the future.

The weldless keg fittings and using kegs seemed like a good idea at the time. Yes they work but they require a ton of fiddling with everything from the exact diameter of the hole you need to cut (plus de-burring and filing) to the arraignment and placement of the seals and parts. Since the valves and connectors are heavy they tend to want to rotate the connections loose. Because the connection is not welded you have to decide how often you want to disassemble and clean that area, which means not only removing a single valve buy a cluster of valves and the corresponding hoses, then remove all parts, clean and sanitize, then finally re-tape with teflon and assemble and test the whole thing over again.

This takes HOURS of time spent bending, twisting, and smacking your limbs agains stainless steel and potentially cutting your self on sharp edges that you missed when de-burring or on a part you put on backwards this time. If I were building it again, I would build in a cleaning cycle. We have a manual one now but it does not account for removing grain, hop residue etc and of course the fittings on the valves.

If possible I would also go for a bottom drain valve on the kettles which makes for easy pump priming. This is only possible with electric however.

1/2" tubing/pipe etc I would say is the minimum needed and in reality 3/4" or 1" is much more practical. Our HERMS coil is 1/2" and that really slowed the system down. As did our pumps... I kept upgrading the pump heads and parts to get more flow out of them. I was at 1/2-3/4 their rated output but they still struggled all the time. What we found out was the issue was seals that were not vacuum tight. Like, bump something and its not a perfect seal, all of a sudden the flow stops....

Hops and grain getting into the lines was a huge issue at various points. Eventually they work their way into seals and TC fittings and you dont find this out until you disassemble and find them wedged in there. Again, we made everything modular and quick dissconnectable so that the system could be easily torn down and cleaned. This was still not an easy task.


If you dont mind spending 8 hours brewing a batch of beer from prep through cleaning up time then really you can go with whatever options you want. If you want to walk up to your brew system, flip some switches, and hang out for 3-4 hours while your system brews the beer with minimal input, work, annoyance, and cleanup, then I would try to plan out a system that requires little maintenance or is easy to maintain. Weldless fittings, threaded fittings, teflon, and the other inferior options I mentioned will just add more time to your brew day or (if you are lazy) ruin your beer, either by contamination or inefficacy.
 
Thanks for the quick reply. I will take everything you said into consideration. Take care!


Sent from my iPhone using Home Brew
 
Back
Top