Basement Brew room build out...

Homebrew Talk - Beer, Wine, Mead, & Cider Brewing Discussion Forum

Help Support Homebrew Talk - Beer, Wine, Mead, & Cider Brewing Discussion Forum:

This site may earn a commission from merchant affiliate links, including eBay, Amazon, and others.

jmark

Supporting Member
HBT Supporter
Joined
Jan 30, 2011
Messages
971
Reaction score
192
Location
Marietta, GA
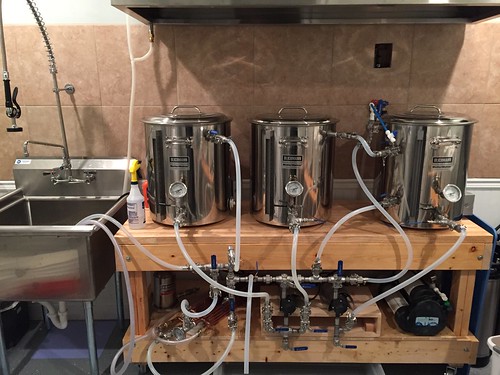
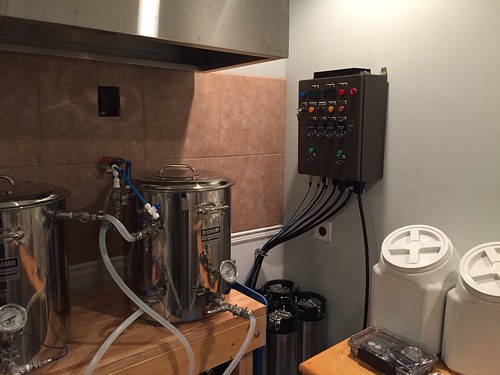
After a year of planning and gathering parts, I've spent the last couple of months putting together my take on Kal's awesome electric brewery although there's really not a heck of a lot difference between "The Original" and mine other than the plumbing. I still have a few bits and pieces to still take care of, along with finishing the room itself (drywall and floors are lower on the priority list than mashing barley for some reason!)

brewstand2.jpg


controlpanel.jpg


I initially started down the Brewtroller road with the intent to automate valves etc., but some of the parts I needed never seemed to come into stock at the OCSYS store so I took a step back and reevaluated what I really wanted from my system. In the end, while hooking stuff electronically has a certain "cool" factor, I decided that I didn't really need the all that extra stuff and it would be just one more "failure" point to worry about. Basically, everything was built pretty much in line with Kal's plans, so if you have any questions about the control panel etc., it goes without saying that I would recommend reading over all his stuff at The Electric Brewery. A HUGE thanks to Kal - without his excellent build information, I wouldn't be even close to where I'm today. My ampmeter is busted (or at least I think it is - it registers 0.00 almost all the time), but otherwise the control panel is an exact clone of Kal's (minus the handles which I may add later) and works great. For the control panel (a 20x16x8 box), a local water jet cutter cut the front panel for me which resulted in perfect alignment of controls - considering my anality, this was well worth the $50 minimum cost.

plumbing.jpg


For the plumbing, I simplified things substantially over my initial plans by using 3-way "L"-type valves where possible. Of course, I did this AFTER buying a boat load of regular 2-way valves (so look for a number of those to appear in the classified section along with other bits and pieces left over). These valves are awesome and although pricier than setting up two 2-ways, I'd make this same decision again any day of the week and twice on Sundays. For those interested, the valves I got were from DirectMaterial.com (1/2" Type L). Instead of the Quick Disconnects that Kal uses on his system, I used Camlocks from BargainFittings.com (another awesome vendor BTW). One recommendation I have here is to avoid using Type C Female camlocks - the barb fitting on these is really restrictive. Instead I chose Type F and Type D camlocks and combined them with full bore high flow hose barb fittings from Brewershardware.com. The total for each connection was somewhat comparable to what quick disconnects would have cost, maybe a little more. (Yes - that's a Powerblock behind the pump - it's just holding down the pump stand until I bolt it down in it's final position).

EDIT: For those interested, the PDFs of the manifold design can be found here

So far, I've just done some basic tests with the system - basically moving slightly heated water (~120 degrees) around the system and the only change I may make is to add a way for getting water DIRECTLY to the BK from the HLT. Right now, it has to go through the HERMS coil and MLT before being pumped over the BK. However, this isn't really something I'd need to do very often (maybe for cleaning) and it would be just as easy to just disconnect one of the camlocks and connect in a new tube. Priming the pumps has not been an issue in my water tests which is a good thing, since adding in a vent valve above the pumps would have been a big PITA after getting the existing plumbing all lined up. Adding in the two valves at the very bottom for drainage has worked beautifully - although it pains me to see almost a gallon of liquid escaping from various places (thankfully most of this will be sparge water from the HERMS coil during actual brewing so it wort loss might not be horrible).

Of course, I'm not yet finished. Plenty of clean-up of the various cabling to be done and still to add (this weekend, hopefully) will be the cooling portion of the plumbing - I have a CFC from B3 to hook into the existing plumbing and test out. Finally, before I actually start brewing for real on this system, I need to build out the ventilation. I'm going to construct a hood out of 2x6's and FRP board like the one in Nattybrew's build and I already have the vortex-type fan ready to go. I just need to drill 6 inch holes in the cinder block & brick wall for the exhaust and make-up air - I'm not looking forward to that!

The very last thing will be coming up with a name for my brewery - I'm not at all creative in that aspect, and nothing I've thought of over the few years I've been brewing have stuck with me. I'm sure I'll think of something eventually, but right now, it's just a "Brewery Without A Name".
 
Looks great! I can't wait to see a completed setup.

What size kettles are those? They look smaller than the 20 gallons.
 
I'm really digging the valve manifold setup off the pumps! Nice setup there!

I thought about going the Camlock route also as that's the standard connection used in most of the Food and Beverage plants I do work in and really like them on big lines - 2"+.
 
Looks great! I can't wait to see a completed setup.

What size kettles are those? They look smaller than the 20 gallons.

Thanks - as for the kettles, they are the 20 gallon ones. Maybe it's the stand that makes them look a bit smaller? The stand is a bit larger than the one Kal built - I made it 6' long to give me a bit more room between kettles. I accidentally ended up punching the hole for the top valve for the MLT too far to the right of the front of the kettle which makes joining to the HERMS coil require a bit more space. In the end, the 6' length worked out great because I was able to get a standard 6'x2' butcher block worktop from Sears for $100!
 
I'm really digging the valve manifold setup off the pumps! Nice setup there!

Thanks... yeah, this part had me worried to begin with as I tried to figure out ways to attach the manifold to the stand and I was concerned with how well the plastic pump heads would support it if I went that route. However, in the end, the pumps appear to support the weight pretty well although I will definitely add some weight actually in the pump stand as it's a bit front heavy right now. If I do have issues with the pumps maintaining the weight over the long haul, I'll look to chuggerpumps who are supposedly coming out with SS replacement heads that will fit my March 809s.
 
Okay, so I finally had a free weekend to work on the ventilation hood and do some final tests before the inaugural brew.

First here are some pictures of the hood and fan:

photo.jpg


photo3.jpg


The hood design was based on the 2x6 approach NattyBrew used. The basement wall is externally facing so it's basically a 2-3 foot run of vent to the outside.

So today I went ahead and simulated a full brew-day on the new system just heating and moving water. Everything went pretty well and I learned a couple of good things (HERMS coil loop will get mash to within 2 degrees of HLT and boil-off rate in kettle is a ridiculous ~2 gallons/hr!). However, I ran into one BIG problem that I'm at a loss to figure out...

In doing the boil test to figure out my boil-off rate, I noticed that that there was a LOT of condensation/leaking out of the vent run as well as the fan itself. Of course this is leaking on to the top of the vent hood so over time this will just rot the wood, get moldy etc.

So the question out there before I do a full-on brew... has anyone had this issue and what did you do to stop it? I've duct-tabed the venting, but that doesn't seem to stop the leaks... any ideas?
 
Your exahust is extremely similar to mine so I am a little worried about mine now. the only difference i can see is that you put your fan attached to the hood whereas I have mine at the outlet almost. The outlet seems to be what most people do. Maybe you can try rearranging it?

Here is my build thread. I can't say that my way is better because I have not tested it yet I just haven't heard of your issue.

https://www.homebrewtalk.com/f170/just-another-electric-brewery-build-thread-317746/#post3951391
 
As much as we all want to get to brewing, it's going to suck to tear it all apart and pull it out of the room to finish the drywall, etc if you ever do now that you're just about ready to brew.

Looks great, otherwise.
 
+1 on moving the fan to the other end of your duct. I tried mine with the fan over the kettle with the same results as you. Switching it solved the problem although my duct is a good 15 feet long.
 
Great setup. I am sure this is a rig I would not want to operate after a few brews. "wait the destination hose should go ..... Oh crap" JK nice rig I love wood brew rigs.
 
Okay, had the first brew day on the system a couple of weekends ago and everything went reasonably well with a couple of exceptions as noted below.

I brewed KingBrian's Common Room ESB since this was a nice straightforward recipe to use as a first brew on the system. The brewday was quite long at around 7 hours from starting the HLT heating to finishing cleaning, but I was being pretty meticulous about each step being the first time brewing all-grain (prior to going electric, I was just an extract/partial mash brewer) so this should time hopefully shorten the more I brew.

I'm not terribly happy with how I heated my strike water. I did end up having to move a fair bit of water around to dough in at the temperature I wanted.

1. I heated about 18 gallons to 164
2. Transferred ~7 gallons water over to the MLT
3. Brought HLT up to 16 gallons (not the full 18 - see step 6!)
4. Recirculated MLT water though HEX while heating HLT until I hit Dough-in temperature again
5. Dough-in at 164, temp dropped in MLT to ~152 as expected
6. Added the final 2 gallons of water to HLT to bring HLT down from 162 to around 154
7. Started recirculation

This was a pain - although mainly just in calculating the volumes for the correct temperature changes. The upside was that my mash stayed at 152 for the entire hour - HLT was consistently at 154 so it seems my HEX isn't 100% efficient (like that matters!). pH for the mash was 5.0 which is on the low end, so I need to spend a little time figuring out why (since I just used faucet water, I used two or three campden tablets in the water to remove the chlorine but I don't know if that had anything to do with it or not), but at least it was still within an acceptable range.

After an hour, I raised the mash to 168 via recirculation through the HEX coil rather than by adding water to the MLT and this took about 20-25 minutes (I thought that going from 152 to 168 wouldn't take that long, but with no prior experience with a 5500W electric element, who knows). Anyway, once I reached mash-out temps I started sparging. Matching flow rates from the HLT-to-MLT and MLT-to-BK was a bit tough as I was either going too fast into the BK or ending up with more sparge water on top of my grain bed than wanted. I guess this is just an inherent issue with manual ball valves and I'll get better at adjusting them with more experience. Overall, the sparge took about 75 minutes to collect ~14 gallons and hit better-than-expected numbers for pre-boil gravity (1.052 vs. 1.049 expected), so I'm not going to complain.

Boil was pretty non-descript... used Fermcap so really nothing to even worry about in terms of boil-overs. However, at flame-out, frustration and weariness from the long day set in. One oversight was not putting a ball-valve on the input to my CFC - that meant I had no way to restrict the flow into it other than from the BK out-valve (which can cause priming issues obviously). So, basically, I just let it fly and figured I'd just be cooling wort in the freezer before I could pitch. First of all, I **LOVE** my Chillus Convolutus (from MoreBeer) - even without any control, that thing dropped my wort from boiling down to 90 degrees in one pass (with tap water around 70 degrees)... However... I have a HopStpper in my BK and as soon as the wort level hit the top of that thing, I lost siphon and ended up with around 2 gallons of lost wort sitting there at a ridiculous temperature with nowhere to go. Apparently - and I did not know this beforehand - if you're using the HopStopper once the wort gets down to this level, you need to severly restrict flow exiting the BK as the cavity in the HopStopper cannot refill fast enough for the flow and therefore empties and the diptube loses siphon. Once that happens there's no real way to restart. So on top of adding an extra ball valve to my chiller, I'll be extra careful next time!

Anyway... in the end I just used an auto-siphon, got my 12 gallons into two Ale Pails and sat them in the freezer for several hours before pitching the yeast... Of course, with all this going on, I completely forgot to take my gravity measurements so ABV will be somewhat unknown. fermentation kicked off within 8 hours and I'll probably keg and force carb this weekend. Should be ready to drink in about 10 days. Fingers crossed.

Overall, an 'okay' brew day, with some lessons learned for next time.

P.S. The ventilation has been setup moving the fan as far as I could (about 2 feet) away from hood and mounted vertically. Still had some condensation drip down the venting but not nearly as bad as before. I'll probably put a dish towel or something on the hood each brew day to avoid damaging the wood top, but nothing really to worry too much about.
 
I'm really loving your manifold design w/ all the 3 way valves. I am looking at designing a manifold and like how efficient this design is.

I have a question, is a water inlet plumbed into your design anywhere? Do you recirculate the water with the CFC? It looks like you can recirculate the wort if needed.
 
Thanks - actually right now I fill the HLT from a faucet behind it and a short length of vinyl tubing. However I'm about to design a separate manifold (much simpler) to provide water for the CFC (that will recycle back to the HLT ready for cleaning) and obviously the HLT. As for circulation, right now I circulate water from/to the HLT while recirculating wort during the mash through the HERMS coil. Doing this keeps the temp in the HLT from stratifying too much. And yup, I can circulate wort through the CFC back to the BK which allows me to whirlpool before turning on the cold water to chill.
 
Okay, necrothreading myself here, but we finally got around to finishing our basement this past summer, so although that meant giving up brewing for a few months while things got finished, I was able to get my brew-room where I wanted it, with some nice upgrades to the sink and hood in particular and some updates to the rig plumbing.

One other nice thing not pictured was a floor drain... that will come in good use as I'm always spilling stuff! We went with an epoxy floor so hopefully that will stay waterproof.

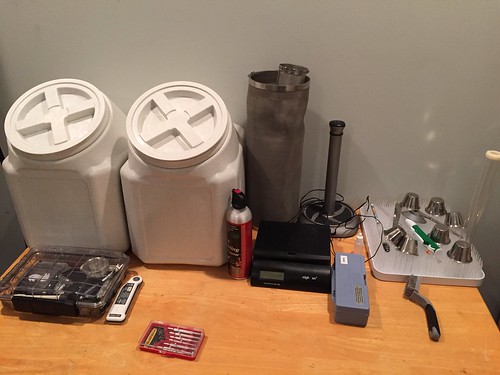
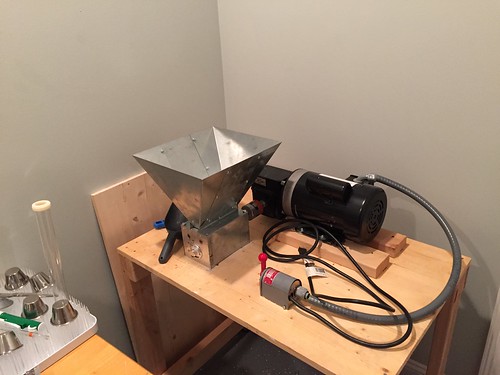
Still a few things to touch up here and there, but here are some pics of the updated space. I keep the milling station in the brewing/fermentation area, but actually mill outside of it to keep as much dust out of the area.

23498557316_404e705cc9.jpg

23442205441_f4638edb6b.jpg

22897554343_a72f35460a.jpg

23228905740_b6c68c9a3b.jpg

22897552773_9675aa3471.jpg
 
Sweet system, I'm real interested in your pump plumbing. I have a plumbing system along the lines of yours with 3 3-way T valves, and would love to see and learn how you go about using yours. I have some questions about your shared "to Hex Coil" port.
 
Thanks... Let me know what you need to know. The two valves above each pump are both three-ways so I only ever have one 'open' in the direction of the HEX coil. I made some mods when I put this back together so that I have individual valves for the BK and MT going into the wort pump and a 'bleed' valve above and to the left of the wort pump. Together these changes have corrected some periodic issues I sometimes had with priming.
 
Thanks... Let me know what you need to know. The two valves above each pump are both three-ways so I only ever have one 'open' in the direction of the HEX coil. I made some mods when I put this back together so that I have individual valves for the BK and MT going into the wort pump and a 'bleed' valve above and to the left of the wort pump. Together these changes have corrected some periodic issues I sometimes had with priming.

Well, I use my set up about the same as you do regarding the shared hex port I also have 3 way valves before the shared port, except mine are "T" valves. You realy have to focus as to how you set them. L valves are left or right. .speaking about priming the pumps, I've been having problems with that. I have 1/4" bleeder valves right after the output side of the pumps as well. I'm thinking I just been over looking the obvious? The pumps are about 2 feet lower then my kettles. My WATER pump is on the left, Wort pump is on the right in the picture. I have valves on every port on the kettles too.This what I do to prime the pumps. All the valves on the kettles are closed, I use the BK to measure out correct sparge water and pump it to the HLT and it enters the HLT through the re-circ valve, So I first open the HLT (OUT), then open the bleeder valve and wait till i get a stream of water, close it, Then , lastly, open the HLT re-circ valve. Fire the pump up and most times it don't prime. I have to fiddle with it to take off. I find that very annoying. I use dip tubes and I think it gets like air locked somehow in there. Should I be opening up the HLT (OUT) valve before I connect the hoses?

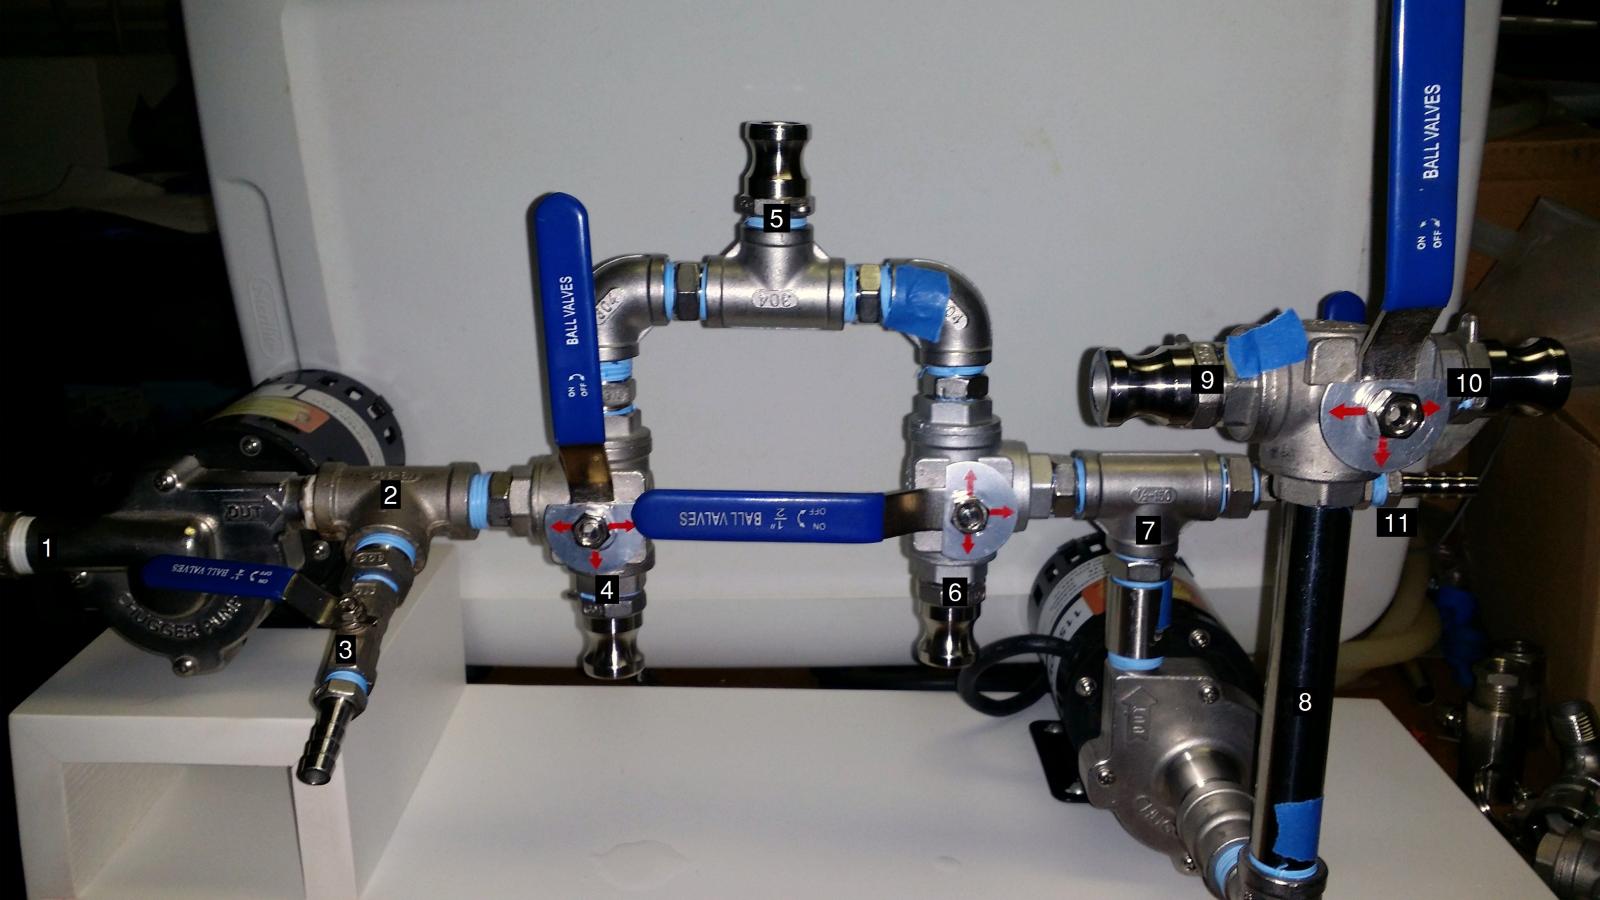
A little over view of my set up:

#1 In Put from HLT
#2 Out put from HLT
#3 Bleeder valve
#4 HLT Re- Circ
3 way Type "T" valve
#5 Shared Hex port
3 way Type "T" valve
#6 BK Whirlpool
#7 Wort pump Out Put
#8 Wort pump IN Put
3 way Type "T" valve
#9 Mash Tun In Put
#10 BK In Put
#11 Bleeder valve

Any thoughts on what I have set up? Any changes you would make?

Thanks

2pumpsetupaltered.jpg
 
That's a nice simplified manifold!!!

A couple of things come to mind though... First of all, I think you need to get your bleeder valve at #3 above the output of the water pump. The way you have it, I think you'll get air stuck around point #2. Secondly, I've never tried the horizontal placement but I've read that can cause issues so you could try a setup that has your pump mounted vertically like your wort pump? I think the first point is your issue though - if you move that so that point #3 is above the output, you'll probably be good to go.

Well thanks, Jmark, I really don't think I'm completely done with it yet?
I definitely have to make it more complicated........ LOL I know my self.

My goal is to NOT remove any hoses while brewing ! I now need to figure out how to incorporate my chilling "zone"

About the priming, Since my last brew, I raised that bleeder valve up above the out put #2. Air should now purge itself more easy. Although the other Wort pump gives me even more problems than that water pump and that bleeder valve should release the air in seconds, since it's the highest point above the output. Do you use the valve opening sequence as I stated? Am I doing that right? :mug:
 
I'm not totally following how you move your liquids around, but let me run through how mine works. All hoses are connected at all times, and now with my bleeder valve above the wort pump I no longer have any priming issues.


  • I heat strike/sparge water in the HLT and recirculate that as it's heating (temp. probe is in the HLT output valve)
  • I flip the 3-way L valve above the water pump (water's on the right in my setup) to send strike water into the MT (via the HEX in the HLT), then flip it back to continue recirculating water in the HLT (helps avoid stratification in the HLT). Recirculation of water continues throughout the mash.
  • I then circulate the MT water through the Wort pump and HEX until I reach my strike temperature again (usually lose a few degrees in the initial transfer).
  • Mash in, wait a few minutes to settle and then start up the Wort pump again and recirculate throughout the mash (again via Wort pump and HEX).
  • When Mash ends, I flip the 3-way above the wort pump to push wort into the BK and also flip the 3-way above the water pump to push water into the MT (via the HEX which has a nice side effect of cleaning out the HEX and not wasting any wort). I regulate the flow of wort into the BK and sparge water into the MT with regular ball-valves on the inputs to each kettle.
  • Once sparge is complete, I proceed with the boil.
  • When boil is almost complete, I open the BK output and recirculate via the Wort pump and a 3-way valve now positioned to loop through my chiller and another 3-way positioned to go back to the BK. This is to sanitize the chiller. I lose a good 5 degrees or so here, so bring back to a boil for the last 5-10 minutes of the boil cycle.
  • When I finish the boil, I can leave the valves as is and recirculate through the chiller back to the BK if I want to bring the temp down to 180 or so to do a hopstand, or I can simply turn the chiller water on and change the second 3-way valve direction so it goes out to my fermenter rather than the BK.
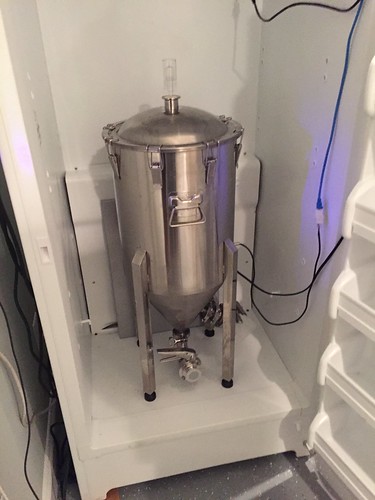
  • I do a chill one pass through and get down to around 80 degrees. Seal up the fermenter in the stand-up freezer and set BrewPi to pitching temp and usually leave overnight to get there. Pitch the next day and good to go.
 
Back
Top