Welding Questions (Technical)

Homebrew Talk - Beer, Wine, Mead, & Cider Brewing Discussion Forum

Help Support Homebrew Talk - Beer, Wine, Mead, & Cider Brewing Discussion Forum:

This site may earn a commission from merchant affiliate links, including eBay, Amazon, and others.

bkloos

Well-Known Member
Joined
Nov 14, 2009
Messages
152
Reaction score
1
Location
Reading, MA
Hey guys,

I'm about to start welding up my brew pots, and would like to know what you use for settings during the weld. This will be my first attempt at welding in couplers....

I have a Miller Maxstar 150 with 3/32", 1/16" and .040" electrodes and 1/16th 308 rod.

I'm wondering what amperage you use for this application?

The pot is a 16 gauge, 20 gallon mega pot.

Thanks Guys,

Bryan

I would suggest that before you jump in with both feet that you don't little practice.

I use 180 Square Wave with 0.040 or 1/16 tungsten with 1/16 filler and set at 48 amps but with a foot control to vary. Thats on a keg and ss coupler. Ark to coupler first and than down and add filler. Watch it for it can blow a hole in the keg.

But again I would find some scrap the same thickness and run a few beads before jumping off the deep end.

Might add to back flow the weld with argon.


Swagman:cool:
 
They are both in PDF form but I can't upload them on here. This forum only allows a PDF under 19.5 kb. PM me your email and I can email them for you.
 
Thanks Swagman,

I just went out and purchased the pieces to split my argon line so I can back-gas, so I am set there...

I will run a couple practice beads on some scrap before attempting the kettle. I don't want to end up with swiss cheese!

I was wondering about the actual weld process. You suggest I arc on the coupler, ramp up the heat to form a puddle, and then walk the puddle up to to the joint and begin filling? This is what I imagined doing, as the coupler is much thicker than the kettle.

How much of the circumference do you weld in one run. I was thinking about doing each coupler in 90 degrees (1/4 circle). This way I am always on top of the weld and not encountering any strange wrist angles.

I have a finger controll so I don't like to keep the work and my torch at easy angles so I can still control the amps and keep steady.... I need a foot switch!

Thanks,

Bryan
Bryan

Couplers like to move from the heat so I do the four point on the clock 12, 6, 3, 9 and than hook them them up. After the 12 I straight the coupler a little.

Good luck

Dominus Vobiscum

Swagman:cool:
 
Thanks Swagman,

I just went out and purchased the pieces to split my argon line so I can back-gas, so I am set there...Please do the test welds. A regulator is only going to put out the set amount of gas. Gas and air flow like water, they will take the path of least resistance. (I remember your coments in another thread)

I will run a couple practice beads on some scrap before attempting the kettle. I don't want to end up with swiss cheese!Again, the test will be about gas coverage.

I was wondering about the actual weld process. You suggest I arc on the coupler, ramp up the heat to form a puddle, and then walk the puddle up to to the joint and begin filling? This is what I imagined doing, as the coupler is much thicker than the kettle.I too recomend this. I would get the puddle on the keg/pot and the focus the heat on the coupler. The puddle will flow up to the area you need it. You can move the heat if you need too.

How much of the circumference do you weld in one run. I was thinking about doing each coupler in 90 degrees (1/4 circle). This way I am always on top of the weld and not encountering any strange wrist angles. Your the weldor. Run the bead as far as you are comfortable with. Even if it is just a couple of dips with the filler wire. Remember the coupler will get hot, so it wont be much of a hand rest.

I have a finger controll so I don't like to keep the work and my torch at easy angles so I can still control the amps and keep steady.... I need a foot switch!

Thanks,

Bryan


I can't say for sure what amp setting I run. The controll of a TIG machine is the beauty of it. I would guess to set your maxstar at 70 amps. I run the maxstar 200 at work every day all day. Nice machines, they just lack the AC mode. I like 1/16" tungsten. I have welded down to .010" with it. I like it better then .040" tungsten, even down that thin. I also like a more thin filler wire. I like .020 or .025 for filler. I like to be able to watch the puddle fill up as I add it. This aslo helps out quite a bit with heat of the puddle. It wont suck as much life out of it making it easier to controll. I hope this helps and good luck.


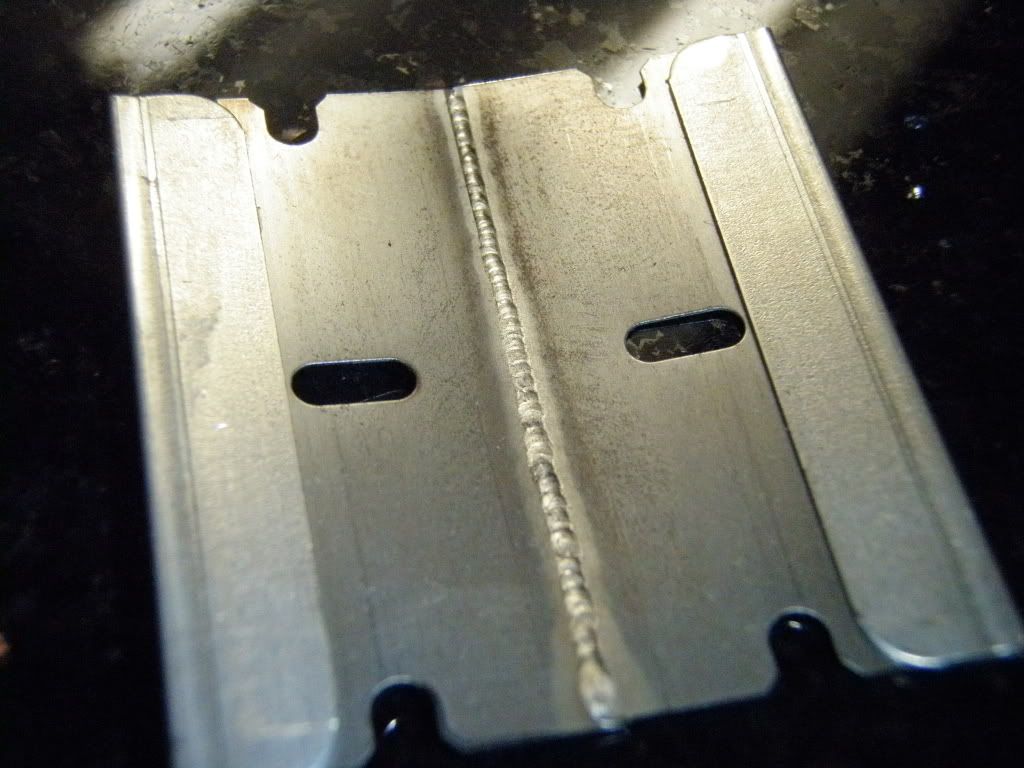
Just for kicks, here is a shot or razor blades. They are .010" thick at the main section, but as you see I welded the cutting edges together. This is with 1/16" tungsten. Enjoy.
P1010140.jpg
 
Thanks again guys for all the advice!!!

I will run a bunch of practice beads today (may even give the razor blades a shot!!!) and report back later.

I hear you about the gas lines... I noticed the flow diference from my back-gas line compared to the torch line b/c of the increased resistance of the long tubing. I plan on cutting it shorter in an attempt to roughly equalize the flow rates to the front and back. From there it will be a test of getting the total pressure up enough to run a clean weld... Time will tell.

Lastly, a question I've never asked. How do you guys like to clean and prep the surface before and after the welds? Solvents/degreaser, grind, etc etc?

I've gotta say this has been one strange trip for me. First time welding ever was my stand, and now I'm about to jump into stainless. My fiancee thinks I'm crazy when I throw on the helmet. I've learned a lot and look forward to giving back down the road!

Thanks.

Bryan

When it comes to the razor blades, start the arc on the table and move into the blades. The High freq is enough to blow away the metal. Have fun.

Before I weld I like to use scotch brite to get the surface shinny. I then like to use acetone to wipe the surfaces off. Try to use something that wont leave behind a lot of lint.

After the weld I use a SS wire brush that has not been used for anything but SS. Don't use a mild steel wire brush. I like to wire brush it while it is still hot. If more of a polish is wanted/needed after that. I use what ever the polish requires. 99% of the time it is just some more scotch brite.

SS is nice cause it doesn't require as heavy of a purge as other metals. Set the pre start on your machien at about 1-1.5 sec. This will flow gas for that amount of time when you step on the pedal before the machine starts the arc. Your gonna want at least a 5 sec post flow setting on the gas too. I run more time then that. But that's just me.

I'm sure a lot of people will say I go too far with prep and what not. But what I do requires the weldor to be very disciplined.
 
Hey GreenMonti,

Would you take a pic of your torch and tungsten. How do you grind your tungsten and what do you use? I've heard all sorts of which way is best. Just wanted to get it from someone that does it for a living. I've been told to use 3/32" tungsten and I found it to be too large for what I'm doing on the kegs. I will take yours and Swagman's advice and go 1/16"
 
Hey Guys,

I just ran a few beads on an old kettle lid... First time with SS, and it was a bit different than mild, though this is probably obvious to all those more experienced than myself. The puddle seems to act a bit different. I blew a nice hole through the sheet at 70A. Guess I'll turn things down a bit

Anyway, The top of the beads looks nice, but the back was clearly sugared (no back-gas applied). Tomorrow I'll try the same with back-gas and tweak the flows...

If that works, I'll try welding in a coupler and post the pics (should make for some good laughs).

On the topic, what is the best way to drill the holes? I've got unibits and bi-metal hole saws. My concern, looking at the specs the OD of the coupler is 1.06". My #9 unibit does 7/8" and 1-1/8" with a few random steps in between... The hole saws only do 1" and 1-1/8". I don't have a metal lathe, nor do I want to purchase one. Will the random intermediate steps on the unibit get me close enough?
 
I would suggest that before you jump in with both feet that you don't little practice.

I use 180 Square Wave with 0.040 or 1/16 tungsten with 1/16 filler and set at 48 amps but with a foot control to vary. Thats on a keg and ss coupler. Ark to coupler first and than down and add filler. Watch it for it can blow a hole in the keg.

But again I would find some scrap the same thickness and run a few beads before jumping off the deep end.

Might add to back flow the weld with argon.


Swagman:cool:

Hey Swagman; a "180 Square Wave" were thinking Miller 180 Synchrowave SD unit instead? I just moved or got one sold for a friend of mine as he found out it only had 16 VDC output at 120 amps at only a 60% duty cycle as he was pushing it to 100% duty cycle with the maximum amperage output. He still got in trouble on this time limited production bid job. I did later find him an older but mint condition as new a fully loaded Synchrowave 250 for $1,500 with wet torch bottle, regulator w/ Victor flow meter and cooler. He bid on a large production job looking for a big money score but got screwed with not having the HP he needed to weld thick stainless parts for the Coast Guard so he came over to use my 350 Synchro. A win win as I got paid in cash plus my 280 cu/ft bottle refilled free.
There is good and bad with a foot control, for me i'm a foot person and hate torch control. To replace the HD foot control for the 350 would be a big money item vs me adding a torch control. Good thing when I purchased the 350 I ordered the HD foot control under my Miller Tech friends advice. Sit still a while as Miller has a few secrets up their sleeve to be released i've been told by my Miller Service Tech friend. Yes I can screw up i've made many of bad welds plus many of times dipping the tungsten into the puddle or touching with the filler rod.
 
Hey Swagman; i've never heard of a "180 Square Wave" before, maybe you were thinking a Miller 180 Synchrowave SD unit you have instead? I just moved or got one sold for a friend of mine as he found out it only had 16 VDC output at 120 amps on a 60% duty cycle. He got in trouble on a job. I later found him a older mint condition fully loaded Synchrowave 250 for $1,500 with wet torch bottle, regulator w/ Victor flow meter. He bid on a large production job and got screwed with not having enough HP to weld thick marine stainless parts, he came over and used my 350 Synchrowave. A win win as I got paid plus a refilled 280 cu/ft bottle.

Miller revolutionized TIG welding by inventing AC squarewave technology and introducing the Syncrowave® Series. Professionals made it the industry standard more than 25 years ago. They still use it as a benchmark today.

The most basic elements are DC or AC/DC welding output (DC for ferrous metals, AC for non-ferrous), amperage range and duty cycle. Professionals welding aluminum will want to purchase a machine using squarewave or advanced squarewave technology. Other important features to consider include ease of use, pulsing capabilities (especially to minimize warping on stainless), sequence control (often used to prevent crater cracking) and type of arc start. High frequency (HF) start-only or continuous HF are common; most Miller machines also feature Lift-Arc™ to provide positive arc starts without HF

Plus I didn't want to try and spell syncrowave


Swagman:cool:
 
Hey GreenMonti,

Would you take a pic of your torch and tungsten. How do you grind your tungsten and what do you use? I've heard all sorts of which way is best. Just wanted to get it from someone that does it for a living. I've been told to use 3/32" tungsten and I found it to be too large for what I'm doing on the kegs. I will take yours and Swagman's advice and go 1/16"


For kegs and what not, 1/16" tungsten is plenty. 3/32" would work but a bit large. I have a CK torch that uses 2 series parts. I run a large gas lense and a #12 cup.

In this break down I use the larger lense. #15 in the diagram. You can see the difference in size from the stock one.
http://www.weldcraft.com/pdfs/cs310ReplacementParts.pdf

As for grinding the tungsten, at work we use a tungesten grinder. One made by Piranha. At the house I just use a bench grinder. I use a White wheel for sharpening and I just eyball it. Yea, your gonna get 12 different answers when you ask 10 different weldors what the best tip geometry is. The more steep the grind the better the penetration. I like a steep grind. I run a 50* point. Sharpen the tungsten so the grinding marks run with the tungsten. I hope that makes sense. Hold it up and down to the wheel not sideways.

Anymore questions I will be glade to answer.
 
Hey Guys,

I just ran a few beads on an old kettle lid... First time with SS, and it was a bit different than mild, though this is probably obvious to all those more experienced than myself. The puddle seems to act a bit different. I blew a nice hole through the sheet at 70A. Guess I'll turn things down a bit

Anyway, The top of the beads looks nice, but the back was clearly sugared (no back-gas applied). Tomorrow I'll try the same with back-gas and tweak the flows...

If that works, I'll try welding in a coupler and post the pics (should make for some good laughs).

On the topic, what is the best way to drill the holes? I've got unibits and bi-metal hole saws. My concern, looking at the specs the OD of the coupler is 1.06". My #9 unibit does 7/8" and 1-1/8" with a few random steps in between... The hole saws only do 1" and 1-1/8". I don't have a metal lathe, nor do I want to purchase one. Will the random intermediate steps on the unibit get me close enough?


Is there no heat controll on your torch? I know it is a rail but, you should be able to controll the heat. Also in your test, your not heating up a coupler. Things will be different when you get to welding a coupler.

I like to use a uni bit. With a coupler diemension of 1.06" and a uni bit drilling a 1 1/8" hole you will only have a 3/32" gap all around. Probly not the nicest fit but, do your tacks with a bit of wire and you'll be fine. I may not be thinking in the eyes of a new weldor but you should not have any problems.

I would get some smaller wire. 1/16" filler is huge IMO. Smaller filler and some test runs, so you get use to how fast it melts when it gets close to the puddle.

You could drill the hole one notch smaller with the uni bit and then slowly make the hole bigger using a dremel and a sanding drum. Run the dremel counter clock wise in the hole. This will help you keep the hole round as you make it bigger.
 
For kegs and what not, 1/16" tungsten is plenty. 3/32" would work but a bit large. I have a CK torch that uses 2 series parts. I run a large gas lense and a #12 cup.

In this break down I use the larger lense. #15 in the diagram. You can see the difference in size from the stock one.
http://www.weldcraft.com/pdfs/cs310ReplacementParts.pdf

As for grinding the tungsten, at work we use a tungesten grinder. One made by Piranha. At the house I just use a bench grinder. I use a White wheel for sharpening and I just eyball it. Yea, your gonna get 12 different answers when you ask 10 different weldors what the best tip geometry is. The more steep the grind the better the penetration. I like a steep grind. I run a 50* point. Sharpen the tungsten so the grinding marks run with the tungsten. I hope that makes sense. Hold it up and down to the wheel not sideways.

Anymore questions I will be glade to answer.

This is what the guy said. Run with the tungsten. 3/32 just spread the heat, it looked to me, for what I was doing. I'm going to 1/16 tungsten and 1/16 filler. I could tell even though I was turning the temp down it was creating too much heat to the inside of the kegs. When you get the darker color inside you can tell it is just too hot. I don't have a temp control on my torch. It is an old Miller 300 amp that is from the late 70's. The thing is huge, but works. Thanks for your help. I learned enough here to do the job. Welding is like everything, you never learn by watching. Thanks
 
This is what the guy said. Run with the tungsten. 3/32 just spread the heat, it looked to me, for what I was doing. I'm going to 1/16 tungsten and 1/16 filler. I could tell even though I was turning the temp down it was creating too much heat to the inside of the kegs. When you get the darker color inside you can tell it is just too hot. I don't have a temp control on my torch. It is an old Miller 300 amp that is from the late 70's. The thing is huge, but works. Thanks for your help. I learned enough here to do the job. Welding is like everything, you never learn by watching. Thanks


Sounds like my machine. Mine was made in 78. I have the Dialarc unit. What is yours?

I like smaller filler. The biggest I would run on this is .035 filler.
 
Miller revolutionized TIG welding by inventing AC squarewave technology and introducing the Syncrowave® Series. Professionals made it the industry standard more than 25 years ago. They still use it as a benchmark today.

The most basic elements are DC or AC/DC welding output (DC for ferrous metals, AC for non-ferrous), amperage range and duty cycle. Professionals welding aluminum will want to purchase a machine using squarewave or advanced squarewave technology. Other important features to consider include ease of use, pulsing capabilities (especially to minimize warping on stainless), sequence control (often used to prevent crater cracking) and type of arc start. High frequency (HF) start-only or continuous HF are common; most Miller machines also feature Lift-Arc™ to provide positive arc starts without HF

Plus I didn't want to try and spell syncrowave


Swagman:cool:

Sorry Swagman; I was just correcting you on the name of your Miller 180 SD welder not to start a pissing war. I believe I may know a thing ot two about a Synchrowave from purchasing a brand new fully loaded 1992 350 Synchrowave that I still own and use.
 
Ya know, I don't know what the model the machine is. My father had it when I was a kid. I used a 316 - 3/32" filler. I used what I had in the shop. Never had welded stainless. Tiging is not bad, but you need help figuring configurations. Makes me curious, I will look and see what model I have. I know an improved torch is at hand if I do much with the TIG. Thanks
 
Miller revolutionized TIG welding by inventing AC squarewave technology and introducing the Syncrowave® Series. Professionals made it the industry standard more than 25 years ago. They still use it as a benchmark today.

The most basic elements are DC or AC/DC welding output (DC for ferrous metals, AC for non-ferrous), amperage range and duty cycle. Professionals welding aluminum will want to purchase a machine using squarewave or advanced squarewave technology. Other important features to consider include ease of use, pulsing capabilities (especially to minimize warping on stainless), sequence control (often used to prevent crater cracking) and type of arc start. High frequency (HF) start-only or continuous HF are common; most Miller machines also feature Lift-Arc™ to provide positive arc starts without HF

Plus I didn't want to try and spell syncrowave


Swagman:cool:

Sorry Swagman; I was just correcting you on the name and model of your Miller 180 SD welder not to start a pissing war. I believe I may know a thing or two about a Synchrowave and it's features from the purchase of a brand new fully loaded 1992 model 350 Synchrowave that I still own and use. The best welder for me after going thru many different brands over the years plus it was almost a freebie when purchased. I was out of pocket by $430 after the torch, bottles and Speedglas 9000X hood.
 
Sorry Swagman; I was just correcting you on the name and model of your Miller 180 SD welder not to start a pissing war. I believe I may know a thing or two about a Synchrowave and it's features from the purchase of a brand new fully loaded 1992 model 350 Synchrowave that I still own and use. The best welder for me after going thru many different brands over the years plus it was almost a freebie when purchased. I was out of pocket by $430 after the torch, bottles and Speedglas 9000X hood.


Will Pardon me sorry I was not Political correct (don't care If Iam) in the Name. Around these parts when a person said 180 Squarewave you knew that it was miller ac/dc, square wave, power supply Period. Mine cost a little more but it was from an all in with Quads.


Swagman:cool:
 
All is great advice. As a welder my advice to you is take your time and dont rush it, in between passes take a break and let the keg especially cool down SS retains heat well and that is where you are going to get into trouble with blowing holes in the keg.

Take your time bro and it will come out great!!!
 
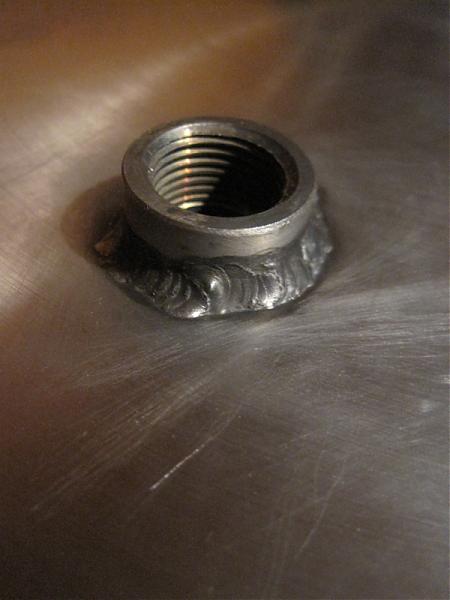
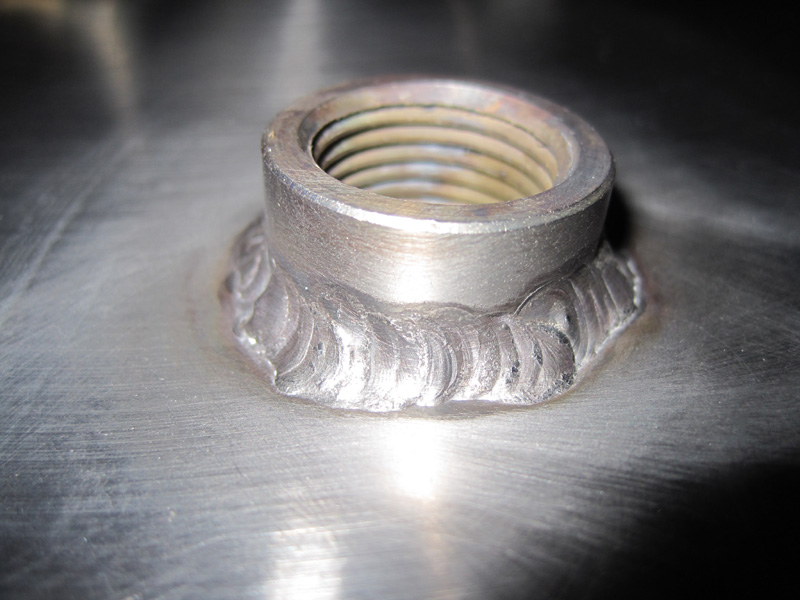
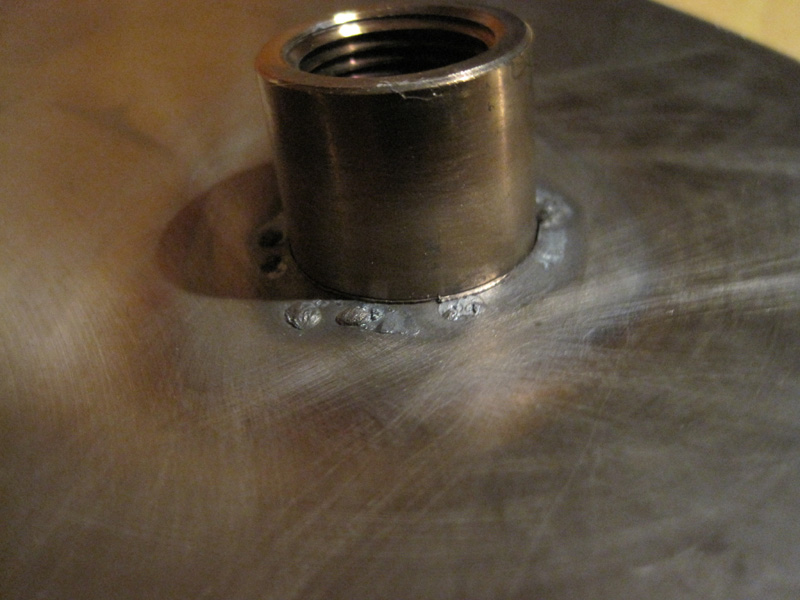
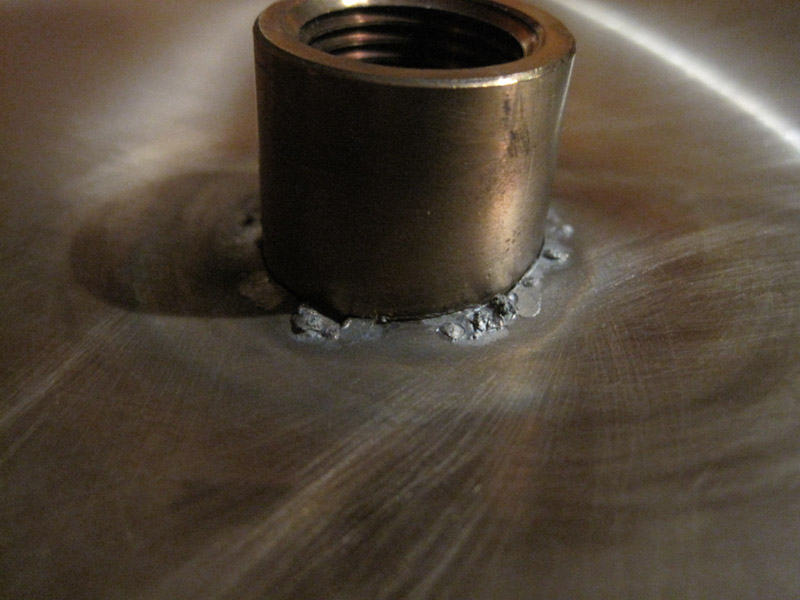
Well, here they are... My first attempt at SS Tig. I didn't back-gas as I just wanted to get the feel for the process before adding more complexity. I will try another tomorrow with back-gas and report back.

I had the Maxstar set to about 75A and didn't need the full power in these welds. Doesn't seem like I had great penetration as judged by the rear photos, buy I can say it is solid, sound and water tight. Not bad for the first try. I was very worried about blowing through the sheet, but keeping the heat on the coupler seemed to do the trick.

1/16" electrode and filler...

Now, so that I can learn, what do you guys think and how should I improve the welds? All advice is greatly appreciated.

Thanks,

Bryan

Picture 001.jpg


Picture 008.jpg


Picture 009.jpg


Picture 012.jpg


Picture 013.jpg
 
Will Pardon me sorry I was not Political correct (don't care If Iam) in the Name. Around these parts when a person said 180 Squarewave you knew that it was miller ac/dc, square wave, power supply Period. Mine cost a little more but it was from an all in with Quads.


Swagman:cool:

I would of offered ya a bier if you're closer Swag, keep on welding my friend.
Cheers.
 
Well, here they are... My first attempt at SS Tig. I didn't back-gas as I just wanted to get the feel for the process before adding more complexity. I will try another tomorrow with back-gas and report back.

I had the Maxstar set to about 75A and didn't need the full power in these welds. Doesn't seem like I had great penetration as judged by the rear photos, buy I can say it is solid, sound and water tight. Not bad for the first try. I was very worried about blowing through the sheet, but keeping the heat on the coupler seemed to do the trick.

1/16" electrode and filler...

Now, so that I can learn, what do you guys think and how should I improve the welds? All advice is greatly appreciated.

Thanks,

Bryan


I wasn't far off on the power.:D

The speed of the weld looks good. The placement of the heat looks good. All I can really see that is wrong is you didn't back gas and it looks pretty dirty. You didn't clean the parts enough, your gas coverage isn't enough, or you have a small leak in your gas line mod.

What size cup are you running?

Are you using a gas lense?

Did you clean it before you started? How?

Did you Oops and dip the tungsten in the puddle or filler? If so, did you stop and re-do the tungsten?

Are you carefull about keeping the tip of the filler rod in the gas zone?

What gas are you using? Straight Argon, 75/25, A SS mix?
 
I wasn't far off on the power.

The speed of the weld looks good. The placement of the heat looks good. All I can really see that is wrong is you didn't back gas and it looks pretty dirty. You didn't clean the parts enough, your gas coverage isn't enough, or you have a small leak in your gas line mod. I think I was a little light on the shielding gas.... What's the best way to determine the optimal flow without a flow meter?

What size cup are you running? I believe it's a #5.

Are you using a gas lense? Yes.

Did you clean it before you started? How? Yes, I cleaned it with acetone.

Did you Oops and dip the tungsten in the puddle or filler? If so, did you stop and re-do the tungsten? When don't I oops....

Are you carefull about keeping the tip of the filler rod in the gas zone? Actually, I had the rod away from the gas zone... It was so hot the rod was beginning to melt so I kept it away from the heat... Let me guess, this is not a good idea...

What gas are you using? Straight Argon, 75/25, A SS mix? Straight Argon.

Again, I am new to welding and have never had any formal training. I'm psyched there are some real experts here to help.

Thanks,

Bryan
 
Again, I am new to welding and have never had any formal training. I'm psyched there are some real experts here to help.

Thanks,

Bryan

Your gas lense, it must be one about the diameter of a dime? Not the cup the actual lense.


What is the reg set at? The guage is a CFH setting. Even though it isn't a flow meter it is. The 10...represents Cubic Feet per Hour. I like about 25 CFH. Make sure there are no drafts around while your welding.

You cleaned it with acetone. But did you do anything to get the oxides off first?

When you do Oops you need to get that crap off the tip. If you don't you welds will never be clean and the arc will be unsteady.

Straight Argon is good to go.

Yes, letting the filler wire leave the gas pocket is bad. Reason being is that the tip is hot and when it leaves the gas it then turns all crapy. The next time you dip the rod you put all the crap right in the weld. Play around with keeping the filler rod pretty close to the arc. You will see there is different temp zones within the area. You have a small area to play with, with a standard gas lense. This is why I use the large ones I linked to in a previous post. You have reflected heat that you need to avoid. This is the same thing you feel while welding with the hand that supplies the filler. When things get hot and you move your hand just a bit, things get much more cool. You got out of the reflected heat zone. A good rule of thumb is, that the reflection will be at the same angle you are putting the heat in at. I hope that makes sense.
 
I wasn't using a lens... :(

I had just a collet body on the front of the torch with a #5 nozzle.

I have a large diameter gas lens (about the size of a dime, maybe a bit smaller) that will fit the 1/16". I guess I should give this lens a try?

I just took a look, and I was at about 10CFH. I will bump this up for the next round.

I didn't do any other prep other than rubbing with a clean rag and then acetone. What should I use before the acetone to remove the oxides?

So, for the next round I will get more shielding gas at the weld, keep the filler in the gas to avoid bringing oxidation into the weld, and prep better...

Thanks again guys,

Bryan

In post #25 you said you were using a lense.:confused:

The lense will give you better gas coverage. I like the larger lenses that are about the diameter of a quater.

Yes do bump up the gas flow.

As I mentioned before I like to use scotch brite so the metal is shiney.

Yes that is a good overall process.
 
I had the lens set-up for my 3/32", and went over to the collet body when I switched over to 1/16". My bad for confusion! I just swapped over the to the larger lens.

Ahh yes, the scotch brite. I asked at HD yesterday and they had no clue...
Looking online, I see they have a stainless cleaner. Is this a scrubber or a cleanser, and where can I get some?

Would Bar Keepers Friend work here, as I have a tub lying around...

Bryan


Scotch brite can be had at the grocery store. The green scrubbies will work just fine. I get mine from the automotive paint supply. I use the maroon and the white. No need to go get some if you have the green on hand.
 
If you want the appearance to look a little better just go over the weld with the torch (washing out) no filler metal needs to be added. When you are doing just manipulate the torch in circles from the top to the bottom of the toe in the weld.

Looks great though, just keep practicing and you will get better. Take your time!
 
Not bad.... I've tried a couple more practice runs with welding in full and half couplers...
The bigges problem I've had is getting the gas flow right for the back-gas.

I'm thinking about sourcing another tank/regulator to do it right. The T is working, but the pressures are totally different and the flow rate changes when my TIG starts to flow the gas from the torch... Not a good set-up as it stands. Just need to come up with some cash... UGH!

This weekend I played with they layouts of the kettles, deciding on where I want the couplers. I have a good layout and will sleep on it for a couple days before I start putting the holes in the kettles.

I'm super busy the next few days but will post some pics of the progress by the weekend.

Thanks!!!

Bryan
 
No offense intended, but did you tack @ 3,6,9,and 12? If you do this, your couplings will end up a lot more square.:rockin::rockin:
 
Will Pardon me sorry I was not Political correct (don't care If Iam) in the Name. Around these parts when a person said 180 Squarewave you knew that it was miller ac/dc, square wave, power supply Period. Mine cost a little more but it was from an all in with Quads.


Swagman:cool:

Well my Miller service tech friends got a laugh with your reply being they also like my homebrews. They told me only Lincoln calls their welder a Square Wave vs Miller as a Synchrowave. Granted the pattern on the scope is square with both machines, you sound like a Lincoln owner. No "Pardon around these parts". The OP asked for "(technical)" advice at the start of this posting hence why I added the technical correction of a Lincoln Square Wave welder vs a Miller Synchrowave.
 
No offense intended, but did you tack @ 3,6,9,and 12? If you do this, your couplings will end up a lot more square.

Not on my first attempt. I was amazed at how much the coupling moved with the heat. On my subsequent tests/practice runs, I have tacked accordingly and the couplings are square. Just need to figure out a better way to back-gas.
 
Why not buy another flow meter and tee into the tank. Would be a lot cheaper and accomplish the same thing.

This is an option, but I would like to find a cheap/free tank bigger than my current 40CF. I can source a cheap flow meter/reg of ebay for about $30, from my first searches. In an ideal world, I pick up a bigger tank and get another meter, which would allow me less frequent trips to the welding supply :mad:

With the way I tend to opperate, I will be doing a lot of upgrades in the future. A new tank/reg combo would still be a LOT less than having a pro do all the welds.

This is one of my mantras, buy the tools and learn the skill for less than having it done by someone else. At the end of the day, it may take longer, but I learn a new skill and own the tools :D

I wonder if SWMBO will approve of this philosophy when I try to replace the front door this spring ;)

Bryan
 
I hate paying anyone to do a job I can learn too. I didn't buy an extra flow meter. I just used an oxygen Y on my tank. I haven't had any trouble with it. I ran the cheap clear hose from the hardware and put a small piece of icemaker copper on the end where I purge. I used the foil tape method for purging like Swagman. Worked fine for me. I just ran a little more gas to compensate for the Y.
 
I just used an oxygen Y on my tank.

I assume the "Y" goes after the reg/flow? Where did you source yours?

My DIY rig just doesn't give me the flow control I need.... I get too much flow to the back, and then when the tig fires up there is not enough flow to the torch... Imbalance, so it seems...
 
Back
Top