Fermentation Chamber w/ Refrigeration

Homebrew Talk - Beer, Wine, Mead, & Cider Brewing Discussion Forum

Help Support Homebrew Talk - Beer, Wine, Mead, & Cider Brewing Discussion Forum:

This site may earn a commission from merchant affiliate links, including eBay, Amazon, and others.
Looking great, Thomcat. You're quite the skilled carpenter/cabinet maker. Is that another hobby of yours?

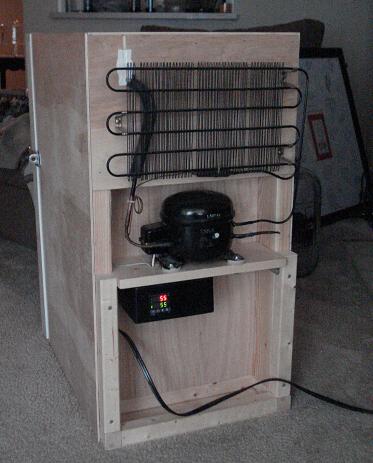
BTW, your controller set up looks slightly familiar to me. :D Why did you choose to mount it to the back, though? Won't that make it inconvenient for observing and adjusting temperature.

Also, since this is strictly a fermentation cabinet and you mentioned earlier you don't always brew that often, are you planning on installing a master power switch for when it's not in use?

Oops, i just asked a bunch of questions. sorry for that.
 
MrFebtober... thanks! I do enjoy woodworking, but it's a little bit harder here in the apartment. I'd love to have a table saw (it would save a lot of time and headaches.) As far as mounting the controller on the back, I wanted to leave the top flat so I could stack stuff on top of it, and it was just a bit easier I have to admit. I hadn't thought about a master on/off switch, but that's a good idea. When I get around to building the Sanyo (or other) based keggerator, I'll probably do something very similar to what you did (nice job by the way).

Okay on with the update.... 08/15/07

It's fully functional and structurally complete. The caulking is done, the door is hung, and the last bit of hole-plugging is done.

The door (closed):

10254-Door1.JPG


The door again (open showing a bit of foam for a good seal):

10254-Door2.JPG


And finally, here's a pic at temperature. With the unit at ambient temperature (74F), I turned it on, and it reached the 55F setpoint in 26 minutes. Not bad!

10254-AtTemp.JPG


I set the hysteresis at 2F so it continued to cool down to 53F and stopped. It took 24 minutes to warm back up to 57F when the compressor switched back on. Even then, it only took 8 minutes to get back to 53F. So it'll probably cycle ~8 minutes, twice an hour or so. Not too bad?!

So... this project was a blast to build. I have to say it wasn't the most economical project, but then mine never are. Projects like this are usually more for the fun of building for me. Plus, this one helps make good beer:D

I'll figure up the material costs at some point, but thanks for all the comments and suggestions guys! Good luck if you decide to build one. I'd love to see some pics.

Cheers,
Andy
 
That is one SEXXXY unit!!! I have a little fridge out in my garage. When I defrost it I can fit one keg in it, sort of. I have to jam that pig in there. This bums me out. Never thought of tearing a minifridge apart to get the guts inside for a fermentation chamber before. I could brew in the garage in the summer!!! (I think for that to be an option though I might want to use 4" of foam, haha!)What I'm really interested in is how did you get that fridge apart. What to be careful of. What NOT to do. What to do.
 
Nice work! I just gutted my mini fridge and I am going to use it either as a fermentation cooler or turn it into a one corny kegerator :D Of course, mine isnt going to look half as good as yours. Good read!
 
thomcat333,
The original freezer compartment looks like an ideal place to mount a muffin fan. This would undoubtedly up your cooling efficiency. It probably would help with any condensation problems as well.
 
08/25/07

Ok... well since you mentioned it, and because I found a suitable AC powered fan at radioshack the other day, I installed one. I added a switch beside the controller so that in the "ON" position, it comes on whenever the compressor is on. In the "OFF" position it doesn't come on at all. I also added a digital thermometer with the display outside the cabinet. I swear I'm going to stop messing with this and start brewing again soon... I think a buddy of mine and I are going to start and Oktoberfest around Labor Day. Cheers!

The Fan:
10254-Fan.JPG


The Switch:
10254-FanSwitch.JPG


- Andy
 
Yes, finally. I've got an Oktoberfest chugging along inside (my first lager). Just in case anybody didn't believe all of the other posts, it really is advantageous to do a starter with lagers. I didn't do one, and it didn't start working for ~4 days. But, all is well now. Cheers!
 
just for interest Thomcat, you should find that once it gets down to temp with a full carboy inside it will cycle much less than it did empty. The full carboy has alot of thermal mass to keep things cool longer. I found this out by running an empty fridge, it kept cycling and I thot it was a bad thermostat until the repair guy asked me how much food was in it? That quick phone call saved me the cost of a service call and I learned something at same time.
BTW...wicked project, well done
 
I'm really impressed with your home handyman efforts. But I'm too lazy. I'll just use two refrigerators with temperature controllers - one to ferment, one to keg. Looks easier and probably cheaper.
 
Bellybuster said:
just for interest Thomcat, you should find that once it gets down to temp with a full carboy inside it will cycle much less than it did empty. The full carboy has alot of thermal mass to keep things cool longer. I found this out by running an empty fridge, it kept cycling and I thot it was a bad thermostat until the repair guy asked me how much food was in it? That quick phone call saved me the cost of a service call and I learned something at same time.
BTW...wicked project, well done

I just McGyverd a make shift insulated box out of 2" foam sheets on my balcony and I also realized you really have to trust the thermal inertia of the liquid. I use a 200W heater (subzero temperatures are common up here during the winter, so my problem is to keep the FV temperature high enough) and even if the air temperature in the box fluctuates between say 13C and 20C (55F to 68F) every other hour or so the temperature on the surface of (and inside) the fermenter is rock steady.

H
 
I'm not sure if you mentioned it, but where did you get the PID and theromcouple? Looks great. I believe that I am going to try and emulate this project.
 
what kind of cost on the PID? I could use more info on how to use one of those.

Would it work to run a couple of free dorm-fridge guts to a nice furniture grade customized cabinet for making a long thin bar out of? I was thinking having all the cornies in a row, sort of a long unit I could put along a wall with taps on top somewhere, maybe a bookcase over it all...
 
I picked up a little (like 2.5 cf) freezer off Craig's list a few weeks ago. I plan to build something like this out of it. I just have not decided if I'm going to build it in the barn (would need to buy a pump) or in the basement fermenting room.
Mine will hold two 15.5 gal fermenters. :rockin:
 
First of all...amazing job! :mug: It's got my brain stirring...

does anyone know if it's possible to use this same concept, but build a much larger box that could hold say, 8 or more carboys? This seems like it could open up a lot of possibilities for much more customizable kegerators as well (you wouldn't be confined to the dimensions of a chest freezer)
 
How much of an area do you think this would cool. I have an old dorm fridge lying around and was wondering if I could do something big enough to fit a 14.5 gallon conical
 
I'm in the middle of building a chamber modeled off the concept Thomcat here has come up with, but mine will be capable of holding two 6.5 gal carboys with airlocks or up to 8 cornies. I'm starting with the same style of dorm fridge, but am keeping the footprint to a minimum by locating the fridge on top of the chamber as soon in the pathetic ascii sketch. Anyway, Thomcat's chamber is my primary inspiration, but as soon as I get it done I'll post build pics. Just ordered the controller today.

_______ ______
|.........|+++++|
|cold<-.| fridge|
|....|....|_____ |
|....V..............|
|....................| <-- room for 8 cornies or 2 large fermentors
|...Chamber......|
|....................|
|____________ |

Oh, and I'm not stripping the plumbing out of the fridge, but instead just removing the door and strapping it to the chamber, probably using cam-action window locks.
 
Cool. I'd forgot about this thread. I have the perfect beat-up mini fridge waiting for a project like this. Depending on cooling capacity and insulation, I could build a combination fermenting fridge and bottle storage (wine cabinet) type box.
 
I have a Johnson Controls A419 Temperature Unit. It can be programmed to either heat or cool. You also have the option to control it's temperature cycle range from 1 degree to 8 degrees. I will set mine to have a range of
+or- 2 degrees. It is also nice cause I can set it to cut off the fridge/cooler in case the A419 unit shorts out. This way the fridge/cooler will not continue to run, possibly freezing your beer or causing the yeast to go dormant. I can also put the probe for the temp unit in a steel tube that comes down from the air stop. So I am controlling the temperature of the beer and not just the fridge. This will allow me to be more accurate since the fermentation process creates heat in itself. Something else to think about. I was going to use my dads old fridge to ferment. With the fridge and the unit it's a plug and play deal. Fermentation control is one of the most important factors in beer brewing. Often overlooked. Great work everyone.
 
Bumpity bump for a fantastic idea.

I had the outstanding fortune to stumble upon this thread, and then a couple of days later, stumble on a free mini fridge at a random garage sale. My beer often has an... odd flavour, which could be down to the fact that my fermentation temps are all over the place, since they just sit around in the garage, and are at the mercy of ambient temps.

Just finished gutting the fridge - took about two hours, being careful - and powering the guts back up, it still chills nicely. Hooray! Ordered up one of the ubiquotous ebay aquarium controllers for $30 shipped, so as soon as that arrives, I'll get to building my version of this, along with some form of heating unit to keep the temp stable even in winter.

Prost this for sure!
 
I built a 2 chamber box with the guts of a mini-fridge for cooling. Works great. I did opt for an old style mini-fridge with the evaporator coils on the back. Makes for a much simpler build compared to the new ones; those are a mess to take apart.
 
Well, guess who found a sanyo fridge at the apartment "stuff exchange" (by the dumpster where people leave things too cool to put in the dumpster when they move out).

It will only hold a 3 gallon carboy in it's current life - I'll try it on a 3 gallon corny / CO2 tank next week when I staycation, and then look into stacking it in some configuration like Mr. Febtober suggested.

As a newbie who has made four unsatisfactory batches, I've come to the conclusion that fermentation temperature control is my first hurdle to overcome, followed by the boil all / boil some paradox.
 
I found that using pre-existing furniture, guts from the fridge, and some foam gets you a fermentaion chamber that is cost effective and large enought for carboys...

IMG_2327.JPG


IMG_2325.jpg
 
...just picked up a mini-fridge for $20, won't hold a carboy as it is, but it'll become a lovely new fermentation chamber in the coming weeks! Thanks for posting this!
 
Can anyone detail how they got the guts of the mini fridge out? I'm not very handy, but want to attempt this and I'm not sure what tools I will need to do this. Thanks in advance.
 
Can anyone detail how they got the guts of the mini fridge out? I'm not very handy, but want to attempt this and I'm not sure what tools I will need to do this. Thanks in advance.
I used a dremel for precision. Cut the back open enough that you can slide the little "ice tray" thru. Bing-bang-boom.
 
08/25/07

Ok... well since you mentioned it, and because I found a suitable AC powered fan at radioshack the other day, I installed one. I added a switch beside the controller so that in the "ON" position, it comes on whenever the compressor is on. In the "OFF" position it doesn't come on at all. I also added a digital thermometer with the display outside the cabinet. I swear I'm going to stop messing with this and start brewing again soon... I think a buddy of mine and I are going to start and Oktoberfest around Labor Day. Cheers!

The Fan:
10254-Fan.JPG


The Switch:
10254-FanSwitch.JPG


- Andy

TOMCAT... When you wired the fan how did you tie it to the temp control? Thanks
 
Thanks! It definitely served me well... I've since moved on to using a small/medium sized chest freezer for fermentation. More room but more difficult to load.
 
Sorry, I have to ask before I screw up a lot of work I've put into this already.

Thomkat, or anyone who has done this please chime in. I've used this basic concept for my own chamber (kudos to you for posting this), but i'm at the wiring stage and a little confused. Forgive, I don't have much wiring experience.

I see you took the fridge thermostat off so all that is remaining are the white and grey wires running from the compressor.

Looks as if the white wire is connected with the actual power cord and the grey wire runs into the new thermostat.

Then you have an additional wire that connects the power cord to the thermostat. I'm assuming this powers the thermostat, please correct me if thats the wrong assumption.

Then there is some sort of relay between the power cord and the thermostat....what is this?

Any diagram or answers to the above would be helpful.

Thanks all,
e.
 
Back
Top