Finally...Wooden Single Tier Underway

Homebrew Talk - Beer, Wine, Mead, & Cider Brewing Discussion Forum

Help Support Homebrew Talk - Beer, Wine, Mead, & Cider Brewing Discussion Forum:

This site may earn a commission from merchant affiliate links, including eBay, Amazon, and others.
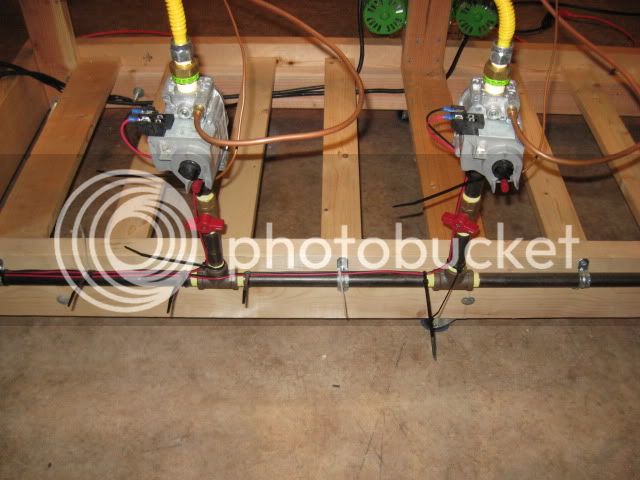
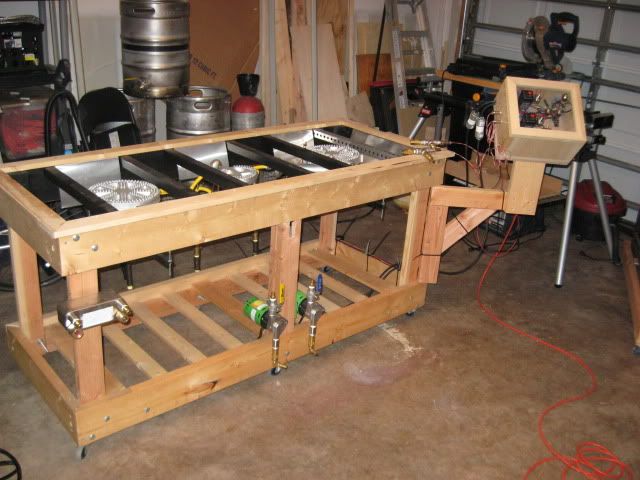
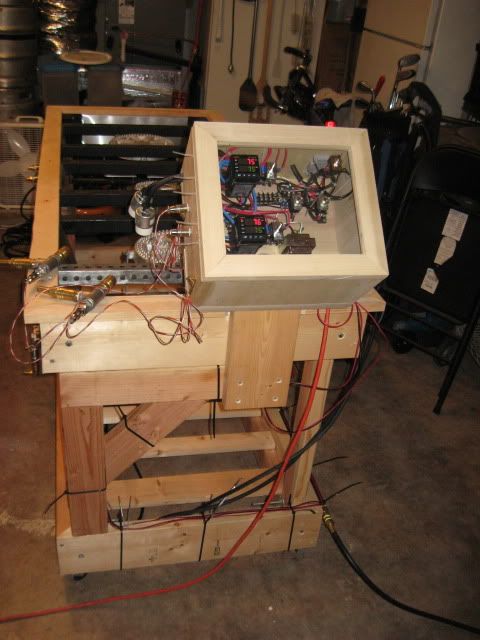
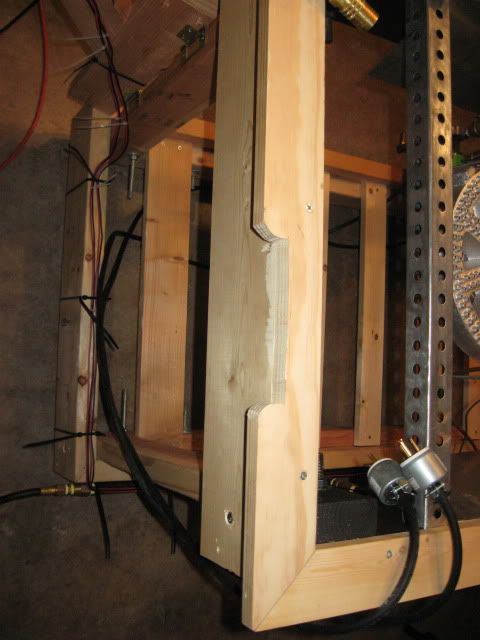
Alllllriiiiight! I finally got the gas manifold all put together and the chiller mounted. I forgot to take pics of the chiller so I'll have to add it later.

So, I ended up using yellow teflon tape on all of my gas connections and haven't had any leaks. I went ahead and ran all three burners as low pressure which meant I only had to buy one regulator for the whole deal. As far as propane is concerned, all I have left is to mount the pilot lights and the thermocouples.

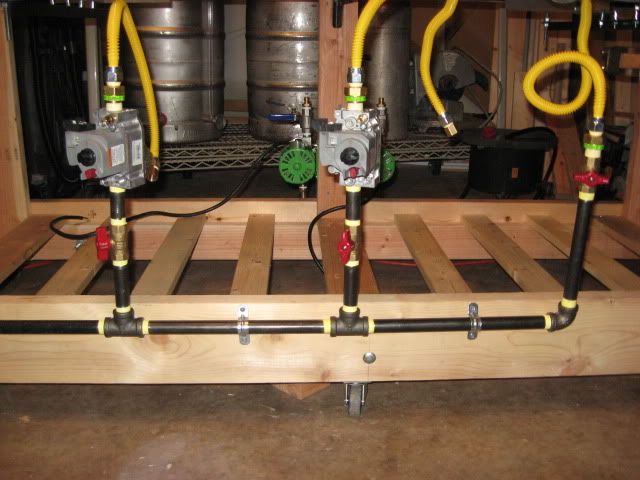
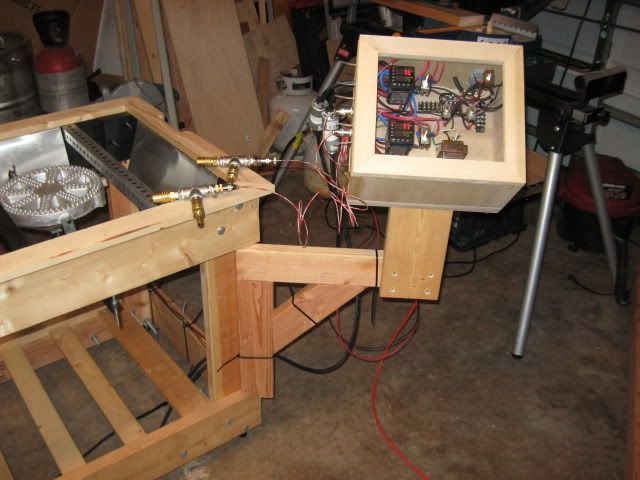
Here's the manifold with the valves:

IMG_1795.jpg


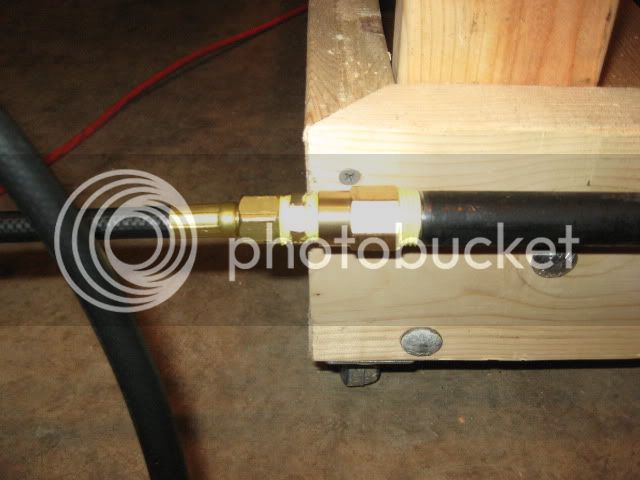
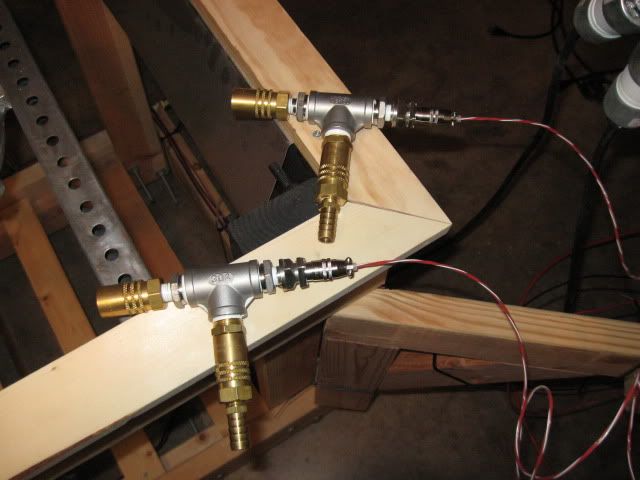
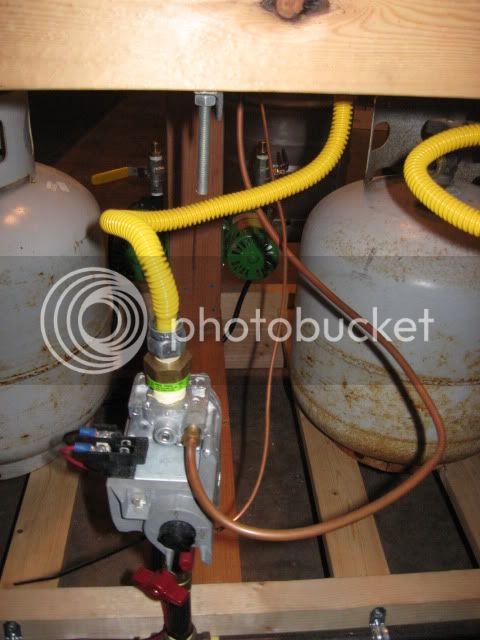
Where the manifold attaches to the hose that's attached to the tank. I had to use a 1/2" FIP to 3/8" FIP connected to a 3/8" MIP nipple to fit the hose.

IMG_1798.jpg


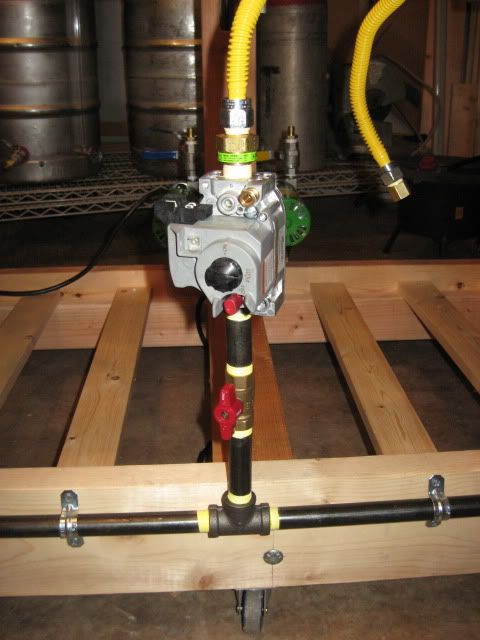
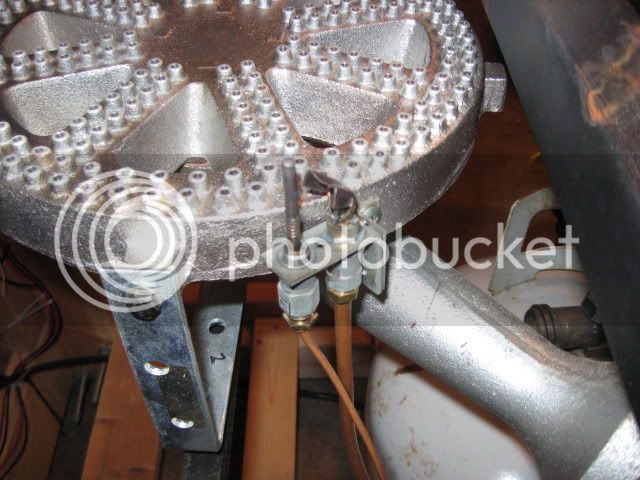
One of the valves. You can see that the pipe goes into the gas rated ball valve and then into another 2" pipe and then threads directly into the valve. On the output of the valve you can see the connector that came with the hose. It's a 1/2" MIP to 3/8" Flare fitting with a built in safety valve.

IMG_1796.jpg


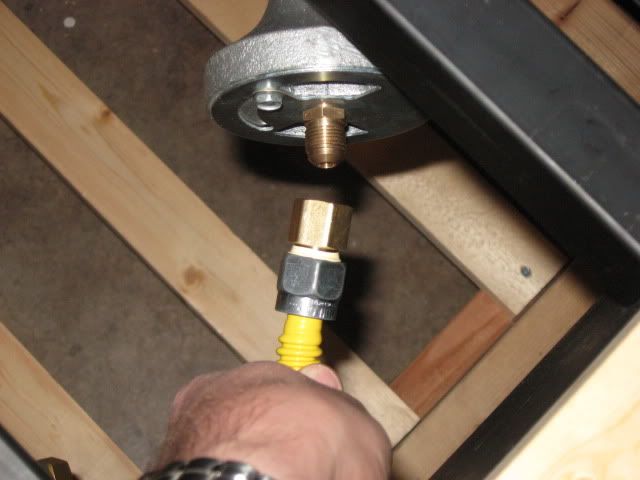
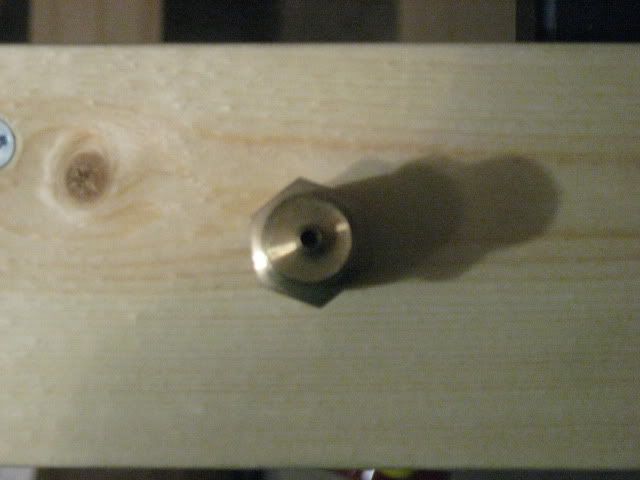
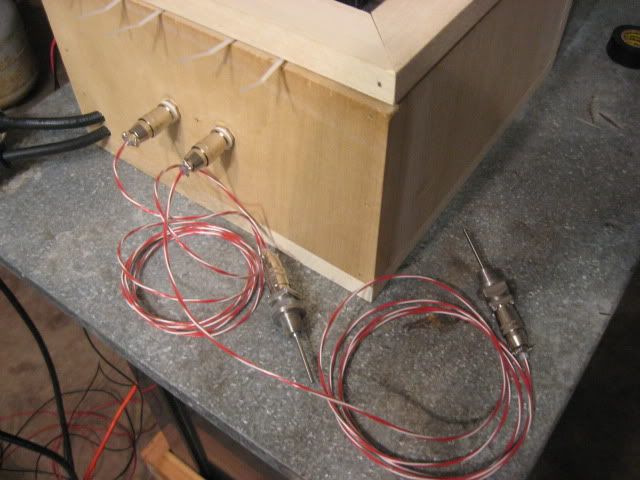
This is the connector to the burner. I've seen quite a few people in other threads with questions on how to connect these to the burner. The fitting here is a 3/8" Flare to 1/4" FIP.

IMG_1801.jpg


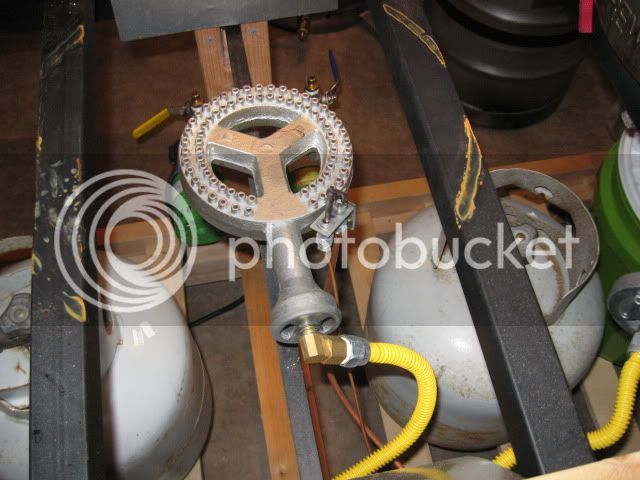
I drilled the orifices for all three burners. On one of the bigger banjos, a 3/32" bit did the trick. On the other, I ended up going to a size 40 wire gauge bit to get a flame that was more blue than yellow. That one was a real B*. It would give me an ok flame but would pulse for some reason where the other orifice worked fine after drilling it once to 3/32".

IMG_1805.jpg
 
I just skimmed the thread, but I didn't see anyone mention charing or burning of the wood. Unless you put some shielding on the sides near the burners, you will eventually burn the wood.

I'm jealous of your stand though. I have a 3 tier wood stand now, but I want to build a single tier soon. I'm also thinking of going electric, so I may have to copy your design.
 
I painted the inside of the upper level with black high temp paint. I know this won't do much to keep the wood from charring but I've been on other threads for guys who built wood single tiers like this and they said they haven't had issues with it. Either way, I sandwiched some aluminum flashing between the 2x6 and that top layer of trim and then bent it down over the wood.
 
Could you give a little more detail on your weldless thermometers and ball valves? How did you install them? What parts did you use? Do they work well? How did you choose location? Etc.? I'm getting ready to finish my keggle and would really appreciate the insight!
 
I got the wedless fitting with the ball valves in kit form from BargainFittings.com and my weldless sightglasses with thermometers I got from BrewHardware.com . They're prices are great, the shipping was quick and saved me the hassle of having to piece them together. Normally, I'll do something the hard way if it will save me a couple bucks but this really was worth it.
 
I got the wedless fitting with the ball valves in kit form from BargainFittings.com and my weldless sightglasses with thermometers I got from BrewHardware.com . They're prices are great, the shipping was quick and saved me the hassle of having to piece them together. Normally, I'll do something the hard way if it will save me a couple bucks but this really was worth it.

Awesome! Thanks, man.
 
The control box has been underway for a little while now...actually, a couple of them. I've made more than one with different wood and this is the first one that I like. Go figure it would be made out of the most costly wood. The box is made from a nice piece of solid poplar. I chose it because it's closer in color to the pine used for the stand but it generally milled a lot straighter than even the more high quality pine at Lowes and, it's a bit cheaper than oak.

The top is the same poplar that I cut into strips, mitered and dado cut to inset the plexi-glass for mounting my switches and temp controllers. The bottom panel is on my work bench and will have the other electrical components attached to it.

Two Controllers, Off-Auto-On switches for the controllers, pump power switches and main power switch.

IMG_1817.jpg


IMG_1819.jpg
 
Definitely. I plan on having everything in one bundle coming up to the lid and then branching off. Careful use of zip ties and properly cut wire lengths should do the trick....in theory.
 
Nice project. How long have you been working on it?

I like your control box in particular. Looking forward to seeing the finished product and learning how it works.
 
I ordered to parts over the course of a six month deployment and have been putting it together since mid-December. Take into account that I've had to go back to work and now have a 6 week old infant. All I have left is this control box and a test run and I'll be ready to brew.
 
I've been spending this week wiring up the control box and now I've hit a wall. I've got 120Vac going everywhere it needs to go, even up to the transformer. The transformer is a standard doorbell chime transformer from Lowe's with posts for 8V 10A, 16V 10A and combining the two making it 24V 20A. No matter which way I wire it up, my multimeter is reading .2Vac on the other side of the transformer. My multimeter only has settings for 600V and 200V on the AC side but being digital, it should read down to 24Vac with no problem.

Here are some pics of my wiring.

Main Power
IMG_1828-1.jpg


Pump Power
IMG_1825-1.jpg


Internal wiring:

IMG_1824-1.jpg


Close up of Transformer wiring:

IMG_1821.jpg


PID and Switch wiring (took this at an angel because of the glare off of the plexi-glass):

IMG_1823.jpg
 
So I returned the transformer and got a new one...still no voltage on the out side. What am I doing wrong here? When I hooked up the new one, it got hot but not too hot and I still had no voltage.
 
This door chime xformer ...these multiple output voltages it can produce would make me highly suspect.
I would set your multimeter to VAC and measure the 2 output lugs with everything disconnected.
If you are not getting 24 vac, then the output of the xformer needs to be modified, jumpered, or better yet, just get a no frills 120vac to 24 vac xformer from radio crap, pexsupply, or amazon.
If you are getting 24vac then you have a short in your barrier strip or somewhere downstream.
good luck.
 
Alright, it turns out...I'm not crazy. I bought the Radio Shack transformer and it burned up and I can't figure out why so, I bought another transformer from Ace Hardware. It was the same door chime transformer as the others and I was skeptical. I got home, hooked it up and it hummed away AND is reading 24-28V on the secondary side. It is wired up the same exact way as the other three were. I felt like I was taking crazy pills. How bad can your luck be to by three bad transformers from two different stores?? I was about to lose it!

EDIT: Well, I may have mis-spoke. I'm reading 24V right off of the transformer but when I wire the 8V and the 16V pole together on the 24V terminal strip, it reads zero. Why is it reading zero when I combine them? on the same strip?
 
From the picture of your barrier strip, I notice you have some jumpered and some are isolated. Looks like you are shorting out your ac and causing some kind of out of phase loop.
Without burning out another xformer, I would trace continuity through each barrier strip contact to see what and how everything is connected.
I would get non jumpered barrier strips and just do the jumpers myself with some wire.
 
Another tip:
Where is your 24 vac neutral?
From your picture it seems that the 8vac and 16vac get combined to make 24 vac but I 'm curious to see if you need to tap off the middle lug off your xformer
How are you measuring 24vac?
 
I finally got the electrical issue figured out thanks to the guys who chimed in the this thread I started. It was a terribly simple fix that I just couldn't see for some reason. Here is the final result of the fix:

IMG_1838-1.jpg


The PID's and Switches:

IMG_1840-1.jpg


All that's left is to mount the control box to my stand on a swing arm and stain everything. I've gotten so impatient that I'll probably brew before I get that part done!

Here are the valves all wired up:

IMG_1836.jpg


GFCI and DC connectors to valves:

IMG_1834.jpg


RTD Temp Sensor connectors:

IMG_1832.jpg
 
Mounted the control box tonight. I wanted it to be able to fold out of the way so I put it on hinges and oriented the control box so that it would take up no more than the actual footprint of the brewstand.

IMG_1841.jpg


IMG_1842.jpg


The Temperature probes:

IMG_1843.jpg


Control box lit up:

IMG_1844.jpg


With the control box stowed away:

IMG_1846.jpg


Had to cut out the top a little to have it fit flush:

IMG_1848.jpg
 
I was able to get my hands on some aluminum lids yesterday at a really sweet restaurant supply store. When I got them home I mounted a stainless T fitting on one with a quick disconnect on one side, a hose barb on the other going to a fly sparger and the down side going through the lid with a plug all Lonnie Mac style. The other lid just has a 90* elbow fitting with a quick disconnect on the outside and a flex tube on the inside for mash recirculation...also, Lonnie Mac style. Now all I have to do to transition from mash to sparge is move the lids over to the next kettle.
 
First batch brewed today on the new stand! My brew days are going to be so much easier.

After some small pump priming issues, things went really smooth. I also sparged more than I wanted to so I boiled a little longer to get down to the volume I needed. I ended up with a gravity of 1.050 on an American Pale Ale which was a little bit lower than I was aiming for but in the end, I'll still have beer.
 
You need to put some blue LED lighting or maybe a cold cathode tube or two in that control box. Rice it out! hah

BTW, I say blue because it'll contrast with the red from the PID's.

All in all, I think it looks awesome. Though I am curious as to how that wood if going to hold up to the heat. I can foresee some definite scorching there.
 
The charring is something I was thinking about throughout the whole process. Based on others who have done single-tier wood stands, I spaced things out accordingly. I also used aluminum flashing on the inside perimeter to reflect some of the heat. Although, during this brew I was feeling for it and the wood never really got that warm. The low pressure of the propane probably helps some as well.

To finish things up, I'm going to clean up the wiring more, put on a couple coats of stain and then finish with some sort of water-proofing laquer or an epoxy...non-flammable of course.
 
Sorry about not getting back sooner about the pilot lights. I've had another project going on in my garage and the brewstand has been pushed into the corner...I know, "no one puts baby in a corner.". However, I only had one power outlet in my garage and had nowhere to plug in my kegerator, refrigerator, lagerator, power tools etc. Now, I have four extra outlets on two 20A breakers...gfci of course.

I'll try to get a couple pics tomorrow to post for you.
 
I drilled and tapped the burners to mount the pilot lights. I would have mounted them towards the interior of the burner but the copper leads to the thermocouples I bought were just a little too short. After the first brew, the placement of these was just fine.

Here they are:

IMG_1849.jpg


IMG_1852.jpg


and the connection to the valve:

IMG_1854.jpg
 
Congrats on the new Brewer. . . rugrats are a lot of fun and when thay get a little older make good gofers :)
 
Brandon,

It's been awhile! Your stand looks great!! Really dig the wood:) I am a 1/3 done with primary (bad WX and poor scheduling) but if things go my way should be back in JAX by the end of the year!! Keep up the good work and, let's see some more pics!!

Nick
 
Cool man! You'll be here right at about the same time I leave on another deployment. Supposed to be 7th Fleet this time so life will be quite a bit better and thanks for the compliments! You'll have to get involved with the local brewclub here. You'll have time while at 30...trust me.
 
I finally got the electrical issue figured out thanks to the guys who chimed in the this thread I started. It was a terribly simple fix that I just couldn't see for some reason. Here is the final result of the fix:

IMG_1838-1.jpg


The PID's and Switches:

IMG_1840-1.jpg


All that's left is to mount the control box to my stand on a swing arm and stain everything. I've gotten so impatient that I'll probably brew before I get that part done!

Here are the valves all wired up:

IMG_1836.jpg


GFCI and DC connectors to valves:

IMG_1834.jpg


RTD Temp Sensor connectors:

IMG_1832.jpg

Collinsbrew, do you have a part list for all the components in your enclosure? You system does everything I want mine to do (same Auber PIDs and same Honeywell Valves) and I would like to recreate it. I think that I can, but the thing that is stopping me is acquiring the parts. Do you have parts list with the specs of everything in there? Even down to the gauge of the wire and names of the strips everything plugs into and the screw connectors used to attach the wire to the strip. I just don't know the first thing to search for to find those things.
 
Post #255 on this thread has almost the exact same parts I used. The difference...someone gave me a bunch of spare components he had laying around. The terminal strips come with the screws in them already and I used 16 gauge wire for all of the internals of the box with the exception of the pump wiring and the connection to the GFCI.

EDIT: For the RTD sensors I used some left over microphone cable I had laying around. It's three conductor shielded wire and the voltage passed through for this use is lower than line level signal coming from an audio console.
 
This system makes my day so much easier. Basically, I get to drink more while brewing without screwing up my brew. It's almost a set it and forget it type of deal. Since this system came online I've gotten an American Pale Ale, Leinenkugels Sunset What Clone, a Belgian Tripel and after today, a Honey Brown Ale made with local galberry honey. I love it.
 
Back
Top