Single Tier HERMS build

Homebrew Talk - Beer, Wine, Mead, & Cider Brewing Discussion Forum

Help Support Homebrew Talk - Beer, Wine, Mead, & Cider Brewing Discussion Forum:

This site may earn a commission from merchant affiliate links, including eBay, Amazon, and others.
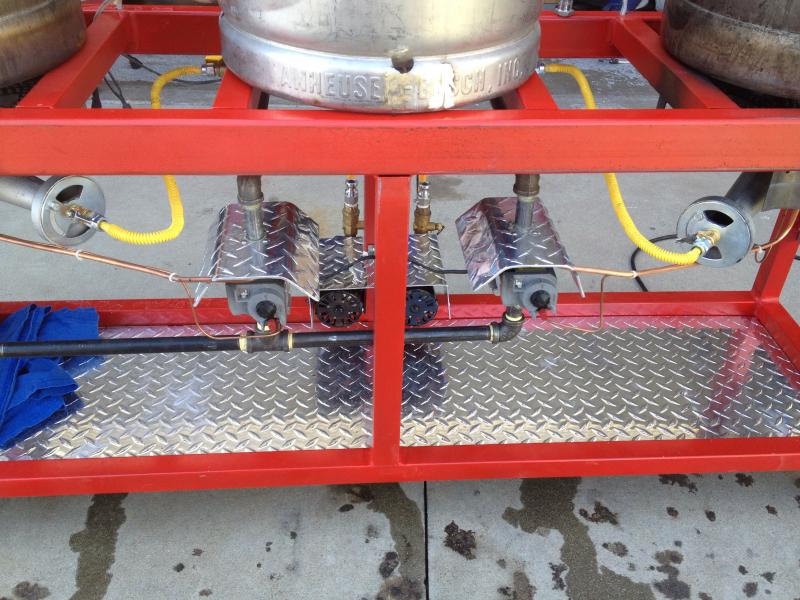
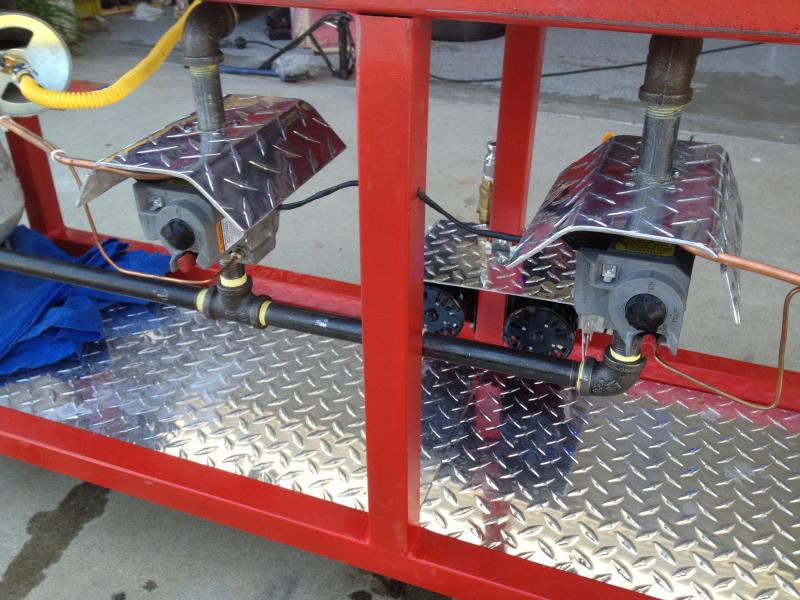
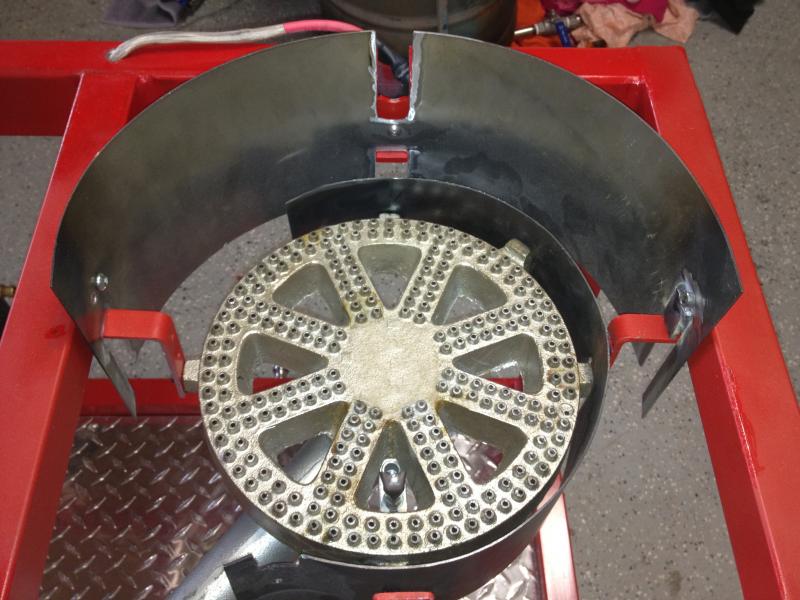
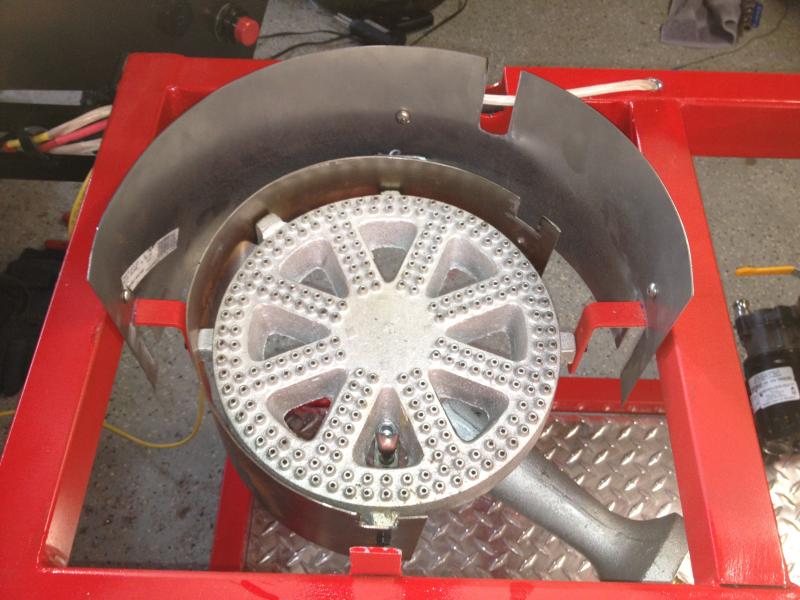
On to the Burner heat shields. I went with two because one did not protect enough. I want the exhaust gases to vent to the rear. This is not completely done but this is what I have so far. Notice the Shields go up above the deck level. thats because they fit tightly to the inside edge of the Keg bottom.. No heat can escape up those sides.. The exhaust heat is directed to the back and up. / next step is to fabricate an exhaust chute on each side.

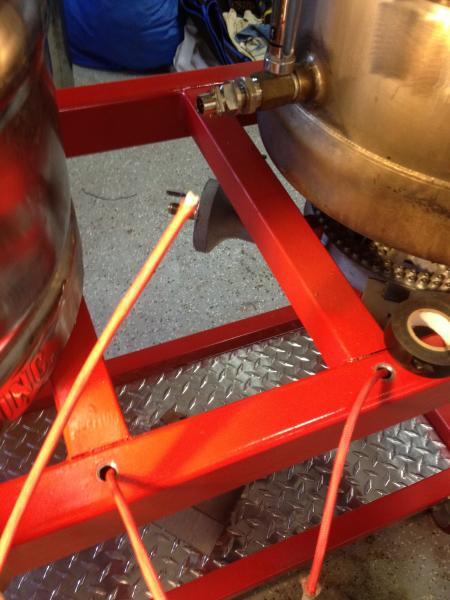
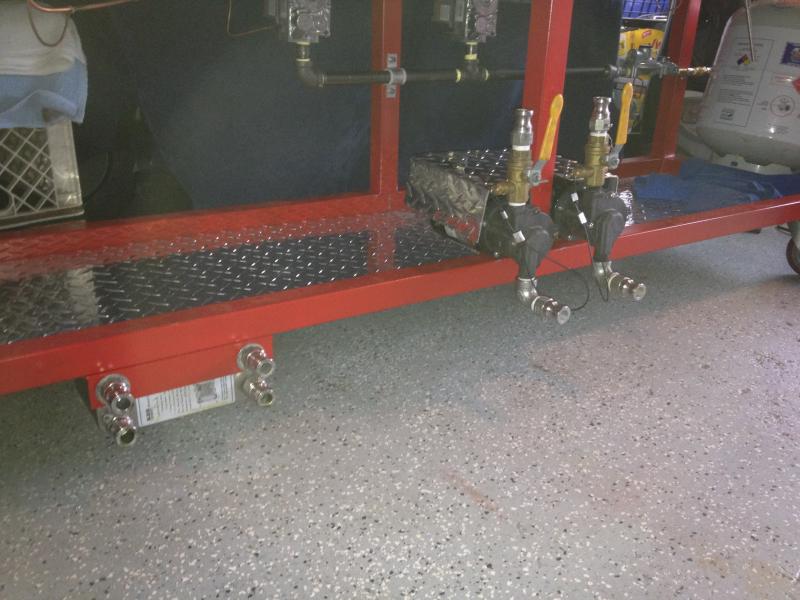
Bottom pic you can see the termination / connector to the RTD probe hanging. all wired inside the frame and color coded heat shrink tube. (Red = BK, Yellow = Mash and Green = HLT)
Iphone Camera 675.jpg


Iphone Camera 674.jpg


Iphone Camera 676.jpg
 
I ran every single wire inside the frame of the Stand. Here's the RTD Thermo connectors comming up through the front frame.. They are made using Kal's method www.theelectricbrewery.com/temperature-probes
As you can see here though I additionally covered them in a third layer. Its a product called Insultherm.. http://www.ebay.com/sch/i.html?_nkw=INSULTHERM+1200+deg.F&_sacat=0&_odkw=INSULTHERM+1200+deg.F+10+feet&_osacat=0&_trksid=p3286.c0.m270.l1313

It can handle up to 1200F. first pic is with the Insultherm on the cable. the second pic is befor I put it on.

Iphone Camera 671.jpg


Iphone Camera 669.jpg
 
drkwoods said:
Notice the Shields go up above the deck level. thats because they fit tightly to the inside edge of the Keg bottom.. No heat can escape up those sides..

CLEVER! Nice work.

Fingers crossed there are no issues with the wires inside the insulation layer getting overheated - but I love the build! Lots of great features being implemented.
 
CLEVER! Nice work.

Fingers crossed there are no issues with the wires inside the insulation layer getting overheated - but I love the build! Lots of great features being implemented.
I put the wires only in the front and front down posts. no where near anything that heats up. (since I have it designed to exhaust the heat to the rear) I tested this first.. I also mounted the heat shrouds with a fibrous fire resistant washer to reduce transfer of heat to the stand.
 
Great job so far.
Seems like you invest a lot of background work too.
 
Very nice build! I'm interested to see what you come up with for venting the gas buildup underneath the kegs. I'm having the same issue with my stand and can't figure out a way around it. My flame is very weak because of this... I was concidering using a plasma cutter to cut slots in the bottom of the keg skirt, but wasn't sure how that would effect the overall heating times...
 
I tested the idea of the two shrouds around the burner. I got great results in the front.. the rail heated up to only 100f . Which was really just warm to the touch not hot.. So Im pretty confident the wiring is gonna be fine.. But the back rail was so hot, it smoked the paint right off. I knew that was gonna happen but I wanted to see how much. So Im adding more heat shield from about 9pm to 12 noon on the clock face..So that only that one corner is left open and I can build my heat (exhaust) guide up an out from there. I also noticed that I may have to add some forced air into these burners.. Just too much yellow flame...I put a computer fan near the opening and forced air in and the flame was beautiful.. So Im gonna work that idea too
 
drkwoods said:
I put the wires only in the front and front down posts. no where near anything that heats up. I tested this first.. I also mounted the heat shrouds with a fibrous fire resistant washer to reduce transfer of heat to the stand.

Cleverer!
 
Subscribed...looking great... I may hit you up for questions when I start my build.
 
finished bending the diamond plate for the Valve protection and pump protection.. I also spend quite a bit of time routing the pilots and thermocouples so it looked clean..

Iphone Camera 777.jpg


Iphone Camera 778.jpg
 
Aw the diamond plate always looks sick but you did a really good job on the details. Looks great!

Did you get your back-rail-overheating prob knocked out? If so how'd you protect it?
 
Thanxx iijakii:mug:
As far as the back rail heat/exhaust prob, I have an idea of what I wanna try but itll be a couple days to weld that up.. i'll def show my idea after I test it and Im happy or not with it..
 
added a Video to YouTube about the first light up of the burners, enjoy
 
Last edited by a moderator:
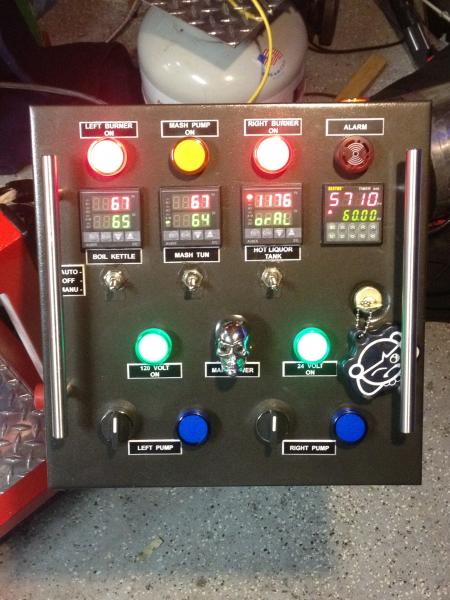
Any chance you have a wiring diagram for your panel? Thanks a lot for including so many links, makes things very easy for those of us planning similar builds.
 
Any chance you have a wiring diagram for your panel? Thanks a lot for including so many links, makes things very easy for those of us planning similar builds.

My wiring diagram is hand drawn.. LOL.. But my nephew says he can sketch it up for me.. So Coming soon
 
I added the plate Chiller to the brew stand and painted it too.. I have a thread that describes how I made the Chiller mount.. https://www.homebrewtalk.com/f51/my-plate-chiller-mount-idea-260003/

The Chiller is from Keg Cowboy http://kegcowboy.com/index.php?dispatch=products.view&product_id=323

Also you'll notice I use Cam Lock QD's on all my hose connections.. The company is right down the street from me http://store.proflowdynamics.com/modules/store/-Couplings-for-Homebrewers-_C12074.cfm
Bargain Fittings also sells them www.bargainfittings.com

Iphone Camera 865.jpg
 
Those are the same orifice's I used. They work great, plus they add another way to regulate the flame. Are you not installing any kind of bleeder valve for your pumps? I found that mine refuses to work without it. I'm using a chugger though.
 
image-1633458333.jpg

I've got what I call "burps"
They're in-line valves that have the cable connected to them to release inline air. I think maybe called a purge valve. I got them at McMaster Carr
 
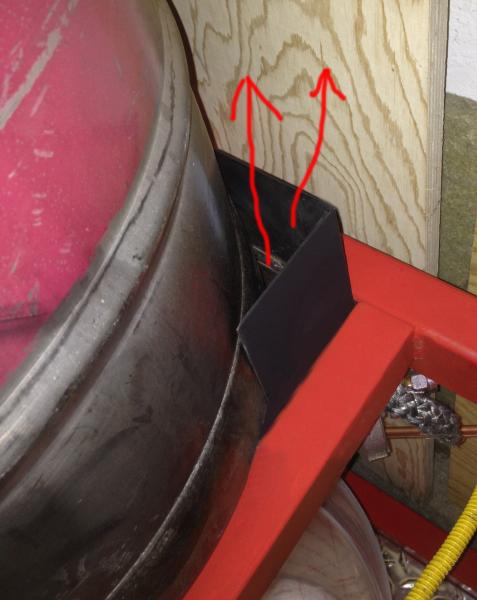
ok So here's my exhaust idea and it seems to work real well.. I drew in some lines to help illustrate how it works. The Burner is completely surrounded by a heat shield. The Heat shield fits up into the skirt of the Keg bottom. There is no escape for the gases and heat except the one back corner. To promote it going up and out I made a Chimney to get a draft going and BINGO it works.. (blue arrows are the fresh air from below and red is the hot exhaust gases.

chimneyidea.jpg


chimneneyidea2.jpg
 
Can you give me some rough dimensions of that heat shield? I was designing mine to sit below my burner, so I was wondering why you decided to go up higher? Wouldn't this allow less air to reach the burner?
 
Is your low pressure regulator at the tank or on the stand somewhere? Any trouble firing both burners at once?
 
Can you give me some rough dimensions of that heat shield? I was designing mine to sit below my burner, so I was wondering why you decided to go up higher? Wouldn't this allow less air to reach the burner?
the heat shields are 13.75" in Diameter and 6" tall. They are mounted 1.5" above the deck so that they fit into the inside skirt of the keg and actually touch the bottom of the keg. I did this for several reasons. 1. the keg is held firmly in place, cannot tip over and makes the whole stand sturdy, all the same time it is stealth and cannot be seen from above. 2. It contains the heat and traps it so that its more efficient with less heat loss. 3. It protects the brew stand from heating up. (My wires are all hidden inside the frame of the stand). 4. It protects the paint job. Ive seen one too many burnt brew stands. 5. it keeps flame from licking up the sides of the Vessels.

The burner gets its air from below it. The heat from the combustion rises and drags air from below the burner up into it.. (Stack effect)

The combustion does need exhaust to encourage laminar flow.. the "Chimney" idea creates greater stack effect because the hot air must rise up and out. thus drawing in more air from below it. (Which is 100% unobstructed)

Ok, so that the science I thought would apply.. Am I 100% right?? IDK..
But my testing has shown it to work very nice
 
Is your low pressure regulator at the tank or on the stand somewhere? Any trouble firing both burners at once?

My Dual stage reg is about 15" before the two Honeywells.. all connected via 1/2" black pipe.

No probs / both burners run identical, simultaneous or independently.
 
1.5" square tubing and the top front/rear rail is 1.5 x 4" tubing...
Is that correct that the RHS is 1.5x4" looks more like 1.5x2"?
Just wondering because I'm looking at building a stand and don't want a beast of a thing the kills me if I ever tried to lift it and seeing that you notched out the top rails I'm reckoning 1" square (or even 3/4") might do fine as long as it is supported in the right places.
Very nice build by the way! :D

Yea your right it's 2" not 4" (post corrected)
I think the 1.5 is fine, it's a good balance between strength and weight. It rolls around fully loaded with ease. With the kettles off I can flip it over by myself, prob weighs around 80-90#

Yea, 1" may work too. 1.5" is pretty strong so I'm sure 1"
Is solid enough too. But I'd try to see if anyone else has done it with 1" and ask what they think so far
 
drkwoods said:
in the back right you can see it.
<img src="https://www.homebrewtalk.com/attachment.php?attachmentid=48082"/>

Thanks, what setup do you have between the tank and gas manifold?
 
Thanks, what setup do you have between the tank and gas manifold?

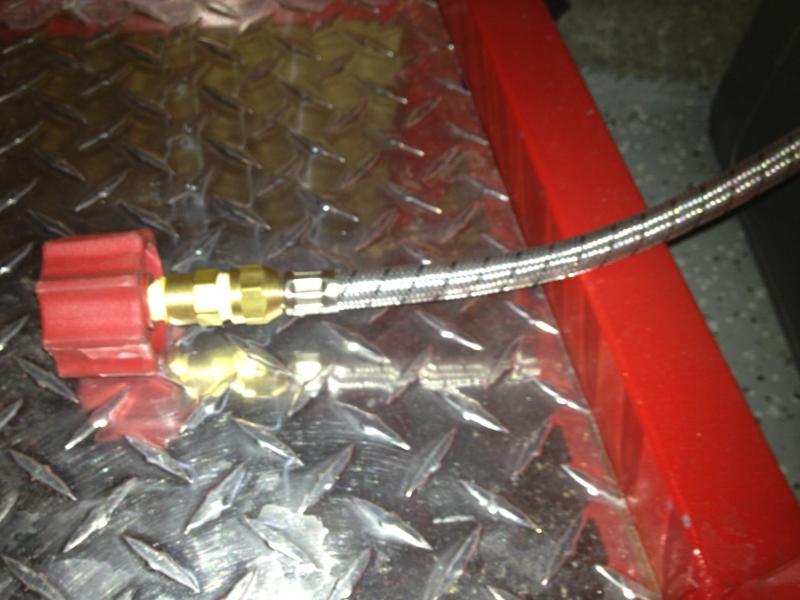
I have a SS braided Propane hose from ebay. http://www.ebay.com/sch/i.html?_nkw=braided+propane+hose+21+inches&_sacat=0&_odkw=braided+propane+hose&_osacat=0&_trksid=p3286.c0.m270.l1313

And the Connector I have is the red one from Ebay too http://www.ebay.com/sch/i.html?_nkw=propane+tank+connector+qcc+high+flow&_sacat=0&_odkw=propane+tank+connector&_osacat=0&_trksid=p3286.c0.m270.l1313

not sure if its ok to use this one, but its been fine so far.. It may send the regulator too much pressure, but isnt that what the reg is for?

BY the Way, After 10 brew days this SS Propane hose began leaking at the coupling. I contacted the Ebay supplier and he immed sent me a new one.. So be careful that the connection crimping is solid and bubble test it first.. I had a close call here..

photo.jpg
 
Back
Top