CodeRage
Death by Magumba!
Guess I kind of asked for that. There is a sub model number, has a couple of dashes in it. Tells yah what kind of features it has, relay outputs, DC outputs, etc etc.it is a model 93.

Guess I kind of asked for that. There is a sub model number, has a couple of dashes in it. Tells yah what kind of features it has, relay outputs, DC outputs, etc etc.it is a model 93.
Guess I kind of asked for that. There is a sub model number, has a couple of dashes in it. Tells yah what kind of features it has, relay outputs, DC outputs, etc etc.
http://www.watlow.com.sg/literature/specsheets/files/controllers/win930503.pdf
the above link will take you to one like it. i don't see anything else on it other than 93.

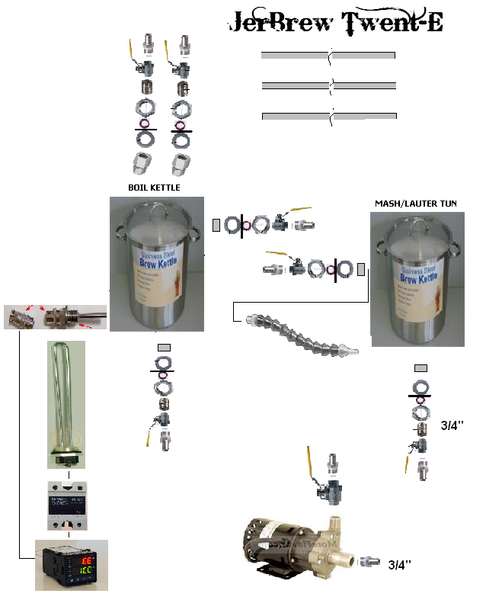


 ) the solution is to take the hose off the pump inlet and drain into a bucket or blow into the hose to restore flow. Basically, you want to run the pump slowly and avoid sticking the sparge
  That is way easier.
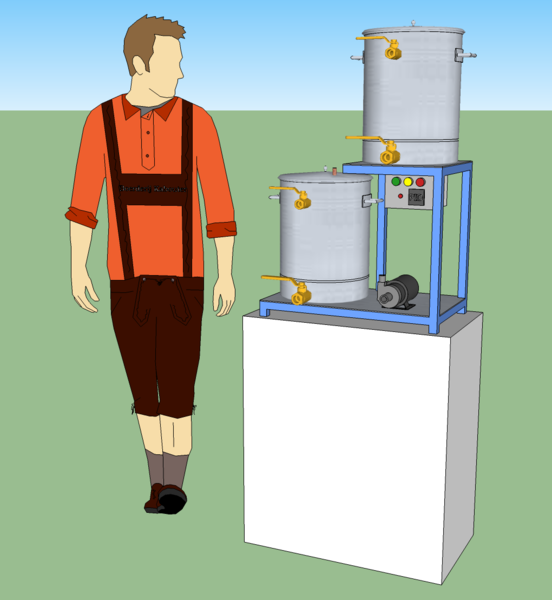
My knee jerk thoughts: Do you have to limit yourself to one 120v element, or can you use 240v? The 8 gal pots strike me as an odd choice for size. With one element, you will not get full 5 gal batches, so the 8 gal pots might be a bit overkill. It will help you on the MLT so you can do bigger beers, but you will be boiling down to about 3.7 or 4 gallons in an 8 gal BK. If you think you may add another element in the future to the BK, the 8 gallon MLT will then limit you to somewhat smaller beers in an 8 gal MLT. I built my system with an 8 gal BK and a 10 gal MLT and am discovering the limits of my system for 5-5.5 gal batches.
I just saw you want to use a 1500w element, this will limit you even more to smaller batches. If you are going to spend close to a grand on this system, I would want it to be able to do bigger batches, but that is just me.
I like!
I have a (perhaps unfounded) fear of pumping from the bottom of the MLT though. What would a stuck or slow runoff do in this configuration? How would you correct? I had the same concern with Lonnie's original design too...
I didn't see what the boil times were for a 5 gallon starting volume from 170º with a 200W element. Can someone post that or direct me to a post where it is mentioned? I am hoping for around 30 minutes or less.
Yeah, I realized I had the 1500W element in there. That should be a 2000W element.
He does need it be be a single element. My house, where he will brew a lot is super old and we would need to run humorously long extension cords to use two circuits.
I was hoping to shoot for 4 gallon finished volume batches. I choose the pots because they have a built in False bottom shelf, and are an excellent deal. Why get a smaller pot when a larger one is the same price? More room is rarely a bad thing in my experience.
It is a bit pricey at around $750 for the system but only slightly more than the original and I think the changes warrant the cost. The stirrer, and the switches are pretty much the only cost difference. Take those out and the rig comes down almost $200, but would not be as convenient to operate, IMO.
Also, these prices are all stock prices, so we may be able to find some deals and lower the cost. I think we all know how that goes.
IMO, a grand is just what it costs to be brewing AG. I know MANY people disagree, but I just hate cobbled together equipment and don't enjoy using it. This is a great design (thanks Jkarp and Lonni) and comes in at a very reasonable price tag. Now, most of my builds are 100% stainless, but for the sake of budgeting, this is aluminum, brass, and copper (with a very few SS pieces). Add my standard SS addiction and the build becomes pretty pricey (about 1200 for the same build).
I didn't see what the boil times were for a 5 gallon starting volume from 170º with a 200W element. Can someone post that or direct me to a post where it is mentioned? I am hoping for around 30 minutes or less.
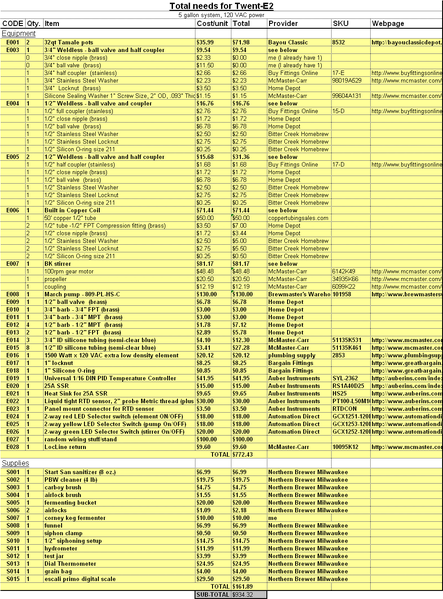
jkarp, i see some black on the outside of your control box. Is that the heatsink? I was thinking about installing a little computer fan and leaving it all inside has anyone done this or is it best to let it hang out of the box?
jkarp, i see some black on the outside of your control box. Is that the heatsink? I was thinking about installing a little computer fan and leaving it all inside has anyone done this or is it best to let it hang out of the box?
It is indeed the heatsink. The SSR very definitely generates heat that must be managed, but a fan should work fine if you want to keep things internal.
I have been testing my PID with a water boil. I live a 5500 ft and water boils a 201 here. I have another thermometer and it reads 201* but the PID reads 244*. I have changed the polarity and it reads 27 at boiling. Is there something I'm missing about this? Is there a calibration? I have the 4" K type from Auber
ok, i was just looking at the picture on page 5, and i saw where your heatsink doesn't have the big piece on the end like mine does. mine has 6 fins and then a big part on the end opposite where you mount the ssr, it looks like a slot to mount it inside of a panel or something.

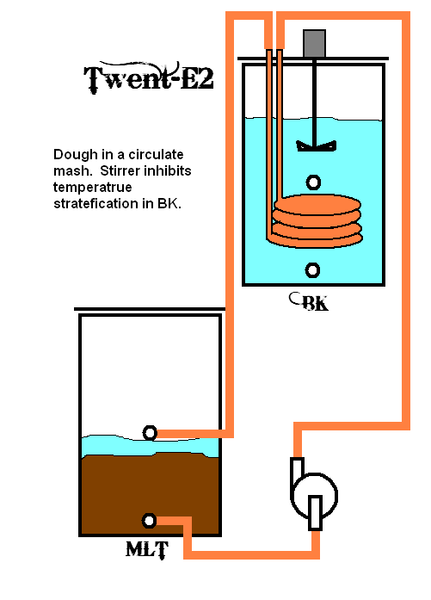
I do have some fine tuning questions - in your mash tun, does the return hose sort of lay on top of the mash or point straight down into it? Anything to diffuse the flow into the grain? Could you estimate the volume/min that you recirc?


Whilst brewing a high-gravity beer (2 Below clone) on my CB20 last night I started pondering the efficiency limits of the Brutus 20 concept.
Enter your email address to join:

