The birth of Zeus. (Non typical brewstand build.)

Homebrew Talk - Beer, Wine, Mead, & Cider Brewing Discussion Forum

Help Support Homebrew Talk - Beer, Wine, Mead, & Cider Brewing Discussion Forum:

This site may earn a commission from merchant affiliate links, including eBay, Amazon, and others.

brewman !

Well-Known Member
Joined
Nov 27, 2006
Messages
2,131
Reaction score
236
I'm building a brewstand. I'm naming it Zeus.

I had a brewstand 10 years ago using various keggles and coolers but sold it. I've been meaning to get back into brewing ever since. This fall I'm taking the plunge and building a brewstand to get going again.

Zeus is a bit off the wall. I made a list of everything that made my past brewing experiences less than perfectly enjoyable and tried to design Zeus to address those issues.

Here is what I am planning.

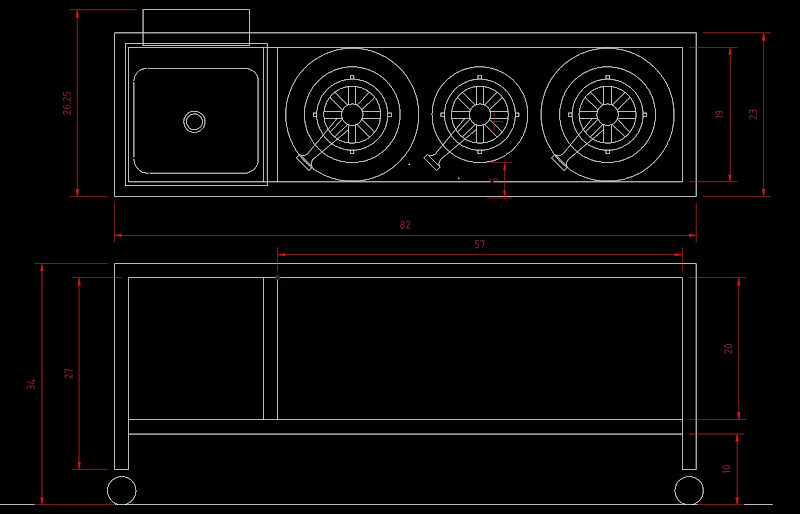
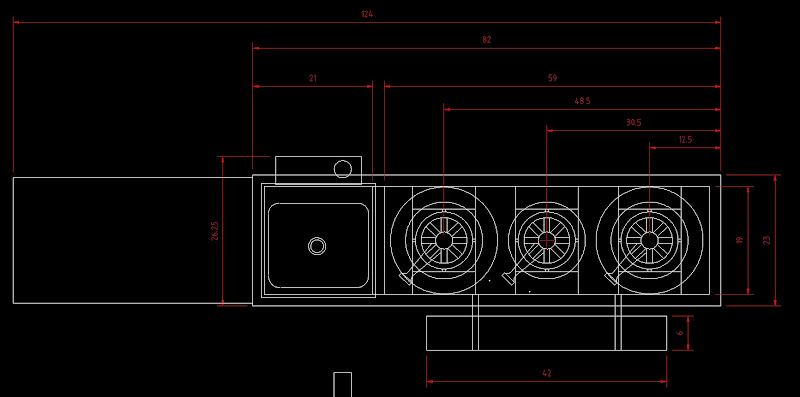
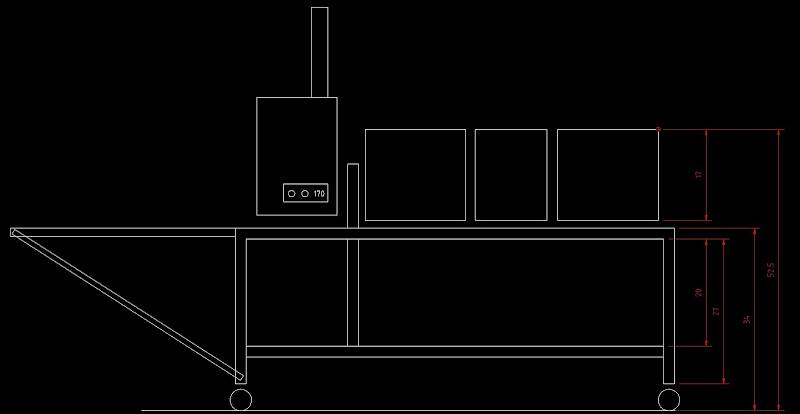
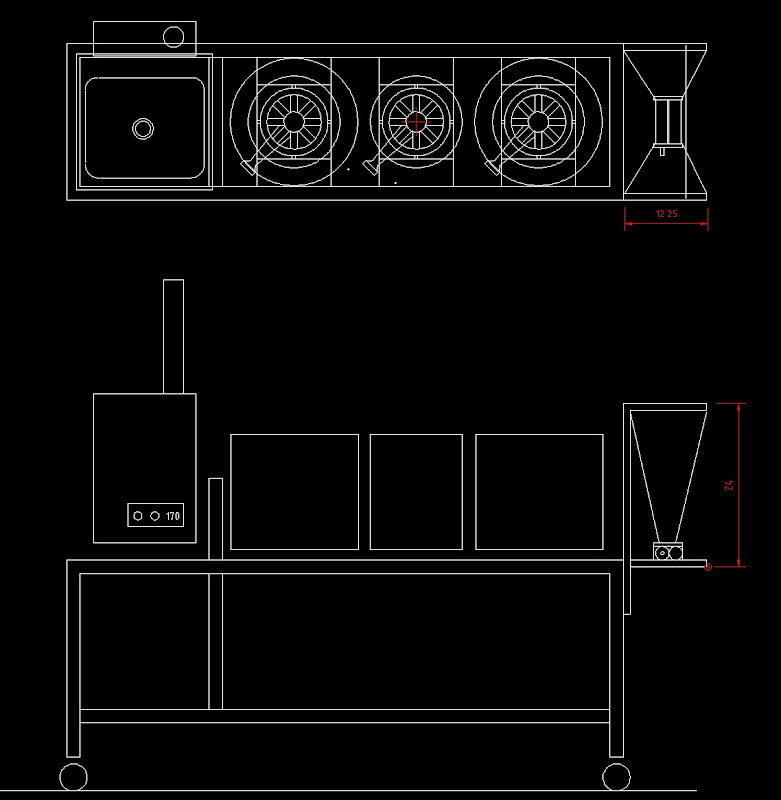
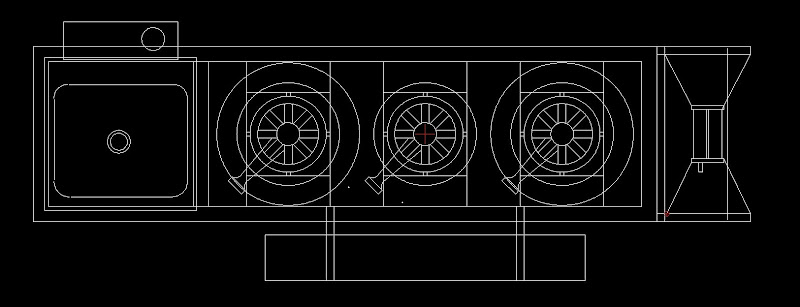
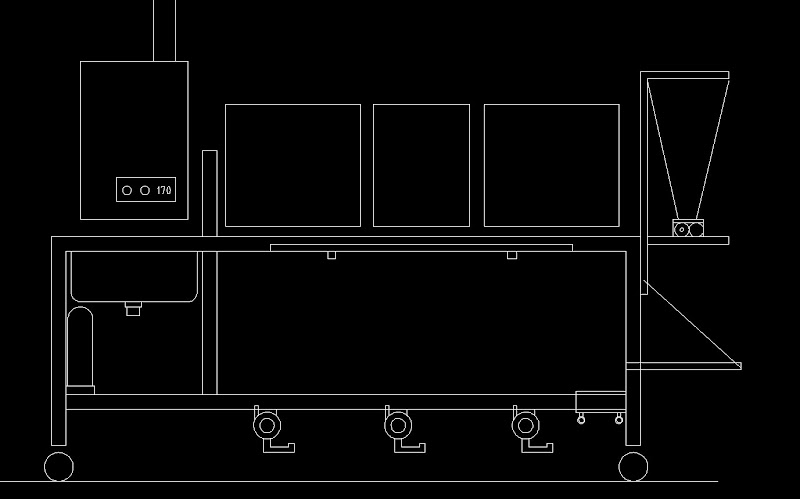
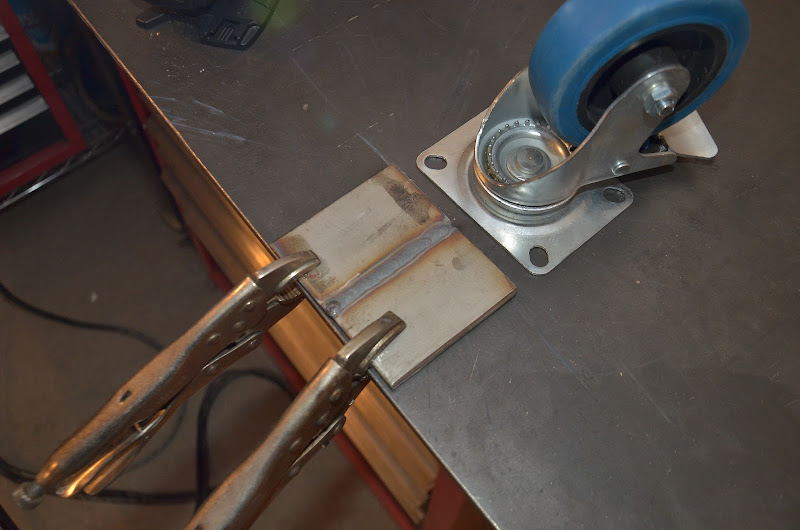
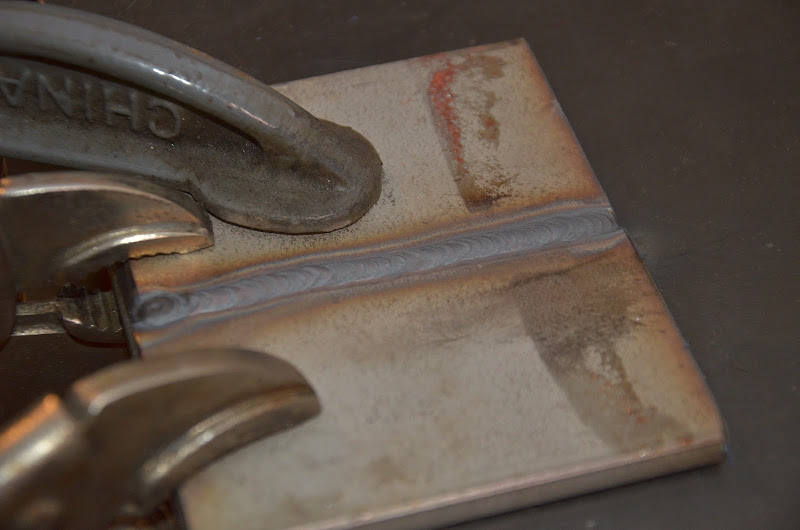
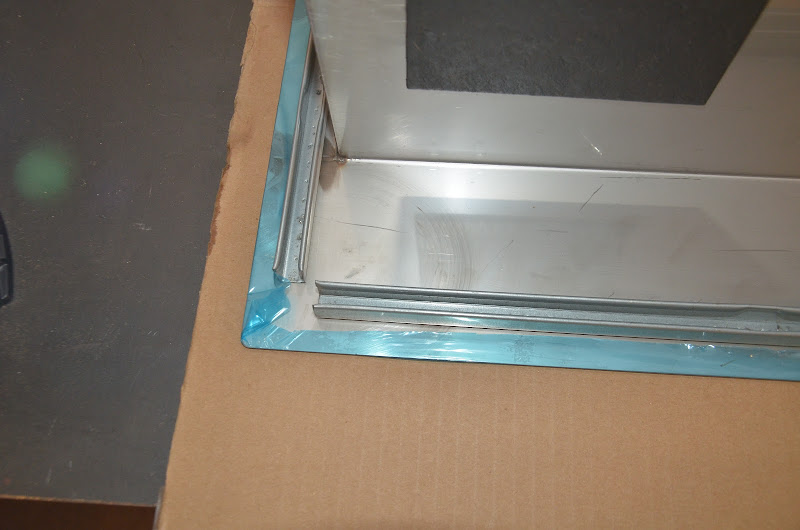
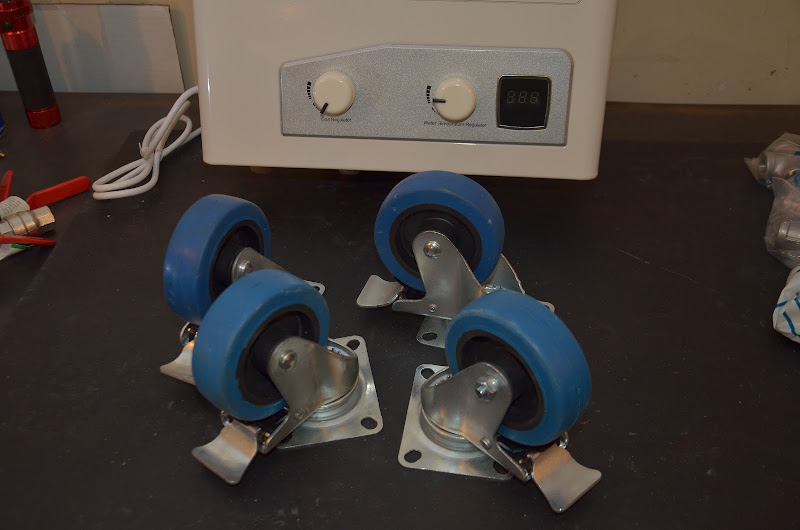
- stainless steel stand on locking casters
- 2x 11 gallon SS boil kettles
- an 11 or 20.5 gallon direct fired SS mash tun on a tippy for easy clean out
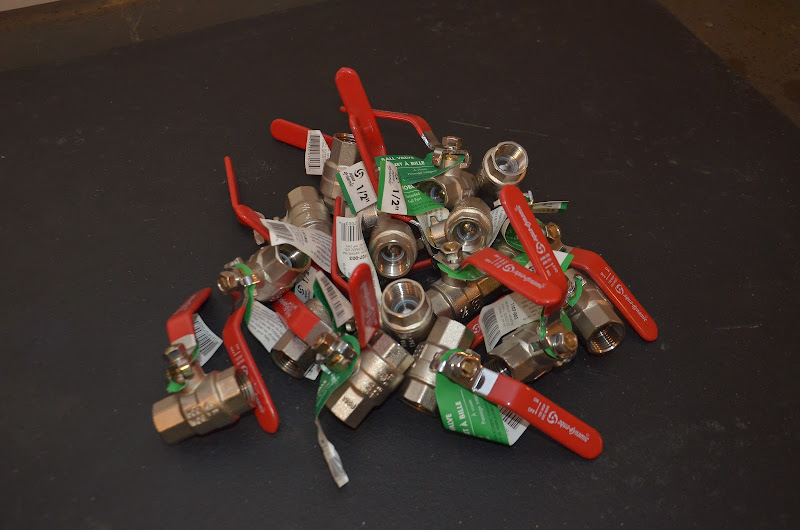
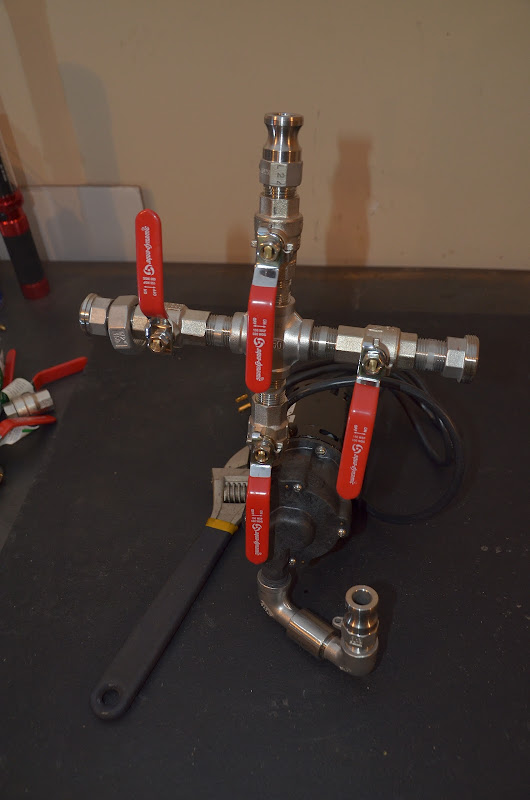
- each vessel has its own March pump
- each vessel has its own temperature control loop
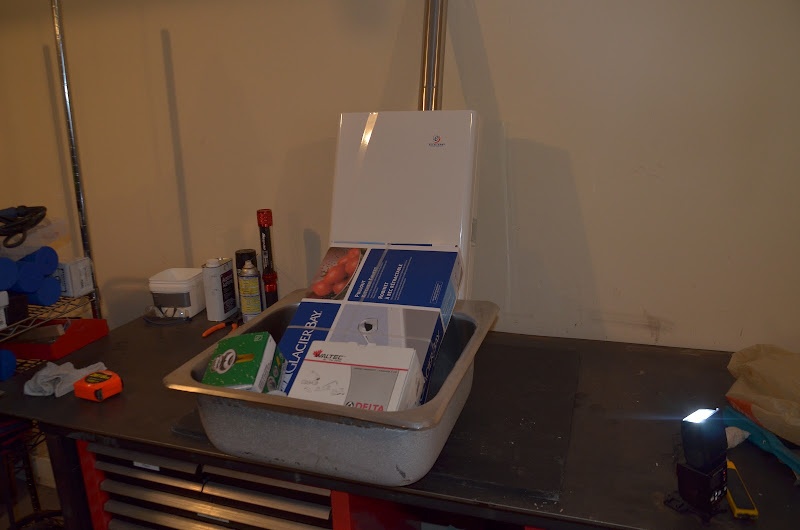
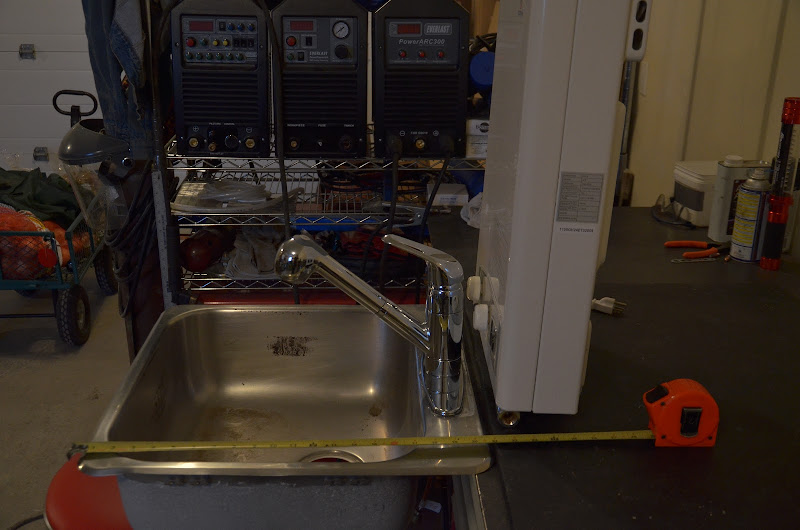
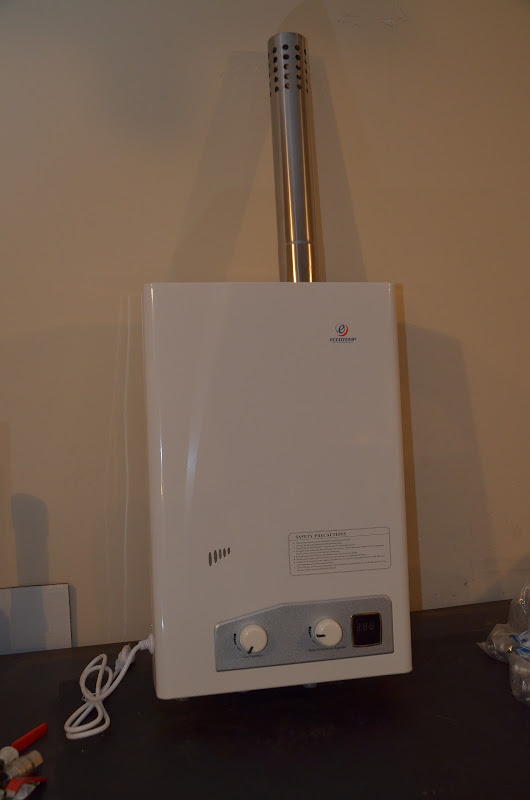
- an on demand hot water heater built into the stand to supply mash in, sparge and cleaning water
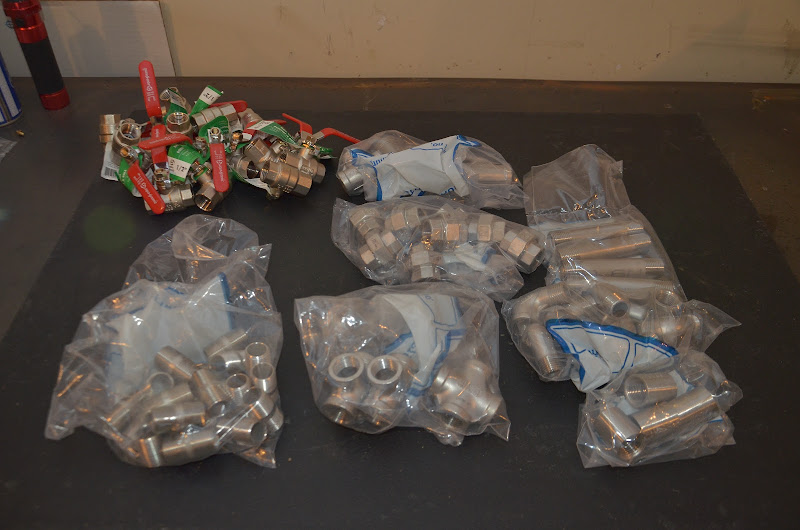
- a stainless steel water/wort manifold with manual valves and cam lock fittings
- 30(?) plate chiller
- the manifold breaks down into pieces for easy cleaning in a regular sink
- natural gas burners using gas control valves to automate burner firing
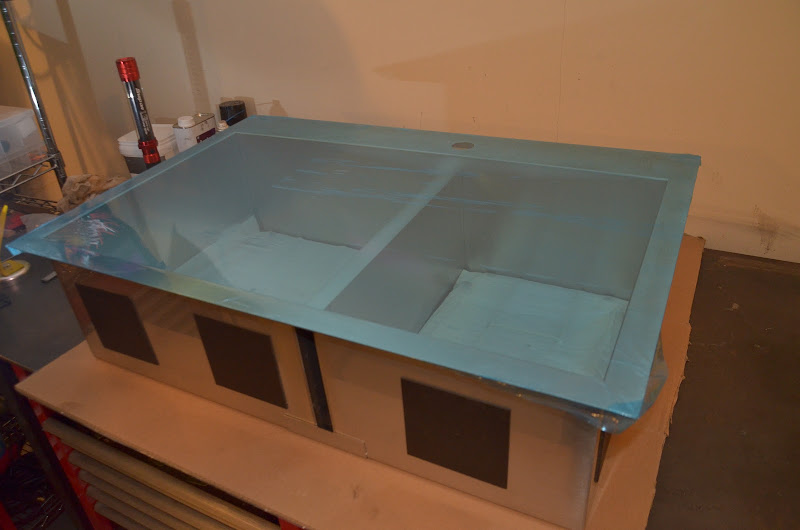
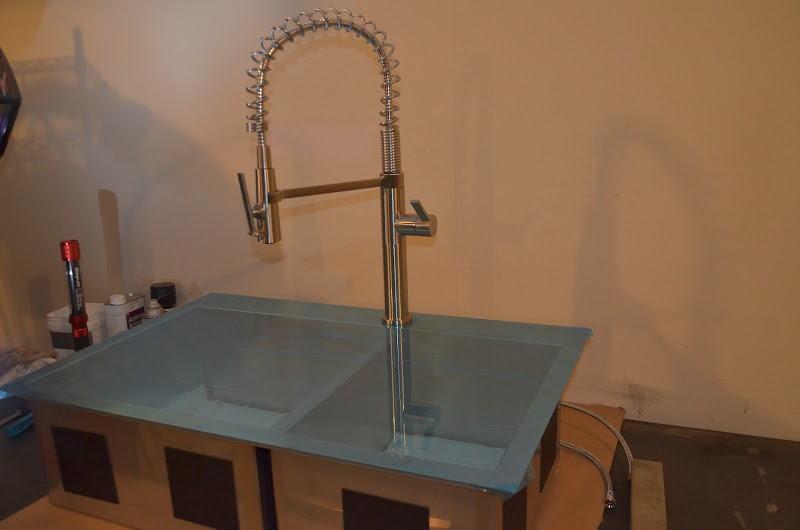
- a SS sink built into the stand with a pump for pumping out waste water
- a fold out SS work leaf
- storage on the lower level of the brewstand
- compressed air input on the stand to blow out all the lines when I am done brewing. I winterize our RV this way and it works well.
- controlled by BrewPi via a browser on a remote computer (Tablet, laptop, etc.)

I've been amassing parts for Zeus for nearly a year.

I'll either be brewing outside or in my heated garage. I've never brewed in the summer, so mostly I'll be brewing in the garage.

I have no running water in my garage thus the need for the hot water heater and sink on the brewstand. No more continuously running into the house to wash things !

I'll be brewing 5, 8 and 15 gallon batches, all kegged. No bottling.

I went with 2 boil kettles for versatility. I'd rather brew more smaller batches than fewer big batches. I'm hoping that with enough automation that I can brew 2 batches almost simultaneously. I'm building the stand large enough to size up one of the boil kettles to 20.5 gallons.

Zeus will be stored outside when not being used.

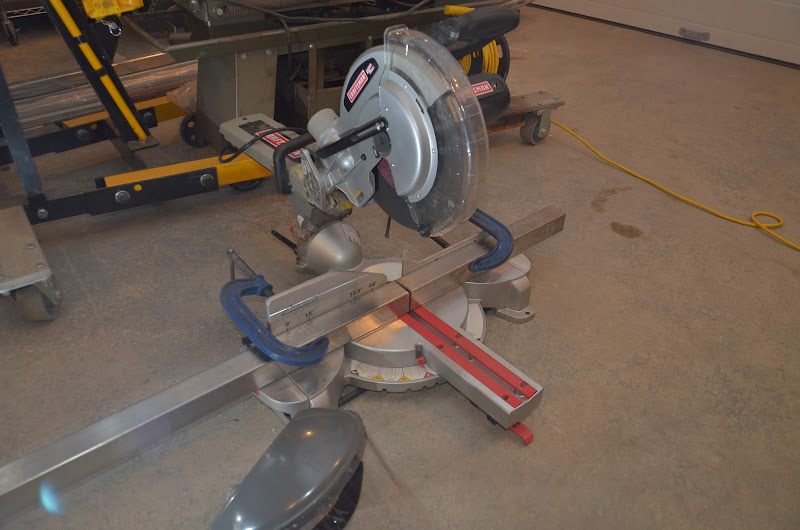
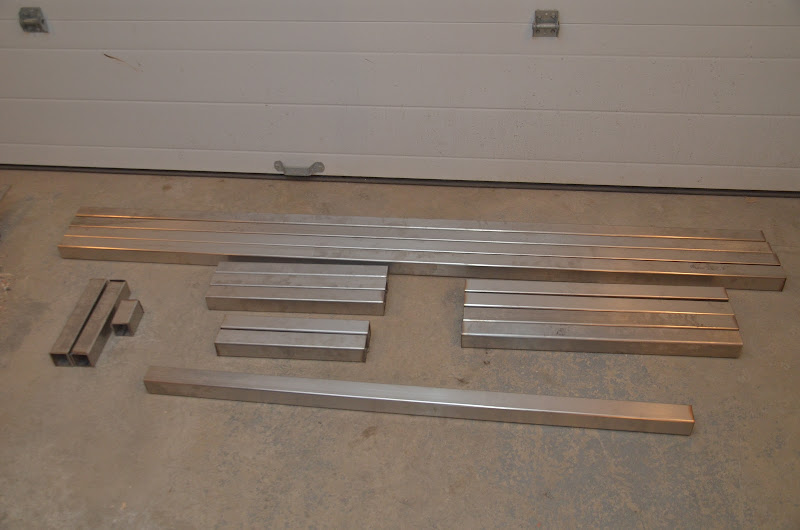
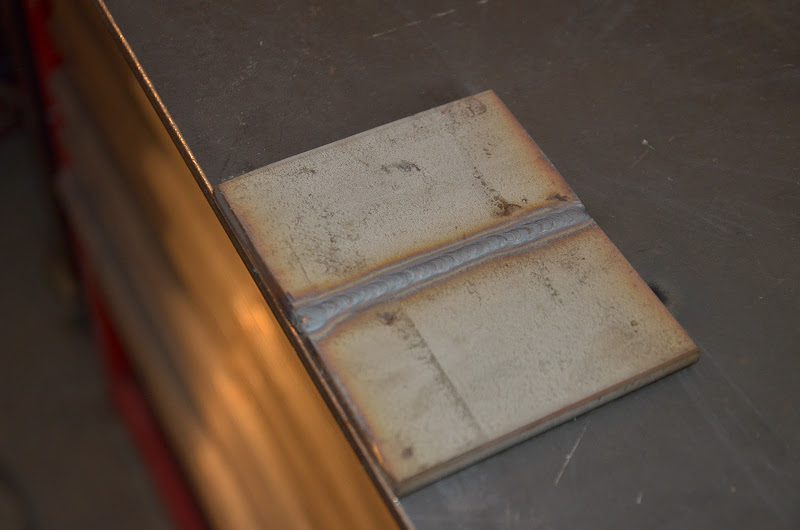
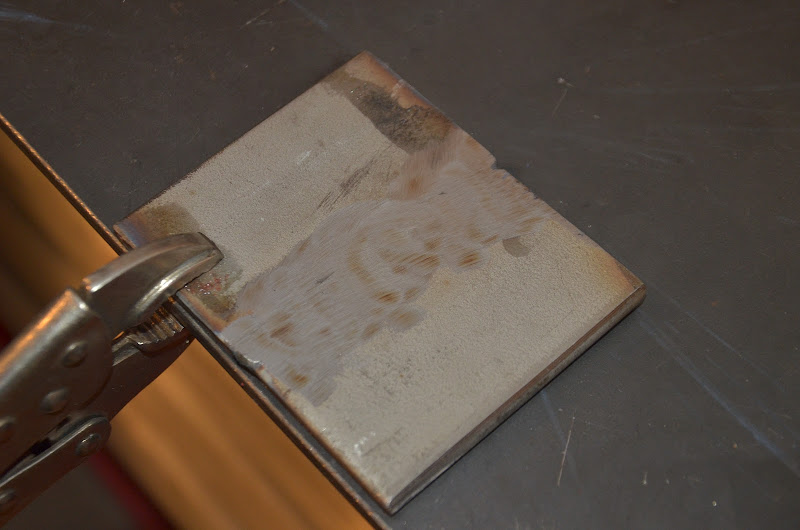
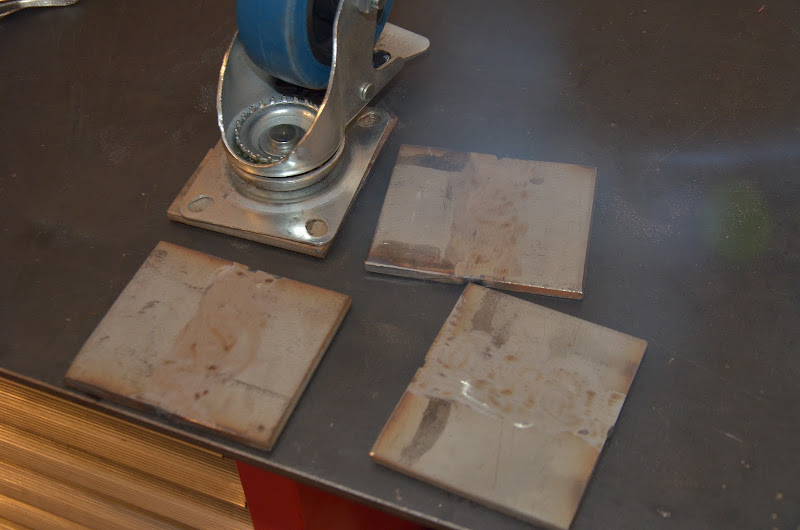
I have just about all the parts and pieces to assemble Zeus. I'll post pictures as I do.
 
DSC_9780.JPG


DSC_9782.JPG


DSC_9790.JPG


DSC_9793.JPG


DSC_9794.JPG
 
Actually, I need another 12 valves.

Each pump head has 4 valves. Manifold in, manifold out, recirc to the vessel and output from the pump. Other manifold designs have omitted the recirc and pump valves, but I'm going to use them. For 3 pumps, I need 12 valves.

Each vessel needs 2 valves. Recirc and pickup. 4 vessels x 2 = 8 valves.

The stand itself needs valves for water in, nat gas in and compressed air in. The compressed air is used to blow everything out after brewing so nothing busts if it freezes. 3 valves.

The manifold has 2 inlets to it, hot water and cold water. 2 valves.

The manifold has 2 outlets, chiller and discharge. 2 valves.

The chiller needs a valve to control the cooling water going through it. 1 valve.

Total valve count: 28, if I don't add a couple special valves.

The valves in the pile are Home Depot specials. 1/2 x 1/2, chromed brass. I'm getting them for a bit over $7 each because some stores will give a discount if you buy more than 5 at a time. Thus far I have emptied 2 stores.

A certain vendor has similar SS valves that they will sell for $10 each in volume. They would have been a good choice too.

I got a super good deal on all the stainless fittings. 30-50% off of McMasterCarr prices. I got them from a local wholesale supplier.

Its a lot of valves and plumbing to set up a brewstand this way, but I'm looking forward to not having to be continually swapping hoses around while brewing. Remember that my stand has the potential to have 3 brews going at once (1 mashing, 1 BIAB and 1 boiling or chilling).

I have a 10+ year timeline on this brewstand. Build it right the first time, cry once. Rebuild it several times, cry many times. I should have bit the bullet and built this thing 10 years ago.
 
I'm not happy with the size of the cross and bushings on the pump head. Too bulky, too much trapped fluid in dead spaces.

I am going to make up some custom male crosses to make the pump head setup more compact with less trapped fluid.

I'll explain my concern with manifold dead space and trapped fluid later in the thread.
 
I'm hoping that with enough automation that I can brew 2 batches almost simultaneously.

You must be a master of multi-tasking! Hopefully you won't have a DFH 90-minute going on the same time you have a hop blasted IPA with all late addition charges going on at the same time. I'd be throwing all the wrong hops in to the wrong kettle at the wrong times! :cross:

Good luck with the build! Can't wait to see more of this behemoth!
 
I'm in the process of building my own rig...getting ideas and such. Holy Ball Valve Batman! I am sure you have more invested in fittings then I will in my entire setup! Keep us posted
 
You must be a master of multi-tasking! Hopefully you won't have a DFH 90-minute going on the same time you have a hop blasted IPA with all late addition charges going on at the same time. I'd be throwing all the wrong hops in to the wrong kettle at the wrong times! :cross:

That is what automation, timers and alarms are for ! I'm hoping that automating burner control for both mashing and boiling allows me to concentrate on everything else. It seems to in the Brutus 10 videos Lonnie has posted on youtube.

I'm hoping the on demand hot water heater really speeds up my brew day. I should never have to wait for sparge or mash in water and clean up should be a breeze.
 
I'm in the process of building my own rig...getting ideas and such. Holy Ball Valve Batman! I am sure you have more invested in fittings then I will in my entire setup! Keep us posted

28 valves x $7.50 each = $210.
The pile of SS fittings you see there was $150. I'll need a bit more to finish the stand.
Wheels were $12 each, $50.
SS for the stand was $350, but I won't use all of it. I'm welding it myself.
3 11 gallon SS kettles were $75 each, $215.
3 March pumps
3 burners at $35 each.
3 gas control valves and thermocouples.
The hot water heater was $250. Sounds expensive, but to replace it I'd need another brew kettle, burner, gas control valve, a longer stand, etc, etc. I'll probably install it in our RV during the summer when I am not brewing.
Sink: $20, used.

I am so sick of drinking commercial beer. If this thing allows me to easily crank out good homebrew for the next 10 years, it will be well worth it.
 
The other thing about the hot water heater is that its really efficient. It will take way less energy to heat sparge and mash water. Between that and powering the stand with natural gas instead of propane, I should save $50 a year in energy costs compared to my old system.
 
That tankless water heater will heat water up to 170-180?

Yes it will.

Here is the spec for the stock water heater.

http://www.eccotemp.com/eccotemp-fvi12-ng-tankless-water-heater/

Don't let the list price on that page fool you.

Here is the spare parts page:
http://www.eccotemp.com/eccotemp-fvi12-parts/?sort=featured&page=1

The stock over temp sensor cuts out at 140F. If you contact customer service, they have an over temp sensor that cuts out at 180F.

This hot water heater does not use a computer to control the output temp. The temp display is just that, a display. There are two dials on it, one that controls the water flow through the unit and the other that controls the gas rate. You adjust the two to get the flow rate and temperature desired at that rate.

I haven't actually used it yet, but I'm expecting it to work pretty well. It will be very interesting to see how it works at the very low flow rates required during the sparge. I might insert a temperature control PID loop into the system using the lead to the over temp valve as an input to the unit to control the heater on/off.

This unit is also available for use with propane.

There are bigger and smaller units available. I bought mine about a year ago. I can't remember why I bought it over the smaller one. It would probably work well too at the flow rates a brew stand needs.
 
Well, you've got most of what you need for the build ;)

I'm hung up on a couple things at the moment.

#1, I'm waiting for an endmill so that I can machine some SS nipples into a cross to weld together. It should be here mid next week.

Its a hang up because I can't figure where to put the lower shelf until I know how the pump and manifold fit together.

#2, I'm having a hard time figuring out where to put the gas control valves.

I'm trying to hide and protect all the electronics and wiring under a cover over the bottom shelf. I want to put the GCVs there too, but I need to be able to get at them when I light the pilot at the start of the brew. And I don't want to have to remove all the stuff that is stored on the bottom shelf in order to get at the GCVs.

But if I put them somewhere else, I need to protect them from the elements, both when brewing and when its stored outside.

It sounds trivial, but its a head scratcher.

#3, I haven't figured out where to best mount the chiller.

#4, I haven't bought my 3rd pump and the 20.5 gallon brew kettle yet, but I can build and brew without those things.
 
4 flute, center cutting 7/8" diameter with 3/4" shank.

Basically I am going to cut a semicircle out of the side in the middle of each of the nipples. They should then mesh almost perfectly when laid over each other at 90 degrees. The OD of 1/2" pipe is 0.840. A 7/8" endmill is 0.875.

I'll TIG weld them together once they fit.

I'll post some pictures when I do.
 
Yes please, I'm having trouble visualizing what you're trying to do. Whenever someone mentions cutting metal my ears always perk up.
 
Yes please, I'm having trouble visualizing what you're trying to do.
I can't easily describe it better than I did.

It might be helpful to think of the overlap between two pipes if you cross them at 90 degrees and have them offset by 1/2 their diameter. Try it with 2 paper rolls and you'll see what I mean.

The flow going from one axis to the other axis is going to be a bit impeded, but it will still be functional. If I find its too restrictive/ugly then I'll machine 2 nipples into 4 nipple ends and align and weld them to create a conventional male cross.

Whenever someone mentions cutting metal my ears always perk up.
Its going to be interesting to see how an inexpensive endmill stands up to cutting stainless steel.
 
I see now. As far as how the endmill will handle stainless, is it coated and do you plan on using coolant? It's probably going to look like hell if it's 316 or 304, since they're both highly ductile with a high nickel and chrome content, making for nasty burrs and high heat at the shear point. You real need to interpolate and not just plunge cut if you want a nice edge.
 
I spent a few hours measuring and figuring and came up with this.

Brewstand%2520drawing1.jpeg


The sink needs a cut out 19x19". That width works well because the 10.5 gallon pots are 18.75" diameter and I don't want the pots sitting directly on the frame. The pots will sit on a grate above the frame.

The drawing shows 2 different diameters of kettles. The smaller is a Bayou Classic 1044, which is 11 gallons. I have 3 of them. The larger size is a Bayou Classic 1082, which is 20.5 gallons. I'll be getting 2 of them.

The left most kettle is the mash tun. The 2 others are boil kettles.

The 3 pumps will sit below the lower level, as will all the electronics, plumbing and controls. The entire space beneath the burners will be for storage. The 1044s are 17 1/4 inches tall and the 1082s are 17" tall, so both should fit beneath the burners.

This design uses all of the 50 feet of tubing I purchased. I bought it as 5 x 10 foot pieces.

Piece 1 will be cut 82, 19, 15 with 4 inches of left over
Piece 2 will be cut 82, 19, 15 with 4 inches of left over
Piece 3 will be cut 82, 27 with 11 inches of left over
Piece 4 will be cut 82, 27 with 11 inches of left over
Piece 5 will be cut 27, 27, 19, 20, 20 with 7 inches of left over

I might juggle these around a bit before I start cutting.

I'll use the 2 11 inch pieces to create a "firewall" between the edge of the the sink and the side of the mash tun.

The hot water heater mounts behind the sink. Its not a water proof unit, so I'll probably put a plexiglass splash shield in front of it.

The stand will have a stance of 23 inches, but an overall width of about 26 inches. The bottom long members will be set back inside the legs so that things that hang out like pump heads will not add to the overall width of the stand more than necessary. I'm hoping it will fit though any doorway I encounter.

The stand is nearly 7 feet long. It would be 5 feet long without the sink. I considered building it without the sink but I feel that the addition of the sink will make things a lot more convenient on brewing day.

My last brew stand had a 16x 24 fold out wooden shelf. I loved it and used it for many things, but it was way too small. This stand will have a 22 x 42" SS fold out shelf, making the entire unit over 10.5 feet long when extended. There is also going to be a 6" SS tray in front of the kettles to set spoons, tools, hoses, etc on. It found these two items at the local scrap yard in excellent condition.

I'm looking for input on this design. If you see anything that could be improved, I would like to hear it. I'm not promising that I'll incorporate everything people tell me, but I'll certainly consider it.

Thanks in advance.
 
BYO (November 2012) has an excellent article on home brewery design on page 44.

In that article the author, John Blichman himself, talks about keeping the work path between the sink, mashtun and boil kettle small, no more than 23 feet for a round trip. His cross aisle setup is 15 feet. My setup is 10 feet round trip from the sink to the far boil kettle, but my sink is smaller than his and my "sideboard" is on the other side of the sink, not across the aisle, so its probably a toss up.

I'd love to have a cross aisle setup like his, but I can't justify having to pull out 2 brewing carts. I know that I *hated* brewing without a sink with my old stand and I know that I'll like the side leaf much better on my new stand, so I'm hoping this will work out to be a convenient setup.

I haven't figured out where I am going to put the brewstand computer yet. It probably won't be a good thing to have it sitting on the leaf next to the sink. That is asking for trouble. Beyond that I haven't figured anything out.
 
I see now. As far as how the endmill will handle stainless, is it coated and do you plan on using coolant? It's probably going to look like hell if it's 316 or 304, since they're both highly ductile with a high nickel and chrome content, making for nasty burrs and high heat at the shear point. You real need to interpolate and not just plunge cut if you want a nice edge.

Four fluter will likely break if plunge cutting. Not good for center cutting regardless of face angle. I've broken my fair share of magic end mills. Hell, just go big and get an indexable mill with ceramic inserts. Shrink fit tool system. Might set you back more than the stand itself.;)

In the process of designing intermediate stands for 10gal system. Subscribed.
 
Any comments on the stand design ? I want to go cut tubing and start welding. I'm afraid to do so lest someone point out some obvious flaw in what I am about to do.
 
maddad said:
Four fluter will likely break if plunge cutting. Not good for center cutting regardless of face angle. I've broken my fair share of magic end mills. Hell, just go big and get an indexable mill with ceramic inserts. Shrink fit tool system. Might set you back more than the stand itself.;)

In the process of designing intermediate stands for 10gal system. Subscribed.

Yes, true. If the 4 fluter is making the hole to size, there definitely needs to be a drill first to pilot the hole. 4 flute endmills are not designed for center cutting.
 
I went shopping today and got a kitchen faucet ($80), a laundry sink faucet ($42) a sink drain ($13) and a bunch of fittings. Total, $140. I got the sink at a metal recycler for $1/pound.

DSC_9855.JPG


I looked forever to find some good used faucets, to no avail. In order to get the brewstand going, I was forced to buy new items.

Now that I had a faucet for my sink, I could see how the water heater was going to fit into the picture and how the faucet plumbing was going to work with the stand.

DSC_9857.JPG


With that figured out I was able to complete the stand design, see the drawing a few posts back.

It was finally time to start cutting. A couple weeks back I purchased an abrasive cutoff blade that would fit my compound mitre saw. Its rated at 5200 RPM and has a 1" diameter hole. Max no load RPM on my saw is 4300 RPM, IIRC. The blade was $12.

Here is how I used it.

DSC_9867.JPG


Note the face shield. What you don't see is a paint mask that I used to keep abrasive dust out of my lungs and welding gloves, just because.

It took about 20 seconds to make a cut. I would apply force for a couple seconds, back off for a few seconds, rinse and repeat until the cut was through. It cuts WAY harder than wood, but if you leave the motor cool by doing the above sequence, it won't even get warm.

Make sure there is no sawdust on the saw that sparks could ignite.

This is what 50 feet of tubing looks like when cut for my brewstand.

DSC_9871.JPG


The top 4 pieces are the long frame lengths. They turned out to be 81 3/4" after the saw kerfs were taken out of them. I took the kerfs from them because their length is non critical.

The 4 pieces on the right are the 27" legs.

The 3 pieces to the left of them are the 19" cross members for the top level frame.

The 2 pieces below them are the 15" cross members for the bottom shelf.

The 3 pieces on the extreme left are "scrap". I'm sure I'll put them to good use.

The single piece at the bottom is yet to be cut into the 2 uprights to go between the top and bottom levels. I haven't cut them because I haven't decided how much ground clearance I want under the bottom shelf.

The cutting went very well, with no issues. I was going to buy a metal chop saw just for this project. Now I am glad I didn't.

It feels great to finally start actually working on the stand.

Next up is to drill a bunch of holes in these pieces before I weld them together.
 
Updated drawings now include the shelf, drip tray and vessels.

Brewstand%2520drawing2-top.jpeg


Brewstand%2520drawing2-side.jpeg


The shelf sits over the burners in storage mode, acting as a counter top. It should be a nice work space for kegging, being there is hot water, a sink, a spray nozzle and pumps right there.

I'm hoping that if I remove a few fittings, all 5 vessels (3x11 gallons, 2x 20.5 gallons) will fit on the bottom shelf, nested.

The drip tray comes off for storage.

The hot water heater needs the exhaust stack to create a draft through its burner. But the stack slips right off for storage.

I'm thinking of adding a collapsing "high bar" to the right side of the stand to hang hoses and stirring implements from. I hate setting hoses and stirring spoons sitting flat on a surface. It takes up a lot of room and it isn't sanitary. Maybe I'm just anal.

It also needs a towel bar or two as they are another thing that shouldn't sit on a flat surface.

Comments/feedback/ideas ? Would you want to brew with this thing ?
 
Regarding your control panel. Have you considered hanging it from the ceiling? If you have the space, perhaps have it stow up and away?
 
Regarding your control panel. Have you considered hanging it from the ceiling? If you have the space, perhaps have it stow up and away?
I want to be able to brew anywhere with this thing that I can hook up to power, natgas and water. That would be in my garage, on my deck, on the pad in front of the garage, in my friend's garage, at a club brewing day, etc. Its completely mobile if we have the muscle to lift it into the back of a truck.

Mounting the controller interface from the ceiling of my garage would defeat that. But I could easily hang it from the brewstand itself. Where should I put it relative to the brewstand ?

Seems to me it should be somewhere close to the mash tun, yet it shouldn't interfere with the path from the sink and the shelf to the mash tun and boil kettles and it needs to be away from heat and spray and it can't interfere with access to the mash tun and...
 
I'm considering shortening the stand or moving the legs in 2 inches lengthwise so that it fits in the bed of a short box Ford Superduty truck. They are 80 inches from the lip on the top of the front of the box to the surface of the tail gate when its closed. My stand is currently 82 inches in that dimension.

Shortening it would mean it could be moved with a short box truck with the tailgate closed. Otherwise I'd probably have to take the tailgate off, which is a pain.

Its not too late to do this. 4 cuts to shorten the whole stand 2 inches, 2 cuts to move the legs only in 2 inches on one end. It will take longer to change the drawings than make the cuts.

What say ye ?
 
Added a reversible, lowerable, removeable hanger to the stand.

Brewstand%2520drawing%2520with%2520malt%2520mill.jpeg


It has multiple functions, though it can only do one at once.

1. Its a rack to hold hoses and stirring implements.

2. Its a rack to hold a cloth malt hopper bag above a Monster Mill, also mounted to it. This will allow the monster mill and hopper to occupy only 12x19x3" when in storage. I've been dreading building the hopper for my malt mill because I don't want to have to store something big.

3. If rotated 180 degrees, it becomes a rack to hold a BIAB for the last brew kettle, though one won't be able to close the lid while it steeps, unless one finds a way to feed wires through the lid.

Its not the ideal place to mount a malt hopper because of steam off the last kettle. And one doesn't want dust where one will be filling carboys with chilled wort. But, I have limited storage space for brewing stuff and I think this is the easiest way to build a compact milling setup. And I can remove the bag from the stand as soon as I am done grinding the malt.

The hardest part would be sewing the bag. I think it would work pretty well. One would have to put the malt bucket on a chair or something to get it the right height to catch the ground malt.

Is it worth doing ?

Edit: I could also hang the brew controller display from it.

Send me your CAD file, in dxf please;)

How about some round tube to fit into your frame that can be machined to accept various hangars and such. You could cross drill the tube an use some thumb screws to lock into the height you want. I am trying to visualize your hangar apparatus in two view.
 
Seems to me it should be somewhere close to the mash tun, yet it shouldn't interfere with the path from the sink and the shelf to the mash tun and boil kettles and it needs to be away from heat and spray and it can't interfere with access to the mash tun and...

You definitely want it close. I have a pyramidal design. HLT up top, then MLT and BK on the second tier. The CP is right between the mash tun and the bk and just below the HLT. I brew with electric water heater elements so I don't have to worry about excess heat except what comes off of the bk.
 
Latest iteration. Added the pumps, chiller, a water filter, the sink has a profile and a shelf to put the malt pail on. I left the shelf off the drawing, but its still part of the design.

Its not obvious from the drawing, but the entire surface of the bottom shelf is covered in aluminum checkerplate. Lest anyone think I'm rich, I've been collecting materials to do this project for a long time. My local metal recycler sells scrap SS and aluminum for $1/lb. I stop in about once a month.

I'll probably also put a door over the area under the sink to hide the plumbing mess that is going to be under there.

I mounted the water filter upside down so that it completely drains without taking it apart when I blow out the system.

Brewstand%2520drawing%2520with%2520malt%2520mill2-top.jpeg


Brewstand%2520drawing%2520with%2520malt%2520mill2-side.jpeg


Right now the rack for hanging tools is just the 12" of square tubing that the grain bag is hanging from. Remove the grain bag (and mill, it unbolts) and you have the rack by itself.

There are a couple problems using pipe instead of square tube.

1) I have to buy 20 feet of anything I use, so the outside pipe would be expensive. It would have to be SS.

2) I can bolt the flat side of a square tube directly to the square tube of the stand with simple bolt holes. And unbolt it and stow it away, sliding it inside the long tubes of the stand. As soon as I go with round tube, I have to weld it, which increases the overall length of the stand.

3) I am leery of using set screws to hold a load, for a whole pile of reasons.

Nevertheless, I'd love to see some drawings or sketches of what you had in mind.

I'll look into sharing the CAD files later. Right now they are a mess.

Thanks for the reply.
 
I got a bit of time to work on the stand last night.

I'm trying to work on things that need to be done regardless of the design of my stand while I let the design ideas I've come up with ferment for a few days.

One such item is the caster mounts. No matter what stand I build, I'll need plates for under my caster wheels.

The bases on my caster wheels measure 3" x 4". Unfortunately, I don't have any 3" or 4" wide SS flat bar and my local SS supplier has a 20 foot minimum on that material at about $5 per foot, depending on thickness.

What I do have on hand is 2" wide SS flat bar that I bought at a metal recycler, cheap. So I cut myself 12 3" pieces and TIG welded them together with a filleted butt weld. It was a bit more work, but a lot cheaper and I got some welding practice along the way.

I'll let the pictures tell the rest of the story.

DSC_9872.JPG


DSC_9886.JPG


DSC_9891.JPG


DSC_9876.JPG


DSC_9892.JPG


FWIW, I was using the TIG function on an Everlast Power Pro 256 on DCEN at about 125 amps, pulser off, with a (dirty) 3/32 electrode and 1/16" 308 (?) filler wire. I had no trouble with warpage. The heat affected zone was very small and the penetration was very good. I was actually wishing for a larger arc and puddle.

As you can see, this material is used and highly tarnished. I'll shine these up once all the welding is done.

This was my first ever production type TIG welding, although in a past life I used to braze with oxy acetylene.
 
For those who asked, this is the cut off wheel I am using on my compound mitre saw. $12. The RPM is the important part, This one is rated at 5092 RPM. I think its meant to be used on a gas powered saw.

The other thing is the blade thickness. This one is 1/8". That removes more material and makes cutting slower, but all my cuts are straight. Some people have been complaining about non straight cuts. I wonder if they are flexing their blades.

DSC_9914.JPG


DSC_9915.JPG


The drill bits are cobalt. I hope they work well for drilling SS. I haven't tried them yet.
 
So I got a bit of time to work on this thing.

Of the best laid plans of mice and men... In the time I wasn't working on it, I stumbled on a large decently sized sink at our local Costco for $220.

DSC_9976.JPG


The main sink is 17x17. The side sink is 12x17. 9? inches deep. It comes with racks for the bottom of the tubs and drains.

I've been trying to get one of the medium sized restaurant sinks used, forever, to no avail. If you think $220 is a lot of money for a sink, I dare you to go sink shopping these days.

What I like about this sink is having 2 tubs (one can be for soaking or rinsing) and the tubs are flat right to the edge, so that things don't fall over if placed near the edge. And the tubs, both of them, are big enough to hold big things, like a keg upside down, draining.

Problems.

1) Cost. Luckily, I've been a good boy this year so Santa is getting it for me.

2) The stand becomes longer by about 11 inches, from 82 inches to 93 inches. So it takes up more room. I'm storing it outside, so it isn't that big of an issue, but it is getting large.

On the other hand, because the stand has hot water and burners and a sink and a shelf, its going to be able to do double duty as a food prep center if we host an event outside somewhere or on our deck.

3) I need to lengthen my stand by about 11 inches, from 82 inches to 93 inches. I already cut my long pieces at 82 inches. I now have to weld 11 inches onto each of them. If I grind and polish the welds, you wouldn't be able to tell.

4) The sink has a mounting track under the lip that stands about 1/2" high. Its spot welded about every 3/8" to the lip. This prevents the sink from sitting flat on the SS tubing, which I would like it to do. I have no idea how I would remove it without wrecking the sink.

DSC_9980.JPG


Ideas ?

I also purchased a different fawcet.

DSC_9984.JPG


It was $135. I'll return the other one which was $80. I need to put a longer hose on this one so that it will reach right to the bottom of the sink and over into my mash tun to fill it.

I decided to upgrade these components after seeing pictures of Mr. Blichman's setup in the home brewery design article in the November 2012 issue of Brew Your Own. He, of course, uses the real, large, restaurant sink with the real restaurant fawcet. I can't afford those, but I can afford this.

My brewstand is getting expensive. But on the other hand, my wife doesn't want me brewing in the house and even if she did, I don't have a room in it to do so. This is the easiest, cheapest way to build something similar to a custom brewing room in a house without actually doing so. And if I ever do get to have a brewery room in a house, all this stuff will fit right in.
 
Looking good. You know what they say, measure twice cut once ;)

The saying should go more like "get your d@mn spec figured out before you start building anything". There were no measurement errors. There were planning errors !

I knew that I wanted a larger sink when I was doing the drawing and playing around with things. Actually, I was happy to have a sink, any sink on the stand when I was working on the drawings, but I also knew the "right" thing to do was to get a larger and better sink than what I had.

I was trying to save money by using the sink I had and I couldn't find anything better for a reasonable price and blah, blah, blah... but then I saw the new sink in Costco and asked myself why am I trying to save $200 on this project and put up with a less than optimal sink for the next 10 years ? The stand is built around the sink and its not something you can change out later on if you build it sized for the smaller sink.

Good tools generally pay for themselves if you use them.

Anyway... justify it anyway you want, or not, I splurged and got the sink.

Side thought.

I could make the sink fold down on the side of the stand when not in use and thus have a stand that is 20 inches shorter when in storage.

However, the design would get a bit messy because the hot water heater would still be mounted above the sink and it can't really be folded out of the way and the tap on the sink would stick out the side when its folded down and then mounting the folding side table gets tricky because then its mounting to a folding sink.

I think I'll just put up with the stand being 93 inches long and be done with it. At least its all stainless and plastic and its not going to rust when I store it outside.
 
Back
Top