Farewell perfectly-functional wet bar 1 wk after closing on the house

Homebrew Talk - Beer, Wine, Mead, & Cider Brewing Discussion Forum

Help Support Homebrew Talk - Beer, Wine, Mead, & Cider Brewing Discussion Forum:

This site may earn a commission from merchant affiliate links, including eBay, Amazon, and others.

NewBrewB

Supporting Member
HBT Supporter
Joined
Dec 26, 2009
Messages
807
Reaction score
48
Location
Pace
Spoiler alert. This thread has a happy ending!

----------------------------
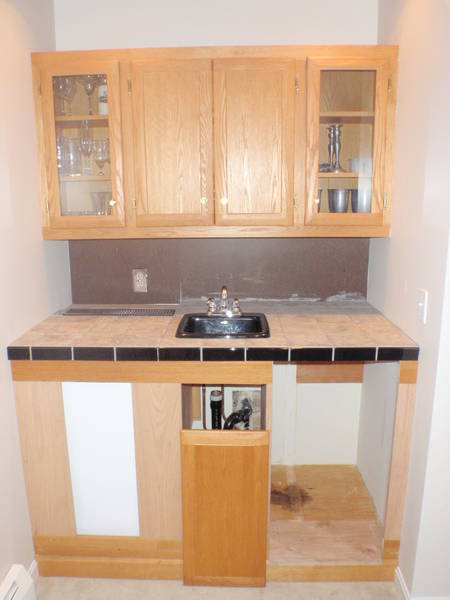
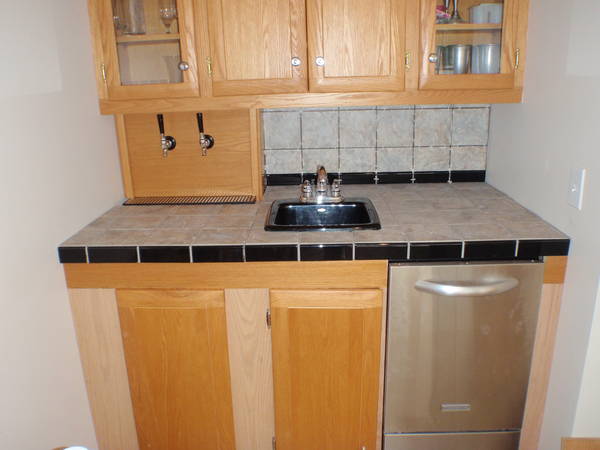
So...we bought this house with a decent wet bar. Unfortunately, a week before closing, I scored a $1700 Frigidaire icemaker from BestBuy for $400. Now, where to install it...

I decided that it should go under the counter at the wetbar, however, it is 3" too tall and would stick out in front about 6". This brings us to the pool table and the homemade 'pleaser keezer' that didnt really fit in the room or look good together. I decided that if I was going to rebuild a perfectly good wet bar to accommodate an ice maker, I might as well build my keezer into it as well...

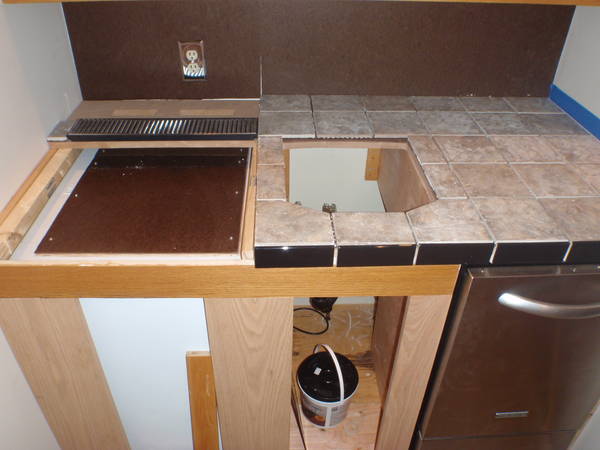
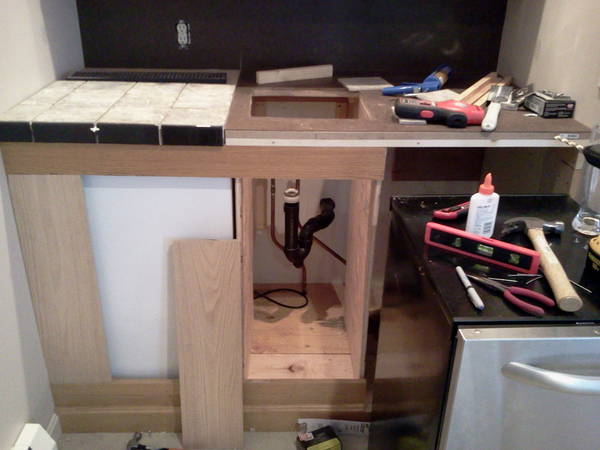
One week after closing, when quite a few boxes had yet to unpack themselves, and when the wife left me unsupervised for too long, I began to dismantle a perfectly good wet bar.

Family Room Wetbar.jpg


ForumRunner_20110726_093520.jpg


ForumRunner_20110726_093729.jpg


ForumRunner_20110726_093758.jpg


ForumRunner_20110726_093905.jpg


ForumRunner_20110726_093953.jpg
 
looking good so far. You must have balls of brass. I get away with everything but I wouldnt have started tearing that apart in a house we just closed on with boxes still laying around.
 
Looks like you've got your priorities in order.
 
asidrane said:
Will it not be a perfectly functioning wet bar when you are done?

An excellent point!

Well, I started by removing the baseboard molding, then disconnected and pulled the sink, then the counter. I pulled the supporting trim carefully so it can be re-used. Along those lines, I should mention that I am on essentially no budget. Everything I can possibly re-use will be.

Once everything was cleared out, I rolled back the carpet. Then my dad and I built an extension for the "stage" platform on the floor and re-secured the carpet.

As it turns out, the ice maker has a drain and produces about 2 gal of waste water per batch....Im going to have to figure out how to fit a U-trap low enough and still get it connected to the sink drainpipe...or go through the floor and run PVC accross the basement to the laundry drain...

First, the kegerator-
I set the small deep freeze in place and built a lid for it that is split into a front part (above the deep end) and a back part that will stay in place for the beer&co2 lines. I havent decided if I want to keep my co2 bottle under the sink for easy access or inside the freezer on the shelf in back, to keep things neat and tidy.

Anyhooo, the counter portion above the front section of the freezer will be removable but still tiled to match the rest of the counter and backsplash. I am using the old counter wood to build a matching "coffin" for the faucets in the back left corner.

Im on vacation right now but I will be jumping back into this when I get home. Here is one picture of me test-fitting the tile for the removable lid.
 
Not sure why the previous picture-uploads failed but here is another try...

I got back from vacation on Thurs PM and took off work Friday. Despite having company this weekend, I managed to make some more progress.

I started replacing the front panel trim pieces and cut/dry-fitted the tile. In-between games of pool, I managed to tile the whole counter (still need to do the back-splash) and might try the next step of adding the grout this evening. This is my first time ever doing anything with tile so take it easy on me!

Oh, the night before I left, I brewed a Belgian Ale, which is ready to keg, as soon as my bottle of sanitizing solution comes in the mail... *jab at the supplier*

2011-08-05_17_15_35.jpg

<BR>
2011-08-07_16_15_14.jpg
 
just make sure to seal the hell out of the grout, especially if you plan on mixing/pouring drinks on it.
 
Dude that is pretty friggin awesome. Way to get started on that as soon as you moved in. At least we know you have your priorities straight.
 
Deuce said:
just make sure to seal the hell out of the grout, especially if you plan on mixing/pouring drinks on it.

I never quite got around to sealing the grout in the first house I owned and regretted it later. This time I know better and bought the sealer at the same time as the grout. Anyone know if you have to seal the tiles too? These are ceramic but pretty rough to the touch.
 
I'm pretty sure that if the tiles are ceramic, even though rough they would be non porous and thus not able to absorb a sealer. If you put a drop of water on the tile and it does not seep into the tile then sealer is not needed, and probably would just make a mess on top of the tile.
 
Actually, there are glazed - and unglazed - ceramic tiles. Ceramic is what the base tile is comprised of, the glazing is an optional finish process.

But it's usually pretty easy to tell which are which (ie: if the top layer looks glassy it's almost always due to fired glaze). We have some unglazed in the house (they appeal to the wife's inner crunchy granola person ;) but they're not used where food or drink are prepared...

Cheers!
 
Think of it this way.

You're doing a RESEARCH project. You just bought the house - you don't know how well it's built! You're doing an in-depth investigation of the plumbing and cabinet construction and all of that, by dismantling a small sample of the house.

I mean, how else are you going to know if the house's bones have problems if you don't start digging around?
 
weirdboy said:
I must be missing something. How are you going to get stuff in and out of the keezer?

Also, where is all the waste heat going from it?

The heat vents to the middle section. If I find that it is warm enough to be a problem, I will install a fan to vent through the back wall to the garage. My last kegerator design had no ventilation and the heat was never a problem. I think most people who worry about heat issues with their keezers have no choice, because they use 14+ cu ft, 1970s era freezers off of craigslist. Mine is only big enough for 2 kegs and is fairly new/energy efficient. You may be right about the heat but I guess time will tell.

As for getting the kegs in/out, I mentioned initially that the left-front panel is removable and then the freezer lid (homemade) sits below that and also removes in sections (so the lines can run up through the back section). At this point, I am still focused on the overall wet bar...the keezer (and finding a CO2 source) will be next. I think the thread will be a lot more interesting when I get past the wet bar stage.

Keep the faith! :)
 
As for getting the kegs in/out, I mentioned initially that the left-front panel is removable and then the freezer lid (homemade) sits below that and also removes in sections (so the lines can run up through the back section). At this point, I am still focused on the overall wet bar...the keezer (and finding a CO2 source) will be next. I think the thread will be a lot more interesting when I get past the wet bar stage.

I'm still a little fuzzy on this. Are you going to have to pull out the keezer from underneath the countertop every time you need to change a keg? I'd just make sure that's what you really want to do before finalizing the bar.

(this is the kind of project where you'd *usually* see a dorm fridge being used. Hoping your design works, I'm just having a hard time visualizing it).
 
Ok, so I only got around to grouting (is that a word?) the lid but here are a few more pictures. Hopefully this will make more sense.

This is the cover by itself. It looks just like the rest of the counter.
Lidgrout.jpg

This is the counter with the cover removed.
counterNolid.jpg

This is the counter with the cover AND the keezer lid removed.


The freezer is in there...sideways... so the shelf is in the back and I can lift two kegs in/out of the 'front' which is deep enough for them. The 'tower' will be above the counter, directly behind the drip-tray. It'll enclose the two holes in the MDF and the electric outlet in the wall. The left hole will be insulated away from the electricity and that's where the beer lines will come up. The right side will be for the electric cables for the keezer & thermostat, as well as the ice maker.
 
Well, I finished the grout and the front frame pieces. Pretty soon, I'll attach the cover panel on the left to cover the freezer and hang the door to cover the opening under the sink. The next major task involves the plumber hooking-up the sink and the ice-maker.

At last, everything will be "done" enough for me to get back to what's really important...the Keezer! ;) I still need to do the back-splash, but the wife and I are still discussing what to do for that. She asked for black tile but I think that might be a bit much. I was initially planning to do more of the same grey-ish tile, but seems like overkill. Maybe in the end, I'll just end up painting the whole back-splash, up to the keezer tower on the left side...decisions, decisions... Unfortunately, it'll be about a week before I have time to take any more steps. Here is a picture of it right now:

P8120025.JPG
 
Finally got back from being out of town for over three weeks and having house-guests long enough to make some progress on the keezer part of the wet-bar. Here are a few pictures:
Lid-Hoses2.JPG

Lid-Hoses.JPG

Right_Side_in-place.JPG

Right_Side_ready_for_install.JPG

Interior-Getting_Hoses_ready.JPG


I'll probably finish things up this weekend and put a few 'final' pictures up but thought I'd go ahead and post some of the mid-process pictures. (DIY forums without pictures are kinda pointless, right?) :)
 
Looking great.

One tip, I'd replace that outlet with a GFCI (ground fault circuit interrupter) to protect from a serious shock hazard in the event that a line bursts or a fitting slips off.
 
Looking great.

One tip, I'd replace that outlet with a GFCI (ground fault circuit interrupter) to protect from a serious shock hazard in the event that a line bursts or a fitting slips off.

Great point. Even though the outlet itself is not GFCI, it is one of several outlets that are all on a GFCI circuit (all of the bathrooms, etc). I may or may not have discovered this the hard way with a spark and then a required switch-search at the breaker-box downstairs.
 
Today, I found some time and tiled the back-splash. In a day or two, it'll be dry and I can grout the tile. The keezer is finished and I was able to pour a rather-tasty sample of a Belgian Ale a little while ago. :) Here is a picture as it stands, now:

Tiled_backsplash.JPG


Still on the to-do list:

(1) Grout the back-splash and even-up the gap between the keezer cover and the rest of the counter (left of the sink)
(2) Cut two small tile pieces and adhere them on the left/right of the drip-tray
(3) Brew a second batch of beer (possibly this afternoon...gotta see how much time I have)
(4) Seal all of the grout
(5) Stain/coat the vertical oak pieces to try and come close to matching the rest of the wet bar
(6) Hire a plumber to attach the drain/water to the sink/ice-maker (saving some $$ for that)
 
looks great.

if you don't mind, i had a couple thoughts on the to-do list:
4- seal it twice. i did just one pass with the sealer on mine and that wasn't enough.
5-i'd consider sanding the rest background wood, then stain them all a darker shade, to kind of mock/echo the light/dark contrast in the tile.
6-most tradesmen that i know will work for beer! :D
 
Well, I'm declaring victory.

Still need to have the plumber by to hook up the icemaker and sink, but everything else is done and I have two beers on tap (Belgian Ale and a Brown Porter).

Here are the before and after pictures. If you're just joining this thread, please read back a bit to understand how the left panel in front of the taps slides/lifts out and then the keezer lid is down beneath, with the deep-freeze under that. Hmm..maybe I should post a video or something because that would probably be more explanatory.

Anyway, here it is...
-----------AFTER------------
Finished_Wetbar.JPG


-----------BEFORE------------
30588d1311687302-farewell-perfectly-functional-wet-bar-1-wk-after-closing-house-family-room-wetbar.jpg
 
This is hands down the most dangerous thread I've found yet. I am in the same boat in that I've just purchased a house with a very nice/new wet bar. However, this bar is totally impractical. I have been telling myself to let it go and have been prioritizing other projects around the house. Now this thread surfaces and plants the seeds of a bar re-do to support a keezer. Brilliant and beautiful, but damn I didn't need this suggestion... Its like a song you can't get out of your head. I know I'm just going to be staring at my bar all week thinking about this project now...:drunk:
 
Very cool. I like it. Only thing I may have thought about doing was continuing the tile around the tap tower part. Think it would have made it blend together better. I guess you would have had to figure a way to still remove it to work on lines or faucets or anything but im sure you could come up with something. Im not saying it looks bad at all just was looking at the pictures and thought might look even better with tile there.
 
Back
Top