Temp controller

Homebrew Talk - Beer, Wine, Mead, & Cider Brewing Discussion Forum

Help Support Homebrew Talk - Beer, Wine, Mead, & Cider Brewing Discussion Forum:

This site may earn a commission from merchant affiliate links, including eBay, Amazon, and others.
My error. Put wrong name in post. Should be Ricand.
Paul

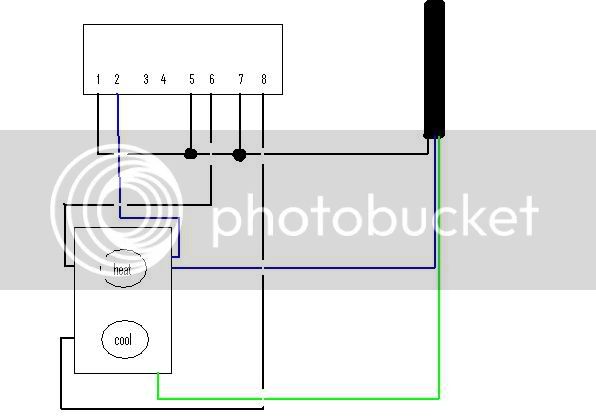
laymeister, i don't remember asking anything about 10A as a power rating?? either way, the schematic i posted worked great for me. i started a new thread detailing the build.
 
looking for some feedback on my proposed wiring diagram... it ain't perfect, but hopefully you'll get the idea. i'm wanting to make one outlet switched for heat and one for cooling. where the line gets white, it is supposed to simulate no connection (a jump). blue is for netural as white wouldn't have shown up well and i'll break the jumper tab only on the hot side but maintain the neutral. let me know if i should make any changes:

possibleschematic.jpg

Maybe add some fusing. Glad it works for you! :mug:
 
Contacts do not have a power rating (in resistive load conditions or really for our purpose), only current and voltage ratings. You can have any combination of current and voltage so long as neither exceeds the rating of the contact. Power has nothing to do with this.
 
Received my controller today. Planned on mounting it in a project box I already had but it's a little over sized. Might have to check out Radio Shack for a new box.
 
I got a box for $10 at home depot that fits two 120v outlets quite nicely. I wish it were smaller, but the fit would get too tight.

30vn23q.jpg
 
I'm looking at hard wiring the controller so need something just big enough to hold it.

Hmm, rx7. You happen to be a fellow rotorhead?

Yeah, even though I've sold both my sevens I still consider myself a rotorhead! I make sure to bug SWMBO about getting another one all the time. I always keep my eye open for a good deal on an FC.
 
Yeah, even though I've sold both my sevens I still consider myself a rotorhead!

I'd be mounting my controller this weekend if it wasn't for the fact I had to rebuild the carb on one of my FBs and swapping that out.
 
Controller came in the mail Friday, and after a very busy weekend I think I have a couple hours to myself tonight. I'll be wiring this up simply for right now, but may add the always-on outlet later. I'm using a simple blue box, and some wire from a new computer power supply cord. Should be able to get some pics up on photobucket later for any interested parties. =)
 
Well I got everything put together - seemed a little too easy.. Finally got to plug it in and give it a shot today. Pics were a non-starter, (wife had the camera in her purse, which was with her at work..) as was the box... I've got power to the box, programmed it, understand its function quite well, but my outlet isn't getting any juice.

Back to the drawing board!

If anybody's keeping tabs on the thread and might be able to help me troubleshoot, I have the following wired up..

Three wire coming in from wall - black to pin 1, white to pin 2, green to ground screw on outlet.

From the controller, pin 7 to neutral side of outlet, pin 8 to hot side of outlet.

Probe is connected and working. I set the compressor delay to six minutes, and I'm sure that I'm waiting the full time and getting a solid red light. Fridge definitely works, I've got it plugged in directly right now and it's running like a top.

It's too early to relax and have a brew, so I think I'll relax, have another cup of coffee, and take another look at this thing.
 
From the controller, pin 7 to neutral side of outlet, pin 8 to hot side of outlet.

This is where you went wrong. The neutral side of the outlet needs to be connected directly to the neutral from the wall, which is the white wire. Pins 7 and 8 are the switch, so one needs to be the hot from the wall (black) and the other needs to go to the hot side of the outlet.
 
This is where you went wrong. The neutral side of the outlet needs to be connected directly to the neutral from the wall, which is the white wire. Pins 7 and 8 are the switch, so one needs to be the hot from the wall (black) and the other needs to go to the hot side of the outlet.

Okay.. I think I was looking at the whole thing wrong. Makes sense now. I was looking at it as pins 1 & 2 taking power in, and pins 7 & 8 sending power out. That was wrong.

Pins 1 & 2 are taking power so the relay/controller can operate. Pins 7 & 8 are switching their own wall power to the outlet, and thereby the fridge, making a circuit that goes through the controller, to the fridge (or not) and back to the wall just like a normal outlet.

Thank you very much for the advice! Much, much appreciated. I hope to swill the first of my own brew this evening.. It'll be much better cold. :mug:

Now I just need to dig up a little more scrap wire and a couple wire nuts.

-edit- Works perfectly. Whoo!
 
So I'm frustrated as hell cause I just can't seem to wire mine up right!
I'm trying to just wire it straight to an extension chord (not a outlet) cause i just need cooling....

I thought it would be as easy as cutting the extension chord in half... splice the ground together (green wire)... Black wire (hot) from male end to Pole1 also spliced to Pole7... White wire (neutral) from male end to Pole2... Then with the female end I would have the Black wire into Pole7 and white wire into Pole8...

The unit comes on and everything... Just no power to poles 7 and 8 (made sure cool light is on)....

Is there something I'm doing wrong? Does there HAVE to be something going into 5 and 6?

Any help is apprecited cause I'm stuck and frustrated!!!

Thanks!
 
I think you want to have it like this...

From the wall: Black to pin 1 and pin 7. White to pin 2 and female white. Ground to female ground.
Female end: Black to pin 8. White to white from wall. Ground to ground from wall.

As was the problem in my initial hookup that didn't run, your neutral needs a direct connection to the wall. At least, that's what I think after having the lightbulb go on for me the other day.

Disclaimer: I'm not an electrician; don't come after me if you burn down your house and all your homebrew stuff with it. ;)


Sweet! That was it! Thanks sooooo much!

btw... house is still standing and I'm enjoying a homebrew as i type!
Thanks again!
 
Okay, question to all of you that are running these. Have any of you been running with the probe submerged in water? I'm tempted to switch mine over since it's just taped to a keg now and it fluctuates more than I'd like.
 
Okay, question to all of you that are running these. Have any of you been running with the probe submerged in water? I'm tempted to switch mine over since it's just taped to a keg now and it fluctuates more than I'd like.

What's fluctuates more than you like? What are your setpoints? I've been taping rancos to kegs for a good long time and they work great. Submerging isn't a great idea. How does the temp of a small glass of water translate to 5 gallons of beer?
 
What's fluctuates more than you like? What are your setpoints? I've been taping rancos to kegs for a good long time and they work great. Submerging isn't a great idea. How does the temp of a small glass of water translate to 5 gallons of beer?

+1 Submerging the probe will only increase the lag time and cause larger temperature swings. I tried it and it did not work well at all for me. Lots of people do it that way, but I will never understand why. You can adjust the differential on most of the digital controllers I've seen to get just about anything you could want. The air temp will fluctuate obviously, but the beer/wort with its large thermal mass certainly won't budge much at all and that's the important thing.
 
If I want to ferment out of a sanke can't I just tape the probe to the outside and cover with bubblewrap like jamil does? Or does the heat not conduct as well in stainless as in glass?
 
First, I'm sold on this controller. FWIW, I jury-rigged a johnson controller to sorta manually do a two-state. Sort of. Here. For $30, I might scrap what I have already done. Still, anyone with a single stage controller (i.e., ranco or johnson) might consider this, especially if they already have the parts sitting around, as I did. It's ghetto compared to the object of this thread, so no flames please.

Resurrecting this thread. Passedpawn, do you still use the analog with the circuit in your link? I'm not quite understanding how it works without switching the jumpers in the controller itself.
 
Hong Kong is in China.

Late to the party.
I realize this being I spent a month each time in Hong Kong as well deep into China.
You would be shocked to see a good looking item in Hong Kong on how it was made deep in China under a rusted out Quonset hut by child labor.
This before the 1997 takeover of Hong Kong by China and again after the takeover.
 
Resurrecting this thread. Passedpawn, do you still use the analog with the circuit in your link? I'm not quite understanding how it works without switching the jumpers in the controller itself.

Yes, I still use it, although it doesn't often get cold enough in florida to put a heater in the chest freezer (although it's all outside).

Inside the ranco is a relay. The relay has a common, to which you connect power. Then, it's arm switches between two contacts. It doesn't just "open-circuit".

So, you want to wire each of those 2 contacts to separate outlets. You only want to plug in one device (either the freezer power OR a heater) and it will just work. If you think about it you will probably figure it out.

It would work if you pluged in both devices, but there needs to be a gap in temperature where nothing happens (hysteresis) so you don't get short-cycling of the compressor and heater. It might work, but I'm not sure; I think the johnson had 3 or 5 degrees hysteresis, but maybe that's not correct.

Doh! Thanks for the reply. I should have checked back here before I ordered the Love controller. I'm sure I can find a use for the analog one.
 
Back
Top