BCS Based Electric Brewery Build Version 1.1

Homebrew Talk - Beer, Wine, Mead, & Cider Brewing Discussion Forum

Help Support Homebrew Talk - Beer, Wine, Mead, & Cider Brewing Discussion Forum:

This site may earn a commission from merchant affiliate links, including eBay, Amazon, and others.

sjlammer

Well-Known Member
Joined
Jul 10, 2007
Messages
534
Reaction score
6
Location
Albany, NY
Update: New Photos 4/21/2010

MY BREWERY IS FINALLY DONE!!!!

well its done for now. here are some photos of the build. please hold off on comments until i get it all posted.

here is the brewery:

attachment.php


attachment.php


I am going to steal a full width cabinet when we redo the kitchen

CIMG1028.jpg


CIMG1029.jpg
 
The HLT and MLT are made from the 26 dollar walmart coolers.

The HLT has a sight glass and weldless fittings courtesy of bargainfittings.com

Above the MLT is my water supply for the brewery.

attachment.php


Fittings are the mcmaster high flow coolant quick disconnects: http://www.mcmaster.com/#6739k59/=5clf54

The tubes hanging out are the silicone recirculation drop tubes


attachment.php


The HLT is powered by (2) 2000W 120V immersion heaters. The HERMS coil is my old Immersion chiller that I gently bent to fit in the HLT. Temperature is meaured using the BSC Temperature Probe:

14251d1263346611-bcs-based-electric-brewery-build-version-1-1-cimg1033.jpg


I saw Bobby M's no leak weldless system, https://www.homebrewtalk.com/f11/no-leak-mlt-bulkhead-design-87197/

and made a small modification by using rubber stock, rather than pvc. I used this part by Mcmaster:

http://www.mcmaster.com/#catalog/115/3483/=5clxnv

i cut the rubber to fit just as Bobby did with the pvc

attachment.php


CIMG1034.jpg


CIMG1033.jpg


CIMG1031.jpg


CIMG1012.jpg
 
The MLT uses a hot water heater braid that is 3/4" stainless steel.

the inside of the MLT:

attachment.php


Here is the pieces to the braid:

attachment.php


Potting the heat sticks

attachment.php


CIMG1035.JPG


CIMG1014.JPG


113 [800x600].jpg
 
I gotta tell you, those last three posts took me two hours... this thread was more work than the build :) cough drag and drop pictures, cough.

I insulated the boil kettle using half inch think buna-N foam rubber

http://www.mcmaster.com/#catalog/115/3456/=5cmyks

and covered it with a foil tape jacket

http://www.mcmaster.com/#catalog/115/3387/=5cmyx9

This didn't end up staying stuck after i heated it up, so i covered the seams with silicone adhesive bought from Home depot.

attachment.php


attachment.php


attachment.php


Finished with Valves:

attachment.php


127 [800x600].jpg


128 [800x600].jpg


129 [800x600].jpg


CIMG1037 [800x600].jpg
 
One last picture of the inside:

attachment.php


I think as soon as i can get it welded up, i am going to go to a full draining bottom outlet. I will use the current outlet hole as a recirculation return port.

CIMG1036 [800x600].jpg
 
I wanted an all in one control panel, so i bought a 12x12x5 clamshell enclosure from a guy off ebay. total cost was 40 dollars.

attachment.php


On the side are (6) 1/8" panel mount mono jacks for the four temp probes for the BCS, and for two additional inputs (like an HLT float switch). An ethernet connection, and the plug for the BK element.

On the top are toggle switches and pilot lights for all the equipment to be controlled.

attachment.php


This picture shows the outlets for the pumps, 120v heat sticks, etc.... all flush mounted :rockin:

attachment.php


Inside of the box. a distribution block, and the BCS, as well as some crydom SSRs that i got on ebay.

attachment.php


123 [800x600].jpg


124 [800x600].jpg


125 [800x600].jpg


126 [800x600].jpg
 
Here is the panel all wired up... and i tried to be as neat as possible:

attachment.php


I haven't printed out the labels yet for the box, but:

attachment.php


Had an extra 19" lcd laying around from my old desktop :ban: 
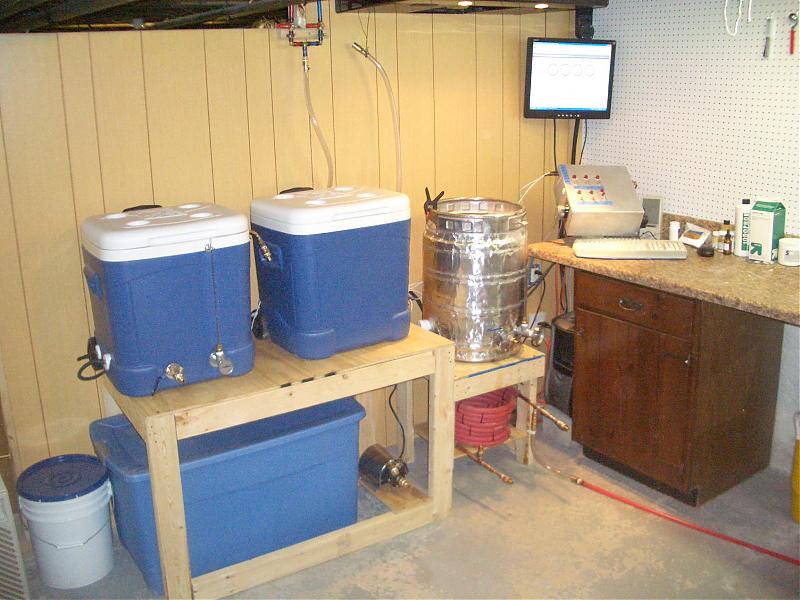
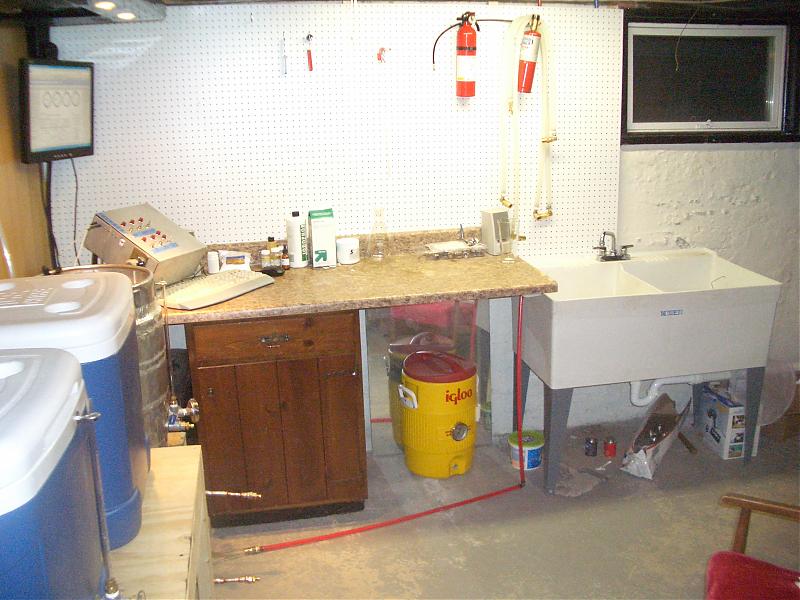
sure i'll use that in the brewery.... thanks to my brother for "lending" me his old desktop computer.

14268d1263357349-bcs-based-electric-brewery-build-version-1-1-cimg1047-800x600-.jpg


Check out that power cord... that is 6/4 rubber cord... i got it from my local electrical supply house for 1.83 a foot (f'ing home depot gets 2.86 a foot for 10/3)

This photos was an accident... but its pretty cool:

attachment.php


CIMG1041 [800x600].jpg


CIMG1043 [800x600].jpg


CIMG1047 [800x600].jpg


CIMG1040.jpg
 
Here is a look at my 100 amp breaker panel with a 50 square D qo breaker:

attachment.php


I can run my elements and pumps off one gfi breaker (i know some others were having difficulty with that)

I love my new counterflow chiller. The thing is amazing. the clear line running to the red pex is a drain line that dumps into my wash sink:

attachment.php


March pump with slightly ghetto drip shield. the blue bin holds about 150 pounds of good old fashioned grain. Right now i have 2-row pale, pilsener, and maris otter.

attachment.php


my silicone hoses with qds, an oxygenation set up, and fire extinguisher, just in case :tank:

14273d1263358169-bcs-based-electric-brewery-build-version-1-1-cimg1046-800x600-.jpg


CIMG1048 [800x600].jpg


CIMG1038 [800x600].jpg


CIMG1044 [800x600].jpg


CIMG1046 [800x600].jpg
 
here is me brewing my first beer on it.. a nut brown

attachment.php


Ok... done for now.

Thanks to all of you who have been a tremendous inspiration, and offered guidance

CIMG1026 [800x600].jpg
 
One last picture of the inside:
<clip>
BK pic
<clip>
I think as soon as i can get it welded up, i am going to go to a full draining bottom outlet. I will use the current outlet hole as a recirculation return port.

What do you currently use for hop containment (if anything). And what will you use when you go to bottom draining?
 
Good question. I use a 5 gallon paint strainer that i hang from a PVC toilet flange with binder clips. I will stay with the same when i go to teh bottom drain. At some point i may try to fabricate some sort of large stainless steel mesh basket (picture a spaghetti cooker)

for now this works, and is easy.

New Photo 4/21/2010:

Here is my system with a new stand and a second pump, and drip trays. the new pump is the Little Giant 3-MD-HC. Thing kicks A$$

CIMG1109.JPG
 
Looks real nice. Good work!

How was it to brew on? You must be stoked to be using it. I should have mine done soon. I am going nuts wanting to use it.
 
It took some time to figure things out, but all in all it is going to be alot easier.

Example. rather than heat up exactly the amount of water i need, I fill the HLT, and heat to 168 (mash in)

then drain out 3.5 gallons into the mash tun. Then i use my water supply and top up the HLT with hot water. this drops the temperature of the whole thing from 168 to 150 ish.... which is perfect for the HERMS

Then just ramp back up to sparge temperature in the last 10 minutes of mashing.

I am already planning my next brew!!
 
Very nice build! I'm just about complete with my BCS build. Totally impressed with the BCS interface and ease of configuration. The iPhone control app. also kicks A$&.
 
I am looking forward to my BCS controlled rig, how are you liking the BCS? Do you have the processes and states set up to run automatically with exit conditions or are you manually running them?

Nice setup, like the flat panel monitor!

I am exoecting you to get this BCS thing nailed down so you can help me on mine in a couple months.
 
I deleted the post that I put right in the middle of your pics... Sorry, I wasn't patient enough.

Just wanted to say... Nice build.
I'm also working on a BCS controlled build. I'm working on the wiring diagram, sourcing and building now. Keep us updated on how the BCS works for you.

Ed
 
Are you going to post a build thread? Parts list?

I may post a parts list.

A LOT of people are going to the BCS right now for control...
 
Just a question out of curiousity. I looked at the picture of your breaker panel. Is that 100 Amp breaker panel dedicated just to your brewing or is it you whole house service? If it is your whole house service, are you dedicating half of your 100 Amp service to brewing? The reason I am asking is that I have 125 Amp service and I felt that would not be enough for an electric brewery. Maybe I am wrong. I just wanted to hear from another brewer with 100 to 125 Amp service.
 
Yah, I didnt catch that. Looks like another panel to the left of the 100A panel in the pic. But, I cannot imagine needing that many breakers in a panel meant for the brewery either.

I have 200A service and feel maxed out (from talk here on the board) with 50A going to my brewery.
 
I have a 125amp service to my house. I have no worries going with 30amp circuit for my brew rig. I will be using the 20amp 120v circuit in the garage as well.

As long as you are not heating water(electric hot water heater) Cooking on the electric stove and running your electric dryer, and brewing at the same time you should be ok. You are dealing with potential energy. If you are not using it, it is not drawing from your main.

If you start to see lights dimming and your circuits start popping then you might want to rethink your design. I don't think you will have much issue though.
 
Thanks guys. It was really a labor of love.

As for the BCS, I really like it so far. I wish that i could do some more intelligent things with it, like go to a website and get the outdoor air temperature (so i don't have to use another temp probe), but I like how easy the interface is. Also, i haven't figured out how to get the BK to automatically go from 100% on (to reach boil) to 67% to maintain boil. I do that manually now.

I live in a two family house, so one breaker is mine, and the other, my tenant. I am not too worried about taking 50 amps from a 100 amp panel. I have a gas hot water heater and gas stove. Also, I only have the HLT and BK on simultaneously for a very short period of time. Also, the most I am drawing at once is about 41 amps per leg. Worst case scenario is that i dont use the dryer while im brewing. Interestingly, i tend to use the washer because i dump as much of my rinse water into the washing machine, so as not to waste.

As for a build thread, i took pictures along the way, and this essentially was supposed to be my build thread. Much of what I did was learned here, so i didn't think i needed to post another "how to build a CFC" for example. Where i made deviations, I detailed that. I will go back and update my threads with links to the instructions that i used, to make it more comprehensive.

I don't know if I have it in me to put together a parts list :( Mostly because i do not want to know how much i spent on this. Tell you what. For you guys, I will do it and edit my threads.
 
I have a 125amp service to my house. I have no worries going with 30amp circuit for my brew rig. I will be using the 20amp 120v circuit in the garage as well.

As long as you are not heating water(electric hot water heater) Cooking on the electric stove and running your electric dryer, and brewing at the same time you should be ok. You are dealing with potential energy. If you are not using it, it is not drawing from your main.

If you start to see lights dimming and your circuits start popping then you might want to rethink your design. I don't think you will have much issue though.

If I were to do this I would be retrofitting my natural gas fired electric RIMS brewery. I do 10 gallon batches and heat the HLT for sparge water while running the RIM heater. I don't think 30 amps would cut it. Besides, I am on thin ice as it is with the amount I spend on my brewery and brewing. If I ask my SWMBO not to use certain appliances while I brew, I will be most certainly be up chits creek.
 
Also, i haven't figured out how to get the BK to automatically go from 100% on (to reach boil) to 67% to maintain boil. I do that manually now.

Great build! Setting up a process for a boil can be tricky. Mainly because its not easy to sense when the actual boil starts. You can use a temperature value, but that's not always reliable. I've even heard of some people using float switches to trip from the foam, but that sounds dangerous to me ;)..

I'm a fan of using a 2 state process. One state for heating to boil, and the other for the boil. To transition to the boil state, you can use a combination of temp value and user input. The temp value can be tuned as you run it a few times, to match your elevation. And if all else fails, use a Win (Web Input button) to be able to jump to the next state when you see bubbles. That way it'll go to the Boiling state when either of those conditions are true.

Code:
Boil Process
State0: Heat to Boil
  Boil Heat = 100% duty cycle
  Exit Cond0: when Temp=212 goto State1
  Exit Cond1: when Win0 Continue is on, goto State1
State1: Boiling
  Boil Heat = 67% duty cycle
  Start Boil Timer
 
Since it is easy to calculate time to heat to a boil with a given volume and starting temp... I plan to do this.

Start volume 13 gallons
Start temp 165F
Time to boil at 100% is 9 minutes

I will have one state that is 100% output for 9 minutes (set by the timer)

This time will be the Exit Condition

The following state will be 60% output for 60 minutes

This will make Heating to Boil and the transition to Boil, automatic.
 
Couldn't you also set it be 100% until a few degrees lower than boil and then switch to your 'maintain boil' duty cycle? The 'maintain boil' duty cycle should bring it the rest of the way to boiling. That would ensure that you don't boil earlier than you think, i.e. temp-based rather than time based.
 
I think what i am going to do is this:

The next time I boil, i will note the temperature.

Then I will set up a program that incorporates a delay.

State 1: Boil Kettle on at 100%
Exit to State 2: when temp >= 212 ( really i will probably i will use my actual boil temp determined above)

State 2: Boil Kettle on at 100%
Exit to State 3: Timer counts down from 3 minutes (adjustable)

State 3: Boil Kettle at 60%
Exit Condition: Timer counts down from 60 minutes (adjustable)


The delay will account for any changing in boil temp based on specific gravity, barometric pressure, etc.
 
I live in a two family house, so one breaker is mine, and the other, my tenant. I am not too worried about taking 50 amps from a 100 amp panel. I have a gas hot water heater and gas stove. Also, I only have the HLT and BK on simultaneously for a very short period of time. Also, the most I am drawing at once is about 41 amps per leg. Worst case scenario is that i dont use the dryer while im brewing. Interestingly, i tend to use the washer because i dump as much of my rinse water into the washing machine, so as not to waste.

You are much braver than I. Your refrigerator takes 12 amps alone. Even with gas appliances, it won't take much to get to 75%-80% of your capacity when running two elements.
 
I respectfully disagree. my refrigerator is rated at 3.5 amps (full load).
I did this little calc. before i built the brewery.

Brewery = 41 amps max
fridge = 3.5 amps
microwave = 10 amps
toaster over = 12 amps
Lights = 15 amps

Total: 81.5 amps

Sure i don't have the dryer in there, but i would have to have every light in the place on, as well as be microwaving and using the toaster over simultaneously.

Basically, my girlfriend can't use the dryer for the twenty minutes that I'm sparging. That is the only time that the BK and HLT are heating simultaneously. Actually i designed the HLT with two heaters... Both on full bore to heat the water, and then only one to maintain the temp. I haven't implemented that into the software yet though.

For me it works. Im sure this will not work for everyone. Really the worst case scenario is that i trip my main breaker.
 
There may be another solution. I believe there is a ramp setpoint mode that you can use to ramp up over say 15 mins and hold at 212 degrees. This would be your state 1. You could tighten up the differential swing to 2 degrees and spend some time calibrating the temp probes so that 214 degrees is a voracious boil and 212 degrees is a slow rolling.

Hopefully you've reached stabilization though PID after 15 mins elapses, exit, trigger an alarm and move to state 2 which is boil for 60 mins. at 212 degrees. Then exit, trigger an alarm and move to state 3 which could be off.

I could be totally off here but after peeling though the docs and wiki over the past few days, I believe this is possible. It would be great if eccsynd could comment.
 
Pig,

I think that teh BCS will do this, but i don;t know if this will really help. Using the ramp mode is for when you want to slowly reach a certain temperature.... I think we are looking to boil asap, for the most part.

In addition, getting to a set tempertature is not a problem... the BCS does this just fine. the crux of the matter is does the measured temperature correspond to a rolling boil. Hence my program.

Let's say for instance that i determine that the temperature reading in my BK is 209 when i am at a rolling boil. I write a program that says turn the heater on to 100% until i reach 209.

So at some arbitrary point my temp sensor reads 209... the question becomes... am I at a rolling boil? the answer may be yes... it also maybe no. several factors influence boiling temperature, including specific gravity ( more importantly amount of solute (sugar)) and barometric pressure.

Ok... so where are we... my sensor says that i am at boiling (209, by empiracal evidence) i want to make sure though, so i leave teh burner on for a bit longer, just to make sure. Hence the time delay. If i happen to be there, then i hit the Win button to change state. If not, then the worst thing that happens is that i boil on full blast for three minutes.

At any rate, while i think your way will work, i think that using the PID or ramp function is overkill for this application.
 
Good points, I agree. If the goal is to get to boil asap the PID really doesn't help much.

Barometric pressure and viscosity/SG do affect boiling point, but I wouldn't imagine that you would see greater than a 4 degree shift from one brew to the next as long as it's in the same season. Your swing on the BCS is default set to 4 degrees which could cause more damage to boil consistency than barometric/SG swings. If you calibrate your temp probes every few sessions then you'll only neet to figure out how much manual intervention you'll need to do from batch to batch to hit the right boil conditions.

The delay is a good idea - as long as the total time (boil + delay) isn't longer than it takes my PID process to slowly reach 209 degrees ;>)

Good info - this helps me get a feel for how BCS handles specific tasks. I just started screwing with it and am learning more every day. I appreciate it's flexibility that's for sure.
 
here is me brewing my first beer on it.. a nut brown

attachment.php


Ok... done for now.

Thanks to all of you who have been a tremendous inspiration, and offered guidance

Nice job! Really impressed with your straightforward approach.

I was wondering about a heating unit in the MLT (if I saw that correctly). Would a heating unit in the MLT impact the wort in a negative way? Such as scorching?

Again, I may have seen that incorrectly.

Thanks!
 
There might be some confusion. The HLT has two heaters (120V 2000W), a temperature probe, and the copper Heat Exchanger.

The MLT has a temperature probe and a stainless steel braid.

I can link the pictures if that isn't clear
 
There might be some confusion. The HLT has two heaters (120V 2000W), a temperature probe, and the copper Heat Exchanger.

The MLT has a temperature probe and a stainless steel braid.

I can link the pictures if that isn't clear

Thanks, I actually figured that was the case after I posted - seemed obvious I guess in hindsight!

Thanks!
 
Sorry to bring up an older thread, but I was curious if you have any round-about figures on what this cost? I'm still doing a lot of research but I definitely will be doing an all-electric brewery and plan to use the BCS, so any advice/info would be most helpful. Very nice build by the way!
 
Sorry to bring up an older thread, but I was curious if you have any round-about figures on what this cost? I'm still doing a lot of research but I definitely will be doing an all-electric brewery and plan to use the BCS, so any advice/info would be most helpful. Very nice build by the way!

I actually never calculated the total cost... to be frank, i kinda don't want to know.

If i had to guess, i would say $1500. I had the LCD and extra computer.
I bought as much as i could on craigslist and mcmaster.com
 
Back
Top