First, a note of thanks to all these members for sharing their ideas and inspiring me.
Disintegr8or
https://www.homebrewtalk.com/f170/how-build-5-gal-110v-ebiab-kettle-304914/
https://www.homebrewtalk.com/f51/my-first-post-simple-ebiab-homebrew-journey-288663/
Seven
https://www.homebrewtalk.com/f36/biab-brewing-pics-233289/
DeathBrewer
https://www.homebrewtalk.com/f39/easy-stovetop-all-grain-brewing-pics-90132/
johnodon
https://www.homebrewtalk.com/f170/my-official-e-biab-build-thread-269164/
aubicat
https://www.homebrewtalk.com/f170/ready-not-e-biab-here-i-come-312256/
Kal
http://www.theelectricbrewery.com/
bargainfittings
https://www.homebrewtalk.com/f51/soldering-stainless-steel-155782/
And the great guys at my LHBS
http://www.hoggetowne.com/
As noted in my other posts, space is at a premium for me and SWMBO frowns on any new hobby of mine. This is a problem since I suffer from a debilitating condition called MHD, Multiple Hobby Disorder. My build had to be multi-function, compact and easy to store. I believe I've accomplished what I set out to do.
I started out with the 44qt. Bayou Classic kettle with the basket. I was a bit disappointed to discover it was made in China and not as heavy as I hoped. But it fit the application. Of importance was the 3” of clearance under the basket and the lip inside the kettle that supported the basket. While the basket isn't necessary for BIAB, there's the chance that the kettle could serve multiple functions like boiling peanuts, crawfish or sous vide. The 3” clearance was also important for installation of the ULWD Camco element.
I didn't like any of the no weld options, my neighbor is a food safety scientist and I've learned a lot from him in regards to where bacteria can hide in minute places. Even more so, leaks concerned me, nothing would be worse than to have my first 8 gal. of mash in a leaky pot. Luckily I stumbled on Bobby_M's spuds at Brewhardware.com. Can't say enough good things about them, they make for a neat professional installation without any aggravation.

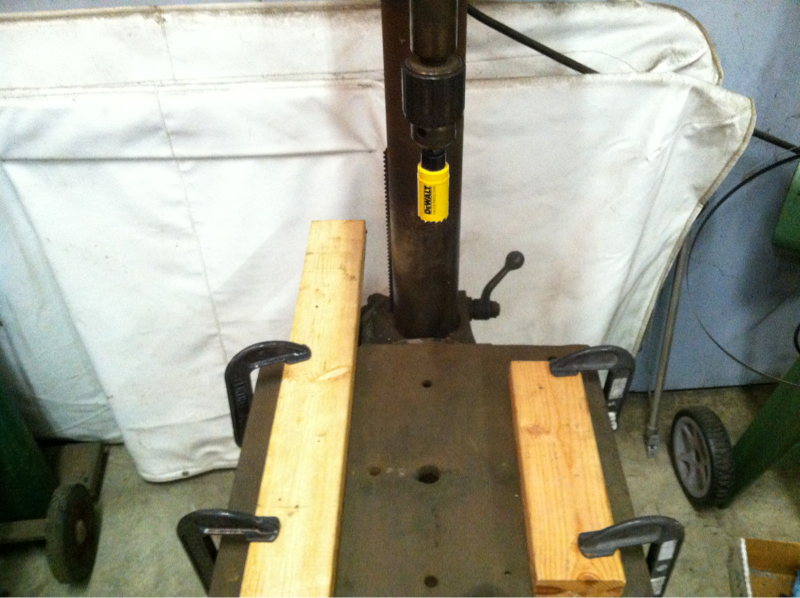
I began by carefully measuring, marking and drilling the holes to accept the spuds. I used Dewalt hole saws in lieu of Greenlee punches.
Dewalt 1-9/16 Saw & Arbor
Dewalt 1-1/16 Saw & Arbor
My first test was cutting a hole in a common coffee can. I figured if I could do that without shredding a tin can, then they would work on the kettle.

I drilled the holes using a drill press, I wouldn't dare try it by hand. I clamped some scrap 2x4's to the table and made a cradle, then centered the table in relation to the drill arbor. Each hole took about 15 seconds total cutting time and I used water based coolant.


I deburred the edges and I was GTG.
I simply tinned the spuds heavy with the recommend silver solder, fluxed the opening in the pot and with the pot cradled on it's side, I set the spud in place making sure the pot was level. I then heated the spud with a propane torch. I allowed the heat to transfer from the spud to the pot and when it was hot enough, it simply sat down in place. I touched up the gap with some solder and moved on to the next spud once it cooled. No distortion or discoloration in the pot. I was careful to make sure the element hole was high enough to allow the element to rotate during installation. Prior to soldering, I tightened the spud onto the element to the amount of compression I wanted on the gasket then I put a witness mark on the top of the spud with the element level. That way the element would be indexed when I soldered it. The element is just shy of the bottom of the basket when installed. The rest of the spuds were installed as low as possible but above the radius of the bottom.
There is a spud for the anode, the RTD, the valve and the heater element. I also soldered a ground lug below the heating element spud.


Had to have something that said Blingman

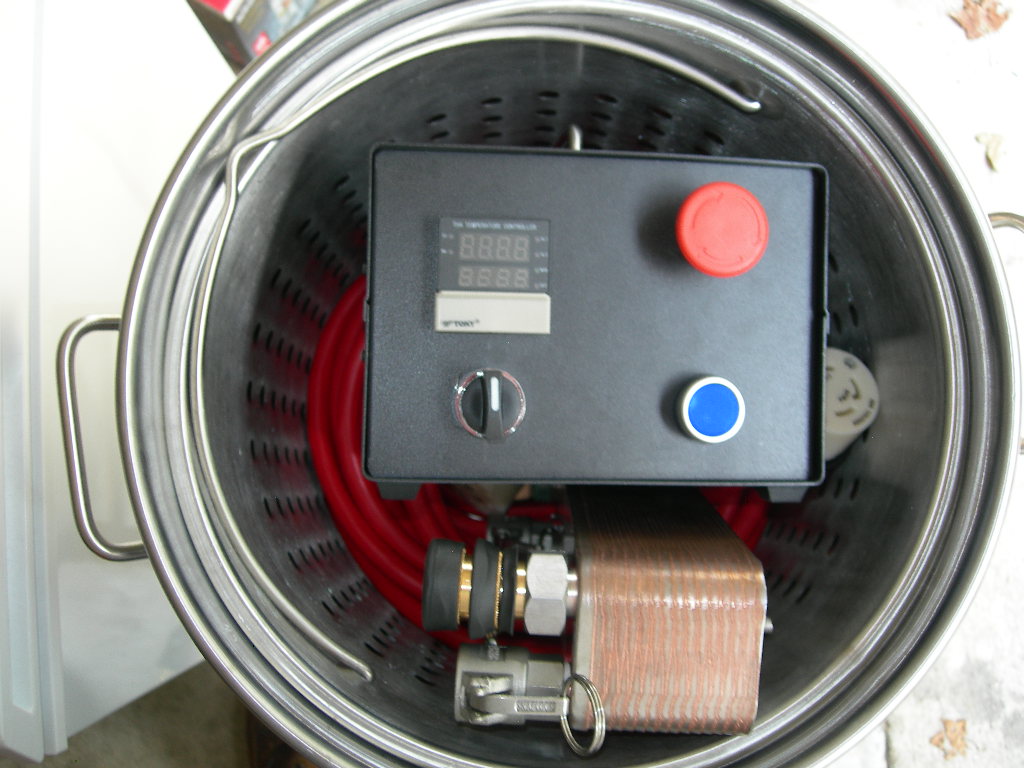
With the kettle finished, it was on to the controller. I already had a PID by Toky on hand. It was a spare I've had for several years, designed to drive an SSR with both a fuzzy logic and manual mode. I had a couple of spare 45A Opto22 SSR's. I decided to order the enclosure from Auberins, along with the heat sink, switches & RTD with the deluxe QD cable.
I picked up the Packard contactors from Amazon.
The plan was to build a compact controller. I used Unibits to drill all the holes, again carefully laying them out and using the drill press. I managed to find a smoking deal via eBay on a fifty foot 10ga 3 wire cord for $50 delivered. It already had a L14-30A plug on one end which was a bonus, I lopped it off and it became the pigtail for the heating element. The other end had a 3 outlet 120V splitter. I lopped it off, it will get a 120V plug for use around the farm. I purchased some additional L14-30A plugs & sockets via eBay. There is the typical dryer plug installed on one end and a L14-30A twist lock on the other.
The layout & configuration was far less complex than other builds. The E-Stop switch serves double duty as the master on/off switch. It switches a contactor that supplies the hot & neutral on the
buss strip for the rest of the control box.

The 3 position switch selects between the PID output, center off and the second contactor that simply shorts across the output of the SSR to provide 100% full on 240V to the element. A PWM control will be installed as soon as it becomes available in the next couple weeks. Details on it are hush-hush at the moment.
The Push button switch supplies power to a 12V 2A switch mode power supply that supplies the 12V DC to the Greatbrew pump. I didn't want a 120V circuit along with the 240V since my house is only a 3 wire system on the 240V side thus no neutral and I hate wall warts.

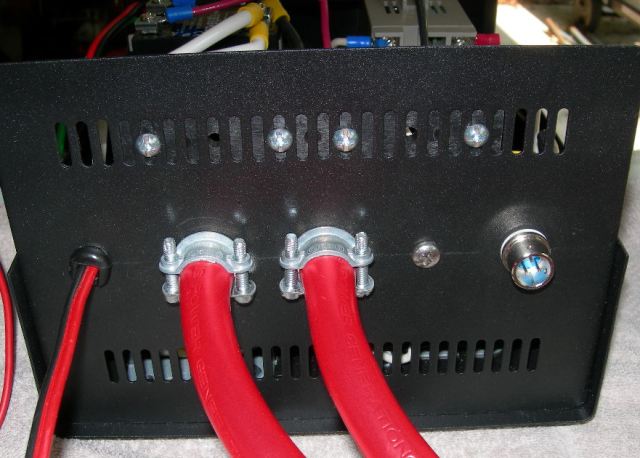
I opted for the pigtail approach for the control box instead of receptacles, due to both space constraints and cost. One pigtail supplies power to the contactor, the other connects to the heating element pigtail. The 12V DC lead has Anderson PowerPoles installed, there are inline fuse holders in both sides of the DC power leads inside the control box.

I found a “wire” drawer handle at Lowes and added it to the top of the enclosure.

One advantage of the controller is that I can use it for other applications, a smoker for example. All that's required is another RTD and a 240V heating element.
For the heating element pigtail, I used a 1” PVC slip to NPT coupler. The threaded side was smaller than the heating element insulator. I profiled the coupler in the mill to match the insulator. You can use a Dremel etc. Once it fit snugly, I drilled an angled hole at the bottom location of the fitting for the ground lead to exit.


I used a slip plug & bored a hole for a snug fit on the cord. I installed two ring terminals on the heater element and bent them at right angles so that the power leads would be straight when soldered and prevent the wire from being all bunched up. I soldered the pigtail leads to the ring terminals then pushed the PVC coupler over the element. I marked on each side of the coupler for screws to fasten it to the element insulator, taking care to choose the length and position them so that there was no way that they could short to the element. I installed one screw to secure the slip plug to the coupling. A quick check with the ohmmeter assured me that all was good. I've considered using some polyurethane adhesive but I like the fact that it's serviceable as is should I need to make a change.


For all the plumbing connections I used economical camlock connections.
Disintegr8or
https://www.homebrewtalk.com/f170/how-build-5-gal-110v-ebiab-kettle-304914/
https://www.homebrewtalk.com/f51/my-first-post-simple-ebiab-homebrew-journey-288663/
Seven
https://www.homebrewtalk.com/f36/biab-brewing-pics-233289/
DeathBrewer
https://www.homebrewtalk.com/f39/easy-stovetop-all-grain-brewing-pics-90132/
johnodon
https://www.homebrewtalk.com/f170/my-official-e-biab-build-thread-269164/
aubicat
https://www.homebrewtalk.com/f170/ready-not-e-biab-here-i-come-312256/
Kal
http://www.theelectricbrewery.com/
bargainfittings
https://www.homebrewtalk.com/f51/soldering-stainless-steel-155782/
And the great guys at my LHBS
http://www.hoggetowne.com/
As noted in my other posts, space is at a premium for me and SWMBO frowns on any new hobby of mine. This is a problem since I suffer from a debilitating condition called MHD, Multiple Hobby Disorder. My build had to be multi-function, compact and easy to store. I believe I've accomplished what I set out to do.
I started out with the 44qt. Bayou Classic kettle with the basket. I was a bit disappointed to discover it was made in China and not as heavy as I hoped. But it fit the application. Of importance was the 3” of clearance under the basket and the lip inside the kettle that supported the basket. While the basket isn't necessary for BIAB, there's the chance that the kettle could serve multiple functions like boiling peanuts, crawfish or sous vide. The 3” clearance was also important for installation of the ULWD Camco element.
I didn't like any of the no weld options, my neighbor is a food safety scientist and I've learned a lot from him in regards to where bacteria can hide in minute places. Even more so, leaks concerned me, nothing would be worse than to have my first 8 gal. of mash in a leaky pot. Luckily I stumbled on Bobby_M's spuds at Brewhardware.com. Can't say enough good things about them, they make for a neat professional installation without any aggravation.
I began by carefully measuring, marking and drilling the holes to accept the spuds. I used Dewalt hole saws in lieu of Greenlee punches.
Dewalt 1-9/16 Saw & Arbor
Dewalt 1-1/16 Saw & Arbor
My first test was cutting a hole in a common coffee can. I figured if I could do that without shredding a tin can, then they would work on the kettle.
I drilled the holes using a drill press, I wouldn't dare try it by hand. I clamped some scrap 2x4's to the table and made a cradle, then centered the table in relation to the drill arbor. Each hole took about 15 seconds total cutting time and I used water based coolant.
I deburred the edges and I was GTG.
I simply tinned the spuds heavy with the recommend silver solder, fluxed the opening in the pot and with the pot cradled on it's side, I set the spud in place making sure the pot was level. I then heated the spud with a propane torch. I allowed the heat to transfer from the spud to the pot and when it was hot enough, it simply sat down in place. I touched up the gap with some solder and moved on to the next spud once it cooled. No distortion or discoloration in the pot. I was careful to make sure the element hole was high enough to allow the element to rotate during installation. Prior to soldering, I tightened the spud onto the element to the amount of compression I wanted on the gasket then I put a witness mark on the top of the spud with the element level. That way the element would be indexed when I soldered it. The element is just shy of the bottom of the basket when installed. The rest of the spuds were installed as low as possible but above the radius of the bottom.
There is a spud for the anode, the RTD, the valve and the heater element. I also soldered a ground lug below the heating element spud.
Had to have something that said Blingman
With the kettle finished, it was on to the controller. I already had a PID by Toky on hand. It was a spare I've had for several years, designed to drive an SSR with both a fuzzy logic and manual mode. I had a couple of spare 45A Opto22 SSR's. I decided to order the enclosure from Auberins, along with the heat sink, switches & RTD with the deluxe QD cable.
I picked up the Packard contactors from Amazon.
The plan was to build a compact controller. I used Unibits to drill all the holes, again carefully laying them out and using the drill press. I managed to find a smoking deal via eBay on a fifty foot 10ga 3 wire cord for $50 delivered. It already had a L14-30A plug on one end which was a bonus, I lopped it off and it became the pigtail for the heating element. The other end had a 3 outlet 120V splitter. I lopped it off, it will get a 120V plug for use around the farm. I purchased some additional L14-30A plugs & sockets via eBay. There is the typical dryer plug installed on one end and a L14-30A twist lock on the other.
The layout & configuration was far less complex than other builds. The E-Stop switch serves double duty as the master on/off switch. It switches a contactor that supplies the hot & neutral on the
buss strip for the rest of the control box.
The 3 position switch selects between the PID output, center off and the second contactor that simply shorts across the output of the SSR to provide 100% full on 240V to the element. A PWM control will be installed as soon as it becomes available in the next couple weeks. Details on it are hush-hush at the moment.
The Push button switch supplies power to a 12V 2A switch mode power supply that supplies the 12V DC to the Greatbrew pump. I didn't want a 120V circuit along with the 240V since my house is only a 3 wire system on the 240V side thus no neutral and I hate wall warts.
I opted for the pigtail approach for the control box instead of receptacles, due to both space constraints and cost. One pigtail supplies power to the contactor, the other connects to the heating element pigtail. The 12V DC lead has Anderson PowerPoles installed, there are inline fuse holders in both sides of the DC power leads inside the control box.
I found a “wire” drawer handle at Lowes and added it to the top of the enclosure.
One advantage of the controller is that I can use it for other applications, a smoker for example. All that's required is another RTD and a 240V heating element.
For the heating element pigtail, I used a 1” PVC slip to NPT coupler. The threaded side was smaller than the heating element insulator. I profiled the coupler in the mill to match the insulator. You can use a Dremel etc. Once it fit snugly, I drilled an angled hole at the bottom location of the fitting for the ground lead to exit.
I used a slip plug & bored a hole for a snug fit on the cord. I installed two ring terminals on the heater element and bent them at right angles so that the power leads would be straight when soldered and prevent the wire from being all bunched up. I soldered the pigtail leads to the ring terminals then pushed the PVC coupler over the element. I marked on each side of the coupler for screws to fasten it to the element insulator, taking care to choose the length and position them so that there was no way that they could short to the element. I installed one screw to secure the slip plug to the coupling. A quick check with the ohmmeter assured me that all was good. I've considered using some polyurethane adhesive but I like the fact that it's serviceable as is should I need to make a change.
For all the plumbing connections I used economical camlock connections.
Last edited by a moderator: