Tips and Tricks for a tidy and safe control box?

Homebrew Talk - Beer, Wine, Mead, & Cider Brewing Discussion Forum

Help Support Homebrew Talk - Beer, Wine, Mead, & Cider Brewing Discussion Forum:

This site may earn a commission from merchant affiliate links, including eBay, Amazon, and others.

shortyjacobs

Well-Known Member
Joined
Aug 12, 2009
Messages
2,509
Reaction score
46
Location
Twin Cities, MN
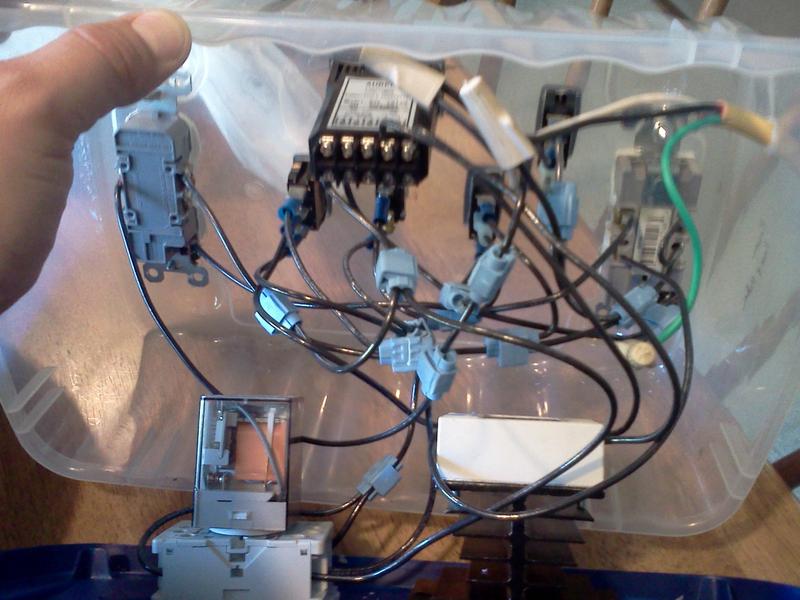
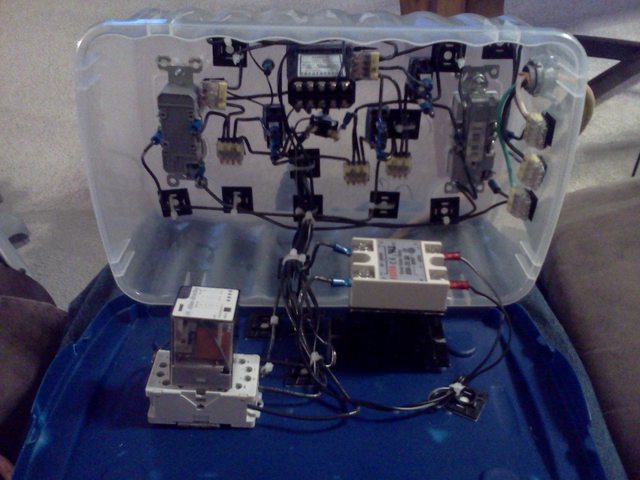
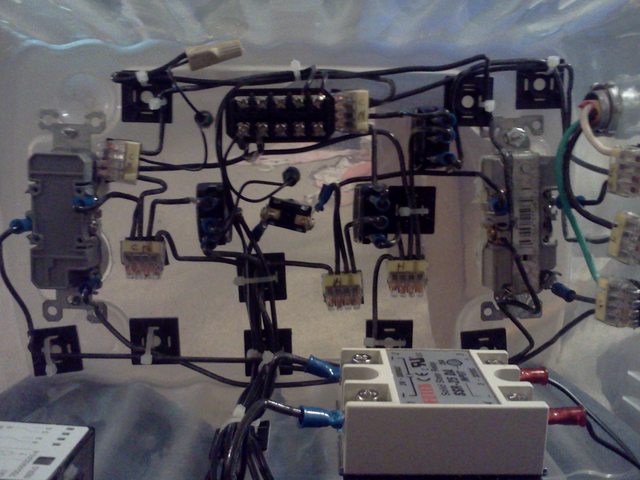
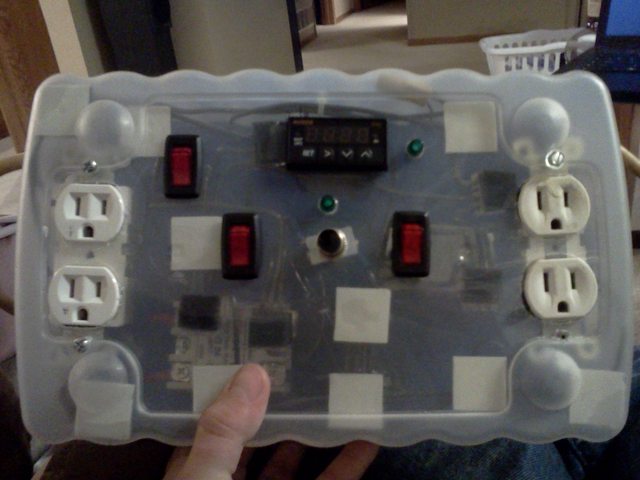
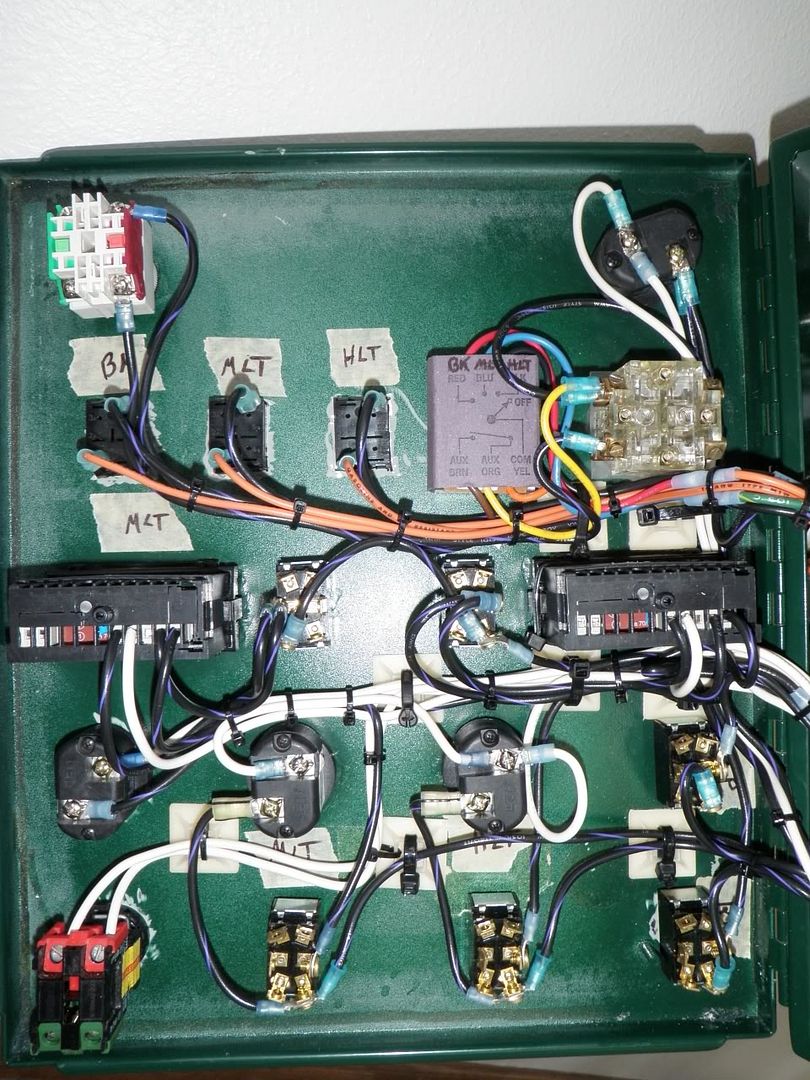
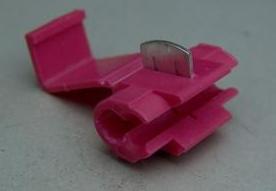
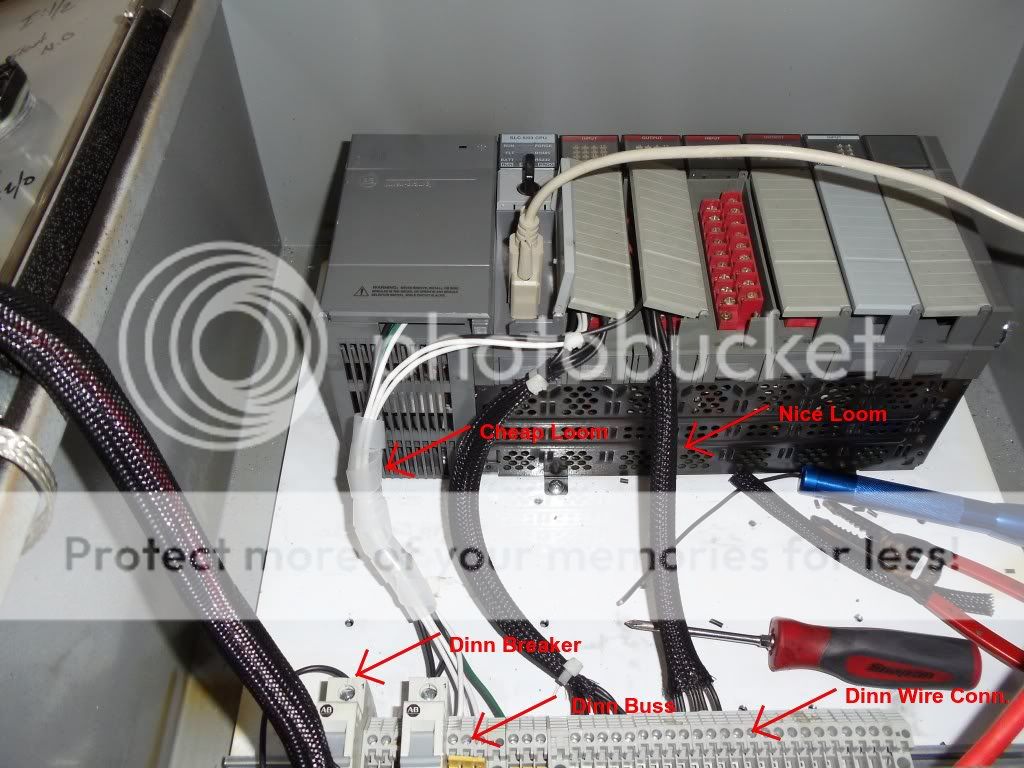
So I wired up my control box yesterday for my RIMS/Pump setup. I used a ton of Scotchlock connectors:
guyft.jpg


BOY is it ugly! Strained wires, a big rats nest of crap. With so many connections being strained when I close it up, it can't really be safe. I know sooner or later a wire will slip off a terminal and short the damn thing out.

SO, how do I do this correctly? Here's my schematic:
3lthN.png

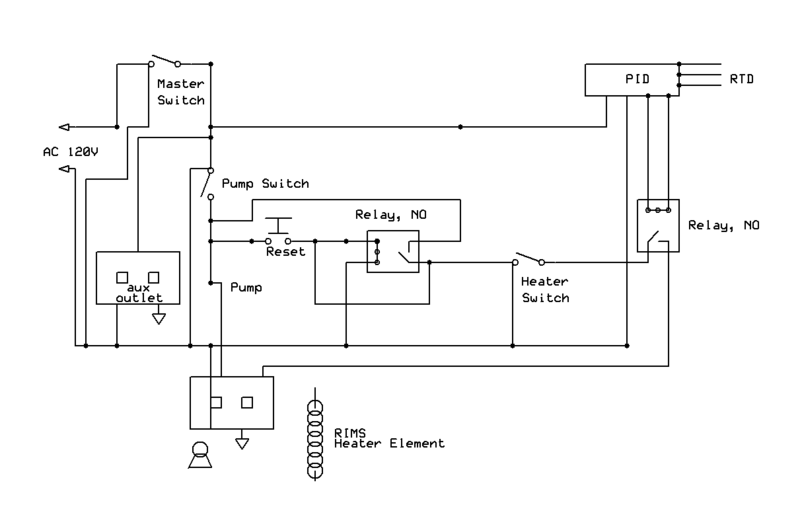
(Note: each switch has a neutral lead because they are illuminated)

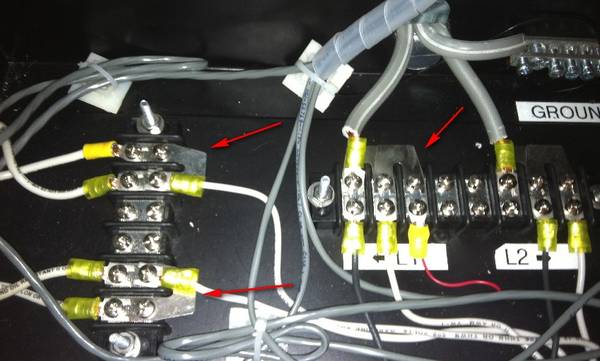
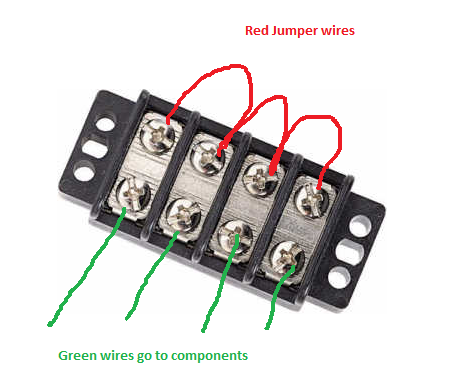
I am thinking perhaps a terminal strip for all the common connections, and a few more strips for the hot side junctions?

  • How do you wire those up for junctions, like this?
HS3Fj.png


  • Is there a better way to do junctions?

  • Are there any tips or tricks to routing wiring so that it isn't one big rats nest?

Thanks! :mug:

(Post script, at least it all worked when I put it together...after I figured out that I had hot/neutral reversed, (seriously, WHY is black hot? WHITE should be hot!), and I only got shocked ONCE! (note to self, even if you turn off the master power switch, don't open it up until you unplug the damn thing!))
 
A Bus Bar or similar allows for an easier wiring job. No jumpers needed. If you use the terminal junctions then look for ones that have pre-made jumpers, makes it neater than pigtails.

I of course did none of that as I already had the parts, but I wish I had followed my own advice.
 
Key factors for any wiring job which are also somewhat money saving techiques.

#1. Wire type and size. Use stranded copper for areas where multiple flexes occur. Solid copper can be neat and tidy when used to snake around. Also use the smallest possible wire size that is safe, this can be done if fuses and breakers are used properly. EX. you do not need 12ga wire going to your PID's or other low amp draw items, like coils for relays and contactors. Keep colors uniform, red and black for hots, white for neutral, green or bare for ground, and blue for DC. This will help you so much in the long run.

#2. Bus Bars. Again sized correctly for load, a bus bar for your control circuit doesn't need to be large and take up a lot of space. I use DINN mounted items for cleanliness (breakers, fuse blocks, relays, bus bars, wire connectors).

#3. Isolation. Keep large gauge wires and high amp draw items away from small and low amp draw items.

#4. Wire loom. Use nice and neat wire loom, I prefer braided, and not spiral or solid loom.

#5. Item Placement. I usually try to keep all common items together. Like you dont want relays placed all around your box, make a row of all relays, all breakers, etc...

Also use zip ties where you feel necessary and cut wire lengths to proper lengths.

Here is a picture of my panel as I was wiring it.

panel.jpg
 
I second everything maxkling just said.

Also, make liberal use of the adhesive backed wire-tie mounts and zip ties. Collect wires by purpose and zip tie them down. Kal has good examples at theelectricbrewery.com under "the control panel (part 2) - wiring basics."

Finally, think about a wiring sequence. Do all of the higher current wires, then the PID wires, then the switches, or whatever order you decide on. That way the wires aren't woven together.
 
Thanks guys. I actually read through Kal's entire build on his site after posting this thread originally, and it was very helpful as well.

I'm taking a lot of what you said to heart. I tore out every wire last night and started fresh in my box using a lot of adhesive backed tie mounts and zip ties. I first bought some euro style terminal bars, but then bought these instead. I am velcroing these suckers down at each junction. They have the advantage of being modular, so I don't have long traces of wire, and are already internally jumpered, (the idea of doing tons of jumpers on the terminal bars to turn them into bus bars made me groan!). So far, I'm about half done, and it's looking REALLY good. I'm doing it all with 14 ga stranded, as that's what I have right now, and I don't want to buy thinner wire. I know it's not ideal, but it's working great so far. I'm going to get some 18 or 20 ga stranded to wire up the indicator lights and RTD port though.

My "box" is very small...only controlling pump and RIMS, so it's not as extensive as a lot of your setups. It's also a plastic rubbermaid type box, (I know, I know...not nearly as flashy as yours, and not rated for taking a fire hose at 6 inches and not taking on water....but I'm cheap, and it's GFCIed, and so there....:D).

Here's a before shot. Hopefully at the end of tonight I can post an after shot:
CKpEG.jpg
 
WOW, that looks like a serious fire hazard, HA.

Make it neat no need in hurting yourself, burning down your house, or throwing away money and time. When I do a mock up, its not neat at all, just to verify my wiring and make sure everything works as planned, thats pretty much all you did, right?:p
 
Some good advice so far. As you found out, Scotchlocks have their place but are awful for this. I really like insulated crimp fittings. When done properly they can be as secure and safe as soldering.

Take your time planning and running wires. It took me hours, but I was able to cram a TON of stuff in a 12x12" box. I'll be happy to answer any specific questions or take more pictures :)

controlbox_wired.jpg


-Joe
 
Well I promised an update. Almost done, just need to wire my stereo plug to the RTD connections on the PID. That involves soldering though, and I'm too tired tonight. Here's the new inside in it's final glory:
BEud2l.jpg


Close up of the "top side":
rjNPbl.jpg


A hazy view through the side plastic to show how everything nests nicely together:
OR9f3l.jpg


Only problem is, all those adhesive backed mounting squares and velcro bits sure make the top side look ugly...might end up taking out the switches and PID and spraying the thing flat black or something....
HkjNGl.jpg


Also, Nostalgia, very nice and compact looking setup! Walker, thanks, I was guessing that was what those were for, but didn't want to guess wrong. I went with the push connectors instead, (which are VERY secure, by the way....I can rip apart my double crimped connections if I really really try, but these are even stronger).
 
When in doubt buy a bigger panel. A 48"x48" panel has so much dang room even the beginners wiring will look organized.

Plus from my experience the moment you get done wiring a cabinet you think of something else that you need to add.
 
When in doubt buy a bigger panel. A 48"x48" panel has so much dang room even the beginners wiring will look organized.

Plus from my experience the moment you get done wiring a cabinet you think of something else that you need to add.

So true...just finished up my first brewday with the new panel....now I realize I need to add a buzzer so I can use the alarm feature on my PID!
 
I second the use of Dinn terminals. I am usually not as concerned with neatness as functionality. Cable ties are great. I found the sticky cable mounts to be pretty worthless...they just dont stay stuck. The power terminal block and dinn blocks made this one much easier to wire than my first attempt.

IMG_20110223_194026.jpg
 
A good question :) What are you using them for?

-Joe

Probably DC to control SSR's? There is one in the upper left of my control box. I sawed off the case and soldered leads to the 120v side. I gorilla glued it to a piece of aluminum for mounting.

*edit* well maybe not ssr's after looking at the picture more closely but probably control power right?
 
Does this look safe and tidy?

Nice job, EarthBound! Looks great. :mug:

Does that Velcro hold the wall bug fairly securely? If it comes loose then there is a possibility that its prongs will touch something and make a short. An adhesive anchor and a cable tie around the body should secure it beyond any doubt.
 
Nice job, EarthBound! Looks great. :mug:

Does that Velcro hold the wall bug fairly securely? If it comes loose then there is a possibility that its prongs will touch something and make a short. An adhesive anchor and a cable tie around the body should secure it beyond any doubt.

Truth here. I had velcro holding my SSR and contactor relay in my box. After one brew session on it's side, the contactor relay fell down! (Luckily the connections were all shielded). If yours fell, there'd be sparks! (by the way, wasn't the actual velcro that let go, it was the adhesive backing on the velcro!).
 
You can buy a small transformer at Radio Shack for like $6 that you can jut screw down in there instead of velcro-ing wall worts to the sides.

Or, if you want to be frugal, get a free radio/cdplayer/something off of craigslist. Crack it open. The AC power cord will be connected to a transformer. Everything inside runs on DC. Snip off the AC cord input and DC output wires and re-use it.

Depending on how old your wall worts are, you might just be able to crack THEM open and pull out a transformer that can be mounted in there somewhere.


I've started pulling parts out of any busted electronics that I have. My wife hates it, but I've got a big box-o-stuff that I am sure I can re-use at some point.
 
When powering a wall wort, female spade connectors work just fine if you get the filly shielded female spades. Slide right on with no exposed metal surfaces
 
When powering a wall wort, female spade connectors work just fine if you get the filly shielded female spades. Slide right on with no exposed metal surfaces

Interesting... I tried that at one point when I was messing with something and the female spade connectors would absolutely not fit over the blades on the wall wort. The blades that fit into a 120v receptacle are WAY thicker than the blades used in your average male spade.

I think this is also why his picture shows rig connectors attached to the blades with screws and nuts instead of spades slid on.
 
beats the s**t out of me. I had never even heard that term until last year. We always just called them "adapters".
 
A good question :) What are you using them for?

-Joe

The one on the bottom is 120VAC/24VAC because I need 24VAC for the coils of the DPST relays. I'm using the 120VAC/12VDC on the wall for turning on/off the fan for the heat sink:

P7010209.JPG


Nice job, EarthBound! Looks great. :mug:

Does that Velcro hold the wall bug fairly securely? If it comes loose then there is a possibility that its prongs will touch something and make a short. An adhesive anchor and a cable tie around the body should secure it beyond any doubt.

Truth here. I had velcro holding my SSR and contactor relay in my box. After one brew session on it's side, the contactor relay fell down! (Luckily the connections were all shielded). If yours fell, there'd be sparks! (by the way, wasn't the actual velcro that let go, it was the adhesive backing on the velcro!).

Tah-dah!

P7010210.JPG


Interesting... I tried that at one point when I was messing with something and the female spade connectors would absolutely not fit over the blades on the wall wort. The blades that fit into a 120v receptacle are WAY thicker than the blades used in your average male spade.

I think this is also why his picture shows rig connectors attached to the blades with screws and nuts instead of spades slid on.

Yeah, the spades did not fit because the blades are too thick. The blades had holes in them that screws fit into perfectly, so I used ring terminals.

BTW, I call them transformers.
 
Tah-dah!

Yeah, the spades did not fit because the blades are too thick. The blades had holes in them that screws fit into perfectly, so I used ring terminals.

Adhesive on velcro, adhesive on a little plastic tab...what's the difference? It's still gonna fall off. Use a screw or some real glue IMO.

I also did the ring terminals on the blades. That is a solid connection. Probably better than spades.
 
Adhesive on velcro, adhesive on a little plastic tab...what's the difference? It's still gonna fall off. Use a screw or some real glue IMO.

I also did the ring terminals on the blades. That is a solid connection. Probably better than spades.

Lol... It's not gonna fall off, buddy. I used gorilla glue, tested it, and it's stuck as ****. Do you have a brew rig of any kind? I saw the panel you made for yooper, but couldn't find anything that you use.
 
Hey bud, you should've said you used gorilla glue, then I wouldn't have bothered to post. That stuff rocks! Silicone caulk is also the ****z in the right application.

I have a few random posts of my setup but never really took much time to document it. Here's a shot. Electric HLT w/HERMS. cooler MLT, and still propane boil (just ran 100A feeder to the shop though).

ForumRunner_20110703_132127.jpg
 
Hey bud, you should've said you used gorilla glue, then I wouldn't have bothered to post. That stuff rocks! Silicone caulk is also the ****z in the right application.

I have a few random posts of my setup but never really took much time to document it. Here's a shot. Electric HLT w/HERMS. cooler MLT, and still propane boil (just ran 100A feeder to the shop though).

Yep, I should've said I used gorilla glue, and you shouldn't've assumed I didn't use gorilla glue. ;) And yes, it does rock! That sticky square won't be going anywhere because of it. I use silicone for sealing just about everything. You can see a s**tload of it at the top of the inside of my panel.

You have a nice setup! It would be awesome to see a thread for it...
 
EarthBound said:
Yep, I should've said I used gorilla glue, and you shouldn't've assumed I didn't use gorilla glue. ;) And yes, it does rock! That sticky square won't be going anywhere because of it. I use silicone for sealing just about everything. You can see a s**tload of it at the top of the inside of my panel.

You have a nice setup! It would be awesome to see a thread for it...

Don't rule out silicone as an adhesive though. I use it a lot especially with porous materials. Do a test sometime you may be surprised.

Thanks for the compliment. I always planned to document my rig but never found the time. I do have some pics from the build...maybe I'll work on it.
 
I used the female spades at one point on the power adapter for my BCS-460. I don't have any pictures of it though and I no longer use it the same way.

I don't think I used any kind of special spades.

Linc
 
Call me crazy, but any two 110v terminals that are close enough to connect with one finger get heat-shrinked/e-taped. Call me a klutz.

B

You're not crazy - it's a good point, for sure, and one that I brought up with my buddies. We thought it was fine the way it is. There are plenty of places in that panel that can be connected with one finger that are more dangerous. We have an excellent grounding scheme and a GFCI breaker to protect us from any danger. But now that you mention it, I little bit of e-tape ain't such a bad idea...
 
You're not crazy - it's a good point, for sure, and one that I brought up with my buddies. We thought it was fine the way it is. There are plenty of places in that panel that can be connected with one finger that are more dangerous. We have an excellent grounding scheme and a GFCI breaker to protect us from any danger. But now that you mention it, I little bit of e-tape ain't such a bad idea...

Here's the thing I realized recently...GFIs aren't the best at protecting you, especially in that situation. I opened up my box at one point, and forgot to unplug it. I managed to touch the hot and neutral (120V) lines, and got a decent shock. I was confused why the GFI didn't trip, and then realized it wasn't supposed to. When I touched hot and neutral, together, my body was the conductor and the load. GFIs don't trip when a load is connected, only when there is ground current leakage. Since I wasn't ALSO touching a ground terminal, (and apparently my shoes were decently insulated), there was no current leakage to ground, so the GFI didn't trip.

So either wear ESD shoes to ensure you're always grounded so the GFI trips, or don't touch hot and neutral lines! :drunk:

That is an excellent point... one I haven't really considered until now. I will definitely keep it in mind, thank you. However, my scenario is different than yours because I will always unplug my panel if I intend on opening it, and I will never touch two live wires. Therefore, whenever an electrical danger arises, it will instantly be resolved because there will be a ground involved. :)
 
Back
Top