Automating BG14 burner on propane

Homebrew Talk - Beer, Wine, Mead, & Cider Brewing Discussion Forum

Help Support Homebrew Talk - Beer, Wine, Mead, & Cider Brewing Discussion Forum:

This site may earn a commission from merchant affiliate links, including eBay, Amazon, and others.

disney7

Well-Known Member
Joined
Dec 21, 2011
Messages
400
Reaction score
63
Location
Maryville
I tried this over on the DIY forum but didn't have much luck. This might have been the better place to post it.

I currently have a brew stand (which I built) that uses the large BG14 banjo burners. They use a 0-30 PSI adjustable regulator connected to a 20 lb propane tank as a fuel source.

I'd like to look into safely automating a burner.

I am familiar with the various PID controllers (MyPin, Auber, etc.) that are often discussed here. I am not very familiar with gas automation.

So, I have read all I can find and it appears that I am using what is considered "high pressure" propane. It also appears that it is not practical to try to automate a high pressure system. Is this correct?

So, can I buy a different regulator and drill out the burner jets to convert it to low pressure?

If that is possible, can anyone point me at a good source for gas valves that have a thermocouple (to stop gas flow if the burner/pilot blows out) and are capable of lighting themselves (they have an igniter)?

Thanks for any info or pointers on this. I have to run off of standard 20 lb propane tanks as I don't have propane/natural gas at the house. What I'd like to do is automate my HLT.
 
After a few minutes of digging I found this page for the BrewTrollers, it seems like what I need, maybe it would work for you.
https://www.oscsys.com/projects/brewtroller/system-design/direct-fired

Direct Fired
You are here1.Projects
2.» BrewTroller
3.» System Design
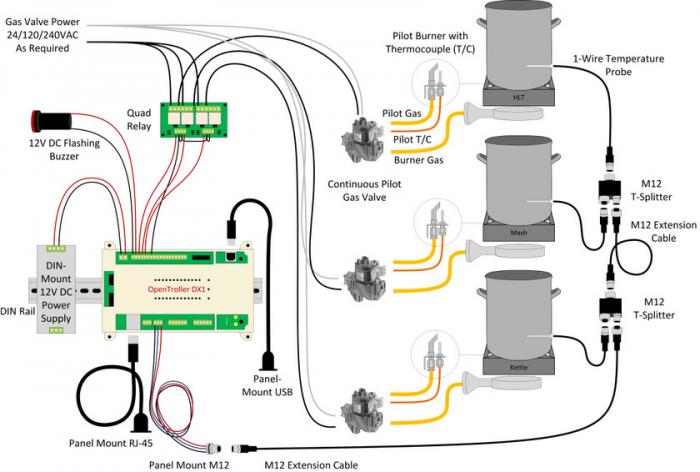
The diagram below shows a Direct Fired, 3-Vessel system controlled by the Opentroller DX1 using Honeywell Continuous Pilot Valves. Intermittent Pilot Control Modules are also available but require extra attention to ensure noise generated by the ignition circuit does not interfere with the function of the rest of the control system.


The diagram below shows a possible plumbing configuration for a single-tier, two-pump direct fired system. With seven valves, two pumps and the heat and alarm outputs shown in the diagram above, this configuration uses 13 of the Opentroller DX1's 14 available outputs.


•All valves require a constant 12V DC supply. A terminal block is used to simplify wiring. Each valve is directly controlled from an output on the DX1 without requiring a relay.
•Chilling is accomplished in this system using a permanently mounted immersion chiller.
•A side input to the kettle is used for Sparge Out as well as for whirlpool during chilling.
This system design would use the OpenTroller DX1\RIMS or Direct Fired hardware profile with BrewTroller 2.5. Output assignments for the various Hardware Profiles is detailed in KB1001886: BrewTroller 2.x HWProfile Assignments.

Design Elements
•OpenTroller DX1 5A DIN Core Package
•35MM DIN Rail (12") Qty 2
•M12 3-Pin Female Panel Mount with Cable
•M12 3-Pin Extension Cable (2') Qty 2
•M12 3-Pin Extension Cable (6') Qty 1
•M12 3-Pin T-Connector Splitter Qty 4
•(Consider using 1-Wire Temperature Probe (4") Qty 1 to control Mash Heat based on Mash Tun outlet temperature and using 8" Probe listed below to monitor internal Mash temperature)
•1-Wire Temperature Probe (8") Qty 3
•Quad Relay Board Qty 2(Also consider using: DIN Mount DPDT Relay Module Qty 5)
•Flashing Buzzer
•Panel Mount USB Adapter B to B
•Panel Mount USB Faceplate
•1/2" NPT 2-Way Stainless Motorized Ball Valve (12V) Qty 7
•(Consider using: 1/2" 3-Way Motorized Ball Valve (SPST) Qty 1 in place of two 2-Way valves on kettle exit. Default flow for 3-Way would be plumbed to whirlpool and when activated wort would be directed to Fermentor. This configuration when used with boil recirculation prevents non-sanitized wort in plumbing fittings. Only the fermentor output port of the 3-Way valve will require chemical sanitation.)
•12 Position Barrier Block
•Gas valves also required but not available from OSCSYS at this time

Direct%20Fired%20Plumb.jpg


DirectFired_0.jpg
 
I believe that those valves can't handle the high gas pressure required to fire high pressure burners. I have the same valves, and I am using them with low pressure banjo burners.
 
No they can't you would just need to put a regulator that drops the pressure to 11" WC or lower.

I don't think it is quite that simple. Dropping the pressure to 11" WC would defeat the purpose of using high pressure burners in the first place. Also, I believe the jet is different for high pressure as opposed to low pressure burners. Here is a link to another thread that has a big discussion of this topic.

https://www.homebrewtalk.com/f51/understanding-high-pressure-versus-low-pressure-propane-157415/
 
Yes you have to change the orifice also to get the correct amount of gas into the burner. The Banjo burners can be used with high or low pressure gas. If you look at the current orifice in the burner it has a really small hole in it. The low pressure orifice will have a large hole to allow more flow threw the orifice into the burner. Not hard at all.
 
Well, here is what I have learned so far:

1) I will need to convert my burners to 11" WC low pressure setups by using a new orifice valve and a new regulator.

2) Kladue posted somewhere on here (can't find the post now) that the pilotless direct ignition type setups can be unreliable due to differences in burners. So, that leave me with wanting to do a standing pilot that has its own igniter. I don't want to have to light the pilot manually and I want it to be able to relight itself if blown out.

Now, I just need to determine what the best parts to use are. To make the install as neat as possible, I'd like to find a gas valve with a built in igniter controller (do these exist?).
 
What you want is an Intermittent pilot valve. The igniter box is normally separate from the valve. The valve sends a signal to the box to light the pilot. once the igniter box senses a flame it tells the valve it is ok to open. Honeywell makes pretty good versions of these you just need to calculate what your BTUs are going to be and buy the correct valve. Also make sure that it is propane compatible.
 
Thanks CrazyIrishMan.

So, does anyone know of a good intermittent pilot setup that will work with converted BG14 burners? I guess I'll need a gas valve, igniter controller, pilot, thermocouple, igniter, and power supply. Am I missing anything? Does anyone have part numbers for parts that are known to be compatible?
 
Honestly I would just use a standing pilot valve. It would be a lot cheaper that whole set up is going to run more then $300 per burner if not more. It really doesn't buy you any safety factor. Also the valve will take longer to respond for a call for heat meaning that your temps are going to fluctuate more. Also there is more things to go wrong with it.
 
One other thing to remember is that you need an orifice for 3.5" WC. The furnace valve also has a regulator in it that reduces the pressure to 3.5" WC. So the williams one listed earlier in the thread won't provide enough gas to get the full BTU rating of the burner.
 
One other thing to remember is that you need an orifice for 3.5" WC. The furnace valve also has a regulator in it that reduces the pressure to 3.5" WC. So the williams one listed earlier in the thread won't provide enough gas to get the full BTU rating of the burner.

I am running the Williams orifice valve on both of my low pressure burners, one with a Honeywell valve and one plumbed directly to my regulator. I have found that there is no difference between the gas flow rates to either burner, even with both turned on at the same time.
 
One other thing to remember is that you need an orifice for 3.5" WC. The furnace valve also has a regulator in it that reduces the pressure to 3.5" WC. So the williams one listed earlier in the thread won't provide enough gas to get the full BTU rating of the burner.

Im running three furnace valve, 2 different brands, neither of which are a honeywell. These were scavenged from dead furnaces (have a buddy in that biz). Furnance valves like most gas appliances have interchangable orifices made for eith natural gas (3.5" wc) or propane (11" wc). They are also slightly adjustable. Once I had my system plumbed my buddy brought over water tube meter and we set my regulator to 14" wc to supply the manifold and tweaked the out on each furnace valve for the cleanest burn. System works great.
 
For those folks working on an automatic control Brutus design with low pressure burners here is a diagram of the wiring needed for a Honeywell S8610U ignition module, VR8304 dual valve low pressure gas valve, and a Love TS-2 temperature controller. This diagram includes a SPDT switch with center off so you can operate the burner manually to test, or in automatic mode with Love controller firing burner.
http://picasaweb.google.com/kevin.ladue/Ignition#5420037998508461298

Here are the part numbers and links:

1 Ea. Honeywell S8610U Intermittent-Pilot-Control-Conversion-Kit
http://www.pexsupply.com/Honeywell-Y8610U4001-Intermittent-Pilot-Control-Conversion-Kit
1 Ea Honeywell Q345A1313 Pilot burner, needed because kit parts are for Q314 pilot burner conversion, and Q314 pilot is not included in kit.

http://www.pexsupply.com/Honeywell-Q345A1305-Pilot-Burner-For-Natural-Gas-14525000-p

1 Ea Honeywell 390686-1 LP orifice for Q345 pilot burner if not included in pilot package.

http://www.pexsupply.com/Honeywell-390686-1-LP-Orifice-for-Pilot-Burners-Q314-Q345-Q3450-Q3451-Q3452

LP conversion spring for valve (New regulator spring) if not included in kit

http://www.pexsupply.com/Honeywell-396221-LP-Conversion-Kit-Envelope-Assembly

For AC power for 2 Ignition modules:

http://www.pexsupply.com/Honeywell-AT175A1008-Foot-mounted-120-208-240-Vac-Transformer-w-9-in-Lead-Wires-75VA-11016000-p

Well I hope this helps get you started on the way for spark ignition system parts needed.

For the lower cost approach with standing pilot gas valves:

here are the parts needed:

The valves, thermocouple and pilot light are:

The VR8200 gas valve

http://www.pexsupply.com/Honeywell-VR8200A2132-1-2-24-Vac-Standing-Pilot-Gas-Valve-11588000-p

Q390A1046 - Honeywell Q390A1046 - 24" Thermocouple.

http://www.pexsupply.com/Honeywell-Q390A1046-24-Thermocouple-1721000-p


Q314A4586 - Honeywell Q314A4586 - Honeywell Q314A4586 Pilot Burner

http://www.pexsupply.com/Honeywell-Q314A4586-Honeywell-Q314A4586-Pilot-Burner-4113000-p

1 Ea Honeywell 390686-1 LP orifice for Q314 pilot burner if not included in pilot package.

http://www.pexsupply.com/Honeywell-390686-1-LP-Orifice-for-Pilot-Burners-Q314-Q345-Q3450-Q3451-Q3452

As to powering the valves, the transformer listed above will handle 3 gas valves.

Here is another panel wiring diagram for a 3 gas valve setup you can use as a starting point https://picasaweb.google.com/kevin.ladue/PanelWiringDiagram#5507979690350514498

Kevin
 
kladue said:
For those folks working on an automatic control Brutus design with low pressure burners here is a diagram of the wiring needed for a Honeywell S8610U ignition module, VR8304 dual valve low pressure gas valve, and a Love TS-2 temperature controller. This diagram includes a SPDT switch with center off so you can operate the burner manually to test, or in automatic mode with Love controller firing burner.
http://picasaweb.google.com/kevin.ladue/Ignition#5420037998508461298

Here are the part numbers and links:

1 Ea. Honeywell S8610U Intermittent-Pilot-Control-Conversion-Kit
http://www.pexsupply.com/Honeywell-Y8610U4001-Intermittent-Pilot-Control-Conversion-Kit
1 Ea Honeywell Q345A1313 Pilot burner, needed because kit parts are for Q314 pilot burner conversion, and Q314 pilot is not included in kit.

http://www.pexsupply.com/Honeywell-Q345A1305-Pilot-Burner-For-Natural-Gas-14525000-p

1 Ea Honeywell 390686-1 LP orifice for Q345 pilot burner if not included in pilot package.

http://www.pexsupply.com/Honeywell-390686-1-LP-Orifice-for-Pilot-Burners-Q314-Q345-Q3450-Q3451-Q3452

LP conversion spring for valve (New regulator spring) if not included in kit

http://www.pexsupply.com/Honeywell-396221-LP-Conversion-Kit-Envelope-Assembly

For AC power for 2 Ignition modules:

http://www.pexsupply.com/Honeywell-AT175A1008-Foot-mounted-120-208-240-Vac-Transformer-w-9-in-Lead-Wires-75VA-11016000-p

Well I hope this helps get you started on the way for spark ignition system parts needed.

For the lower cost approach with standing pilot gas valves:

here are the parts needed:

The valves, thermocouple and pilot light are:

The VR8200 gas valve

http://www.pexsupply.com/Honeywell-VR8200A2132-1-2-24-Vac-Standing-Pilot-Gas-Valve-11588000-p

Q390A1046 - Honeywell Q390A1046 - 24" Thermocouple.

http://www.pexsupply.com/Honeywell-Q390A1046-24-Thermocouple-1721000-p

Q314A4586 - Honeywell Q314A4586 - Honeywell Q314A4586 Pilot Burner

http://www.pexsupply.com/Honeywell-Q314A4586-Honeywell-Q314A4586-Pilot-Burner-4113000-p

1 Ea Honeywell 390686-1 LP orifice for Q314 pilot burner if not included in pilot package.

http://www.pexsupply.com/Honeywell-390686-1-LP-Orifice-for-Pilot-Burners-Q314-Q345-Q3450-Q3451-Q3452

As to powering the valves, the transformer listed above will handle 3 gas valves.

Here is another panel wiring diagram for a 3 gas valve setup you can use as a starting point https://picasaweb.google.com/kevin.ladue/PanelWiringDiagram#5507979690350514498

Kevin

I read that the spark wire maximum distance is 3'. Doesn't that create a problem with a 60" stand and the control box at one end? Ok, so you don't have a pilot on the boil kettle but that still leaves it pretty close to 3' from the control box to the center burner pilot.
Jeff
 
Spark leads of 6' and longer have been done and they work, less contact with conductive frame structure helps. The honeywell factory cable is 3' but wire core spark plug bulk cable can be purchased by the foot from an auto parts store like O-Reilly's, Napa, etc. Rubber jacket is sufficient but if you want colors or silicone jacket check with Summit racing parts.
 
You could also just locate the ignition modules in a separate box that is no more then 36" from the igniters. That would also isolate them from the PIDs and cause less interference. You would just have to run the control wires to the box.
 
So for the electric ignition you need a $110 ignition controller in addition to everything else ( seems like gas and electronic pilots are around the same cost).

Do you wire the PID controller to the ignition and then to the valve? I assume you would have to do this if you have the safety 'pilot on' verification before ignition.

This just lights the pilot.... Not the burner itself, correct?
 
I wired mine in such that the PID energizes the transformer which in turn will fire off the burner. The controller gets a signal for heat, it then lights the pilot after the pilot is lit the heat generated on the igniter allows the main gas valve to open which then lights the burner.
These controllers are very easy to wire and work very well. Unlike a pilot that is lit all the time this system lights the pilot and then the burner, when heat is no longer required gas is shut off.
 
You should have the transformer before the PID. That way you can use one transformer to control all of your valves. The way that herc1354 has things wired you would need a transformer per gas valve. Also if you wire the transformer before the PID you can use T-STAT wire for anything after the transformer and that will save you money.
 
crazyirishman34 said:
You should have the transformer before the PID. That way you can use one transformer to control all of your valves. The way that herc1354 has things wired you would need a transformer per gas valve. Also if you wire the transformer before the PID you can use T-STAT wire for anything after the transformer and that will save you money.

Yep you are correct, I lost my mind wiring this, afterwards I realized that there was a better way to wire the transformer into the system. I'm going to make the corrections as well as add a switch for off, on, and PID control.
 
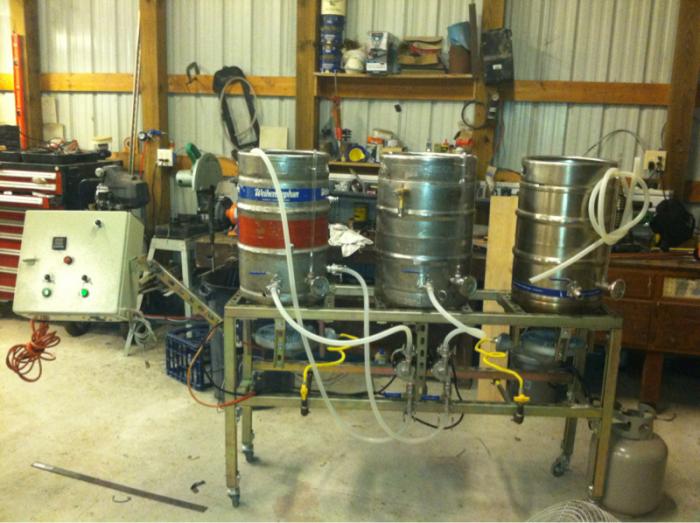
Kits complete with valve, controller and pilots can be found on ebay for $175.00, the only thing you would need is a 24 VAC transformer, orifice and low pressure regulator. On my system, a single tier three keg setup, I only have one honeywell valve and two BG14 burners. The HLT with HERMS coil is controlled by a PID, the boil kettle is on or off as I don't need to have precise temp control.

image-527617337.jpg
 
crazyirishman34 said:
Very cool rig. Also running 24vac to the PID will put less stress on the relay in the PID.

Thanks! Yeah that is a good point about only running 24vac to the PID rather then 120.
 
herc1354 said:
Kits complete with valve, controller and pilots can be found on ebay for $175.00, the only thing you would need is a 24 VAC transformer, orifice and low pressure regulator.

Link please.
 
ClaudiusB said:
Post 17 has all the info you are looking for.
as always Kladue did a great job.

Agree.

I was having trouble finding a kit with everything but the transformer on EBay. I looked; but my search terms were not yielding much. Just lookin for a little help. One stop shopping for $175 minus the transformer sounded good to me.
 
Thx. You'd think that someone would make it easier and just assemble the parts. Oh well, it is half the fun.
Thanks again!
 
The .010" orifice is shipped with the pilot burner, and is shown in the parts included in the package. The pilot burners are usually shipped with the .018" installed, and changing is as easy as removing the brass compression nut and tapping the pilot to get the orifice to drop out.
 
Keep in mind that you may have to adjust the pilot, when I fired mine off the first time the pilot was very high, the directions for my gas valve explained how to make the adjustment.
 
Is there any resource for wiring up a single Auber PID with the "lower cost approach" kladue gives in post 17? I have searched extensively - all setups seem to be for multiple controllers and valves which I think would be overkill for my needs. I simply want one PID to control the temp of my Hot Liquor tank, a main power switch, and a switch or two to power a pump or two.
 
Back
Top