RIP Cooler E-HLT... HELLOOOOOO Bottom Drain Keg E-HLT....

Homebrew Talk - Beer, Wine, Mead, & Cider Brewing Discussion Forum

Help Support Homebrew Talk - Beer, Wine, Mead, & Cider Brewing Discussion Forum:

This site may earn a commission from merchant affiliate links, including eBay, Amazon, and others.

Duckfoot

Well-Known Member
Joined
Jul 7, 2008
Messages
1,362
Reaction score
9
Location
Dürty Soüth, GA
Was setting up for today's brewday last night, when I noticed the Igloo cooler E-HLT decided to stop not-leaking-like-an-f-ing-civ...

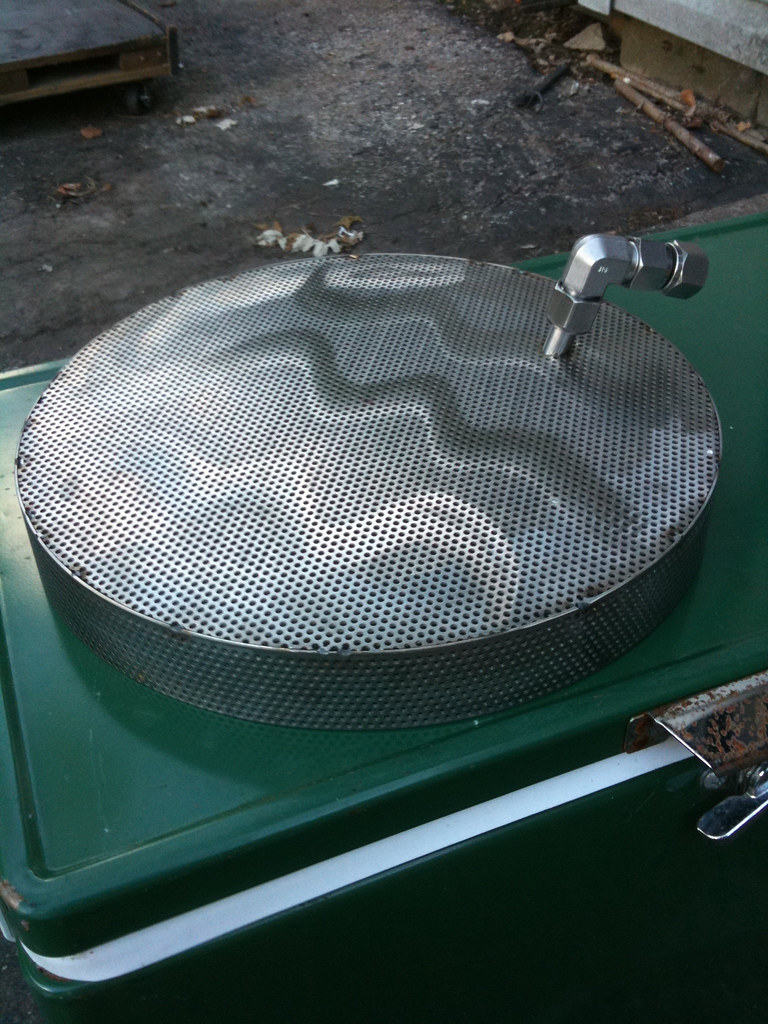
So, 10:30p and I have a dilemma... Try to seal up the cooler or bust out the angle grinder and go to town on the spare keg I have been saving for a bottom drain E-HLT? Well, just ask my neighbors what happened.....

Around 11:30p, the bottom was off and i couldn't find the step bit... Woke up at 8a this morning and headed to Harbor Freight... Was home by 9:45a and was drilling away... Wired by 10:30a and leak tested around 11a... Cleaned it out and voila` the brew day was a success....

EHLT-Front.jpg

EHLT-Bottom.jpg

EHLT-Inside.jpg
 
What size tri clover did you attach to the bottom of the keggle? I really like that solution. Has anyone else tried this set up?
 
Wow, that is freaking awesome! I wish I had your mad scientist skills. :rockin:
 
The tri-clover is a 2" tri to a 1/2" male NPT...

As far as mad scientist skills, read into some of the other things people are doing in here... I am the kid with the baking soda / vinegar volcano at the 12th grade science fair compared to those guys...

Hehehe...

:mug:
 
So you would just drill a hole in the actual bottom of the keg and do the elbow there? That would work as well, I just figured the tri-clamp on the sanke fitting is pretty water tight... I may do a weld less fitting for a sight glass / themo fitting...
 
Seal is gone, as is the dip tube... Made a silicone gasket out of a clearance store bought Kitchenaid baking dish for the time being... Food safe and can withstand high temp...
 
Id also do without the Triclover due to funds but that sure is sweet. Id also want to try and come through the skirt to hopefully avoid the need for the build up blocks on the sides.
 
Oh, I have to do this now. I'm glad I didn't cut anything before I read this post.

I'm going all electric, including BK, so I think I'll do this on both MLT and BK. Any concern with doing this on the BK for wort in the extension not boiling with the rest of the volume, or am I WAY overthinking this. (I have no mad scientist skills).

I've never used any tri clamps, I'm guessing a 2" clover takes a 2" clamp right? So you just cut the gasket and clamped the tri clover directly to the unmodified sanke "neck"? This will make for some super fast clean up, nice set up. Thanks.
 
I've been thinking about doing this, but I want to run mine out through the skirt. I'll probably skip the triclover.

This is a pretty sweet no-weld setup. You'd have to take an elbow and grind it down to match the shape of the dished bottom of the keg to have the tube come through the skirt. The bottom of the dish is almost flush with the bottom of the skirt. If you weld to the bottom of the dish, it's already sticking down passed the skirt. When integrated into a brew stand, there's no worry about all this.
 
I have this same setup for HLT and MT. My only concern with the BK dumping all the gunk into your fermenter. I'll be whirlpooling so the grub cone will form right over the drain. I went with a side siphon tube on the BK.
 
Could you use a FB or something to keep the junk out of the BK valve for this kind of set up? I'm building my first rig and haven't used a FB before so don't fully understand it's limitations. Will the hops clog it to quickly or does it not offer enough filtration? Could you somehow mount a scrubby or other system used by guys here to prevent the dump into the fermenter or clog?

Thanks. I would love to do this for the BK as well for clean up purposes but don't want to get screwed because of lack of real world experience.
 
I'm guessing a 2" clover takes a 2" clamp right? So you just cut the gasket and clamped the tri clover directly to the unmodified sanke "neck"?

Yes, 2" tri-clover... Got it from McMaster... Was less than $12 IIRC... And yes, Clamps right over the existing unmodded sanke neck (where the spear inserts)....


Nice all stainless setup with a brass ball valve fail.:D

Don't worry, there will be some 3 piece SS bling on there soon enough... :rockin:


Could you use a FB or something to keep the junk out of the BK valve for this kind of set up? I'm building my first rig and haven't used a FB before so don't fully understand it's limitations. Will the hops clog it to quickly or does it not offer enough filtration? Could you somehow mount a scrubby or other system used by guys here to prevent the dump into the fermenter or clog?

I am sure a FB would help... I am even more sure that someone on here would come up with some sort of solution that may be even better... I will let you know if I go this same route with my boil kettle and come up with something...
 
I'm surprised no on has thought of this before. It just seems so obvious now. :rockin:

I've been trying to figure out a way to mount my element in a clover clamp so I can easily remove it to clean it. But, I've become very lazy recently and prefer to brew over tinkering.

If you used something like a big heatstick, you could mash and boil in the keggle, then remove the heat stick, no-chill, and ferment in it.
 
Ordered all the parts of Ebay the last couple days. I was able to get the clamps and high temp FDA gaskets as well for both my MLT and BK. (Brutus 20 electric)

I'm thinking a FB with a SS scrubby stuck in the neck and using a hop bag should keep me from having tons of junk pour into the fermenter. If I need to I guess I could treat it like a conical. Whirlpool the junk, which will get dumped first, then all the good stuff to the fermenter.

At this point I think I'll build a wood stand and integrate this to come out the skirt. Maybe even have the nipple come flush to the front with a QD and have the valve removable with a QD so there isn't anything sticking out except on brew days.

One less hole to drill in each keg.

EDIT: Just realized that slipping a FB below an element may get to be more trouble than it's worth, about the first time. So why not transfer like I do now through a SS colander to the fermenter and grab all the nasty stuff on the way out. Simple, effective and keeps the bottom drain.
 
EDIT: Just realized that slipping a FB below an element may get to be more trouble than it's worth, about the first time. So why not transfer like I do now through a SS colander to the fermenter and grab all the nasty stuff on the way out. Simple, effective and keeps the bottom drain.

Here is my new hop stopping FB and it easily fits below the element in the BK.

4886723202_14f274bdac_b.jpg

4886119701_bf8b86fe34_b.jpg


I just bent the element a tad to make it easier. I have no problems taking it in or out.
 
Yeah. That officially effing rocks :rockin:

You just made the hopstopper your b!tch!!!!

So, looks like a pretty simple design....how'd you bend the wall so perfectly?
 
I have lots of skills, but TIG welding isn't one of them. I contacted Jaybird, emailed some pics of cardboard mock-ups and voila! It's 12" in diameter and 1.5" tall. Itr has almost 50% more surface area than a 12" FB alone. I also have a whoopie cushion style (ala Hopstopper) mesh screen to go below it if on occasion I need to use pellet hops. Currently I'm only using whole leaf hops.
 
Jaybird did such a bang up job I should bake him a cake or something :mug:

You could draw him a picture of a Liger.

Thanks for posting. I'll see what clearance I have when I install the element. I'm using the long RIPP element. I need a FB for my MT anyway, and I'm waiting to order from Jaybird until I cut the keg open, it's a little smaller 12.5gal I believe. Thanks again, if I can make it work I'm going with this idea, no question.
 
Duckfoot - this is very cool. I'm planning to go all electric, can you list the parts used? I'm new enough to this I'm not sure what all is in the picture.

Thanks!
 
I have lots of skills, but TIG welding isn't one of them. I contacted Jaybird, emailed some pics of cardboard mock-ups and voila! It's 12" in diameter and 1.5" tall. Itr has almost 50% more surface area than a 12" FB alone. I also have a whoopie cushion style (ala Hopstopper) mesh screen to go below it if on occasion I need to use pellet hops. Currently I'm only using whole leaf hops.

:off: 
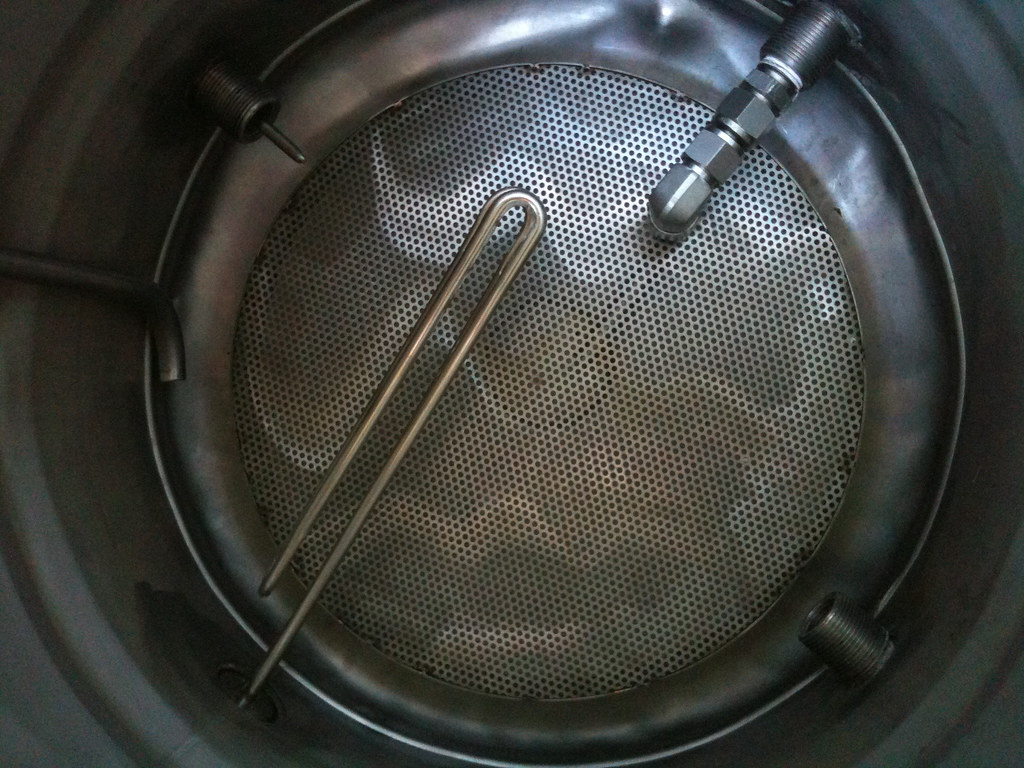
I've thought about this type of stuff a lot....we talk a lot about surface area to prevent clogging, but isn't it a moot point for the bottom of the vessel EXCEPT the bottom drain? The whole/leaf hop matter will essentially sit on the floor around the drain and it would be kind of dead space. The fluid should continue to drain towards the center, even if it takes longer. If you had a simple dome type drain cover (screened of course) you could probably get by, right?

Pellet hops would be a different story...you'd definitely need all the surface area you can get.
 
Duckfoot - this is very cool. I'm planning to go all electric, can you list the parts used? I'm new enough to this I'm not sure what all is in the picture.

Thanks!

Sure..

Keg (derrrrr!)
2" tri-clamp to 1/2 mpt fitting
2" tri-clamp clamp from McMaster
1/2" ss fpt 90* elbow
10" x 1/2" SS mpt nipple
1/2' ball valve (i got brass, soon to be replaced with SS)
homemade gasket from a silicone baking dish
4500W 240v water heater element
1" SS locknut for heater elements
 
I finally was able to water test this design. I got the tri-clover stuff off ebay finally and made a silicon gasket out of a pot holder from the dollar store. Not a single drop of a leak in site, filled the keg to the top and it worked great!

I'll have to paraphrase Bobby_M, the dead space in this thing would leave a paper towel dry!

Awsome. Thanks!
 
So, just got my angle grinder and I think I am going to have at my first keggle this weekend. Most of the cutting jigs I saw used the sanke neck to make a nice round cut.

Can you tell us more about how you cut the top (er bottom)? Bonus appreciation points if you post a pic of your cutting jig!
 
No jig here, I just free handed the bottom. It's pretty easy to use the edge of the sanky as a guide by riding the guard along it. Mine came out pretty clean.
 
When making mine a couple nights ago, I first tried a dremel, that got me about 1.5 inches before each cutting wheel was shot (probably using the wrong wheels). Next I tried the angle grinder, but the one I borrowed had a really thick cutting disc on it, so it was taking forever too, since it was cutting a 1/4" wide cut. Finally, I broke out the reciprocating saw and that worked fantastic. I had to modify the cutting blades to make them thinner so I could make the curved line. I think I went through a 4 pack of blades getting all the way around and it took around 10 minutes.

Whatever way you do it, wear ear protection (and obviously eye protection), the sound tends to reverb in the keg and it is painfully loud.
 
Back
Top