Dirt cheap RIMS heater

Homebrew Talk - Beer, Wine, Mead, & Cider Brewing Discussion Forum

Help Support Homebrew Talk - Beer, Wine, Mead, & Cider Brewing Discussion Forum:

This site may earn a commission from merchant affiliate links, including eBay, Amazon, and others.

alphaomega

Well-Known Member
Joined
Jul 10, 2013
Messages
1,041
Reaction score
461
Ok, first off, I'm swedish *bork bork bork*, so excuse me if my wording is a bit strange. Also I don't really know standard pipe sizes in the US, but I think at least you'll know what I'm getting at and could adapt.
Ok, so I'm doing 6-7 gallon (that is 23-27 liters approx) batches, I fly sparge as most all grainers do here (except biab brewers). During mashing I recirculate for half an hour or so, using a solarprojects pump (you know the cheap, small, but foodgrade 12v kind). I set the flow using a LED dimmer to pretty much as little a possible to avoid compacting the grainbed.
However, during recirculation, temperature drops typically 10F (5C). So, I was thinking about building a RIMS heater. I've seen the stuff put up here, and although very cool, way überkill for my budget and needs. But I've taken one thing away from these threads. Cleanability.
So, I want a cheap, easily cleaned, lower power heater, and this is what I came up with.
2nov20.jpg

I bought a cheap stainless steel cartridge heater off ebay, 300mm length, 10mm dia and 600 w power. I used a 22mm copper pipe, cut to be just a bit longer than the heater. Drilled holes for hose connections, and soldered in 10mm pipes. The silicone hose from the pump can be attached with mild force.
The heater is held in place and sealed using silicone bungs (inteded for airlocks).
Here's a pic of it all assembled.
33ld0ef.jpg

So far I have only tested with water, but it works. And yeah, I know about electrical safety, it will be grounded and ground fault protected.
Cheers!
 
Very cool idea!! I may utilize it if I get tired of my herms setup. this way I can control my mash while I heat up the sparge water to 170.

edit... I just impulse purchased a 1000w version from a supplier in the states for $13!.... I can easily make a rims element holder from 3/4" copper piping
 
Very cool idea!! I may utilize it if I get tired of my herms setup. this way I can control my mash while I heat up the sparge water to 170.

edit... I just impulse purchased a 1000w version from a supplier in the states for $13!.... I can easily make a rims element holder from 3/4" copper piping

Sweet! Hope it works out well for you!
 
Very cool idea!! I may utilize it if I get tired of my herms setup. this way I can control my mash while I heat up the sparge water to 170.

edit... I just impulse purchased a 1000w version from a supplier in the states for $13!.... I can easily make a rims element holder from 3/4" copper piping

Can you tell me where you found that? I'm considering a RIMS build, but the piping cost is too much for the moment. 3/4" copper or stainless would be a lot cheaper than 1.5" or 2".
 
Can you tell me where you found that? I'm considering a RIMS build, but the piping cost is too much for the moment. 3/4" copper or stainless would be a lot cheaper than 1.5" or 2".
just search "stainless cartridge heater" on amazon or ebay.... I bought mine on ebay.
 
just search "stainless cartridge heater" on amazon or ebay.... I bought mine on ebay.

Ah, OK. I did do this quickly before I asked, but it's only showing up 240VAC 1000W elements - I'm stuck with 110V, so it looks like the maximum power I can get is 600W. Might not be worth doing at such a low power, as I'd like to get some kind of mash out temperature step assistance. I'll have to price up the traditional option vs this one.
 
Ah, OK. I did do this quickly before I asked, but it's only showing up 240VAC 1000W elements - I'm stuck with 110V, so it looks like the maximum power I can get is 600W. Might not be worth doing at such a low power, as I'd like to get some kind of mash out temperature step assistance. I'll have to price up the traditional option vs this one.

The original starter of this thread used a 600w element and said it works fine
 
Yeah... Well...
I use pretty low flow rates also, and will actually lower the power with PWM and an SSR to avoid denaturing precious enzymes during mashing. I don't really expect to be able to do any step mashing, only maintain and just maybe raise a few degrees towards the end.
This is highly theoretical at this point as I have so far only tested with water.
I hope I can give you more info in a week, as I'll be brewing on saturday :)
 
The original starter of this thread used a 600w element and said it works fine

Yeah, 600W is plenty for keeping a cooler up to temperature, but I'm trying to decide if step mashing (or at least a mash out step) is worth spending the extra cash on bigger hardware to be able to run a 1500W LWD element, which can do a mash out step on a 5 gallon batch in about 10 minutes. I make the total cost of stainless pipe from Murray Equipment for a 3/4" rims tube with a 600W cartridge heater to be about $60, vs. about $120 for 1.5" with a 1500W LWD water heater element.

Hmm, decisions...

But the stainless isnt necessary at all? You can build the rims enclosure from copper pipe for much less... just saying.
 
But the stainless isnt necessary at all? You can build the rims enclosure from copper pipe for much less... just saying.

Unfortunately I don't have the kit to sweat or solder copper, so that's one price to add to that option (although I could convince someone at work to do it). Stainless pipe fittings in 3/4" work out at $27 + shipping from Murray Equipment, apart from the fitting required to securely fit the cartridge heater into the tube (about $8-$10), and the hose barbs, sourced from elsewhere.

What I have just remembered is that I have 2kW 120-240 VAC step up transformer (from running my UK spec espresso machine in the US), so I can theoretically run up to about a 1800W, 220 V cartridge heater off a 20A 120V circuit, alongside the pump and PID. I've just built a PID+SSR control box (I was going to use it with a bucket heater in the HLT to start with) which will happily run off 120 or 240V single phase.

Sorry, this post is mostly thinking out loud...
 
I really like the idea of this heater, and the low cost! How are people planning to attach the heater to the RIMS tube? I plan to use 3/4" copper pipe. Would a compression fitting work? Is the heat a problem in any way?

My rough estimate so far is approx $80 to build including a cheap PID.
 
I was thinking that a compression fitting for 3/8" OD pipe should fit well enough on the 9-9.5mm cartridge heaters. Not all the sellers are that accurate with specifications of the heaters though - some seem to say 9 mm, some 10 mm, others 9.5 mm.

You'll probably have to drill out the compression fitting to allow the heater to feed through it the wrong way, much like the way some of the counterflow chillers are constructed.
 
Thanks for posting this, alphaomega! I think I'm going to build one of these as well.

Cheap, simple, but effective. My kind of engineering.

Thanks man, that just warms my frugal heart!

Regarding compression fittings, that was my first choice as well, and I really think that would be the best way. But here in sweden, that would mean having to order strange size fittings, that would be pretty expensive.
Also, once compression fittings are tightened on both ends, I don't think it would be all that easy to take apart again.
Cheers!

Do you take it apart for cleaning?

My cleaning procedure is to pump hot oxyclean from the mash tun through the counterflow chiller for 10 minutes, then 10 minutes with clean water. I thought adding the RIMS tube into that cycle would be enough.
 
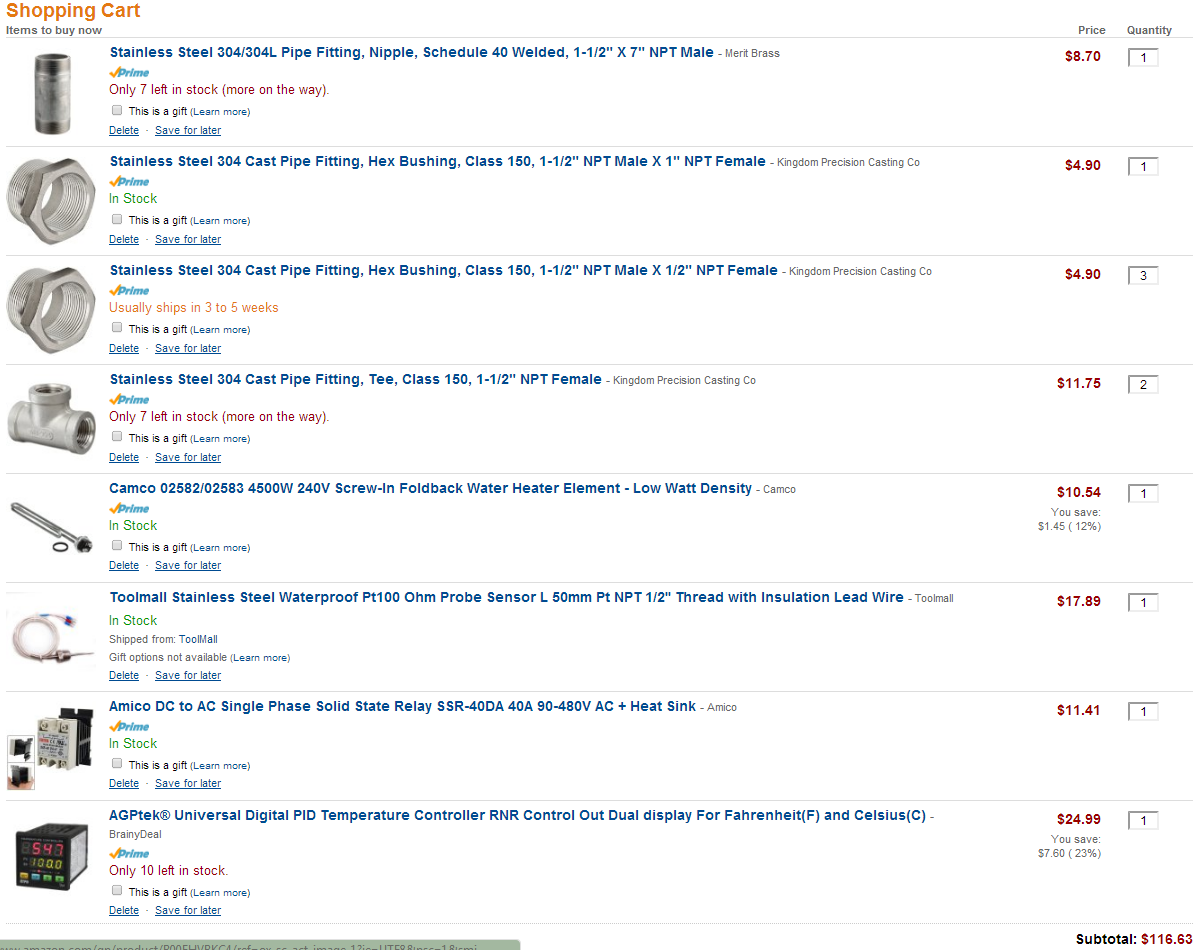
Is going all stainless that much more expensive, and you get the benefit of it being stainless, not soldered together, able to use hot water heater for more heating power, can take it apart.... add a 30$ PID SSR Combo and a 15$ 1/2 npt probe and your looking at 116$ shipped for the entire setup.

Here is an amazon wish list I made for anyone interested in all the parts.
RIMS Setup
Link: http://amzn.com/w/2AZOVBJMSE47R

0X9cz5k.png
 
Is going all stainless that much more expensive, and you get the benefit of it being stainless, not soldered together, able to use hot water heater for more heating power, can take it apart.... add a 30$ PID SSR Combo and a 15$ 1/2 npt probe and your looking at 116$ shipped for the entire setup.

I think that is awesome! And I very much applaud the effort to assemble a complete list of needed components. That is very useful!
And yeah, I know it is not a fair comparison, but in my case I had some copper pipes, and equipment to solder, so i spent around 10-15 bucks to build this.
But if that wasn't the case I would be really tempted to look up these parts.
Cheers!
 
This thread is pretty interesting. One snag on the copper for me is figuring out how to get that element in there since I don't where to get the silicone bungs. All I have seen are the standard carboy bungs.

Also I would be tempted to use my STC100 for the cheap copper setup....even with the delayed cycling it might work for a cooler MT.

For the SS version, that is very cool. I have one question though. On Kal's design he has the probe on the SS 1/2" T coming out of the ball valve, and the probe connected to that for accurate measurements of mash temp. Is there any reason why the probe should be attached to the RIMS tube instead?
 
But whats the actual benefit of stainless over copper soldered with modern lead free solder? You can still use copper screw on caps? some people seem to be under the impression copper will effect the beer... Truth is there are many commercial copper brewing systems... some even have Brass trim!! Just last week I saw prickly pear saison being made in one in texas on "beergeeks"
 
For what it's worth..... if you can make the dimensions work - an the RTD linked below probe would be better for nearly the same price ($17.98)

http://www.amazon.com/gp/product/B00FHVBKC4/?tag=skimlinks_replacement-20
I think thats the same "$15 1/2" ntp probe he was talking about... I know most are 15 bucks...
I use the $6 pt-100 and then use a compression fitting with a water faucet washer as a seal... as mentioned the heater would likely work with a standard compression fitting... my 1000w one will arrive in three days I will post results.
 
Last edited by a moderator:
I was doing a little digging on amazon and found a SS setup (3/4") that would be cheaper than copper for me. The only thing I haven't found was the compression fitting for the element, but I expect it to be ~5$. So for roughly 30$ you can have hose barbs, compression fitting and almost all SS. Free ship with Prime. Sorry for the tiny picture.
Edit: forgot to add reducer for hose barb for $1.65. And found 110V, 800W stick for 6.76 with free ship: http://www.amazon.com/dp/B007HKK6XW/?tag=skimlinks_replacement-20

Or maybe i'm missing something?

Screenshot from 2014-01-24 12:50:09.jpg
 
Last edited by a moderator:
Just wanted to let you guys know that I brewed with the dirt cheap RIMS heater today, and I got to say I'm very happy with it. It worked like a charm. No leaks, no problem maintaining mash temp and I did manage to raise temp towards the end by a few degrees. So, I'm calling this one a win.
Actually, I'm so happy with it that I consider this project done and next brew day I'll try to maintain mash temp using a cheap mica plate heater instead :)
Cheers!
 
Couple questions...

Do you have any pics of it in use so we can see the layout?

From your description, I assume the non-wired end is contained in the silicone bung?

What kind of heat does the cartridge heater put out? Are you controlling the heat in any way?

Thanks for you answers. This is a pretty cool idea. Surprised no one has tried using these cartridge heaters before.
 
Sorry, I didn't think of taking photos today, but I don't think it would add much either.
Both ends are sealed with silicone stoppers. I just push the stoppers from both ends, so it seals both the heater and the pipe at the same time.
The heater puts out 600w, I use an SSR fed by a PWM circuit to lower the power. I just eyeball it, I don't use any fancy schmancy PID regulation :)

Edit: maybe it wasn't clear from the pictures, but the stoppers have a hole, that fits the heater snugly.

Cheers!
 
I finally got around to putting this together. I used 3/4" SS from amazon and one of the 800w heaters. I ordered two heaters, the first I was refunded because it never came. The second one arrived on time alongside the original order.

Both are supposed to be the same thickness but they are slightly different. I tried a 3/8" compression fitting but the nut is too large. I had to drill the inside of the fitting to get the element in. I'm going to try a smaller fitting and drill it out.

For what it's worth I brewed a batch with it and it worked great. I used silicone to seal the end but that didn't work too well. I didn't see any signs of scorching when I cleaned it. I ran it with a PID.
 
This has really intrigued me, and seeing Mojzis tube on another thread has me trawling Ebay to find the required parts. My thoughts are to incorporate this into my very long and no-light-at-the-end-of-the-tunnel-yet arduino controller project, but to get it up and running I was think of using a cheap Ardunio Mini Pro to run it.
All in all I think I could get a stand alone tube with controller up and running for around $60 (with hose tails for the in/out). I have a similar issue that Alpha has with not living in the US so getting cheap fittings sometimes get stung with crazy shipping costs. I have found a couple of Chinese suppliers with "free" shipping and pretty cheap unit costs for fittings. I have also gone for a 1/2" tube design and 6mm heater (only 400W but should be able to maintain temps) due to restrictions in what these suppliers do offer!
Tube
Controller
Total Build cost $52.80

Can you walk me through assembling and programing the controller?All the parts are still on a slow boat from China
 
I've just released the mash control firmware for the stc. It will be better suited for the task, but it is still pretty untested.
I don't wanna start any HERMS vs RIMS war, they both have merits, but I think that RIMS has the upper hand in a few key aspects. Cleanability mainly, but also smaller footprint and faster acting. A properly implemented RIMS will not have scorching issues. HERMS on the other hand can be easier to build and use.
 
I just read your relase notes but not sure what they mean. Im using one of my STCs for powering my ghetto HERMS what benefits do would I see if I reflash it to the newest version?
 
Can you walk me through assembling and programing the controller?All the parts are still on a slow boat from China

So I feel a bit bad now, Sorry but I was listing the parts I intended to buy to build this... and then got hit with some life curveballs and probably won't be into this until at least November... but since you have bought the bits I could look at building it vicariously through you :D
Once the stuff arrives give me a PM and I can start looking at it.
One other thing it looks like I missed on my first post is you will need to get the compression fittings drill through to allow the sensor/heater to slid all the way through the fitting. A decent machine shop should be able to take care of this in less than 10 minutes (an offer of a dozen beers is usually all it costs :D)
 
I just received a bunch of stuff today.I have everything for the controller but missing the sensor.
I need to pick up a box and wall wart .Thanks
 

Latest posts

Back
Top