My homebrew stirplate

Homebrew Talk - Beer, Wine, Mead, & Cider Brewing Discussion Forum

Help Support Homebrew Talk - Beer, Wine, Mead, & Cider Brewing Discussion Forum:

This site may earn a commission from merchant affiliate links, including eBay, Amazon, and others.
camiller said:
That one is out of stock currently, I'm considering this one http://www.newegg.com/Product/Product.aspx?Item=N82E16835200021

Cheaper also.

I want to setup a stirt plate soon and will need to buy a fan... so why not get one with the controls built in... sounds like it will make things easier in the end, but I want to make sure this will work right for a 2000ml flask before building it... any ideas..??
 
Jester said:
I want to setup a stirt plate soon and will need to buy a fan... so why not get one with the controls built in... sounds like it will make things easier in the end, but I want to make sure this will work right for a 2000ml flask before building it... any ideas..??

The only thing I'd be worried about regarding a fan with a built in speed controller is how slow it will go. If it's too fast even on it's lowest setting, the stirbar might never get a good spin going and just bounce around like crazy.

Otherwise I don't see an issue with it. It should stir a 2000ml flask fine. You can see from the picture below, it gets my 1000ml really swirling. Slightly less so than pictured with a thicker wort.

Whatever route you go, it's pretty cool to see it in action :D

4083-stirplate_half_full.JPG
 
My first post here since joining:


you guys rock!!! I just started doing starters since I'm doing lagers now mostly.

Biult my stir plate this week and it works like a champ in my 1000 ml flask.

Im totalyy stoked and one day im gonna be the best brewmaster EVER!!!!!


HAHAHA just kidding. anyhow, i did it just like it was done here and soldered it together myself(first time soldering)

one thing i will say is definitely dont buy everything from radio shack (unless your impatient like me). They charge a ton for these parts. Do yourself a favor and order it online and save some dough. ( i undoubtedly could have purchased enough grain for an AG batch with the money i would have saved if i wanted to wait for the parts to come in the mail)

by the way, i am using a 2 inch and 1 inch stir bar, both 3/8"' diameter and they both hold the magnetic field fine with a couple 3/4" round magnets, probably 1/4" thick each, 2 glued together on each side of the fan hub (found at a artsy craftsy store) glued together. I tried the rare earth ones from a hard drive but couldn't get two of the same size and shape, so the rotating field was too erratic to hold the stirbar in even rotation. Don't think you cant biuld one without rare earth magnets, you can. Just glue a few together so you create a stronger magnetic field on opposite sides of the fan.

just my .02

excuse the typos, many beers today. hehe
 
I just got my fan in the mail today... going to look for the magnets this week sometime... then I jsut need to get things put together... I did order a fan with a speed controller too... we'll see how it works...
 
Finished mine up today!
I can't wait to get some yeasties in there!

DSCN0655.JPG


[YOUTUBE]2YsMDM9efC8[/YOUTUBE]

I should have taped that without Sunday Night Football blasting in the background.
 
At one point, you have a few items all coming together on the schematic. Your image shows the items pretty close together.

For example: On the schematic you gave, OUT of the LM317 goes to one side of the R1 and to the + on the fan while the ADJ on the LM317 goes to the other end of R1 and to the POT. *scratches head*

A little more explenation would really help me out.
Thank you in advance.
 
I just finished putting my stirplate together. I used the RadioShlock project box as an enclosure, and it worked great. Used an old 9V wall wort from an abandoned cell phone. A 25k ohm rheostat worked perfectly to get the right range of speed adjustment. Goes slowly enough not to throw the bar when ramping up to speed, but quickly enough to get a nice vortex. Not quite as aggressive of a vortex as the professional stir plates in my lab, but certainly sufficient for growing a starter. No pics yet, 'cause my GF has my camera on a weekend trip.

For folks who may be hesitant to do this, it's a pretty simple operation, and can certainly be done w/o the more sophisticated controllers other folks have used. That's certainly not to take anything away from Mr. Salty's design, because it's definitely more elegant than my own, and in all likelihood provides a finer degree of speed control. However, the simple & cheap 9v wall wort + RadioShlock rheostat, switch and project box will do the job admirably, and for a total cost of about $12, assuming you have an old fan and some magnets to scavenge.

Oh -- one other thing: if you happen to have an extra stir bar lying around (I bought a few for good measure), they work very well as the driver magnet for the system. :)
 
Does anyone still have problems like I do with the damn stir bar getting flung off a lot.....or have problems starting it up? It takes awhile sometimes for me to get it just right
 
98EXL said:
Does anyone still have problems like I do with the damn stir bar getting flung off a lot.....or have problems starting it up? It takes awhile sometimes for me to get it just right

If it's flinging off, it's probably one of three things:
1) Spinning too fast for the size of the bar. Even on the professional lab stir plate at work, this happens to me if I turn the speed up too high or ramp it up to full speed too quickly.
2) Magnets not centered on your fan. If the fan/enclosure doesn't wobble when you power it on, this probably isn't the case.
3) Bottom of your container isn't flat. If the flask or other container you're using is convex on the bottom, the stir bar is unstable and is much more likely to get kicked off.
 
e lo said:
If it's flinging off, it's probably one of three things:
1) Spinning too fast for the size of the bar. Even on the professional lab stir plate at work, this happens to me if I turn the speed up too high or ramp it up to full speed too quickly.
2) Magnets not centered on your fan. If the fan/enclosure doesn't wobble when you power it on, this probably isn't the case.
3) Bottom of your container isn't flat. If the flask or other container you're using is convex on the bottom, the stir bar is unstable and is much more likely to get kicked off.

It's on a variable speed control....doesn't seem too fast at all
Maybe but I doubt it
regular flask
 
I made mine with a 110v fan and a dimmer switch.
I'm lucky enough to work in a sign shop and could make the base from scrap metal, but what is simpler?
No futzing with power sources or voltage settings, just turn it on.
 
Ok now that I have all the parts and I thought I understood the layout I have spent about an hour sodering my little heart out and when I plug it in, NO JOY!!!!

I am not sure I am reading the diagram right as I am new to this, so are you really to hook the .1uf between the power and gournd pre lm137 and the 1uf post lm137 and then hook the pot to the same .1uf?

Ahh man, I must have tanked something. Does any one step by step instruction as to what to connect to what and on the board or just inline type?

thanks
 
Right on thanks, I will make one this way and I am now just determined to make all these parts I have spent money on work ;0). I think I am in to this little project for about $40.00 and still no stir plate. So for about $20.00 bucks more I could have bought one. hehe, o-well live and learn.

Thanks for the post. I really appreciate the info.
 
looks like a great design, nice work, and thanks.

FYI to all the cheapskates/lazy people out there, I was able to cook up a usable stirplate (the ghetto way) with just a computer case fan, an old cell phone charger, and a low power potentiometer. It throws the bar sometimes though - i think i need MORE GAUSS!
 
Baron von BeeGee said:
They apparently make quite a large difference. There's an article on the Maltose Falcons website with good details, but I don't have a handly link to it. I believe a big factor is that the stir plate keeps the yeast in suspension in working, i.e., it doesn't flocculate and go dormant.


i think this might be the link you are looking for http://maltosefalcons.com/tech/MB_Raines_Guide_to_Yeast_Culturing.php

also another good one http://www.mrmalty.com/starter_faq.htm


im doing a 3qt starter tomorrow for the double ipa im brewing monday. first batch was big success (fat tire clone). me along w a few others that have tasted it agree that its dead on..im stoked. 1554 clone fri and dbl ipa mon...SUPER STOKED!!
 
frothy said:
Ingenious guys - loving it. I was looking for stir plates on Ebay the other day and they cost a fortune (and are mostly older than I am.) Boy is my old PC in for a rough night.

..have found em for 50-60 usd..not bad i think
 
I'm building one of these (with just a few changes to the circuit) and have a quick question for anyone who has one. How far do you turn it up? From what I can tell, this design is capable of driving the regulator into dropout, which I don't like, so if you're only turning it up half way, I'll just change R1 to max out at a reasonable voltage.
 
Thanks for the pics on the stir plate. I had one question if you don't mind. Is the bottom of your Erlenmeyer flask flat or is it slightly concaved in the middle to add stability. Mine seems to have an usually large concave to it and I can't get the stir bar going. It falls off center almost immediately. It works great in a perfectly flat bottom vessel. I've tried all different magnet configurations and I'm starting to think its the concave bottom thats the problem not the actual stir plate. Please help. Thanks
:mug:
Alex.
 
Alex -- it can be quite hard to get a bar to spin stably in a concave vessel, even on a professional stirplate. If I'm stirring large volumes here in lab, I always make sure to grab a flask with the flattest bottom available. Flasks vary from manufacturer to manufacturer. If you don't plan on heating your wort in your flask, you can substitute any glass vessel you want for use on your stirplate.
 
OK So I have fallen back to a new approach after the 500MA power supply burned out. This is becoming more frustrating than anything else. But I will never give up.

I have come up with a new modified design, I have just orderd some of the PC fans kits form newegg mentioned in the post earlier, I am going to salvage one of the many PC Power supplies I have here at the house and I am going to the MAN STORE (aka Home Depot) and get some LEXAN (Plexi-Glass); maybe in some funky colors and put it all together. This will allow me to do the 2 - 5000ml flasks at once if I place the fans right. I envision it looking like a plastic brief case with fans. Plus I could some disco lights or something inside if I get real adventurous. I will post some pics this next week when I have it all put together.

Should be pretty cool.
 
Scimmia said:
I'm building one of these (with just a few changes to the circuit) and have a quick question for anyone who has one. How far do you turn it up? From what I can tell, this design is capable of driving the regulator into dropout, which I don't like, so if you're only turning it up half way, I'll just change R1 to max out at a reasonable voltage.

Anyone reading this thread anymore that has one?
 
I made a cheap stir plate as well. $7 fan and $3 pot from RS. Old cell phone charger and a magnet from a hard drive. I saw a lot of pics with two hard drive magents being used, but one is all that is required. If you use two, make sure both positive poles are at one end and both negative at the other, otherwise you end up with a weaker magnetic field. (Most flat magents have poles that go out the flat sides, so you have to use two - one with positive up and the other with negative up. Hard drive magnets have poles that go out the ends.)

The issue with only using one hard drive magnet is balance - single axis of symmetry. The trick is finding the center of gravity. The easy way is to put the magnet on top of a taut piece of thread the long way and try to pick up the magnet by balancing it on the thread. By trial and error, find the axis it balances on and mark this on the magnet with an extra fine tip marker. Then draw a line dividing the magnet in half the short way (measure, eye ball it, or use the thread again). The point where the lines cross is the center of gravity. I drew cross hairs on my fan at its center and lined up the lines on my magnet with the lines on the fan. Not a hint of wobble.

Made a cheap box out of 2x4s and a clipboard.

IMG_0252.jpg
 
Bearcat Brewmeister said:
The issue with only using one hard drive magnet is balance - single axis of symmetry. The trick is finding the center of gravity. The easy way is to put the magnet on top of a taut piece of thread the long way and try to pick up the magnet by balancing it on the thread. By trial and error, find the axis it balances on and mark this on the magnet with an extra fine tip marker. Then draw a line dividing the magnet in half the short way (measure, eye ball it, or use the thread again). The point where the lines cross is the center of gravity. I drew cross hairs on my fan at its center and lined up the lines on my magnet with the lines on the fan. Not a hint of wobble.

That's a fantastic way of getting the COG. I've tried balancing the magnet on a pencil. same idea... mark the COG
 
Well I am not sure how to upload images on the forum. I look around for a pic place or something and didn't see anything. I am dieing to send a pic of the layout I have so far. I ended up with 1 magnet on each also. Works like a charm.

any help on how to upload images would be great.
 
waterkc said:
Well I am not sure how to upload images on the forum. I look around for a pic place or something and didn't see anything. I am dieing to send a pic of the layout I have so far. I ended up with 1 magnet on each also. Works like a charm.

any help on how to upload images would be great.

I can't wait until you post your pics so I can see how yours turned out.
I ordered a 2" stir bar and a 2000ml Erlenmeyer last week, and they arrived
at about 5pm yesterday.

I have scavenged 7 hard drive magnets (one drive only had one), so I have
more than enough of those to get any size field that I want. I also have a ten
pack of rare earth magnets from Rockler Woodworking. They are 3/8" by 1/10".
I believe that I will use the hard drive magnets, but may change my mind yet.
The Rockler magnets are SUPPOSED to be for some refrigerator magnets for the wife.

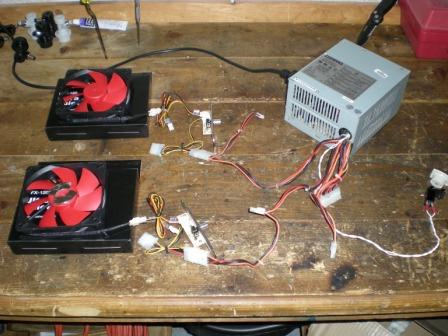
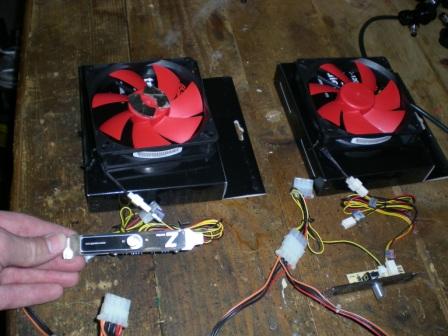
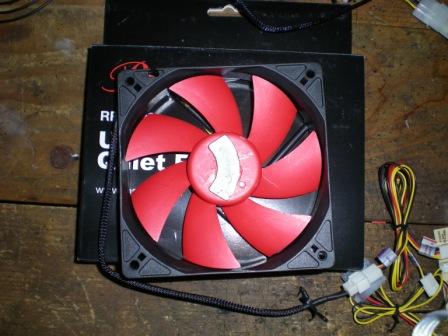
I have two standard 80mm case fans, and one 120mm case fan to play around with also.
I also scavenged the power supply from an old AT form factor computer
case, and am trying to use that. It appeared to be way too powerful, ramping
the fans up to full speed instantly, and sending that pig of a stir bar flying. I
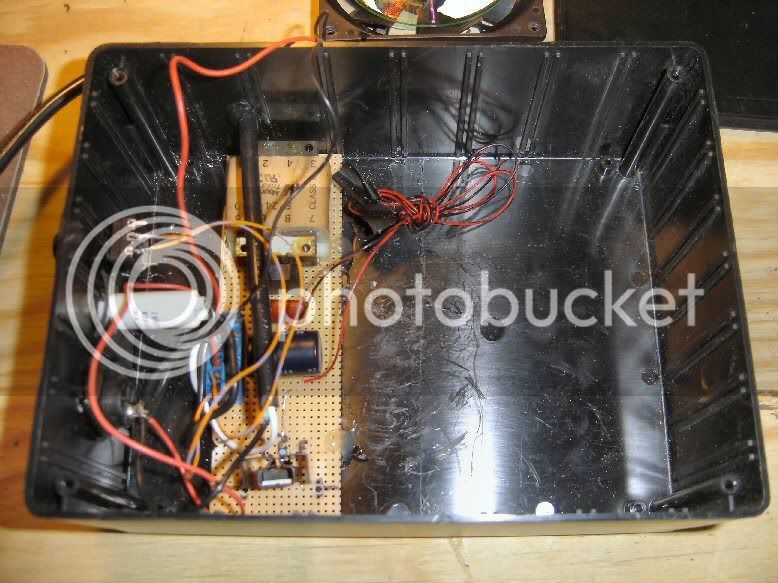
pulled out an old fan speed regulator, and that seems to be helping some,
but I am still having some trouble. With one of the 80mm fans, I glued on a single hard drive
magnet, and it just does not seem to grab the bar well. With the other, I have two
magnets stacked together, and they seem to grab the bar better, but they also seem to
be slowing down the fan considerable, even causing it to not start spinning at times.
I would really like to try the 120mm fan, but it will need to have a large washer added to it,
as I have seen done in some of the other plans on here, as the inner workings of the fan itself
are keeping me from placing magnets where I would like to.


I just got done drilling a piece of Lexan, putting screws down through it, with
some spacers, and clamping the fan on underneath, with two hard drive
magnets stacked together and fairly well centered. I have not had a chance
to test it yet.

The advantage to the old AT power supply, assuming that it is truly not too
powerful, is that it already has the pin connectors for the fan, so there is no
extra work needed, you just plug it in and go. My fan controller can also handle
up to three fans, so ONCE I get this thing working right, I will probably expand
it to handle at least one more fan. I have two 6.5 gallon primaries, and five
5 gallon secondaries, so it would be nice to be able to run two batches of yeast
at the same time.

Well, we will see what tomorrow holds.

Hopefully I can get this thing working. I have a batch of cider that is just finishing
its first yeast, then I am going to pitch a champagne yeast into it to take it the
rest of the way, and I really want to test this thing out with that yeast.
 
Ok well I figured out how to upload images ( ya pay's your money and you take your chance's)

So here it goes, this is the overview of the hole setup keep in mind that I still need to clean up the wires and all.
13858-fnspwrsply_overview.JPG


Here is a shot of the fan controllers
13858-clspctrlr2.jpg


and here we have the magnet in place
13858-fnlmagstp.JPG


Yeah I am feeling pretty good at this point, hehe:rockin:

I have a piece of Lexan and some sheet wood to build the case that is this weekend. So stay tuned for the finished product.
 
Rabidgerbil, how did you stack the magnets, by gluing them together?

I had the same problem with the fan not spinning - the magnet pulled the fan down onto the motor real tight and wouldn't let it spin. If you look at my picture, you can see a piece of metal under the magnet. It was from the inside of the hard drive (magnet was attached to it). I ground it down to near the size of the magnet and now it shields the motor from the magnetic field. Washer would do the same thing.
 
The one issue I do have is that one of the magnets is spinning fine and the other spins for a second or two then kicks off the stir bar. I am going to work on this a bit. As the first 30 tests it worked just dang fine on both. Hmm

any suggestions?
 
Cool to see that I am not the only one using the old pc power supply, and a pc fan speed controller. If you are ripping apart old hard drives anyway, why not ?!

Ok, so I have tried a few configurations now, and nothing is working perfectly for me.
The one that is working the best is the 120mm fan, there is a rubber washer, and a flat washer on top of that, both about the size of the hub of the fan... these are glued on, and then i am putting "rare earth" magnets from Rocker Woodworking on there. The big problem seems to be the 2" stir bar. If you are looking down on the magnets as they spin, the outer edges of the bar match up with the outer edges of the spinning magnets, so the bar is pretty much dead even over the top of the entire field. Since the bar is so heavy, if there is anything at all that causes it to wiggle, it starts dancing all over the place and sooner or later flies off. I am thinking that a shorter bar will fix that, as it will be "trapped" inside the field, even if it tries to dance around, where the big one can get its fat butt outside the field...

So now I just have to order up a shorter bar and wait a week or so for it to show up.
So much for testing this weekend :mad:

Well, one of these days soon I will snap a few pics and upload so that you can see what I am talking about...
 
so i came up with another idea...
i grabbed a 4" hole saw, and cut out a disk of polycarbonate, and
laid that on top of the fan to see how it would work...
better, but still not as big as i would like... (no puns, please)
some more thinking and I thought hmmm...
cd...
so I sandwiched the polycarb between two cds...
closer, but not quite there...
needs to be taller, to clear the sides of the fan...
two more polycarb disks and we are good to go...
strong, light, nice wide area to mount magnets to...
next problem was not getting it perfectly centered on the fan when mounting...
this next part is not OSHA approved,
nor is it approved by your insurance company, your wife, or anyone else who cares about you...
if you are not an experienced wood turner, just quit read now...
if you are an experience wood turner, be smarter than me and don't do this...
so I spin the thing up to full speed, and grab sharpie, and mark out the widest true circle that i can...
next I grab a razor blade, use a file to put a nice bur on it, and begin slowly shaving down the disk...
like I said, don't try this...
not a smart thing to do...
but it worked...
I now have a perfectly round platform for mounting my magnets, which I will do tomorrow afternoon.

and no, no beers were killed in the making of this method, nor was any blood shed (though I came close once):drunk:
 
Wow. You guys have no clue how much trouble I had.

I tried two big magnets on each side and I can only guess that the magnetic field was too small for the stir bar to stay in it.
One small magnet and I had trouble not shooting the stir bar to the sides.
One big magnet and I guess I got it off center which meant that the stir bar was doing circles as opposed to spinning on itself, which would throw it off to the sides as well. It would work ok for water, but not for the starter. Now I'm desperate so I start thinking of really weird things to try.
I tried mounting a CD onto it (as the last poster did) to have a bigger surface... didn't get it centered so that didn't work.
I retried mounting two big magnets... again didn't work.
I retried mounting one small magnet, didn't work.
I retry one big magnet. BAM I get 'er centered right off the bat, put the starter back on and I get lovely movement. It's been spinning great for about 8 hours!

Thanks a lot for the original idea!
 
wow, I am glad to see I am not the only one fighting with this simple project. I tell ya I found 2 of these dang stir plates about a month ago and they were $45.00 each. I should have grabbed them, They were lab quality stuff.

I am wondering why is it the need for the spacers etc? I have not had any issues with a single magnet and getting a 1 inch spin bar going and stable with no issues. I just have the Hard drive magnet mounted to the fan and the things seems to be working fine. I would say I am getting a good spin in water 19 out 20 times trying, and that would be to full RPM.

I am not sure how this is going to work with the a pitch in it, but we will see here real soon.

As far as I am concerned any excuse to sit in the work shop and drink a few home brews, is a good one!

Next is the case, I will send some photo's once all the junk is mounted etc.
 
I have built several of these and may have the solution to your problem or maybe problems.
1. You need fairly powerful magnets, the little round disks R Shack sells will work but I had to have four on each side.
2. The magnets must be mounted north side up on one side and north side down on the other. Which is which doesn't matter as long as they are opposite. If you are using more than one magnet on each side make sure all of them are oriented correctly. All north up on one side and all north down on the other.
I didn't fool around with mounting a substrate to the fan to mount the magnets on. They are glued directly to the fan hub. If the fan seemed to vibrate I repositioned the magnets till it was smooth again.
Mine have all worked flawlessly using 1/4 X 1", 5/16 X 1 5/8 and 3/8 X 1 1/2 spin bars.
If you just can't get them to work shoot me a message, I have some for sale.
 
So you got the little round magnets in the R shack, I saw them but I had these so i was trying with them I have them working now. So I am going to stick with these for now.

But thanks for the info, I will keep you in mind.
 
Stirplate V2. Stirbar is 1" from MoreBeer. V3 will have a LED panel to show RPM

The Guts
inside2.jpg

Test 2
test2a.jpg

Stirplate V2 with non skid pad
V2.jpg


:rockin: Stir on my brothers!
 
Thanks but MrSalty was my inspiration. I just read this thread and up and built it. The main problem was figuring out the magnets. I deviated from the original by building the entire power supply internally. I had plenty of cell phone adapters but I just thought it more easier to make it self contained. If you want a schematic I can post it up but I have to draw it out yet.....
 
If you want a schematic I can post it up but I have to draw it out yet.....[/QUOTE]

I would love to see a drawing and pictures of the board (top and bottom). Not great reading schematics, I do better with pictures.

thanks

tom
A parts list would be nice also
 

Latest posts

Back
Top