Portable igloo cooler kegerator

Homebrew Talk - Beer, Wine, Mead, & Cider Brewing Discussion Forum

Help Support Homebrew Talk - Beer, Wine, Mead, & Cider Brewing Discussion Forum:

This site may earn a commission from merchant affiliate links, including eBay, Amazon, and others.
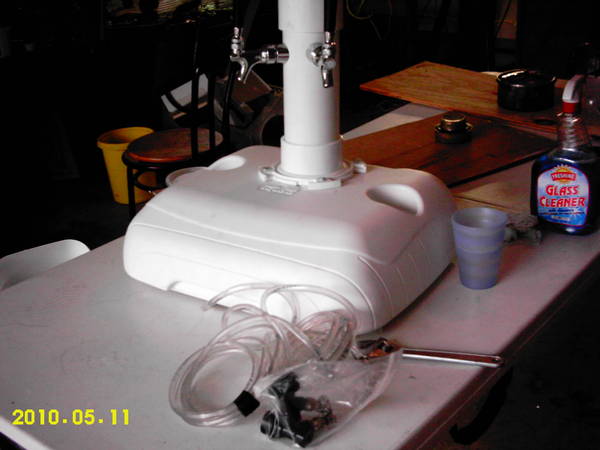
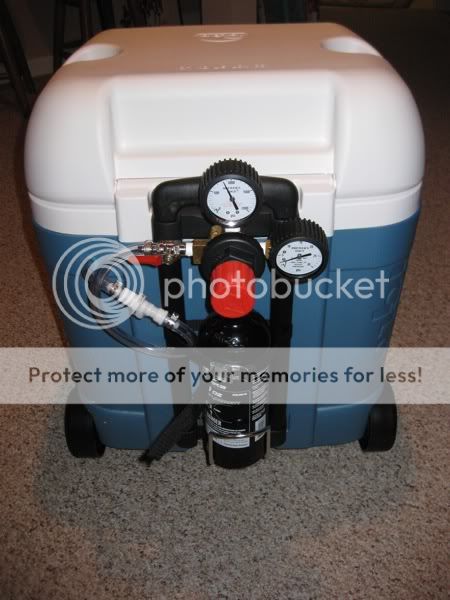
Well, the major parts are complete. I haven't hooked up the manifold yet because I don't have my paintball canisters full yet, so I'm using my 5 pound tank instead. Still trying to figure out the correct dispensing pressure (too much foam so far). I'm also kinda drunk from too much "testing".

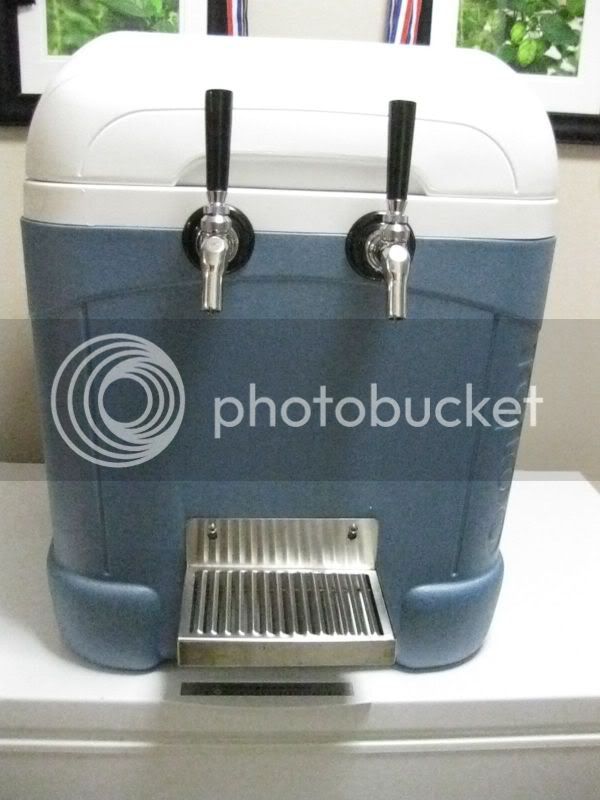
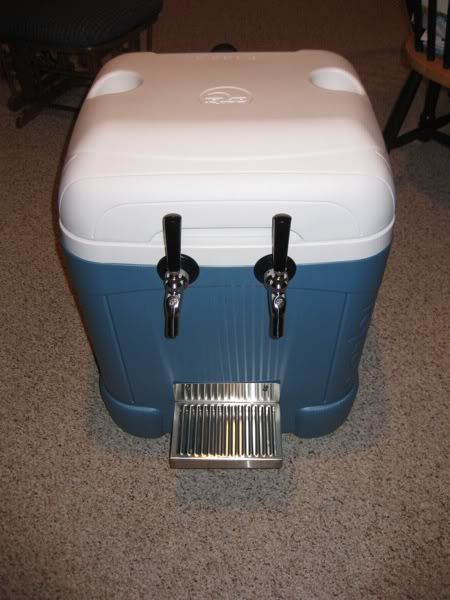
Outside/faucet view:
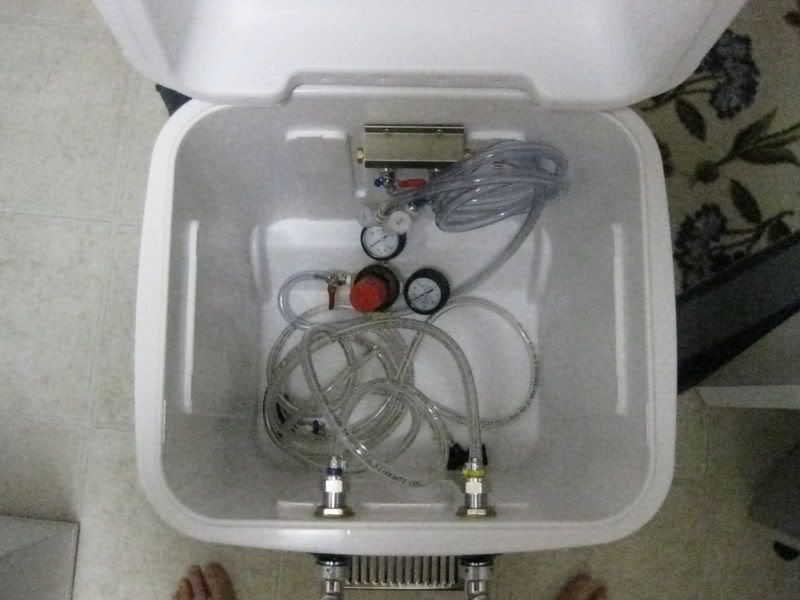
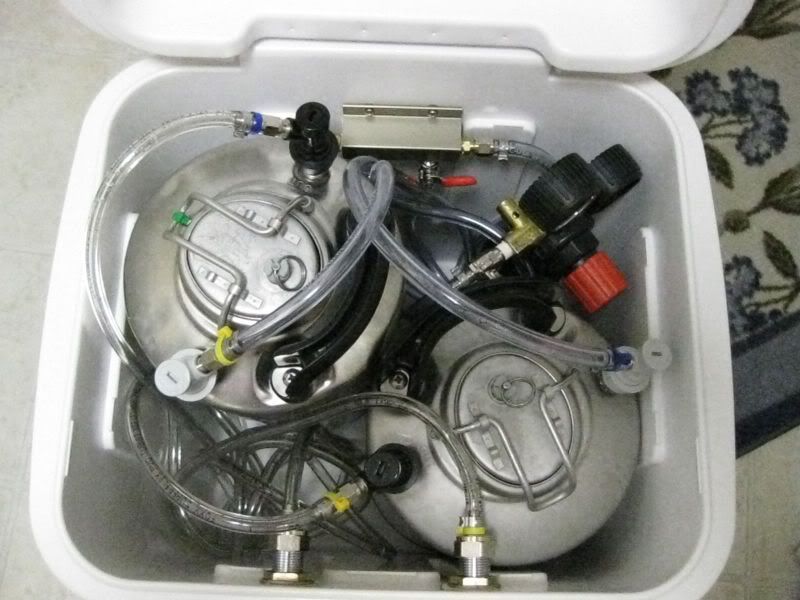
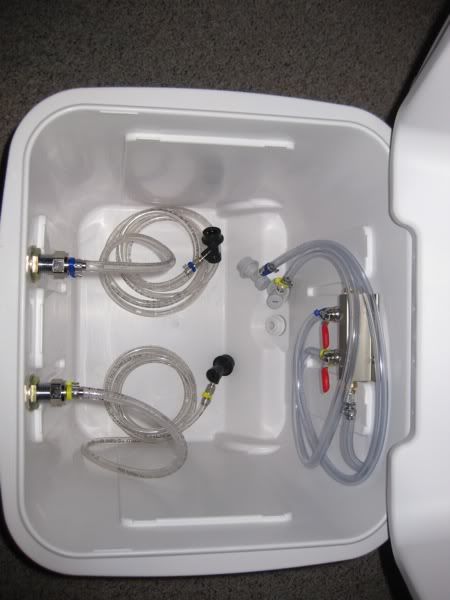
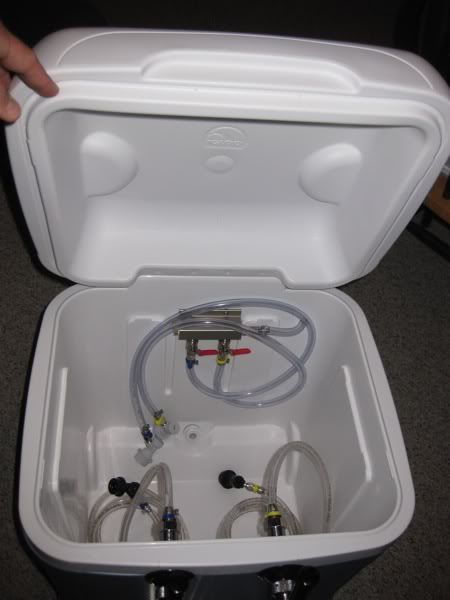
complete_faucets.jpg


And the guts:
complete_inside.jpg


Also, good lord Hell-Bent, getting that 3/16" ID on the 1/4" barb was painful! Heating the tubes with hot water definitely helped though. Now I have a lot of incentive NOT to clean things by taking them apart though...
 
What fitting did you use to go thru the wall for the pocket charger? I love this set up!

This is what I have posted in My Gallery under one of the photo's of the Tailgater:

Ok, this isn't the same as what I did to connect the CO2 injector to the Tailgater but might actually work better/cheaper as it has one less part:

Adapter: 1/4" x 3/8"

Long Nipple: 3/8" x 1 1/2" (or shorter)

Female Hose Barb: 3/8" x 5/16"

Then just drill the appropriate size hole to fit through. I believe it was 11/16".
 
Well I just got my cooler and everything seemed to fit ok. So I don't think Igloo changed the dimensions of the cooler. It looks like the newer kegs are just a bit bigger, as Blue mentioned.

Here are few pics for comparison. The first pic shows how both kegs fit. The second pic shows that the bottom of the older kegs are definitely narrower than the newer kegs.

I just received my cooler in the mail and my 3-gallon kegs look just like yours.

They fit but it's TIGHT.
 
TimmyR said:
I just received my cooler in the mail and my 3-gallon kegs look just like yours.

They fit but it's TIGHT.

So I just investigated further and find the kegs fit great as long as the keg with the triangular broken base is in the back corner and sitting high. That base slightly more narrow and fits over the wheel well of the cooler. I just found another one on eBay(I think) and will hopefully have 4 by the end of the summer.

Do the 3" shanks work well? I plan to have this built in 4- weeks so I can keg 20 gal in 4 kegs and bring 2 of them to my family reunion at the end of July.

image-2565778955.jpg


image-3272502996.jpg


image-2170764163.jpg


image-3919335074.jpg
 
So I just investigated further and find the kegs fit great as long as the keg with the triangular broken base is in the back corner and sitting high. That base slightly more narrow and fits over the wheel well of the cooler. I just found another one on eBay(I think) and will hopefully have 4 by the end of the summer.

Do the 3" shanks work well? I plan to have this built in 4- weeks so I can keg 20 gal in 4 kegs and bring 2 of them to my family reunion at the end of July.

That sucker needs a TOWER. Really. It is just SO COOL to have a tower on one of those cube coolers:

IMAG0017.JPG

PDR_0185_2_.jpg


That PVC tower was easy and cheap to build, too. Keg Cowboy has the tower shanks cheap, about $13. Half what I paid for mine.

:mug:
 
Vongo,

I followed the same approach as outlined by Whutever. I used a 2" long x 3/8" nipple with two 3/8" x 3/8" barb ends. I don't actually have that in my current pictures, but I'll upload now that I have that completed. I also added a drip tray to the front (10") and a water bottle holder for a bike to the back which lets me strap in my 20 oz paintball cannisters. I'll get pictures up soon unless I forget. Be sure to measure the wall where you want to go through as some portions of the cooler vary from 1" to 2" in width (sides vs middle back vs side back, etc).

TimmyR,

3" shanks work out wonderfully. I also bought 2 of the wingnut beer nuts and I'll be honest I wish I hadn't. Although they are nice and easy to tighten down, the extra space taken up by the wingnut flares is annoying. I'll probably swap them for normal beer nuts at some point. Now I'm wondering if 2" shanks would work.

Cpt Kirks,

The tower does look awesome and if the beer is really flowing it seems like the best option. If you're getting only periodic use one downside of the tower would be that the lines are not sitting down in your icewater as they are in the models with drilled fronts. However, it does keep the cooler nice and pristine. And...its a tower...

Best,

Blue

I remove the lid, add a baggie of ice, and replace the lid. That and the foam I lined the PVC with keep the lines and taps cold.
 
Thanks Blue and Cpt Kirks. Althought I like the tower, I prefer the compact design of having the two faucets out the front. I need maximum ease of transport. I thought the wing nut type nipple clamps would be problematic....good to hear that I should just get the standard ones. I am thinking for CO2 I wil go with the Williams Brewing 45g cylinders and their regulator or the 20 oz paintball tank and the Williams dual gage regulator....still deciding but am thinking 45g cartridges will not sit in ice and we be supremely portable.
 
...Do the 3" shanks work well? I plan to have this built in 4- weeks so I can keg 20 gal in 4 kegs and bring 2 of them to my family reunion at the end of July.

I used 3" shanks with welded on nipples and it worked out well for me. I don't think I would have had enough exposed threaded part of the shank to screw on a nut for a separate nipple where I installed the shank
 
Whutever - how'd you run your CO2 cartridge into the cooler with threaded connections on both sides? I like it and am thinking about the the Williams Brewing 45g cartridges with their regulator.

Like this:

Adapter: 1/4" x 3/8"

Long Nipple: 3/8" x 1 1/2" (or shorter)

Female Hose Barb: 3/8" x 5/16"

However, I no longer attach the CO2 cartridge to the outside. I was on vacation a few years back and had a leak so I just connected it to the keg. And I never got around to finding / fixing the leak. If you want, pm me your address and I'll mail you the fittings if you think you'll use them.
 
Ok, final shots now that the portable kegerator has been used 3+ times:

Drip tray (10" with 2" splashback).

portable_drip_tray.jpg


Gas manifold closeup (2 switch manifold running to outside of cooler with 2 3/8" barbs on a 2" long x 3/8" nipple).

portable_manifold.jpg


The portable regulator and paintball 20 oz canister sitting in a biking water bottle cradle. Note, a large rubberband is being used to hold the bottle in the cradle when the setup is tilted/rolled.

portable_regulator_carrier.jpg


portable_regulator.jpg


Another shot of the guts all hooked up and then both taps in use at a party (note the classy beer mug which may appear to be a coffee mug to the untrained eye).

portable_guts_2.jpg


portable_in_use.jpg
 
I want one of these!!! Can anyone coment on what happens while rolling one of these along a side walk or sandy beach? Does your beer get shaken and foamy? Do ou have to let it settle out? I want to build one for the 4th of July, but if rolling back and forth from the house to the beach makes the beer uselss then there's no point.
 
Gryphon,

I've had good luck transporting my beer and having it be extremely clean and drinkable immediately. However, I always use a secondary fermenter and have very little sediment in my kegs as a result of this in combination with force carbing instead of sugar. The only time I've had an issue has been in dealing with the IMMEDIATE force carb method when I overcarbed an IPA. The beer looked more like a snowcone than beer, but once it settled in the glass people loved it and ended up draining that keg regardless of the foam (so I chalk that one up to my screw up). The other tap was normal 1-2 week force carbed and that poured clear after being wheeled out of house, driven for 30 minutes, and wheeled down a street and up 2 flights of stairs.

The rollers appear to handle normal flat surfaces well, but you'll need to use the handles for everything else as you will have up to 6 gallons of beer and ice/water if you've already loaded it. I'm just happy that the telescoping handle can take the weight honestly. I'm looking into possibly upgrading to "offroad" wheels somehow to make beach or field travel more reasonable.

Blue


Thanks Blue. My beers are very clean as well, same processes. I was more worried about the vibrations on the kegs while rolling, but it sounds like you didnt have any issues so thats great!

Off-road wheels are a great idea. Extended axle and mudders, would just need to figure out how to level out the front.
 
I love the way you have the CO2 hooked up. How is the bike cradle attached. I'd like to do the same thing, but I'd like it to be removable so I can put the cooler in the backseat.
 
BBBF,

I had the same question and problem, but mine is (semi) permanently attached. Luckily, the cooler fits in the backseat, but turned sideways (sidewall against the seat). On top of that, I put my seatbelt on the thing to keep it in place (just the lap belt as the shoulder belt a] would run over or into the faucets and b] makes the belt too tight so it goes into retract mode).

I used anchor screws for all of my attachments because I didn't want to drill from outside the cooler inside at low heights. Note that the manifold breaks this rule, but it is high enough that I'm not worried about leakage. Just be careful when you drill for the anchor piece that you don't go through the internal wall of the cooler or you'll need some heavy duty sealant.

I think I used a combination of #8 and #10 screws. However, the bigger screws wouldn't fit all the way, so I have a mix of #8 and #10 anchors which are all filled with #8 screws. The anchors allow me to get a good firm point to screw into without going through the second wall of the cooler. This is important as the internal foam is not firm at all and a screw would likely move and spin without at least a washer and being tightened completely to the wall of the cooler which would make my drip tray more permanent instead of removable.

Blue
 
Like this:

Adapter: 1/4" x 3/8"

Long Nipple: 3/8" x 1 1/2" (or shorter)

Female Hose Barb: 3/8" x 5/16"

However, I no longer attach the CO2 cartridge to the outside. I was on vacation a few years back and had a leak so I just connected it to the keg. And I never got around to finding / fixing the leak. If you want, pm me your address and I'll mail you the fittings if you think you'll use them.

Thanks. I am going to test run with it in the cooler. Plan B seems to b to just drill a hole just large enough to run the CO2 line into the cooler near the top. I should have all the parts by Saturday.
 
Thanks. I am going to test run with it in the cooler. Plan B seems to b to just drill a hole just large enough to run the CO2 line into the cooler near the top. I should have all the parts by Saturday.

Yeah, I just stick my 20oz tank inside the cooler. Works fine for me.

There's a little less room for ice, but it seems fine.
 
Check your local Dunhams, MC Sports or any sports stores. They tend to run in the $28 range but if you have a local place to buy them why order off line? You still have to get them filled and you don't need to pay for shipping. Most of the places I have bought them either fill them or will tell you the local place to get them filled. Just my 2 cents. I just happen to be into Pball a few years back and still have this stuff hanging around.
 
If you carbonate your beer in another keg then transfer it into the 3 gallon one, do you ever have a problem with excess foam or anything?

How do you transfer it from one to the other?
 
If you carbonate your beer in another keg then transfer it into the 3 gallon one, do you ever have a problem with excess foam or anything?

How do you transfer it from one to the other?

I use a jumper (5 foot beverage line with a ball lock liquid disconnect on either end). Purge the 3 gallon keg of O2 and then hookup the jumper to transfer from one keg to another.
 
I have officially decided this is my August project. If I get it done next month it will be ready in time for college football season tailgating!

I like the look of having the co2 tank inside, but read someone on here moved it outside because it kept freezing on them. Is that why most of you moved it outside?
 
You can see from my pictures, the tank and regulator (at least the one I bought) are a little crowded in the cooler. I moved it outside for convenient readjustment and to not cramp all the hoses etc. It DOES fit in the corner.
 
TimmyR, where'd you get the Reg? I've seen it before but now can't find it. Also, did you need the converter for your CO2 can?
 
Brewer's Edge Paintball Regulator

I just bought this....do do over I MIGHT have spent the extra $50 for the small cartridge regulator, but I REALLY like the 20 oz (1.25 lb) paintball bottles now. PLUS I have it on a Q/D that allows me to use it like my 5lb utility CO2 tank to purge kegs and carboys and to do transfers on CO2

WOW! I got a deal.... KegConnection( http://stores.kegconnection.com/Detail.bok?no=268 )doesn't carry the one I got from them anymore.... :( The link use to go to it. If you call and ask they may tell ya they have a few or may not carry it at all.
Sorry for crap post but I got mine for 56 bucks. just saying.... Worth a shot to ask 30 bucks could buy extra beer supplies if a calls worth it or not. :drunk:
 
Nice.....$30 is worth it for sure. The Kegconnection regulator looks to sit lower than the Williams catalog regulator which is a tight fit in the corner of the cooler. However, I can attest to the how it operates now. Although I over carbonated my beers slightly, both my Belgian and IPA were poured tonight at a reunion and well received. The REAL leak check is now in progress. We'll see if I have any CO2 left tomorrow....but that's why I brought a 2nd 20 oz bottle.
 
Update: So far the only real issue I have is it APPEARS I am losing a little CO2. The bottle was full around 850 psi when I started and is now sitting around 25 psi. The beers were both carbonated when I put them on and I leak-checked everything once but did not re-check with the kegs connected. I think I might have bumped something. I have an extra bottle just in case this one runs dry.
 
I bought my paintball reg through kegconnection and that reg has worked just fine for me. I've pushed more than 30 gallons on one fill (I think I'm using 20 oz tanks) and haven't had to switch to the backup yet.
 
Blueskew said:
I bought my paintball reg through kegconnection and that reg has worked just fine for me. I've pushed more than 30 gallons on one fill (I think I'm using 20 oz tanks) and haven't had to switch to the backup yet.

That's what I'd expect. A 20oz bottle is 1/4 of a standard 5 lb tank so I'd expect to get a lot of mileage out of a paintball 20 oz tank. My tank has dropped from 850 to 250 in about 3 days with min carbonation req'd since kegs were carbonated. I'll leak check at home post-vacation.
 
Back
Top