A Chest of Bitters (Keezer Build)

Homebrew Talk - Beer, Wine, Mead, & Cider Brewing Discussion Forum

Help Support Homebrew Talk - Beer, Wine, Mead, & Cider Brewing Discussion Forum:

This site may earn a commission from merchant affiliate links, including eBay, Amazon, and others.

Schrodinger

Member
Joined
Jun 22, 2011
Messages
23
Reaction score
2
Location
Tallahassee
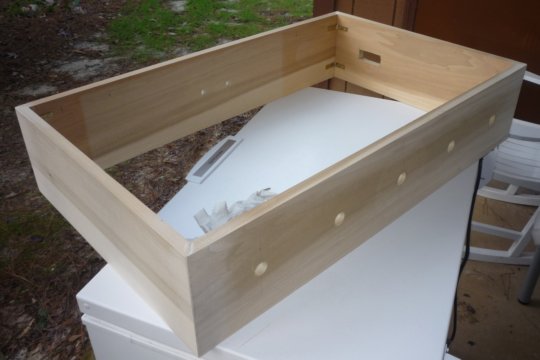
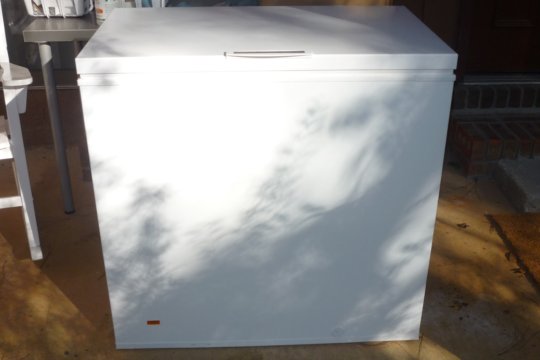
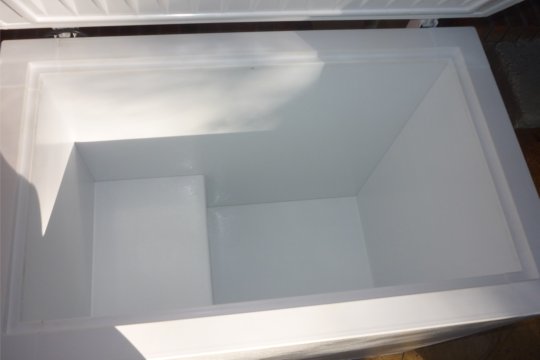
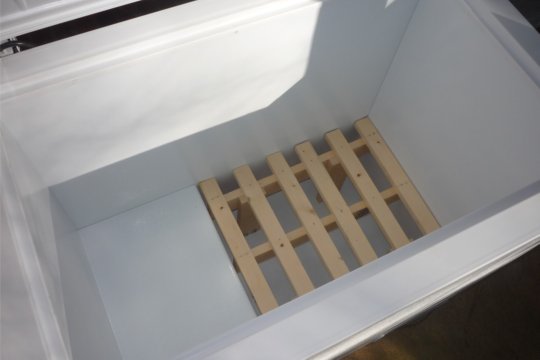
Yet another Keezer Build, by yet another woodworking novice -- (That sounds wrong. What's less experienced than an novice? Neophyte? Yea let's go with that one.)

My wife is very supportive of my homebrewing hobby, but laid down one rule: Kegs, not Bottles. You see, she got roped in to helping a friend clean and sanitize bottles one evening and decided never again. So a kegerator is a critical component for my hobby.

It's been quite some time since I started sourcing components for this build, as I'm one who tends to take an inordinate time on any project and have difficulties finishing. Not this time! I've gotten re-started over the holiday break and have given myself a deadline, Jan 1, 2013.

Wish me luck!
 
Just put a collar on one, paint it and drill some holes in it. DONE LOL
 
I wanted a freezer that would not dominate the space it was in, whilst holding a good variety of brews. I'm not living in a dorm, so >2 kegs, but I've neither basement nor den, so those beautiful ~12 keg setups are right out. After looking around and checking the internal dimensions of many a chest freezer, I settled upon the Frigidaire FFFC07M2KW, a 7.2 cubic foot freezer that should hold 5 kegs with a little work.

P1040752.JPG


The compressor hump takes up quite a bit of space, but I need a collar for the taps any way, so no problem.

P1040753.JPG


As you can see, the dimensions are just a bit off in this configuration, the recess won't quite hold three kegs. The third one won't make it all the way in without some serious squeezing (which I didn't do). You could probably make it work and dent some surfaces in the process, but this would be a clean-in-place job from that point forward.

P1040754.JPG


So, instead, I build a little wooden platform to raise all the kegs to the same level. The space below the platform will be awkward to access, but I could probably stash extra hose length down there.

P1040756.JPG


And now I have space for up to five happy kegs (I only own four at the moment).

P1040757.JPG


As an extra note: My kegs are the shorter, fatter, coke style. If my measurements are accurate, up to two commercial slim quarter kegs could fit in here if I switched to the taller pepsi style kegs.
 
The collar is now cut, drilled, and assembled. I used right angle brackets (two per corner), and reinforced the joint with liquid nails. There is some difficulty as of late in finding time that is simultaneously Day, Dry, and Warm (>40F) enough to work, but I have one layer of wood putty on and cured. I'll do some more sanding and make a second application of wood putty today.

P1040849.JPG


P1040851.JPG


P1040853.JPG


Some notes for my future self:

Don't trust dimensional lumber, wood comes with a 30% margin of error not counting any kerf. My two pieces used for the collar ended up having different heights.

The instructions for the angle brackets say to drill the pilot hole at an angle away from the cut. Don't do this, it looks sloppy and makes it impossible to fit a screw driver. Do space the pilot holes slightly far from the joint, that way the bracket will squeeze the wood together, instead of just holding it in place.

In working with wood, the facing of your piece matters. Make your first cut on the visible face for cleaner results. Working from the back tends to cause splintering on the front.

Making round holes is way easier than square! That trick with hammer and chisel looks simple when someone else does it, but I had no luck. Also, the Dremel is quick and adaptable, but not much better for square holes. Just borrow a wood rasp and take your time.

MOST IMPORTANT: RDWAHAHB! I'm not trying to hold a vacuum with this piece, worst case is the thing leaks like a sieve and I spend a few pennies extra per month on electricity.
 
I see people constantly using Liquid Nails. That is for gluing flat things to flat surfaces (i.e. wainscoting). Wood glue (probably something like Titebond III that can handle moisture) should be used and it will be STRONG.
 
I see people constantly using Liquid Nails. That is for gluing flat things to flat surfaces (i.e. wainscoting). Wood glue (probably something like Titebond III that can handle moisture) should be used and it will be STRONG.

couldn't have said it better myself.
 
I see people constantly using Liquid Nails. That is for gluing flat things to flat surfaces (i.e. wainscoting). Wood glue (probably something like Titebond III that can handle moisture) should be used and it will be STRONG.

Thanks for the advice. I'll keep it in mind for my next project.

For now it's too late to re-make the joint. Would it be useful to squirt some wood glue in the (numerous) gaps on the inner edge of my miter joints? I had considered putting some silicone caulk in there as a seal, but glue could do the job as well.
 
For now it's too late to re-make the joint. Would it be useful to squirt some wood glue in the (numerous) gaps on the inner edge of my miter joints? I had considered putting some silicone caulk in there as a seal, but glue could do the job as well.

That would be a waste of glue...use the silicone.
 
Thanks for the advice. I'll keep it in mind for my next project.

For now it's too late to re-make the joint. Would it be useful to squirt some wood glue in the (numerous) gaps on the inner edge of my miter joints? I had considered putting some silicone caulk in there as a seal, but glue could do the job as well.

Yeah, no use now. I wouldn't waste the glue trying to seal the inner edge either. Especially not after adding the reinforcing brackets. It wasn't so much addressed towards you, just that I have seen that a lot recently. That and people reinforcing the crap out of those corners. A properly cut and wood glued joint is majorly strong. Often stronger than the wood itself. Just info for next time when you upgrade to a 12cf chest freezer. :rockin:
 
Just info for next time when you upgrade to a 12cf chest freezer. :rockin:

Indeed.

I took another look at the collar today and went over it with some 220 grit paper. I declare it to be "Good Enough" and will forgo another round of putty. I will now move on to the stain/urethane step.

I have a friend coming over this evening to help. He stained a batch of Ikea stuff a couple months ago, so it is soon enough that his skills are fresh, yet sufficient time has passed that he's dumb enough to want to do it again.

In the mean time, let me show you a bit of flair that I've been working on. One will frame each tap.

P1040758.JPG


I picked these up from my work's scrap pile. Anyone recognize them? The project's name is a hint.
 
I see people constantly using Liquid Nails. That is for gluing flat things to flat surfaces (i.e. wainscoting). Wood glue (probably something like Titebond III that can handle moisture) should be used and it will be STRONG.

couldn't have said it better myself.

I recommend the SimpsonStrong-Tie RTA1 hurricane straps if you want an easy no-muss, no-fuss solution that doesn't require any permanent liquids and can be easily disassembled.

They're top-right in the first picture in my FCM7SUWW build thread (which I should go update now).
 
Thanks for the advice. I'll keep it in mind for my next project.

For now it's too late to re-make the joint. Would it be useful to squirt some wood glue in the (numerous) gaps on the inner edge of my miter joints? I had considered putting some silicone caulk in there as a seal, but glue could do the job as well.

Glue won't do you much good unless you clamp it down afterwards.

If you want to fill the void and still be able to stain it, you'll want to use stainable wood filler.
 
You don't want the keezer to have leaks. Mine does and it ices up inside a lot.

The easy fix for this is to spray a couple of small squirts of Good Stuff in the corner right before you glue on the foam collar insulation. It'll both hold the insulation tight in the corner and prevent air movement.

http://greatstuff.dow.com/

Window & Door formula would be easiest, but the original formula works just as well with a little care.
 
Finished staining yesterday. Two rubbed coats of red walnut with a light sanding (220 grit) and wipe-down in between. Gotta say, it looks nice.
P1040854.JPG


I also dry-fitted one of the taps, just to see how things looked together:
P1040856.JPG


Next up: Polyurethane!
 
Finished staining yesterday. Two rubbed coats of red walnut with a light sanding (220 grit) and wipe-down in between. Gotta say, it looks nice.

Coming along nicely.

It looks like you used water-based or pigment stain. You got only a little bit of blotching. Did you use a pre-stain conditioner? Just curious.

Next up: Polyurethane!

What type of poly? :D
 
Coming along nicely.

It looks like you used water-based or pigment stain. You got only a little bit of blotching. Did you use a pre-stain conditioner? Just curious...

Oil-based, actually. No pre-stain conditioner.
The poly is a clear semi-gloss. I figured that the hardware would be shiny enough that I'd not want a high gloss poly.
 
Oil-based, actually. No pre-stain conditioner.
The poly is a clear semi-gloss. I figured that the hardware would be shiny enough that I'd not want a high gloss poly.

I never use anything but satin finish poly myself. Gloss is just too unforgiving when it comes to dust nibs. Sure, you can buff between coats, but unless you have a hermetically sealed spray booth, the third coat will always attract just enough dust to make it look terrible.

Edit: Noticed you said semi-gloss. Most are forgiving enough. :)
 
pabloj13 said:
I see people constantly using Liquid Nails. That is for gluing flat things to flat surfaces (i.e. wainscoting). Wood glue (probably something like Titebond III that can handle moisture) should be used and it will be STRONG.

+1 some titebond yellow glue when dried is stronger than the wood itself.
 
unless you have a hermetically sealed spray booth...

Not even close. This project is happening less than one meter from the open sky. I'm just thankful I'm not attempting to poly this during Yellow Season (Spring and Fall, when the Oaks and Pines drop so much pollen it turns everything yellow).
 
So I got a few days recently of >40F+Dry and made some significant progress.

P1040872.JPG


Two coats of Semi-Gloss Poly. I got all but the second coat on the tap-face done in one day, but it was another three days of rain before I could finish the last face. I came back to discover that I had a few running drips on that face, but they should be covered by the hardware, so I didn't worry too much.

P1040873.JPG


Sealed the corners with some silicon caulk, and put some weatherstripping down to serve as a gasket. I'm not sure about that weatherstripping, it may need to be upgraded in the future.

P1040875.JPG


Put down a layer of 0.5" Extruded Polystyrene insulation. I would have preferred something thicker, but this is all that they stock in FL. So far no-one is willing to order one sheet of 2" Polyisocyanurate for me, so :rolleyes:
It was starting to get wet outside by then, and I had difficulties with the spray glue not quite holding. One of the short pieces of insulation kept popping up (they were cut slightly long, so there is a tendency to bow out). I sprayed some more glue in the gap and wedged the piece in place with a full keg.

Drumroll Please!

P1040877.JPG


The view of the Chest of Bitters fully assembled!
Well, it isn't fully assembled, but it looks the part from the outside.

I still have air and beverage hoses to run, and a temperature controller to wire, but I'm feelin' good about this. :ban:
 
Back
Top