My Stirplate... Cheap and Easy Build...

Homebrew Talk - Beer, Wine, Mead, & Cider Brewing Discussion Forum

Help Support Homebrew Talk - Beer, Wine, Mead, & Cider Brewing Discussion Forum:

This site may earn a commission from merchant affiliate links, including eBay, Amazon, and others.
Yeah, if you aren't using an actual stirbar, don't expect much. Also, one important tid-bit I learned: The stir bar cannot be longer than your magnets. For example, a 1" micro stir bar will tear ass on my plate, but even a 1.25" will wobble around and eventually get thrown. Food for thought.

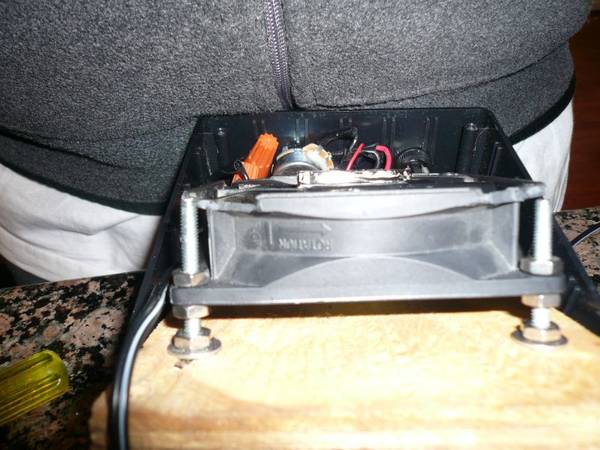
Regarding the magnets, I stacked them. Be careful, though..the attraction between the magnets pulled the one out of my hand from about a foot away. The plus is that they lined up perfectly. I'd take a pic, but it would involve disassembling and reassembling my plate...I like you guys, but not that much...

For me, my problem was a lack of magnetic power coupled with a lack of electronic power. Once I doubled up on both magnets and volts, I was set.
 
I finished and gave my stir plate a run this weekend. It work pretty darn good. Had a steady stream of CO2 buddles for 24 hours.

Here are the pics from the inside. There are more in my gallery. Excuse my beer gut

P1010925_comp.jpg


P1010927_comp.jpg
 
I'm glad it's working better with the stir bar. Also, thats not C02, its air. The idea is to pull oxygen into the wort.
 
So the best way to balance the magnet(s) weight is to install it(them) on a large washer/disk? But anyhow one have to glue the washer/disk on the fan rotor and wait until it's cure...?

In my first attempt, I had problem getting the assembly balanced.

Nice thread. Thanks Anthony!
 
The idea of the washer is to give yourself a place to balance your magnet placement. Once I got the entire assembly built, I powered it on and off with the pot at its highest resistance with the washer glued down with the 60 second epoxy. I just eyeballed it, but I got it pretty damn close...
 
So the 60 seconds epoxy should allow me to move the washer/magnet(s) assembly yet keeping it in place strong enough for the alignment test...?

Exactly... Make sure you aren't running the fan full blast either. You want the pot's resistance turned ALL THE WAY UP so the fan is moving as slow as possible. I still turn the switch on and off to keep it moving slow until the washer is nice and centered. Once the washer is all set, do the same with your magnet. You want to get your magnet perfectly centered. Fortunately, that steel washer you just glued down gives you a great magnetic point to keep your magnet attached while you center it.
 
Radioshack sells a project enclosure larger than the one listed in the original parts list. Also, you will have more room if you mount the controls on one of the smaller faces of the box.
 
Hey SilverKing,

Where did you get your parts? I'm having trouble finding a big enough project box. I like the lighted switch too!

-Tripod

Got most everything from Radio shack. The power supply I had already. Magnets off of Amazon.

here's the site and list that I copied. Except for the switch, it pretty much identical. I just felt like it needed a little extra flash. :)

Stir Plate


update: I ended up getting a 12V equivalent power supply and swapping out the 6V phone charger. Once my 2000ml starter really took off, it needed the extra juice to spin. got the power supply at Radio shack too. not the cheapest part of the build.
 
Wow... that guy built almost my exact build, including the washer. I know the idea of a power supply and a pot isn't my intellectual property (it's been done) but I've never seen a single person use the washer method.
 
FYI, I believe the cheapest magnets are on dealextreme.com, if you don't mind waiting two weeks for delivery (they are in Hong Kong). You can get like a 20 pack of the 1 cm neodymiums for less than $3 w/free shipping. The extras are fun and can be useful to have around.
 
FYI, I believe the cheapest magnets are on dealextreme.com, if you don't mind waiting two weeks for delivery (they are in Hong Kong). You can get like a 20 pack of the 1 cm neodymiums for less than $3 w/free shipping. The extras are fun and can be useful to have around.

Are those mags "rare earth"?

Thanks All, for the quick replies! It's just a matter of time 'til I get mine going! I'm itching to move into using liquid yeast but I wanna get a stir-plate ready first...plus I'm an engineer/techie so I can't just watch a project being made and not wanna make one too. Whether or not I actually NEED it to make starters is beside the point! ;)

-Tripod
 
Yeah, rare earth. I ordered some from them a long time ago, before I started brewing, so I happened to already have some laying around when I made my stir plate.

dealextreme.com is a great site, in general, for just cheap little things like that. They also have a lot of Chinese knock off stuff, iPod socks, Nintendo DS accesories, etc., for a fraction of the price.
 
If you have a power supply that works with a type M connector, that will work. I have used that on some of the plates that I made with router power supplies.


FYI- I'm going to be working on a heated version of this stirplate.
 
Ideally you like the starter to be as close to the wort temperature as possibly when pitching. This avoids a time lag as the yeast adjusts.

Thanks! That makes a lot of sense. I suppose you would also want to control temps so there is no temperature "shock" by adding room-temp starters to a warmer wort that is cooling...

-Tripod
 
I will only be doing the heated version if I get a free temp. controller. I'm still waiting on the free PID, so I'll let you all know what happens...
 
Just curious...wouldn't the heating have an adverse affect on the electronics? I suppose it wont be an issue since you are using a fan!

-Tripod
 
So, I figured with the number of older stirplate threads with dead links as well as the multitude of questions I have seen regarding how to actually make one, I would cover the subject with my own. I made one that is cheap, easy to build, and requires nearly ZERO technical knowledge of electronics.

Your "Cheap and Easy" Stir Plate:


From Radio Shack, you'll need the following:
7" x 5" x 3" Project Enclosure: Part Number 270-1807 - $5.99
25 ohm 3 watt Rheostat (aka Potentiometer): Part number 271-265 - $3.99
12 Volt DC/30Amp Rocker Switch with LED - Part Number 275-018 - $3.99
Silver Tone Knob - Part Number 274-424 - $2.99

I just caught this thread, I'm glad to see people are still making these things the way I designed it 5 years ago. These are the same parts I spec'd when I came up with the idea of using a computer fan for a stir plate...
 
As I asked in another thread, who are you? I honestly am not familiar with your name on here. My parts came from old power supplies at work and I found the closest possible parts at the Shack... post a thread or website?

I have openly admitted that I didn't come up with the idea of a computer fan, however I find it hard to believe that you used the EXACT same parts as me considering that I walked into a radioshack and picked up what I could find that would work with a 6 VDC power supply.

Regardless, congratulations on proving evolution...
 
So I got mine up and running. Had to make minor tweaks such as bringing the magnet in closer. I installed my fan hanging upside down under the metal plate that came with the project block. This allowed me to use the nuts to bring in the fan really close. I also used a 2 inch octagon stir bar. It makes a HUGE funnel. Perfect. Now I need some yeast to make a starter with this.

1 inch stir bar in a growler
MSP.jpg


2 inch stir bar in a Erlenmeyer Flask
MSP2.jpg
 
Me? Yeah. I was referring to ChillyP's second pic. His vortex is like 1.5" across at the base.
 
Yes. That a 2 inch Octagon stir bar. It's a 1000ml flask, which is kind of small. I tried it with a Half Gallon Growler I had filled half way and with some tweaking of the switch and adjust the distance of my magnets I could get the same results.
 
I'm sorry if this is on here, but I couldn't find it. Where is everyone getting their stir stick.
Cheers,
Jeremy
 
Ditto, using a 2". Most expensive part of the project.

I have a 2" also but I think it's causing me problems. I find that it gets off center easily and gets thrown a lot. I'm using a 1.5L coffee press as a vessel.

How big are are your starters? You using a flask?
 
Back
Top