One Jig to Cut Kegs and False Bottoms

Homebrew Talk - Beer, Wine, Mead, & Cider Brewing Discussion Forum

Help Support Homebrew Talk - Beer, Wine, Mead, & Cider Brewing Discussion Forum:

This site may earn a commission from merchant affiliate links, including eBay, Amazon, and others.

dutchoven

Well-Known Member
Joined
Mar 18, 2011
Messages
623
Reaction score
13
Location
SF Bay Area
I’m in the process of moving to all-grain and have been fabbing up a new brew kettle, MLT, and HLT from kegs. I recently cut my kegs and built a custom false bottom … thought I’d post my progress so far.

First, the keg cutting …

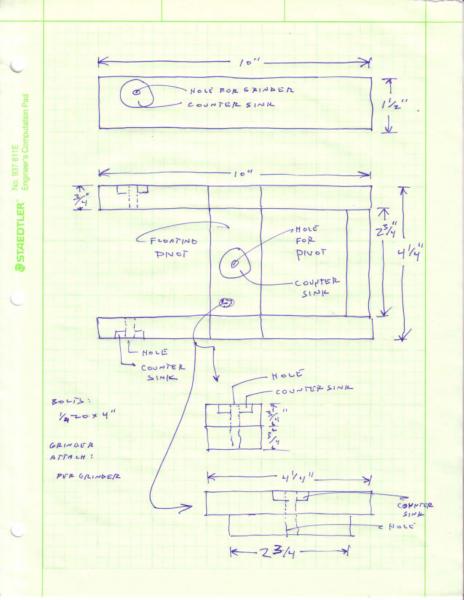
To cut the kegs, I built a jig out of 1”x2” wood stock and fit it to a 4” angle grinder. The jig mounts to the grinder handle attachments and pivots off the keg opening. All told, the jig took me about 45 minutes to build and cost around seven bucks. Yeah, probably overkill, but it helped me get really nice cuts …

IMAG0188 2.jpg

In building the jig, I wanted something that could be adjusted to different cutting diameters. To do this, I let the pivot point of the jig float in the jig, adjusted by a bolt installed in the back of the jig. Once I set my desired diameter (12” for the keg openings), I screwed everything into place.

IMAG0353.jpg

At the pivot point, I used another bolt to adjust the height of the jig and angle of the blade – this helped maintain the cut-off wheel at 90 degrees to the keg top.

IMAG0354.jpg
 
The jig pivots on a 2” diameter block built from two stacked plywood circles cut with a 2-1/8” hole saw. This conveniently left me with a 2” diameter block with a 1/4" hole in the center – fits perfectly in the sanke keg opening. The height adjustment screw on the jig fits into the 1/4" hole.

IMAG0182.jpg

IMAG0183.jpg

Prior to cutting, I depressurized the keg and removed the dip tube. I then filled the keg with water to dampen the noise and remove excess heat. During the cut, I took several passes; removing a little material at a time – this resulted in a cleaner, perfectly round cut.

IMAG0212 2.jpg
 
On my first keg, I used a Harbor Freight cut off-wheel, which cut fine. On the other kegs, I used a Dewalt XP cut-off wheel. The Dewalt cut faster and left me with a cleaner cut … well worth the extra cost.

Once the kegs were cut, I deburred with a flapper wheel. Before …

IMAG0205.jpg

After …

IMAG0227.jpg

IMAG0230.jpg

Overall, cutting the kegs went way better than expected. I couldn't imagine trying to cut a keg "freehand".
 
Now for the False Bottom …

I wanted a full-size false bottom (15 1/8” in my case) so no grain would sit on the floor of the MLT. I settled on a two-piece design that could be bolted together inside the MLT. To fit the false bottom through the 12" opening in my keg, I cut one piece at 12" wide; the other piece accounts for the remaining 3 1/8". I chose to offset the seam to maintain the overall strength of the FB.

IMAG0363.jpg

IMAG0374.jpg

The FB is built out of 16-gauge stainless with 3/32” perforations on 5/32” centers. I picked up the perforated at a local metal company (Howard Wire Cloth in Hayward, CA). A 12” x 48” sheet ran me $66 (about 20% cheaper than onlinemetals.com).

To cut the FB, I drilled a hole in what would become the center of my FB for the pivot point of my jig.

IMAG0300.jpg
 
After cutting the larger section, I ground the edge straight, matched it back to the perforated sheet, and cut the smaller section.

IMAG0332.jpg

IMAG0336.jpg

Apparently, I like to wear striped thremals when I use an angle grinder :eek:

IMAG0344.jpg
 
To connect the two sections, I cut down a 1” wide strip of perforated and fit it to the bottom of the two sections.

IMAG0356.jpg

Drilled out for #6 by 3/8” SS bolts to hold the whole thing together.

IMAG0367.jpg

IMAG0366.jpg

IMAG0376.jpg

After everything was cut, I deburred with the flapper wheel.

Overall, I’m very happy with the FB. It fits tight in the MLT and sits approximately two inches from the bottom center (should allow for direct fire RIMS).
 
ONE JIG TO CUT THEM ALL! :rockin:

Nice work, I have one last keg to cut, will be using this!
 
Excellent stuff all around but I wanted to suggest that you might want to put a hinge on that extra flap because you'll probably want to remove it often to clean it. I'm aware that it can be done inside the tun, but pulling it out easily will work out better.
 
Man, you guys are literally taking your life into your own hands by using a cut off wheel like that without a safety guard. If that wheel fails and breaks, you could have a piece of that wheel sticking out of the side of your head and be dead.
 
Man, you guys are literally taking your life into your own hands by using a cut off wheel like that without a safety guard. If that wheel fails and breaks, you could have a piece of that wheel sticking out of the side of your head and be dead.

The pics showed their heads out of line with the wheel so a shattered wheel would do no more to them without a guard than it would with a guard. . .

i.e. the guard would only help for the shards that would fly directly UP and those will fly only in the exact plane of the wheel itself so as long as they are out of that plane, they're okay (and the pic showed he was, as far as I can tell)

The pieces that fly down and against the keg and bounce out. . . the guard wouldn't help with those. . .
 
jigmordor.jpg


I like how clean your design is. Plus it works with cutters that do not have handle mounting points on all sides of the head.
 
Nice Job on teh Jig and subsequently the cuts. At some point I will most likely move from Mash Tun cooler to Mash Tun Keg, when that time comes I'm sure I'll be using your Jig design. Also +1 to Bobby M's comment on a hinge for the screen.
 
Man, you guys are literally taking your life into your own hands by using a cut off wheel like that without a safety guard. If that wheel fails and breaks, you could have a piece of that wheel sticking out of the side of your head and be dead.

I used to run cutoff wheels like that until one failed and lodged a 1/3rd of the wheel into my inner thigh at about 1 1/2" deep just millimeters away from my manhood... especially cutting thin sheetmetal is when most cutoff wheels fail when they grab the edge and crack the wheel.
 
jigmordor.jpg


I like how clean your design is. Plus it works with cutters that do not have handle mounting points on all sides of the head.


(OT) I am so happy somneone else went the same direction I did with this title :mug:

I have shattered many a cutoff wheel. they are dangerous machines and not to be taken lightly. wear lots of PPE and pay attention and you should be fine.
 
Hey Everyone,

Thanks for the feedback ... I'm glad everyone liked the jig design and the method.

Bobby M: I've thought about adding a hinge ... know of any sources for thin SS piano hinge?

Pick and doctorsbro: Thanks for the observations -- you're absolutely right. Looking back, I shutter at the thought of what could have happened. Using the jig did help to minimize the pressure and side loading on the cut-off wheel, and I did keep my face out of the path of destruction. But ultimately, none of this can prevent a defective blade from exploding. I'll definitely be using the guard from now on ...
 
The design took the bulk of the time. My brother-in-law and I brainstormed ideas for a week or so. We originally thought of using unithread or welding something up. I think we even threw around the idea of using two angle grinders on one jig (hahahaha ... that would have been so eff-ing dangerous).

I finally settled on a wood design for simplicity sake.

Putting the thing together took about 45 minutes. Its basically a box, with the grinder being one of the edges of the box, and a center pivot that can be adjusted for different cutting diameters.

As it turns out, there were a few parts to the jig that were overkill. On the front of the jig, next to the blade are two bolts with caps on the end. I put these on thinking they would help level the grinder side to side. They're completely unnecessary -- I ended up tightening them all the way back while cutting.

IMAG0177 2.jpg

IMAG0175.jpg

And I probably could have gotten away without the adjustment screw in the back (though it does help to dial in cutting diameters).

IMAG0353.jpg

If anyone's interested, I'd be happy to draw up some plans and post them up ...
 
Where do you get the sheet of perforated stainless? I'd like to get a false bottom but its gotta be a DIY project for cost... Thanks
 
I picked up my perforated from a local metal supplier (Howard Wire Cloth in Hayward, CA). Search "perforated stainless" near your location; should point you in the right direction.

I know Online Metals (www.onlinemetals.com) sells perforated also.
 
dutchoven said:
I picked up my perforated from a local metal supplier (Howard Wire Cloth in Hayward, CA). Search "perforated stainless" near your location; should point you in the right direction.

I know Online Metals (www.onlinemetals.com) sells perforated also.

Right up 880 from where I am! I'll have to check it out!
 
Just wanted to send a "Thanks" out to DutchOven. I used your overall design, tweaked it a little to suit my needs & comfort & it worked very well. I will post some pics in the near future and I too can provide a drawing & parts list. (bought it all from Lowe's as it was close to my home, but a local hardware store would have been cheaper)

More to come.
 
I'm right on the north side of Philly, what do ya need??

I honestly don't need anything at the moment. Just bought a CFC and will be ordering a fully assembled keggle in a few days.

I'll have to invent some excuse to get something made once I've paid those off! ;)
 
Mason, Toolbox: Glad the design worked out for you guys.

Toolbox: your jig is AWESOME ... makes mine look a tad janky! And love the portable kegerator, do you have a coil in there, or just ice around the kegs?
 
Mason, Toolbox: Glad the design worked out for you guys.

Toolbox: your jig is AWESOME ... makes mine look a tad janky! And love the portable kegerator, do you have a coil in there, or just ice around the kegs?

that one just uses the ice around the kegs, I also have a 2 tap jockey box with coils if I need to do multiple beers
 
Back
Top