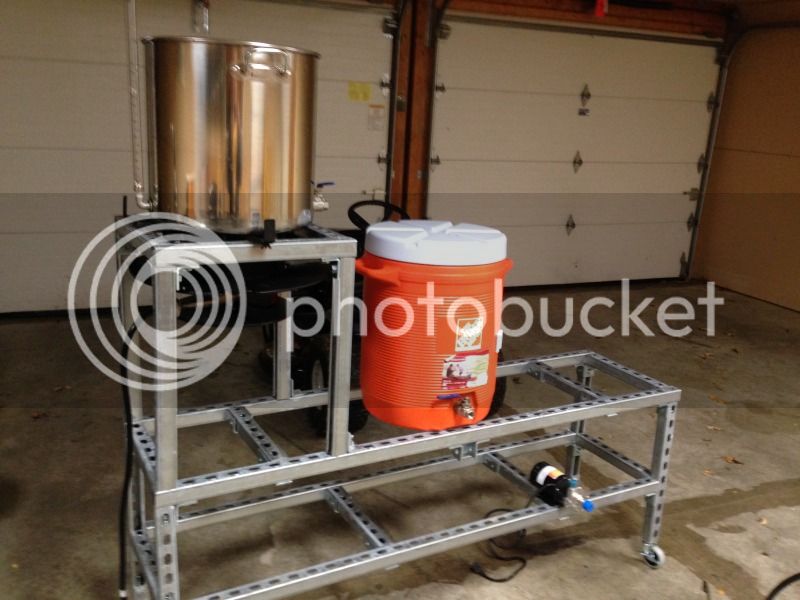
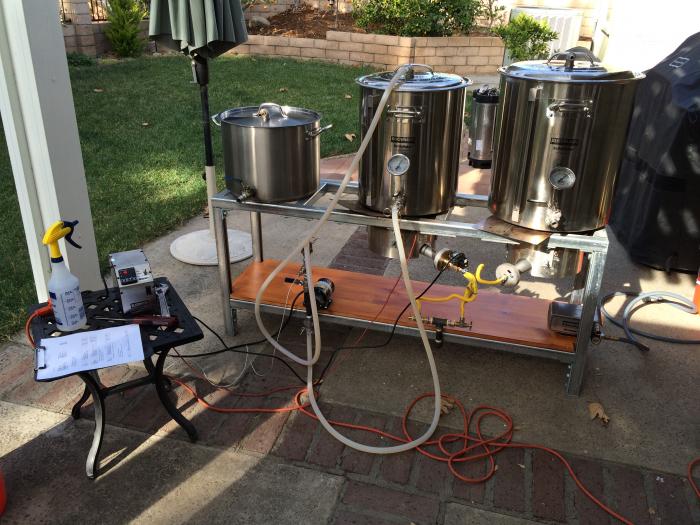
My Weldless Build Using Strut

Homebrew Talk - Beer, Wine, Mead, & Cider Brewing Discussion Forum

Help Support Homebrew Talk - Beer, Wine, Mead, & Cider Brewing Discussion Forum:

This site may earn a commission from merchant affiliate links, including eBay, Amazon, and others.
sweetcell said:
nothing. the metal is thick, it will take years if not decades of resting before it becomes a problem. chances are good folks will replace or rebuild long before then. the stand is going to look like hell due to spills and boil-overs anyways, a little burned off galvanization won't even register.


I agree with this, I will have moved to stainless and chances are electric long before it rusts out.
 
Daves69 said:
I agree with this, I will have moved to stainless and chances are electric long before it rusts out.

So now that I've used my galvanized stand for a few brews and the galvanization has burned off, is there any high temp spray paint that will not burn off even if in contact with flame?
 
So now that I've used my galvanized stand for a few brews and the galvanization has burned off, is there any high temp spray paint that will not burn off even if in contact with flame?


Some have had a little luck with the flat black BBQ paint and even the engine block paint. You also might be able to get the tops powder coated?
 
image-1178168904.jpg

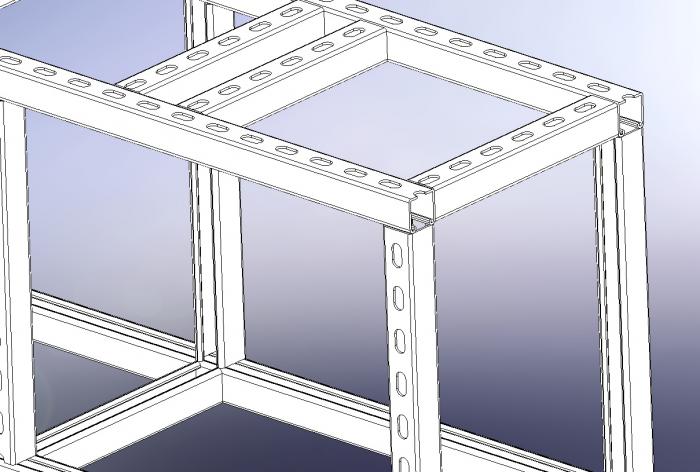
Hey guys one question about design . I plan to make a 3 tier like reulliss's stand . Would this ^^^ be ok to hold my brew kettle or should I cut the strut and put the braces across on the support strut ?
 
coinhall09 said:
Hey guys one question about design . I plan to make a 3 tier like reulliss's stand . Would this ^^^ be ok to hold my brew kettle or should I cut the strut and put the braces across on the support strut ?

Cut the strut and make braces, you will feel better standing next to all that hot liquid. Not to mention it will just be a cleaner more professional look. If you use slotted from a big box store your talking $15 in strut and $5 in bolts, can't count the angle brackets because your using them regardless..
 
Yes , any good casters at Home Depot or harber freight ? I'm guessing get some rated for about 200 - 300 lbs ? And how should I attach them , just use some self tapping metal screws I have on hand ?
 
Yes , any good casters at Home Depot or harber freight ? I'm guessing get some rated for about 200 - 300 lbs ? And how should I attach them , just use some self tapping metal screws I have on hand ?

I got my wheels at Tractor Supply Co. I didn't us swivel bases because I set it up like a wheelbarrow for rolling one end while the other is lifted. My wheels had a hole in the mounting plate that I was able to put one of the strut bolts through and use the strut nut inside the strut. Pretty easy actually. I don't know what the official names are for those peaces. Of you want a picture I could probably get one.
 
Update on my build.

Ran out of strut and 4-hole corner
Brackets, need 6 to complete.


View attachment 160492

Soooooooo close !!

Looks nice. I think you guys may be underestimating the sheer strenth of these fittings and channel nuts. I would not have cut it. I searched but could not find a number for load rating on even simple 90 degree corners. I looked at globe strut and unistrut. If anyone knows, I am curious. I suppose it depends mostly on the grade of bolt used.

I am going to use four uprights and four corner angles to hold up my 55 gallon HLT. I may up the 3/8 to 1/2 in bolts. I can do a chinup on a cross member supported by two corners and 3/8 bolts. My 200lbs doesn't seem to have any effect. I bet I could support the whole family on there with the same results.

The full HLT will be under 500 lbs. So, evenly distributed that is less than 125 per connection. I won't loose any sleep over it.
 
So after about a month of work and ordering parts my stand is complete . I'm actually kind of sad it's done I had a lot of fun building it . But on the other hand I'm pumped to brew on it this weekend . I picked up all my ingredients today for my first 10 gal batch . Thanks for all the help and ideas .

Great stand! How did you wire up the box for the pumps? Any chance you could take a close up pic?
 
It's been over a month since I moved into my house and my strut is sill standing uncut in the corner of my garage....arrrrrrgh. I need to get motivated...as soon as my wife keeps deciding to retile bathrooms and buy new ranges and microwavesWTF ok done venting ow
 
musikguru6 said:
Great stand! How did you wire up the box for the pumps? Any chance you could take a close up pic?

Thanks man I bought an outdoor extension cord and cut off the female end and then cut the male ends off of the pumps . then wired it as you would a switch . Ill take a picture of it later on this afternoon .
 
Picked up my strut today, and I'm about to order my fittings. FYI there is a coupon code for strutchannelfittings.com "SAVE" for 10% off.

I was planning on going for a 2 tier system, but looking at the cost for the fittings and additional strut, I think it is wisest in the long run to just pony up and get a second pump.

That's the advantage of strut, I was in the same boat and just changed my design to a temporary 2 tier.
null_zps1dcab446.jpg
 
I've been doing a single tier with one pump and just batch sparging. But I just got my second pump, mounted it, made a cover, wired them into a switch box, lids, sparge arm in lid, locking in second lid... Just waiting for another couple fittings in mail.
 
Well stage one of this build is complete, stage 2 to come later is the automation. I want to brew a lot on this and get it dialed in before diving into automation.

I got my lids, got both drilled and in one mounted a sparge arm and hose clamped a silicon hose to it (will add a disconnect later probably). On the other lid I mounted my Loc-Line and have a cam lock disconnect on the outside.

Just did a quick test run with both pumps, practiced fly sparging. No leaks, works well. I see now why Lonnie has a big hole cut in his sparge arm lid, need to be able to see the flow from the sparge arm. I will look at doing this but not sure how to cut a big hop win aluminum lid with decent edges.

Planning on a batch run tomorrow, just 5 gallons, making the House IPA (Sweetwater IPA clone) and looking forward to getting back to fly sparging! I will take pics tomorrow.
 
Drewski8986 said:
Thanks man I bought an outdoor extension cord and cut off the female end and then cut the male ends off of the pumps . then wired it as you would a switch . Ill take a picture of it later on this afternoon .
Kind of what I did. Extension cord from wall to near stand. Cut piece of another extension cord leaving male end and about 8". This is the power in to my box and only have a short cord with make plug hanging off. Then cut plugs off pumps and wired them into switches in the box. Works great.


image-485716.jpg
 
First off, this thread is amazing. Thanks to everyone that has contributed ideas!

I'd love to develop my design in Sketchup, but I'm completely overwhelmed with how to get started. Any easy ways to learn the basics? I'm sure building something so simple as a brew stand must be pretty easy, right?
 
image-2467314234.jpg

Here is how I avoided the galvanize burn off problem (sorry about the poor pic). I built my weld less stand around the dimensions of the Blichmann Top Tier burners, there is one under the HLT and one under the BK on my HERMS system. The burners are mounted slightly above the height of the top of the stand so the heat won't get to them.A few advantages to this design:
- when I upgrade to a different sculpture, I can reuse the burners.
- everything around the burners are stainless
- already have the perfect distance between the burner and the keggles.
- burners come with wind shield.
Disadvantage:
-cost....they are a bit expensive.
 
hepkat, any concern with just 4 bolts bearing the weight of the kettles? I debated a similar design with my blichmann burners and decided to build it so the frame was supporting the burners from the bottom. There was a reference earlier to the weight capacity of the bolts, but wanted to see what your experience was with them.
 
I was going to reply with that observation as well. The double holed "L" brackets are a bit cheaper than the THK-233 corner fittings, but yes, you are then relying on one 1/2" bolt bearing the weight at each corner. The ideal design is to have the main beam (or longest) horizontal beam being supported by the vertical pieces. The shorter horizontal beams would be the ones that would be supported by the wing of the corner fitting (see pic)

corner.jpg
 
HopChef said:
hepkat, any concern with just 4 bolts bearing the weight of the kettles? I debated a similar design with my blichmann burners and decided to build it so the frame was supporting the burners from the bottom. There was a reference earlier to the weight capacity of the bolts, but wanted to see what your experience was with them.

I have brewed several batches like this. I have had a full keggle on the far right burner, stood on top of the stand and lifted it and set it in the center. If you think about the way the burners mount to the top tier stand, my set up is actually more sturdy. This thing is rock solid.
 
Ok I am thinking about doing one of these stands because it sounds awesome. A couple of things I dont understand though.

According to the OP he paid about 13.50 for a 10 foot section in PA. On http://www.strutchannelfittings.com/THK-001-HDG-1-58-x-1-58-STD-STRUT-CHANNEL-12-SLOT_c_102.html, its now 27 dollars for an 8ft section. Am I reading that right? Did the stuff really go up that much? If so, maybe it’s better to go to the big box stores and buy them there, or maybe go with 2inch stainless steel squares and have them welded up.
I also remember that it comes in precut kits that was mentioned somewhere on this site, I just can’t remember where it was.

Also exactly where it the OPs article so I can read it.


Also, is the $27 for stainless or galvanized? Big diff in price. Stainless will discolor around the burners, but galvanized will burn off. Most people use galvanized because of the price difference, and some use stainless just around the burners on the top section. The galvanized will burn off and you don't want to inhale those fumes, but afterwords just a quick sand and it is fine.
 
Look for an electrical supplier in your area. I picked up 6 10' galvanized lengths for $85.00 from a local electrical contractor supply house when I built my new stand. All of the fittings came from www.strutchannelfittings.com.

I have left over 1/2" hex head machine screws and spring nuts if anybody is interested, PM me.
 
The local box stores might be a better option for the strut, you should be able to find 10' sections for about $18-19 each.
 
Look for an electrical supplier in your area. I picked up 6 10' galvanized lengths for $85.00 from a local electrical contractor supply house when I built my new stand. All of the fittings came from www.strutchannelfittings.com.

I have left over 1/2" hex head machine screws and spring nuts if anybody is interested, PM me.

The local box stores might be a better option for the strut, you should be able to find 10' sections for about $18-19 each.

My local electrical supplier charged $16 per foot, AND they cut them custom to my preference. I even had some wildly mismatched cuts on each section to minimize waste (I was able to buy one less 10ft section by distributing the various sizes across multiple pieces)
 
I agree with the posts above. I buy mine at the local electrical supplier for around $15 each in galvanized. SS I think is around $80/ea. For most stands you need five 10' sections, so that takes the cost from $75 to $500 just for the strut. Trying to find all of the fittings in SS and then buying them all makes it very expensive. At that point yes, it's probably much more cost effective to get 2" square tube and have it welded. I do sell kits at strutstands.com. The killer is the shipping. I tried to price them at the point where it just makes it worthwhile for me to do, so you're basically paying for the hassle to source everything and get it all cut up. Assembly is super easy.
 
Hi gifty - thanks for the gift of this thread! Apologies if this has been covered in the previous pages, but how do you attach the THK-64 splice plates to the cross beams? It isn't clear in your photo on the first page. Thanks again!
 
Annnnd, I realize as soon as I post my question how to do it. Was thinking the bolts had to go through the hole in the cross beam strut. NM :)
 
Fantastic thread. Thank you to everyone who has contributed and shared their builds, thoughts and suggestions.

Anyone here have some info on solid strut builds? Still as sturdy and same connections? I am looking at building a strut stand but am looking at possibly solid strut.

Cheers!
 
Back
Top