Calling Accuflex Bev-Seal Ultra (3/16) experts

Homebrew Talk - Beer, Wine, Mead, & Cider Brewing Discussion Forum

Help Support Homebrew Talk - Beer, Wine, Mead, & Cider Brewing Discussion Forum:

This site may earn a commission from merchant affiliate links, including eBay, Amazon, and others.

amishland

Well-Known Member
Joined
Dec 26, 2007
Messages
397
Reaction score
1
Location
SE Michigan
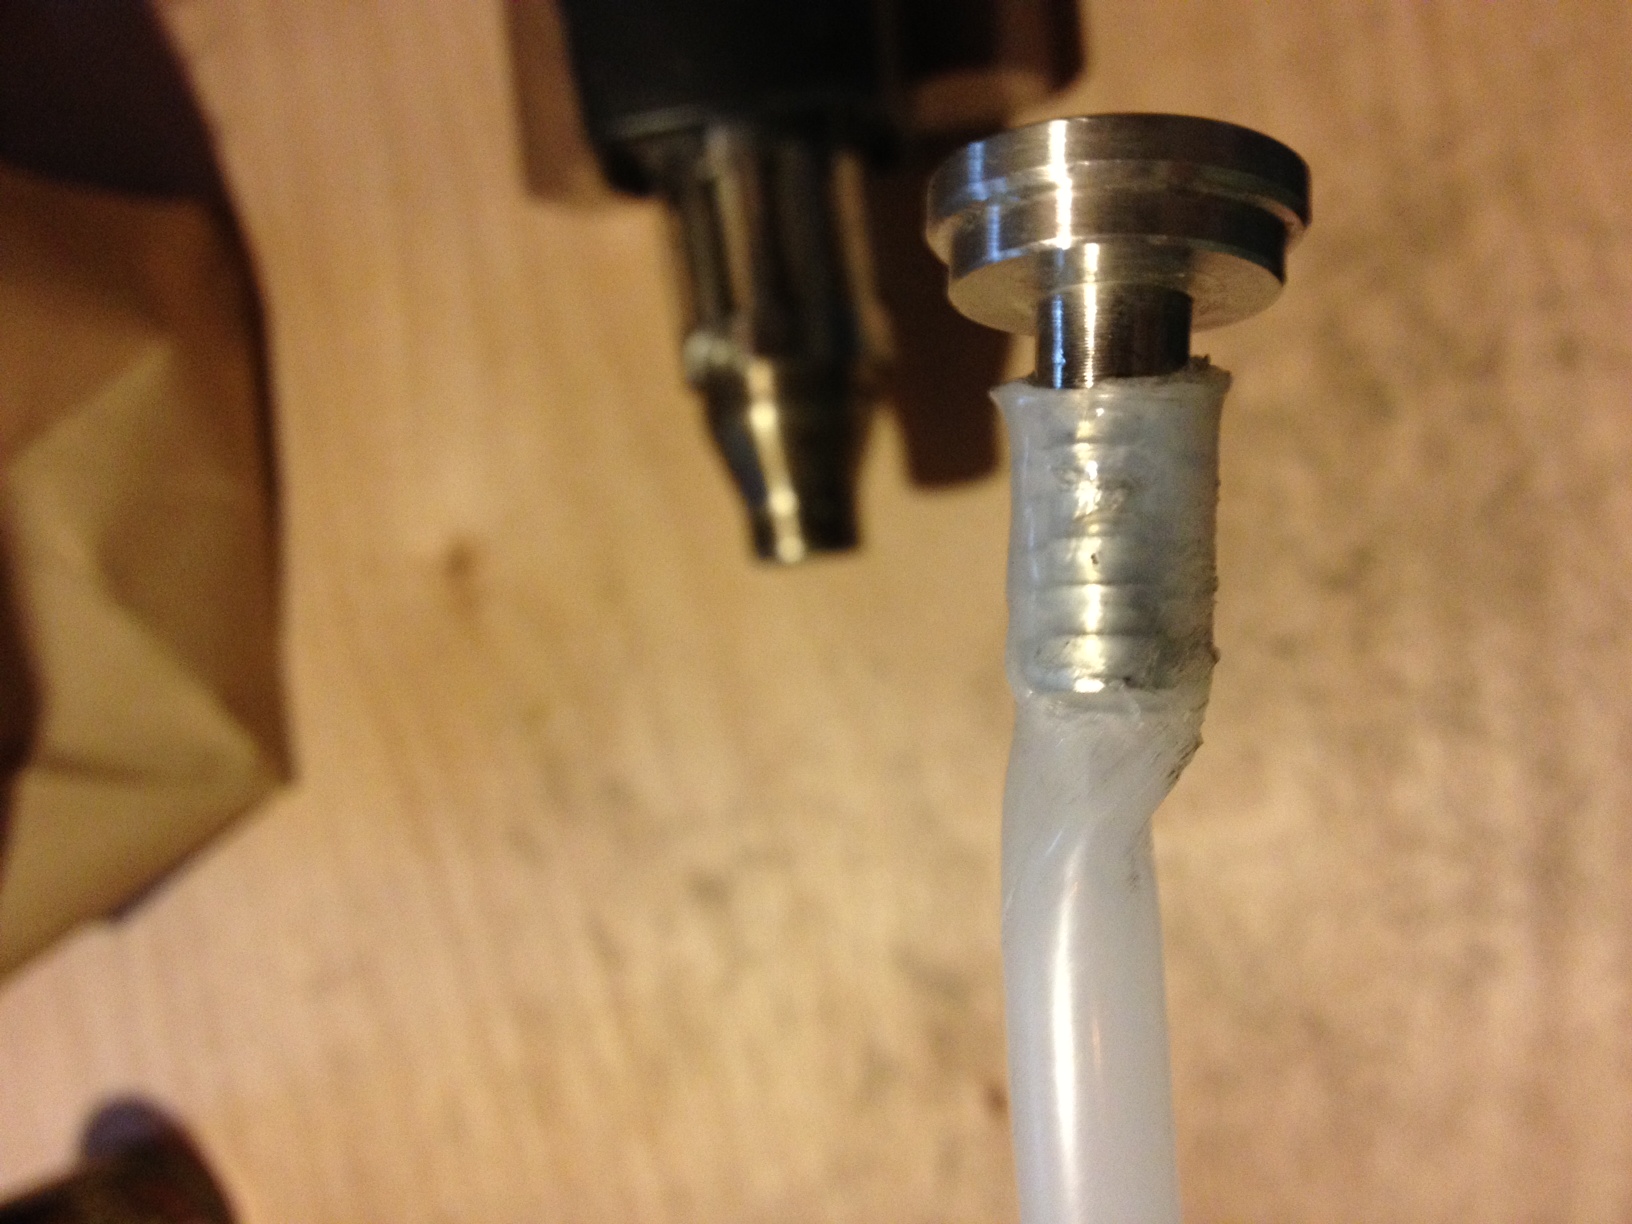
I am trying to squeeze the 3/16" PET lined hose onto a 1/4" hose barb.
I have searched and read the forums and folks say the following
use a heat gun on low to soften tube
use needle nose pliers to stretch the opening
once you get the tip in :) bang it on a table or push using a wall

Now none of these are very easy but I have managed to get my barb almost entirely on.
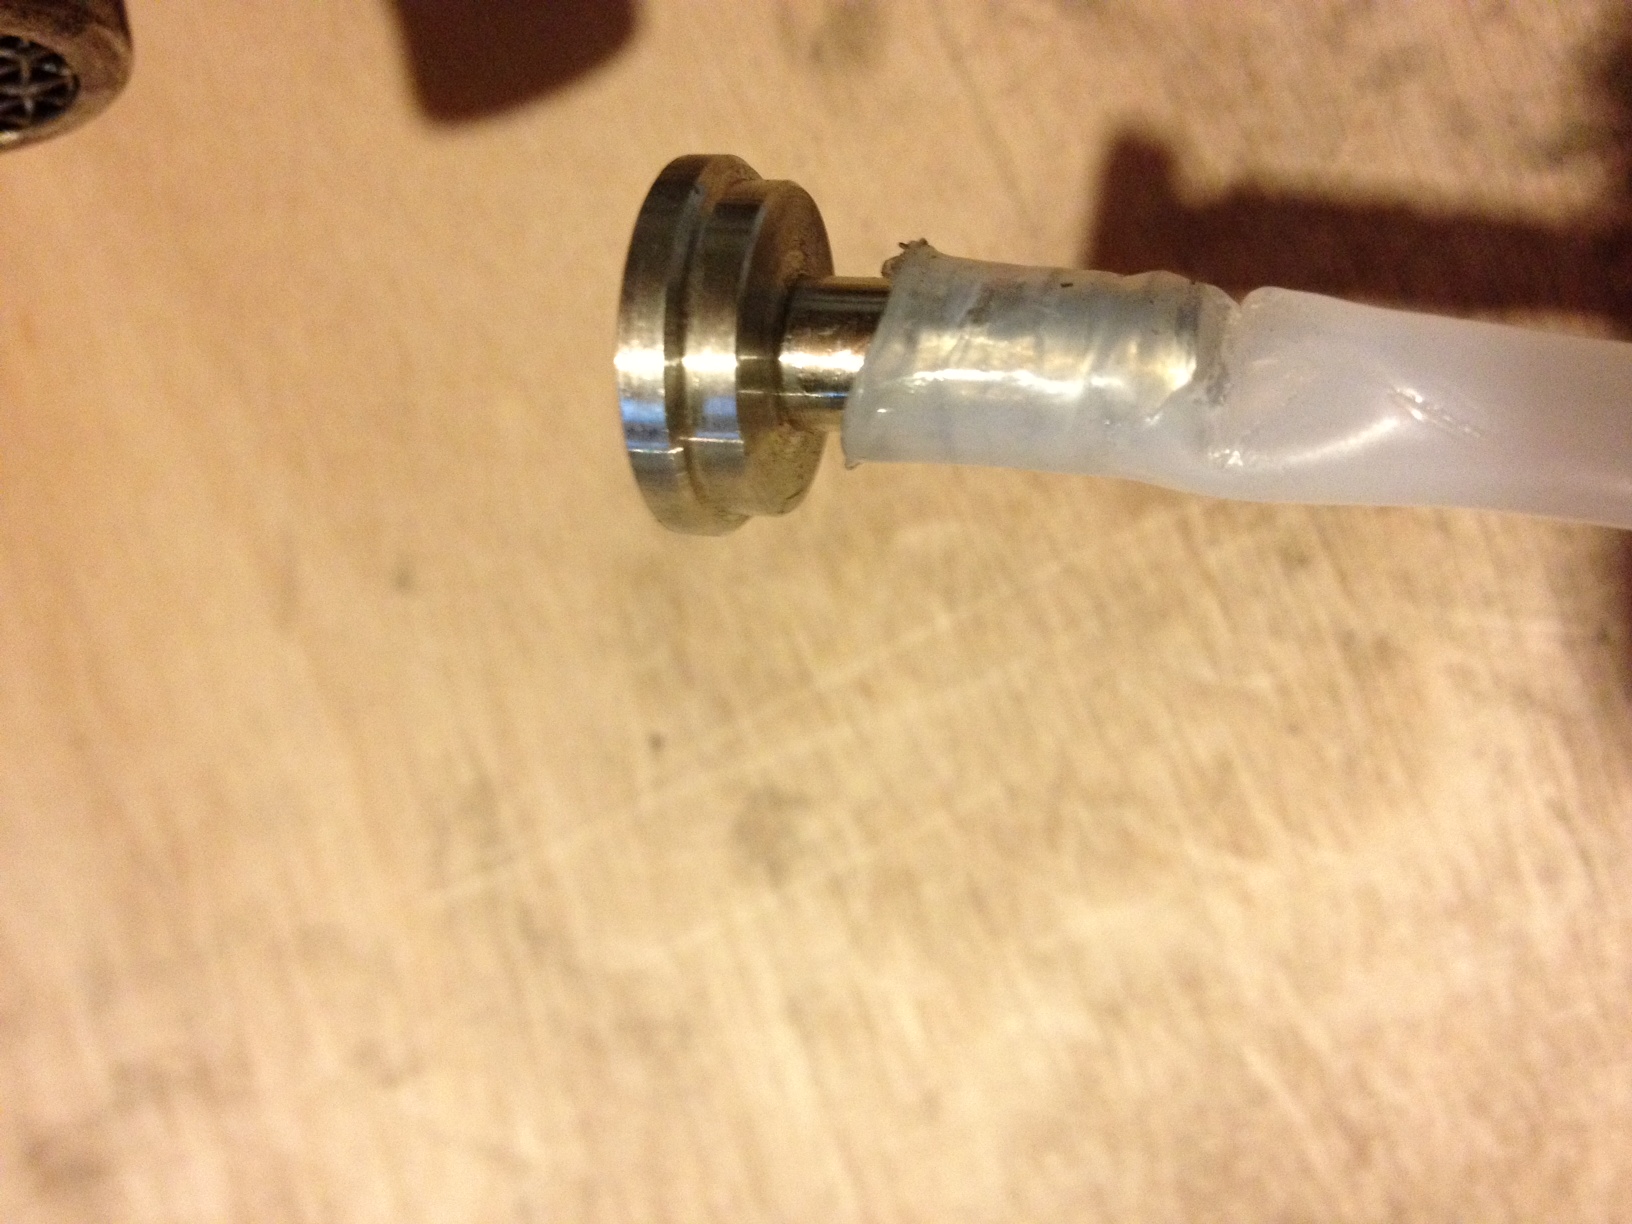
Unfortunately I am not all the way on, and I feel like I have mangled the hose so badly that i now have a few thin spots and what may result in a weird restriction.

Can the experts please chime in with some more tips, pics, or ideas. I just feel like I am doing this wrong. See two pics below
photo-1.jpg

photo-2.jpg
 
I am no expert on this line, but have installed ~50 fittings. The OP requested I add my method to his thread.

I have not tried the heat gun, because boiling water has worked for me. It worked better in Austin than when I tried it in Denver, so the minimum temp needed is very close to ~200F.

In my process, I believe it is key to only heat the immediate area being worked. Heating too much line prevents being able to apply enough force to push it on the barb without the line collapsing.

To get it started on the barb, I dip just the first 1/4" of line or so in boiling water for about 5 seconds, but away from the active boil which can cause water to be pushed far up the line. I then spread out the end. I was lucky in that I found an old metal wine stopper that is a cone almost perfectly sized for this, which I preheat in the water. I grip the cone and tube (around or just above the heated section to provide support) with a towel and push it on without twisting. Others have used various tools including needle nose pliers, nail sets, etc. As long as your restrict the area affected by the spreading tool to the first 1/4", it doesn't really matter if it mangles the line a bit.

After spreading onto the cone, if it looks like it spread far enough, I run cold water over it to set the line. If not, I dip the cone and line back in the water, but only just far enough to heat the part that needs to flare, and push it on the cone a little farther.

After setting the line with cold water (while still on the cone), I pull it off the cone and immediately place it on the barb. The cold water helps to hold the new shape, but it will slowly revert back at least part way to its original shape.

I then put the barb and line back into the boiling water (away from the active boil area as before) for about 5 seconds. Again, only just enough to submerge 1/8" or so of the line that is not on the barb. I then grab the line with a towel around or just above the heated portion, and push against a flat surface until it won't go on anymore for that heat cycle. For swivel nuts, you will need to use a male flare fitting to fix the barb so that you can effectively push on the barb.

Repeat as needed until the hose is seated far enough on the barb. It is possible to get the line all the way to the flange using this method.

The amount of time in the water, and the depth you submerge it, is variable. You know you have gone too far with one of them when the hose collapses when you push. Also, if you can't get any movement, especially in the later stages, you need to increase the time or depth. Try increasing time first, because heating too much line will reduce the amount of force you can apply before the line collapses.

Occasionally I was able to do it in a single push (once it is on the barb after stretching), but it happened less often than the tube collapsing when I tried to repeat it. Now I try to shoot for 3 heat cycles.

I usually finish it off with a final ~10 second heat cycle to form it to the barb, then put it under cold water to set it.

Straightening the tube before starting seems to help.
 
I have 3/16" barbs on my shanks and 1/4" on my keg disconnects I found a supplier online that sells 3/16" barbs that fit the flare nuts for my keg disconnects I plan to upgrade the barbs on the disconnects to 3/16" and switch to bev seal. It will make everything much easier IMO and I'm a big fan of easy.
 
I have 3/16" barbs on my shanks and 1/4" on my keg disconnects I found a supplier online that sells 3/16" barbs that fit the flare nuts for my keg disconnects I plan to upgrade the barbs on the disconnects to 3/16" and switch to bev seal. It will make everything much easier IMO and I'm a big fan of easy.
Be very careful when dealing with barb sizes. The nomenclature, and adherence to it, is a cluster. Generally, for beverage service, they refer to the barb size according the ID of vinyl hose. A 3/16 barb will be ~3/16 ID and ~1/4 OD. A 1/4 barb follows this pattern. There seems to be no standard though, and if you order a 3/16 barb, you may get a 3/16 OD, ~1/8 ID. Some, like Micro-Matic, give hints as to what convention they follow by saying what size soft tubing (vinyl) AND hard tubing (like Bev-Seal) a barb fits.

That being said, you do not want to buy the size spec'd for 3/16 ID hard tube, or barbs that are 3/16 OD (~1/8 ID). The smaller ID of the barb (than the line) will cause a choke point, and usually causes foaming issues. To prevent foaming, you want to keep the ID of your barbs the same as the ID of your line. Yes, the 3/16 OD barbs will slide right into the line, but a few minutes of up front effort to install the correct barb size will save a lot of foam headaches. You will eventually get so fed up that you redo your lines with the correct barb size, anyway.

A word of caution- I tried to make things easy for myself as well, by using swivel nut flare fittings on both ends of all lines, and then using flare tailpiece adapters on the shanks. After a lot of debugging, I found that the flare tailpiece adapters cause foaming issues when used this way, especially on higher carb stuff or cases of borderline line length. They seem to work reasonably well when used on Sankey couplers, but not on shanks. The issue is that they have a funnel shape, which is then compounded by several cavities from the welding/manufacturing process. They are not very well made, at least the ones I have seen.
 
I'm no expert either, but I've gotten pretty good after doing ~40-50 of them. I found it to be a huge struggle with just boiling water, but heating the tubing past boiling temps just made it hard to push on without deforming or kinking it. I've found that heating the barb more than the tubing is the key.

I start by putting on some good leather gloves to prevent burning myself. If you have an extra shank to attach the tailpiece to in order to give yourself something to hold onto, it will help greatly. For the corny QD's I screw the MFL tailpiece onto a spare QD for the same reason. I heat the end of the tubing and something to stretch it out with in boiling water. Extra pointy needle nose pliers, or a knot tying awl work very well for stretching the tubing out, but whatever you can find that's the right size should be fine. It may take a few dips in the boiling water, but I try to get the opening of the tubing stretched enough that the tip of the barb almost fits inside. I don't worry how stretched out the tubing is past the very end. Then I heat the barb over a flame for ~15 seconds to get it nice and hot. Once hot, I quickly insert it into the tubing, holding the tubing close to the end to prevent kinking.

If it's not hot enough it won't slide in all the way. If it's too hot it will slide in a little too easily. If this happens, I suggest cutting an inch off the tubing and trying again. I just don't trust the integrity of the tubing or connection once it's been melted too much. With a little practice you should be able to get it just hot enough to make it easy, but without melting the tubing.

And I completely agree with cwi about avoiding restrictions by using barbs with an ID similar to the ID of the tubing.
 
CWI, I will try your idea about the cold water for setting the line. From the way you described it sounds like you can "set" it with a bit of a cone shape. This could be helpful, as when my line was air-cooling the cone was shrinking, so i had to rush.

Juan I also will try your method of heating the barb, that makes sense, but unfortunately I do not have an extra shank. The idea of making a handle is great idea.

It seems like patience is required, and to walk the line between temp and time for the perfect flexibility of the hose. Too much heat or too long of time will create kinks.
 
I'm no expert either, but I've gotten pretty good after doing ~40-50 of them. I found it to be a huge struggle with just boiling water, but heating the tubing past boiling temps just made it hard to push on without deforming or kinking it. I've found that heating the barb more than the tubing is the key.

Yep, me too. I heat/boil the barb and then slide the end of the heated tubing over the hot barb and push. It's worked pretty darn well for me, but I'm glad I now have fresh 10' lines on all my taps and won't have to do it again for quite a while!
 
Yep, me too. I heat/boil the barb and then slide the end of the heated tubing over the hot barb and push. It's worked pretty darn well for me, but I'm glad I now have fresh 10' lines on all my taps and won't have to do it again for quite a while!

Yoop, so you are saying you do no heat treatment of the hose? only the barb end?
 
CWI, I will try your idea about the cold water for setting the line. From the way you described it sounds like you can "set" it with a bit of a cone shape. This could be helpful, as when my line was air-cooling the cone was shrinking, so i had to rush.

From what I remember, something needs to be supporting the new shape, like the tool being used, when the cold water is applied. If not, the tubing will return to its normal shape, at least partially anyway.
 
Yep, me too. I heat/boil the barb and then slide the end of the heated tubing over the hot barb and push. It's worked pretty darn well for me, but I'm glad I now have fresh 10' lines on all my taps and won't have to do it again for quite a while!


I wish I could use 10 ft lines. At 10 ft and 13 psi at 42 F I got a half glass of foam all the time. With 20ft lines they work perfectly minus the fact that the CO2 comes out of solution in the long line for the first pour of the night.
 
I wish I could use 10 ft lines. At 10 ft and 13 psi at 42 F I got a half glass of foam all the time. With 20ft lines they work perfectly minus the fact that the CO2 comes out of solution in the long line for the first pour of the night.
You might try adding a fan, if it only happens on the first pour. Coiling the lines so that the gas can percolate up to the faucet will help as well. 20ft seems a bit short for that P/T. You could also just turn your keezer down a few degrees along with the pressure. The fan is still a good accessory, though. Even without the fan, it is summer after all- that English ale that needs to be served at rectal probe temperatures should get there after about a minute in the glass.
 
:drunk:
Be very careful when dealing with barb sizes. The nomenclature, and adherence to it, is a cluster. Generally, for beverage service, they refer to the barb size according the ID of vinyl hose. A 3/16 barb will be ~3/16 ID and ~1/4 OD. A 1/4 barb follows this pattern. There seems to be no standard though, and if you order a 3/16 barb, you may get a 3/16 OD, ~1/8 ID. Some, like Micro-Matic, give hints as to what convention they follow by saying what size soft tubing (vinyl) AND hard tubing (like Bev-Seal) a barb fits.

That being said, you do not want to buy the size spec'd for 3/16 ID hard tube, or barbs that are 3/16 OD (~1/8 ID). The smaller ID of the barb (than the line) will cause a choke point, and usually causes foaming issues. To prevent foaming, you want to keep the ID of your barbs the same as the ID of your line. Yes, the 3/16 OD barbs will slide right into the line, but a few minutes of up front effort to install the correct barb size will save a lot of foam headaches. You will eventually get so fed up that you redo your lines with the correct barb size, anyway.

A word of caution- I tried to make things easy for myself as well, by using swivel nut flare fittings on both ends of all lines, and then using flare tailpiece adapters on the shanks. After a lot of debugging, I found that the flare tailpiece adapters cause foaming issues when used this way, especially on higher carb stuff or cases of borderline line length. They seem to work reasonably well when used on Sankey couplers, but not on shanks. The issue is that they have a funnel shape, which is then compounded by several cavities from the welding/manufacturing process. They are not very well made, at least the ones I have seen.

I have smaller barbs on my shanks and have no foaming issues so I think I'm going to try the 3/16" barbs on my keg disconnects too. I'll report my results.
 
:drunk:

I have smaller barbs on my shanks and have no foaming issues so I think I'm going to try the 3/16" barbs on my keg disconnects too. I'll report my results.
Are you even certain you have 3/16 OD (~1/8 ID) barbs on your shank? If it is a barbed shank, it almost certainly is not as they are not a stock item. Even 3/16 OD barb tailpieces are fairly uncommon. If you are currently using 3/16 ID vinyl on the barb, the vinyl should barely make a seal on the barb without a clamp if it is 3/16 OD. It may even be loose/wiggle on the barb.

Using a smaller ID barb goes against conventional wisdom, as well as common sense. Even if it doesn't cause foaming, which it most likely will, it will reduce your pour speed. While waiting a few extra seconds for a beer isn't a big deal, low flow can cause 'hollow pours' from the faucet which can cause additional foaming issues.

If the only reason you want to go with 3/16OD barbs is so you don't have to fit the proper barb size (3/16ID) in the Bev-Seal, it isn't that difficult, and it's not like you have to do it every time you pour a beer. Dealing with slow pours, foam, hollow pours......
 
Have you guys had any problems putting the QD barb in boiling water? Any damage to the plastic portion?
 
I had the exact same problem and came up with a pretty easy solution.

After 2 hours of futzing with boiling water and heat guns, I used a drill and a 7/32" bit and "whittled" out a bit of the inside of the tubing. I then gave the tubing and nipple a bit of heat with a heat gun and pushed it on. Put it under cold water and voila! It's on!

The fit is still very snug - I am unable to remove it by pulling on it with everything I got.

perogi.
 
Have you guys had any problems putting the QD barb in boiling water? Any damage to the plastic portion?

I have put my QDs in boiling water before without visible damage, but I refrain from doing it now. Many plastics do not tolerate heat well, especially when they need to retain specific shapes. One additional caveat is that you will be applying significant force when the plastic is hot. In my case, I just forgot about some disassembled ones on the stove in a pan of water I was heating up before adding oxyclean.

When going to this beer line, many/most people switch to flare QDs and swivel nuts and barbs. Don't try to use the flare tailpieces on shanks if you plan to serve any high carb or foaming stuff. The standard 1/4 OD barb tailpieces seem to work better.
 
I used a golf tee to help stretch the tubing. It helps to stick the golf tee in the end of the tubing and boil it then bang the tee in deeper. Just an idea. Needle nose pliers works too
 
Sort of a hijack here but home many feet of line are you using. I have a some of the acuflex line I want to replace my lines with but not sure how much line to use with the acuflex. With regular beverage line I have about 10 ft and run 10 psi at about 38 degree.
 
Sort of a hijack here but home many feet of line are you using. I have a some of the acuflex line I want to replace my lines with but not sure how much line to use with the acuflex. With regular beverage line I have about 10 ft and run 10 psi at about 38 degree.
The most common advice is to use 50-100% more of the 3/16 barrier line than 3/16 vinyl. That will definitely get you close, and making them shorter later is easier than making longer. I used ~18 ft for a similar P/T with no foam, and didn't bother to shorten it since the pour speed was acceptable. I have found that some beers foam more than others, so there is no hard/fast rule for length. Having a few lengths available as spares is convenient and relatively cheap.
 
Thanks for the tips everyone, I have tried so many techniques and have found one that works very well for me

You will need the following items
heat (heat gun)
heat proof gloves
flared stretching device
washer (large enough to fit on your stretching device but small enough to catch on the hose)
large bucket of cold water
vegetable oil (cold oil is fine for lubing the hose)

Stretching of the hose is best done in three stages. First just a flare on the tip, then a bit more each time (Do not try to stretch it all in one shot this will lead to cracking and kinking)

  • Evenly heat up your flared stretching device with your heat gun on high(I found 60 seconds heating all sides of your stretching device works best)
  • Dip just the tip of your hose into the oil, and apply controlled pressure onto the stretcher. the oil makes it easier to slide hose on and off of the stretcher
  • After each stage of stretching I take the hose with stretcher inside and dip it into the bucket of cold water (this helps set the hose and allows you to stretch a small amount in each stage)
  • I also use a washer to push the hose off the stretcher after it cools (if you try to remove the hose by pulling it actually tightens like a Chinese finger trap)
  • After you have stretched the hose in 3 stages it should be able to almost slide onto your barb or fitting when cold, if you have not gotten to this stage do another cycle of heat and cold setting
  • Now heat up your barb fitting for 60 seconds and insert your hose into its final position and hold it in place for 30 seconds prior to dipping it in the cold water bucket.
  • I finished the job by soaking in PBW, hot water rinse, Starsan, then installed to my keezer.

Hope this helps some one, and if you do not have a heat gun and choose to use the oven heated jar of oil, be very careful hot oil can make a mess and hurt if you are clumsy.
I did not feel comfortable with any plastic fittings going into the oil, I only used this method on my raw SS barbs. But the heat gun worked just great heated oil is not needed.
 
I didn't have any issues using boiling water. Only extra equipment I needed was a glove on my left hand and a MFL tailpiece.

I got the accuflex onto 1/4" barbed swivel nuts by putting the mfl tailpiece on the swivel nut first so that it would be easier to push. Took maybe 2 tries, third try I got it onto the barb, then dunked it again in the water and slid it all the way on. I used Part No. 52545K27 from McMaster for the Oetiker Clamps (11/32" to 13/32")...if i ordered again, I might go one more size smaller.
 
I didn't have any issues using boiling water. Only extra equipment I needed was a glove on my left hand and a MFL tailpiece.
These flare tailpieces are handy for locking the swivel nut barb in place, dunking in the boiling water, and giving something to push with.

However, as I have said previously in this thread, these flare tailpieces can be a source of foaming issues if used on a shank. They seem not to cause issues when used on Sankey couplers. Using a standard flanged/barbed tailpiece for the shank end, and a swivel nut flare for the keg end, along with the flare tailpiece, allows easy swapping between flare QDs and Sankey couplers. Using swivel nuts on both ends requires requires using flare tailpieces to be used on the shanks, and can contribute to foaming.
 
thedude123 said:
Why not just get 1/4 or 3/8? I have 5/16 and I can't get it on for the life of me. Granted I have almost no patience.

The larger the ID of the line, the less resistance it provides, and the longer it needs to be for a balanced system and a good pour. Larger ID lines are fine if you have a 100' long run, or don't mind giant coils of beer line in your kegerator/keezer.
 
As others, I use a heat gun to soften the tubing. I also flare out the end of the tubing with a large phillips head while hot. You need to push the tubing on relatively quickly after heating, otherwise it cools and wont go on all the way in one shot. After it's on I heat it again to form it to the barbs.

It's frustrating to work with this tubing and I've bent a bunch, but I just cut off the affected portion and start over. In the end it's worth it.
 
It turns out I had 3/16 not 5/16. Would you really need that much more if you used 3/8's? It is only 1/16th more.

This is an honest question because I have no idea.
 
It turns out I had 3/16 not 5/16. Would you really need that much more if you used 3/8's? It is only 1/16th more.

This is an honest question because I have no idea.

Yes, the pressure drop through tubing is very highly dependent on ID. The numbers are all a little rough (since it's based on commercial systems) but here are some examples (source)

3/16″ ID vinyl tubing = 3 psi/ft
1/4″ ID vinyl tubing = 0.85 psi/ft
3/16″ ID Polyethylene tubing = 2.2 psi/ft
1/4″ ID Polyethylene tubing = 0.5 psi/ft
3/8″ OD Stainless tubing = 0.2 psi/ft
5/16″ OD Stainless tubing = 0.5 psi/ft
1/4″ OD Stainless tubing = 2 psi/ft
 
You have the 3/16" accuflex, that's the good stuff. The other stuff is 1/8" larger ID and it's not accuflex, though it may still be good tubing.
 
Cool. Thanks for your help dude.

I will try to do some of the ways everyone suggested to get the damn thing on.

How often do I have to replace the lines? This is not something that I want to do often.
 
I will have to say I was cussing everyone of you experts this weekend. This was a huge pain. But seriously, thanks for posting your hint/tips. I would have given up if I didn't know so many other people had succeeded.

The beer taste much better now (especially the first pour). I am sure it was a combination of the AccuFlex and that my vinyl lines were 1.5 years old.
 
How is everyone routing these rigid beer lines within a kegerator ?

I find that they are so rigid that they often pop open the fridge door after its been closed for a while.

The only solution I can think of is to switch to 90 degree elbow shank tail pieces and route the lines (I am using a fridge with shanks mounted in the door) straight to the door hinge and screw in some kind of hook or line spacer to the inside wall right next to the hinge. This would lower the pull on the lines as the door is opened and lower the push when closing. But I don't know if it will actually work or be too much friction to open the door easily.

I don't know what to search for for this topic but I'm sure I've seen it mentioned before somewhere.
 
Back
Top