NattyBrew's Electric Brewery Build

Homebrew Talk - Beer, Wine, Mead, & Cider Brewing Discussion Forum

Help Support Homebrew Talk - Beer, Wine, Mead, & Cider Brewing Discussion Forum:

This site may earn a commission from merchant affiliate links, including eBay, Amazon, and others.

NattyBrew

Well-Known Member
Joined
Mar 19, 2009
Messages
207
Reaction score
4
Location
Cincinnati, Ohio
So after being a keggle all grain brewer for about three years now I stumbled across Kal's very well known ElectricBrewery.com site and well to say my jaw dropped was an absolute understatement. I had always dreamed of not having to lug all my equipment outside in the dead of winter to brew my beers but never felt comfortable enough with my working knowledge of electricity and wiring to pull off a build that I as a supreme perfectionist would be satisfied with. That was of course until I found Kal's site and realized that he may be more of a perfectionist than I am!

I have now embarked on the long build journey to replicating Kal's build and being the engineer that I am, I decided to begin with the most work intensive section in the control panel. I will keep this thread updated as I save up to piece together the other components of my build and update my progress on the brewery.

I hope this serves as an example to anyone considering trying to tackle Kal's build that his instructions, advice, and site are supremely impressive. Props to Kal for providing information that really covers every single aspect of this build and leaves no stone unturned. Happy brewing!

The first step of course is to cut the holes in the enclosure and prime the beast:

167641_10100615299396964_9314355_78302116_8125521_n.jpg


167401_10100615299671414_9314355_78302123_7209431_n.jpg


33823_10100615299880994_9314355_78302128_4883095_n.jpg


After the enclosure is primed you need to apply to hammered finish spray paint. I tried a couple of different types on some scrap metal and quickly found out why Kal used the hammered finish. For one it looks super cool and durable and two its uneven texture helps conceal any irregularities in the metal surface and holes:

167676_10100615300065624_9314355_78302133_7269788_n.jpg


168395_10100615300265224_9314355_78302142_3168705_n.jpg


After the enclosure is dry I removed some of the painters tape I used to protect the gasket and a few other spots, re-assembled the enclosure and prepped the whole thing for the switches, lights, and receptacles:

168384_10100615300509734_9314355_78302150_6589345_n.jpg


167488_10100615300794164_9314355_78302160_235906_n.jpg


And of course here is the enclosure with everything but the Amp meter installed which I believe is coming on horseback all the way from China!

166885_10100615300973804_9314355_78302169_4076048_n.jpg


163105_10100615301263224_9314355_78302175_644900_n.jpg
 
After all the buttons, switches, and receptacles are installed I did a little wiring of the temperature controllers to the PIDs as well as mounted nearly everything on the backing plate.

165365_10100615302151444_9314355_78302185_2101570_n.jpg


33805_10100615302371004_9314355_78302193_1124055_n.jpg


167116_10100615302580584_9314355_78302202_7517756_n.jpg


168193_10100615302845054_9314355_78302213_5156243_n.jpg


164541_10100615303054634_9314355_78302222_1337409_n.jpg


The most annoying part now is that I am stuck where I am at as I wait on the Amp Meter and shunt to make it across the Pond from China. I am hoping that it arrives sometime this week so I can move forward with the wiring of the box.

If anyone is considering this project or has any comments/questions please feel free to leave them and ask and I'll be happy to respond/help!

-=Matt=-
 
Great eyes Buffalo! I didn't even think about the fact that I caught that BMC blasphemy in my photo, I promise to drink 3 craft beers in penance for my sins!

-=Matt=-
 
NattyBrew,
Looks Awesome! Big kuddo's to you. How was it cutting all those holes?
 
That looks amazing! Good work. I second Sparky's question, how are you cutting the holes? Knockout punch or holesaw/stepbit?
 
Sparky/Mrlisk - Let me reiterate a point that Kal makes on his website in regards to using a Greenlee step bit... Don't buy cheap knockoffs! I originally tried to use a cheap step bit and regretted it after less than 5 minutes on my first hole. They are pricey to get via Amazon but just check on eBay as I was able to get a brand new Greenlee bit in it's packaging for 35 shipped.

Kal recommends a drill press for the hole drilling process which would have made it much easier in my opinion. I used a hand drill and did just fine but I am sure I would have saved myself a few curse words if I had a drill press for the whole process (unintentional pun!). The key if you go the hand drill route is to have a drill with more torque and lower speed. I used a Black and Decker 1/2" chuck drill that maxes out at a whopping 850 RPMs but is powered by a 7 amp motor. The difference in torque and power makes a huge difference with both the step bit and the hole saw holes as they tend to catch on the metal and stall a higher speed but lower torque power drill. Also don't forget to use plenty of oil when drilling otherwise your bit gets very hot very quickly.

Thanks for all the comments/questions glad to help everyone skip the same mistakes I made!
 
Just when I go and start complaining about the delivery time of my Amp meter in the mail from China look what shows up on my front porch! Also got a nice surprise with the panel tags being delivered!

I decided to name my contraption "The Flux Incapacitor", a nice play on one of my favorite movies of all time....except this contraption will send you to inebriation before it sends you to 1955. Anyway here's the control box with a few updates!

Front of the control panel with all components installed:

168062_10100615303269204_9314355_78302227_6102414_n.jpg


Bottom Panel with the tags:

163652_10100615303369004_9314355_78302230_2144449_n.jpg


Interior shot of the door with the amp meter installed. I decided to take the optional step and set myself up for the safe start interlock that Kal added after the fact on his panel. I figured it was easier to take the step now and prevent any accidents than to go back after and add it. You can see the interlock mounted on a metal backing plate in between the water/wort pump switches and lights.

164004_10100615303573594_9314355_78302237_2482851_n.jpg


And last but not least a (semi) artistic shot of my new creation! The Flux Incapacitor!

163912_10100615303758224_9314355_78302243_5856638_n.jpg
 
this looks almost identical to the electric berwer build.

Can you tell me where you got your switches and your connections for the RTD probes.
 
this looks almost identical to the electric berwer build.

Can you tell me where you got your switches and your connections for the RTD probes.

The switches all came from the same place, Pioneer Breaker Supply in Texas. They are the same eBay store that Kal links to via his site. My one suggestion would be to go directly through their webpage at www.pioneerbreaker.com instead of going through their eBay store. For some reason I found that shipping prices were actually a little more competitive via their actual webpage than their eBay store front. I was able to snag the XLR Male connectors for the RTD probes via eBay very easily for something like 6 bucks for a set of 4.

-=Matt=-
 
:( If only I was a premium supporter, I could see the pictures too. :(

Oh man, can only premium members view the pictures I upload to the site? I literally just upgraded my account to make posting all these pictures a little bit easier but didn't realize that non-premium members would be unable to see them. Sorry about that gromitdj, I will go ahead and host the images somewhere else so all can see them! Thanks for the heads up.

-=Matt=-
 
Did you get your labels from the same place Kal did? I never got a response back from them when I ordered my labels. Maybe I did something wrong.
 
Hey NattyBrew,

This is freakishly familiar! I am right in the middle of building the exact same thing!!! I just got my last parts from China yesterday and can now start wiring. I plan to do that tomorrow so we'll see how it goes. I have completed everything else on the kettles and pumps and wort chiller. Luckily I already had the pumps, kettles and chiller from my Brutus stand! Now if I can just sell that I'd be ahead of the game.

What part of town do you live in? Didn't know anyone else here that's also on HBT so that kinda nice. I'm up near Fields Ertel area.

Good to see your progress and talk to another Cincy brewer!!
 
Did you get your labels from the same place Kal did? I never got a response back from them when I ordered my labels. Maybe I did something wrong.

Yeah I ordered them from the exact same place as Kal and they were extremely responsive. I got a follow-up email from George just about two days after I ordered them. If you are having some delays it may due to the big jump in traffic thanks to Kal's site! I would follow up with an e-mail if he hasn't gotten back to you yet, I am sure he will get back to you shortly.

-=Matt=-
 
Hey NattyBrew,

This is freakishly familiar! I am right in the middle of building the exact same thing!!! I just got my last parts from China yesterday and can now start wiring. I plan to do that tomorrow so we'll see how it goes. I have completed everything else on the kettles and pumps and wort chiller. Luckily I already had the pumps, kettles and chiller from my Brutus stand! Now if I can just sell that I'd be ahead of the game.

What part of town do you live in? Didn't know anyone else here that's also on HBT so that kinda nice. I'm up near Fields Ertel area.

Good to see your progress and talk to another Cincy brewer!!

Awesome man! You are way ahead of me then in terms of this build as I opted to begin with the control panel before anything else. I will be saving up for the rest of the build in chunks with a goal to have everything wrapped up by about this time next year (crosses fingers)!

I am actually just down I-71 in Hyde Park. Also glad to see another Cincinnati brewer on the site, be sure to stay an touch and update me on your build. I can't wait until I can fire this thing up for the first time, you'll have to fill me in on how yours has been working. I am sure that, thanks to Kal, it will operate just as superbly as it should. Cheers! :mug:

-=Matt=-
 
Yeah, hopefully I'll get a thread started and post some pics of the build. I've been taking pics throughout here and there but just haven't uploaded anything from my phone yet. I looked around for a long time before deciding to take on trying to build a Kal replica. I'm planning to start wiring tomorrow but having a little trouble figuring how I'm going to wire the doorbell transformer up. Mine do not look like Kal's and I have to figure out where the wires that came with the part go and where I need to attach wires to it to complete the circuit. Have to do some digging tomorrow I guess.

Did all your wiring go smoothly? I have an electrician coming next week as well to run a 240v line to my brewing area which will be the last of the "big" projects. I couldn't have fronted the cost for everything at once so I was lucky I had stuff from my prior stand! I'll keep you posted on things and hopefully all goes well!

Doug

I actually have just started the wiring so all is going extremely smoothly so far. Each doorbell transformer is just a little bit different but they all obviously operate on the exact same premise. Mine were bought new from Amazon so they had the original instructions pamphlet included which I used to wire them up. All the other wiring has been a breeze, absolutely no issues what so ever, though that moment when I finally plug this thing into the wall will be a little hair raising/exciting to see if everything works as it should. Did you go with GFCI cord like Kal did or did you splurge on an actual GFCI 30A breaker?

Definitely keep me posted Doug, I'd be excited to see a finished replica that I can look at and continue to drool over and remind me why I am eating ramen noodles every night for dinner! Happy building and drop me a line if you ever get that thread together, I'd love to see the build.

-=Matt=-
 
i'll look for those switches. Looks like i could use these from AUber's as well for panel mount.

index.php


http://www.auberins.com/index.php?main_page=product_info&cPath=7&products_id=118

You can definitely use those, I think Kal actually discusses that a bit on his site. His reasoning for going with the XLR connectors is that he thought they were a little more rugged and would stand up a bit better to the plugging and unplugging duty they would go through in normal use of the brewery. Having some musical/band background I agreed with him that the XLR connectors are extremely durable so I just went right along with his build. That actually has happened several times during my build so far, look at something Kal did, question his method/product/etc., then quickly realize why he did it that way. So far Kal has laid the mental smackdown on my build and I don't even know the guy!

-=Matt=-
 
I did get the GFCI cord that Kal got and the guy that is selling them is absolutely awesome. He made me a great deal on the cord and of course it has been lost in the UPS system and we're tracking it now. He has backed it up 100% though and if it is unrecoverable by UPS he has said he will ship me a new one for free. He's been great. I also am having a 50amp breaker installed though and the electrician I have said he may have an extra GFCI 50amp breaker available for next to nothing if I would want it so I may put that in just for extra piece of mind I guess and it gives me the ability to upgrade should I ever decide to do so.

Yeah, I have the instructions for the doorbell transformer as well and got it from HD. It looks exactly like your picture but I have to see how to wire that up. Not sure why I'm not getting it right away but may be just tired and need to concentrate more:)

I'm hoping to get most things done by this week so I'll keep you posted.
 
I am sure you will figure out the transformer wiring but if for some reason you are still stuck on it I will be sure to follow up with how I wired mine and take some close up pics for you as well. Good luck with the wiring ddknight, I will be diving head first into some of it today.

-=Matt=-
 
how much did the components run?

Currently I am sitting right at the $1,200 mark for all the components for the entire control panel (including the GFCI power cord) with shipping. That total does include a few extras which I either mis-ordered or ended up not using/needing, as well as a few tools which were needed (Greenlee Step Bit, Hole Saws, etc.). In the purest sense I'd say the estimates that Kal has on his site are pretty much right on the money, everything parts wise without shipping is going land you right at $1000 bucks or so.

For me this is just step one of the saving/purchasing process for this project. Next up will be saving up for the Bilchman kettles, then the brew stand, etc. I just jumped at the opportunity to tackle the control panel first because I was attracted to it like a moth to a flame!

-=Matt=-
 
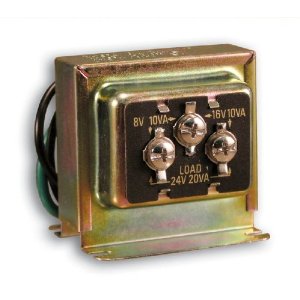
Quick question: On the doorbell transformer, mine looks like the one here. Do I connect the wires to use the 8v, 16v, or 24v output? I know Kal used 12v but doesn't look like I have that on these transformers. Thought you may know. Thanks and hope the project is going well today!
Doug

51DhFPAFj5L._SL500_AA300_.jpg
 
Quick question: On the doorbell transformer, mine looks like the one here. Do I connect the wires to use the 8v, 16v, or 24v output? I know Kal used 12v but doesn't look like I have that on these transformers. Thought you may know. Thanks and hope the project is going well today!
Doug

If you got the exact same DC power supplies as Kal had linked on his site it really doesn't matter. The key with the 10:1 doorbell transformers is to step down your 120V power source to a level that the DC power supply can handle. The DC power supplies are rated for 4V to 30V AC input so any level you choose to use on the above transformer won't matter. For no other reason than it falls pretty much in the middle of the safe AC input range, I'd probably use your 16V output on the transformer you have.

-=Matt=-
 
sorry if you posted but what brand timer did you go with? I know he talked about the omega and auber version. Yours doesn't look like either.
 
sorry if you posted but what brand timer did you go with? I know he talked about the omega and auber version. Yours doesn't look like either.

Thanks for the clarification there ddknight, it is the Auber timer. There are some wiring instructions floating around here somewhere that I found that saved me half the headache of having to read through the wiring diagrams.

-=Matt=-
 
We need to start a local club devoted to building Kal's electric brewery!
I too live in Cincinnati and I'm tackling the same project as you right now! I'm not nearly as far along as you, but I'm getting there. I just started drilling holes tonight. It will probably be a few more weeks before I catch up.
Yours looks AWESOME so far! What part of town are you in? I'd love to check out your system some time. We should trade some bottles of homebrew sometime too:)

By the way, I love your avatar picture of the Roebling Bridge, very nice!
 
Hey NattyBrew,

This is freakishly familiar! I am right in the middle of building the exact same thing!!! I just got my last parts from China yesterday and can now start wiring. I plan to do that tomorrow so we'll see how it goes. I have completed everything else on the kettles and pumps and wort chiller. Luckily I already had the pumps, kettles and chiller from my Brutus stand! Now if I can just sell that I'd be ahead of the game.

What part of town do you live in? Didn't know anyone else here that's also on HBT so that kinda nice. I'm up near Fields Ertel area.

Good to see your progress and talk to another Cincy brewer!!

Holy Crap! Cincinnati must be a hot spot for building Kal's brewery!
 

Latest posts

Back
Top