
autobaun70
Well-Known Member
My last fermentation chamber died shortly after my last brew (September), and I really haven't had the time to get around to replacing it (or brew). This week I finally got around to it, and found a nice commercial Frigidaire unit at a local used appliance shop. $350.00 and I was out the door. It was pretty nasty, but nothing Clorox Cleanup couldn't handle.
As soon as I got it home, I ripped apart my old temp control box, and dug out the STC-1000 (ebay aquarium controller) that I was using in it. Fortunately the design on the new fridge allowed for a very easy installation, and plenty of power was already available at the factory thermostat to run the controller, and the small space heater that I use to maintain temps during the colder months.
The following pics outline the build.
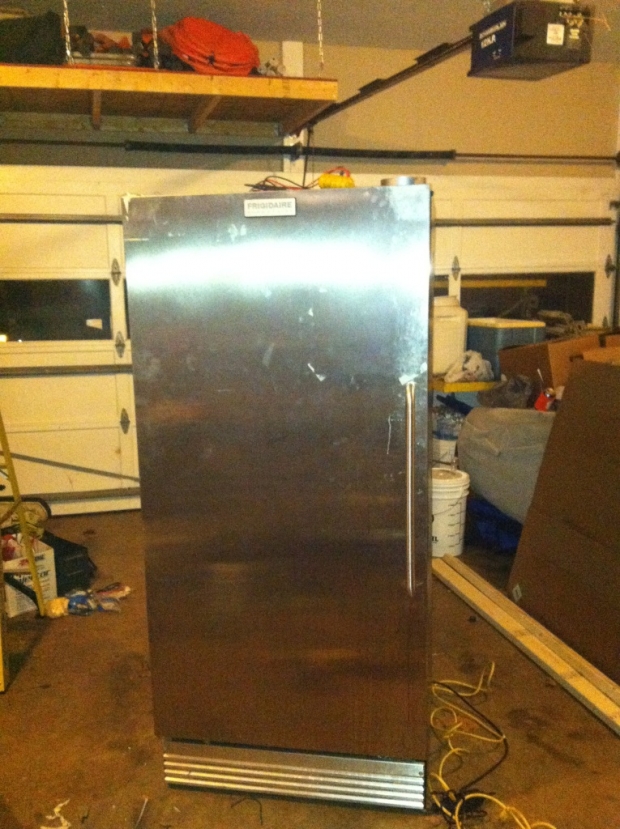
Exterior.......has a few dents, dings and scratches, but it will work. I will work on getting rid of all of the tape and adhesive residue another day.
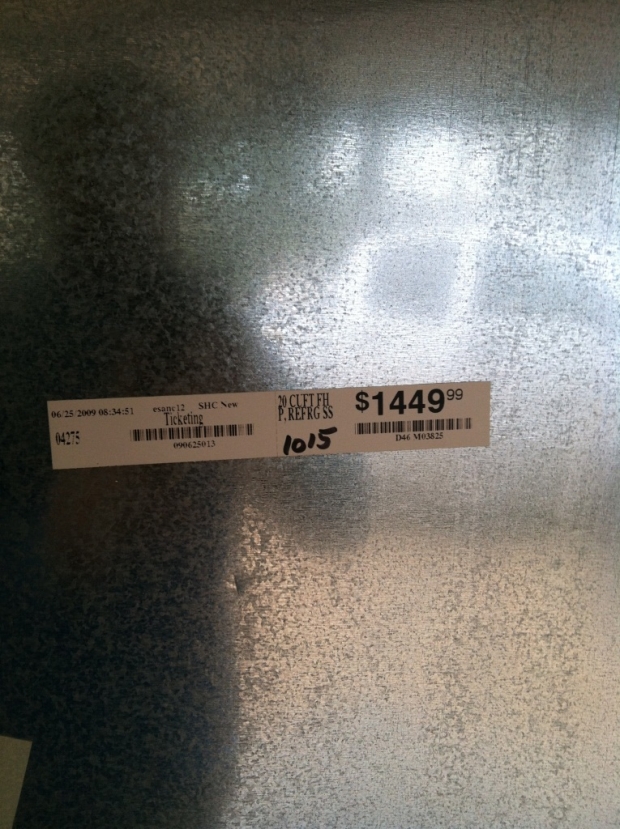
Not sure how old this price tag is, but I am glad that I didn't pay this much for it........$350.00 was plenty.
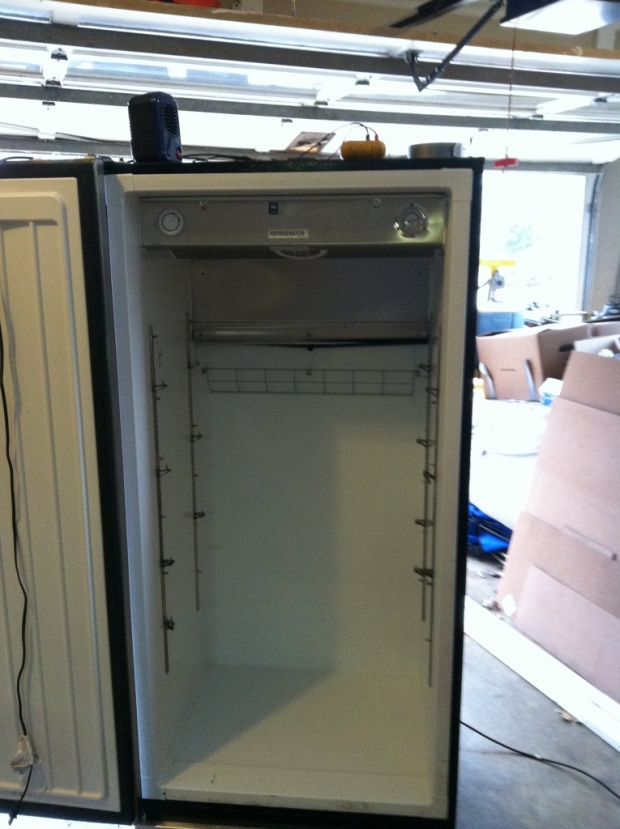
Interior prior to adding my temp controller.
The entire control panel drops down by removing 8 screws. Even the screws are stainless, which I found to be a very nice touch.

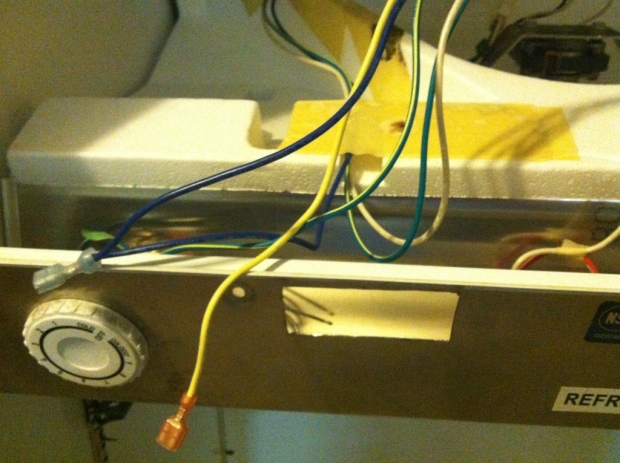
In this photo you can see the factory thermostat. The top cream colored wire (looks white in this photo) is the trigger for the compressor relay. The lower terminal (blue wires) is constant 120V, which feeds power to the thermostat and the circulation fan that blows over the coils. In factory configuration, the fan is designed to run all the time, right over the cooling coils. I pulled the power for the controller and the auxiliary heat outlet from here. Because I am going to be using a space heater that has is own fan, I changed this up so that the fan only runs when the compressor is. Another benefit, because the fan is not running, it frees up a bit of amperage to run the small (200 watt) space heater. The green wire is the ground.....which I was able to make use of later.

Same wires as mentioned above, and the hole for the STC-1000 is cut.
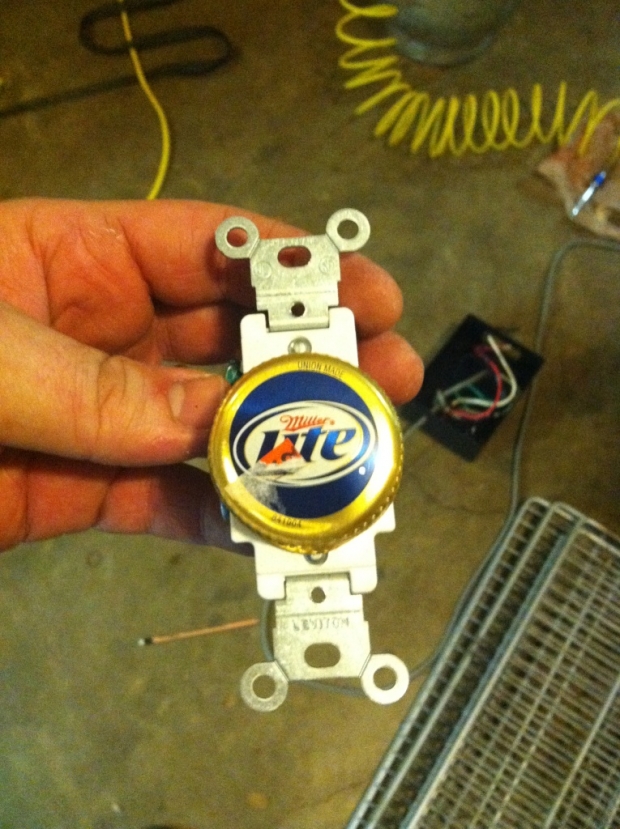
I picked up a single outlet from Home Depot on the way home. If I were to do it again, I would probably go with a Decora, just becuase the cut out is easier with a Dremmel. My though was that I wanted to avoid the opportunity for more than one item to be plugged in there, just in case, and I thought I had a hole saw that was close to the correct size........but as it turns out, all of my hole saws are at my folks lake house over an hour away. Oh well, a Miller Lite 16oz aluminum bottle top makes for a perfect template (flame away about the Miller Lite). Too bad my free hand work with the Dremmel looks like someone hacked at it with an axe.......oh well, it will be out of site unless you look really close. I made one other mistake here. The bulb for the fridge was going to be in the way of the outlet, because I wasn't paying attention to how long it was when I cut the hole. Thankfully, it wasn't a big deal, just pointed the bulb holder in the other direction and all is well. I hooked the ground wire that was previously hooked to the factory thermostat to the outlet. The space heater I currently use is only 2 prong, but that is bound to change at some point. I didn't want to have to open everything back up if I didn't need to.
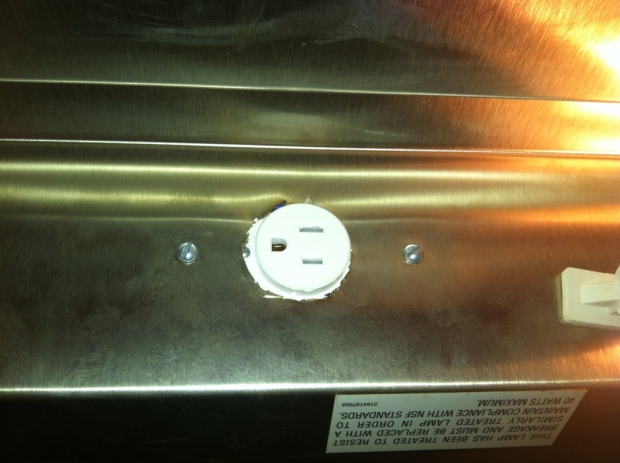
Here you can see the outlet, re-positioned bulb holder, circulation fan, and the temp probe for the STC-1000. I put a grommet in the hole for the temp probe to prevent the wire from chaffing, and knotted the wire inside the control panel to be sure that it couldn't be pulled out by accident.

Most of the way back together. The knob for the factory thermostat is still there, but does not function in any way. I plan to stick a degrees C to degrees F chart on this panel, directly below the STC-1000. A nice feature of the fridge is that it has a analog thermostat on the control panel (far right), which is independent of the control thermostat. I plan to tape the probe for the STC-1000 to the side of my fermenter when I have an active fermentation going, and stick it in jar of water if I am just using the fridge as a fridge. This extra thermostat will let me see the variance between the air temp and liquid temp.

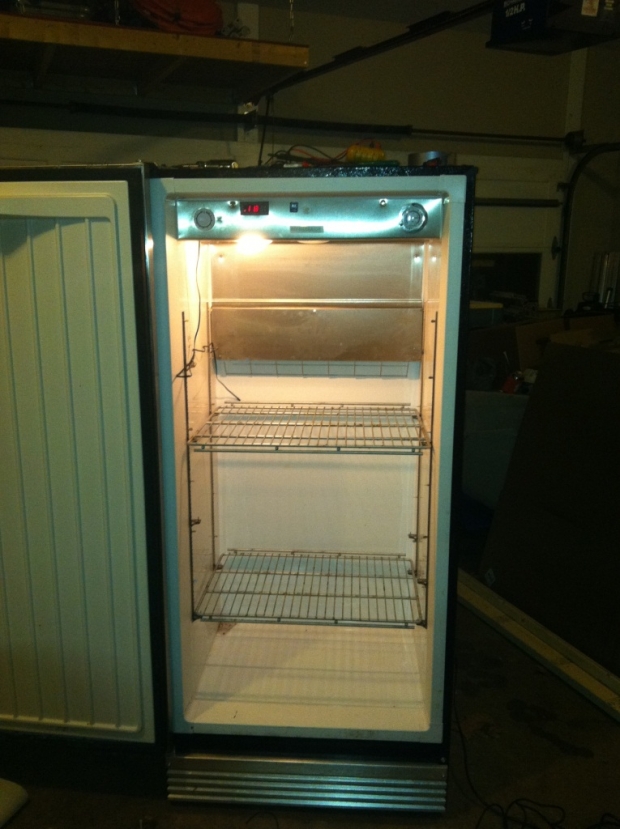
All back together, and a couple of the shelves installed. The shelves are one item that drew me to this unit. They are super strong. I can fit (4) 5 gallon fermenters for certain, I am pretty sure that with careful placement, 6 should not be a problem. Also, there is plenty of interior space should I ever move to a conical.
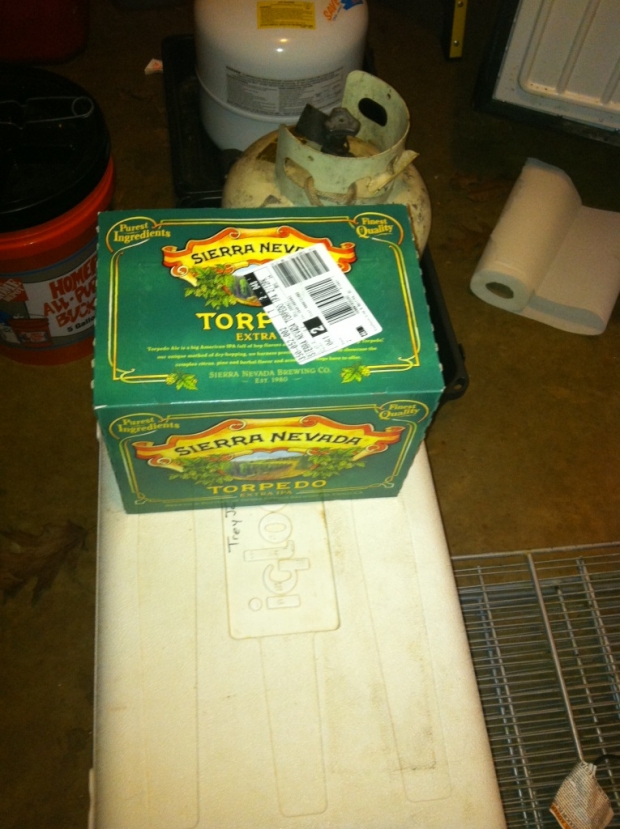
At this point the only real setback of the project occurred. I plugged in my space heater to test everything out, and nothing. The lighted switch on the heater would come on, but the element and fan would not. Tested it in the house on a wall outlet, and sure enough it was dead. Off to wally world I went. Grabbed a 12pk of Torpedo while I was there......no need to waste a trip.

Final item of the night was to give all of the shelves a good soak in oxyclean and bleach. They were pretty nasty as well, and are now drying in the tub.

I hope to post a couple more tomorrow with a 10 gallon batch of my house pale fermenting away.
As soon as I got it home, I ripped apart my old temp control box, and dug out the STC-1000 (ebay aquarium controller) that I was using in it. Fortunately the design on the new fridge allowed for a very easy installation, and plenty of power was already available at the factory thermostat to run the controller, and the small space heater that I use to maintain temps during the colder months.
The following pics outline the build.
Exterior.......has a few dents, dings and scratches, but it will work. I will work on getting rid of all of the tape and adhesive residue another day.
Not sure how old this price tag is, but I am glad that I didn't pay this much for it........$350.00 was plenty.
Interior prior to adding my temp controller.
The entire control panel drops down by removing 8 screws. Even the screws are stainless, which I found to be a very nice touch.
In this photo you can see the factory thermostat. The top cream colored wire (looks white in this photo) is the trigger for the compressor relay. The lower terminal (blue wires) is constant 120V, which feeds power to the thermostat and the circulation fan that blows over the coils. In factory configuration, the fan is designed to run all the time, right over the cooling coils. I pulled the power for the controller and the auxiliary heat outlet from here. Because I am going to be using a space heater that has is own fan, I changed this up so that the fan only runs when the compressor is. Another benefit, because the fan is not running, it frees up a bit of amperage to run the small (200 watt) space heater. The green wire is the ground.....which I was able to make use of later.
Same wires as mentioned above, and the hole for the STC-1000 is cut.
I picked up a single outlet from Home Depot on the way home. If I were to do it again, I would probably go with a Decora, just becuase the cut out is easier with a Dremmel. My though was that I wanted to avoid the opportunity for more than one item to be plugged in there, just in case, and I thought I had a hole saw that was close to the correct size........but as it turns out, all of my hole saws are at my folks lake house over an hour away. Oh well, a Miller Lite 16oz aluminum bottle top makes for a perfect template (flame away about the Miller Lite). Too bad my free hand work with the Dremmel looks like someone hacked at it with an axe.......oh well, it will be out of site unless you look really close. I made one other mistake here. The bulb for the fridge was going to be in the way of the outlet, because I wasn't paying attention to how long it was when I cut the hole. Thankfully, it wasn't a big deal, just pointed the bulb holder in the other direction and all is well. I hooked the ground wire that was previously hooked to the factory thermostat to the outlet. The space heater I currently use is only 2 prong, but that is bound to change at some point. I didn't want to have to open everything back up if I didn't need to.
Here you can see the outlet, re-positioned bulb holder, circulation fan, and the temp probe for the STC-1000. I put a grommet in the hole for the temp probe to prevent the wire from chaffing, and knotted the wire inside the control panel to be sure that it couldn't be pulled out by accident.
Most of the way back together. The knob for the factory thermostat is still there, but does not function in any way. I plan to stick a degrees C to degrees F chart on this panel, directly below the STC-1000. A nice feature of the fridge is that it has a analog thermostat on the control panel (far right), which is independent of the control thermostat. I plan to tape the probe for the STC-1000 to the side of my fermenter when I have an active fermentation going, and stick it in jar of water if I am just using the fridge as a fridge. This extra thermostat will let me see the variance between the air temp and liquid temp.
All back together, and a couple of the shelves installed. The shelves are one item that drew me to this unit. They are super strong. I can fit (4) 5 gallon fermenters for certain, I am pretty sure that with careful placement, 6 should not be a problem. Also, there is plenty of interior space should I ever move to a conical.
At this point the only real setback of the project occurred. I plugged in my space heater to test everything out, and nothing. The lighted switch on the heater would come on, but the element and fan would not. Tested it in the house on a wall outlet, and sure enough it was dead. Off to wally world I went. Grabbed a 12pk of Torpedo while I was there......no need to waste a trip.
Final item of the night was to give all of the shelves a good soak in oxyclean and bleach. They were pretty nasty as well, and are now drying in the tub.
I hope to post a couple more tomorrow with a 10 gallon batch of my house pale fermenting away.


")

