Show us your sculpture or brew rig

Homebrew Talk - Beer, Wine, Mead, & Cider Brewing Discussion Forum

Help Support Homebrew Talk - Beer, Wine, Mead, & Cider Brewing Discussion Forum:

This site may earn a commission from merchant affiliate links, including eBay, Amazon, and others.
@Celticway: Looks good nonetheless! Great work/implementation. Do you have anything online that talks about the various components you use and why you chose what you did? I searched and you don't see to have a brewery build thread...

Kal

Hey Kal,

Thanks for the kind words. Your system however is one to be measured against!

Yeah I don't have a build thread. One of these days its probably a good idea. I used to build all my own stuff back when I lived in MA. Since moving down to GA 6 years ago I now have 2 small kids. So most of my equipment has been purchased; I wanted to ave the time for more brewing! I have been brewing for 16 years now and I can honestly say that I have mostly everything that makes my brewing life easier now. Life is good!
 
I have been brewing for 16 years now and I can honestly say that I have mostly everything that makes my brewing life easier now. Life is good!
That's part of the trick! It usually takes a while (and lots of false starts) before you get to the point where you're 100% happy with the setup and can confidently say "I'm done" (go have a beer).

Happy brewing!

Kal
 
Finally time to build my sculpture. The design is set. Went through all the parts and metal I've been accumulating for this build. Placed the order for the extra metal I will need. Cant wait to dig in and get this thing rolling.

Here is the sketch of my design. I will be posting actual build photos along the way.

beerstandfinal2jpg.jpg


Check out the 3D version @ http://sketchup.google.com/3dwarehouse/details?mid=4e433c674da0a690f3f08423f8dc3b7a&prevstart=12
 
Have several batches under the belt on this one. BCS controlled fully automated...well with the exception of grain and hop additions (I have to have something to do!).

Awesome sculpture! Can you give me the details on how you automated your burners? I have been looking at the Asco Redhat electric solenoid valves but I'm not sure exactly how to rig these up with a digital thermostat. Thanks!
 
Awesome sculpture! Can you give me the details on how you automated your burners? I have been looking at the Asco Redhat electric solenoid valves but I'm not sure exactly how to rig these up with a digital thermostat. Thanks!

+1 on burner automation. Next on my list
 
Just placed the metal order!!

--------------------------------------------------------------------------------

Finally time to build my sculpture. The design is set. Went through all the parts and metal I've been accumulating for this build. Placed the order for the extra metal I will need. Cant wait to dig in and get this thing rolling.

Here is the sketch of my design. I will be posting actual build photos along the way.


Check out the 3D version @ http://sketchup.google.com/3dwarehouse/details?mid=4e433c674da0a690f3f08423f8dc3b7a&prevs tart=12

Congrats on getting under way with your new build... just a couple of questions about your desing. Will it have wheels? Why not the traditional 3 wide design? What is the top shelf for in the brew setup? What is the middle tank doing in the brew setup? Will you be able to remove the grain from the middle tank if that is in fact the mash tun, after the mash? I am very curious about your design, and the benefits that you have devised for your system.
 
Made this short video during my brew day last weekend:
Great video:mug:


My brewing controller (PLC) just died and no spare parts are available from the manufacturer.
I built in enough redundancy so brewing can go on with more manual labor.


Cheers,
ClaudiusB
 
Congrats on getting under way with your new build... just a couple of questions about your desing. Will it have wheels? Why not the traditional 3 wide design? What is the top shelf for in the brew setup? What is the middle tank doing in the brew setup? Will you be able to remove the grain from the middle tank if that is in fact the mash tun, after the mash? I am very curious about your design, and the benefits that you have devised for your system.
1: Yes it will have wheels. 2 swivel 2 stationary.

2: In a word "Storage". The main purpose of this design is to save space when not in use. While when in use giving me extra room for Most importantly a cold one from the previous brew. As well as space to put down odds and ends. * It is effectively still a three wide design HLT on left with a herms coil, MT in the middle, and the boil kettle on the right.

3: The top shelf is just for storage. I thought about removing it. But with space being as tight as it is. There is plenty of things that could be stored up there. I can fit all three converted kegs on the middle shelf.

4: The middle tank will sit on the middle shelf during brew time as a MT. As for moving the grain, Do you mean for disposal? * If it cant be picked up ill dump it into a wheel barrow.

The very bottom shelf with hold the pumps, gas lines, any automation equipment, ETC.

Here are a few dimensions:
Burners~ 2@ 17"Wx17"Lx12"H ~35"H with keg on it.
Center Section~ 51"Wx20"Lx51"H + 4-5" with wheels.

http://sketchup.google.com/3dwarehouse/details?mid=4e433c674da0a690f3f08423f8dc3b7a&prevs tart=12
Please shoot me any questions If there is something you want to know. ??? give me a look at the design from another eye, so I'm happy to answer them.
 
Well, here is my brew rig. It is for a BIAB setup, but I made it big enough that I can expand to a 3 vessel system if I ever decide it will be better. The control panel is also capable of a 3 vessel system, should I choose to do that. I wanted all the plumbing to be compact and everything to be super easy to assemble and disassemble. I also wanted to to be quite tall so it can gravity drain into the fermentor. I bake my RIMS tube (without the element) and chiller between batches to turn any possible gunk into ash between runs, especially as I opted to not bother with a bypass of the chiller. It is constantly getting recirculated and has never clogged (there is a homemade hopstopper in the kettle that HAS been cogged, though), so I figured I could just keep recirculating through it. The extra PID at the bottom of the controller is a 4-20mA control PID, and it runs the orange valve which controls the outflow temperature (by limiting the flow rate) when cooling the wort. The black valve is a standard irrigation valve and controls the flow of chilling water. I am not showing the optional hopback. I base all of my brewing on weight, and have a scale under my kettle- this way I can always know exactly how much I have without having to wonder about the kettle being perfectly level and I don't have to worry about changing volumes based on temperature. I had to find one that didn't have an auto off, so I can keep an eye on the weight at all times without having to reset it. Also, I have not yet plumbed the carbon water filter into it yet, which comes off the main hose intake and will go to the kettle. I had it plumbed initially, but didn't realize how high pressure the water was- used silicone tubing which blew up and popped like a balloon.

72ltu2

iuci24

t688z4

zuyavv
 
kshuler said:
Well, here is my brew rig. It is for a BIAB setup, but I made it big enough that I can expand to a 3 vessel system if I ever decide it will be better. The control panel is also capable of a 3 vessel system, should I choose to do that. I wanted all the plumbing to be compact and everything to be super easy to assemble and disassemble. I also wanted to to be quite tall so it can gravity drain into the fermentor. I bake my RIMS tube (without the element) and chiller between batches to turn any possible gunk into ash between runs, especially as I opted to not bother with a bypass of the chiller. It is constantly getting recirculated and has never clogged (there is a homemade hopstopper in the kettle that HAS been cogged, though), so I figured I could just keep recirculating through it. The extra PID at the bottom of the controller is a 4-20mA control PID, and it runs the orange valve which controls the outflow temperature (by limiting the flow rate) when cooling the wort. The black valve is a standard irrigation valve and controls the flow of chilling water. I am not showing the optional hopback. I base all of my brewing on weight, and have a scale under my kettle- this way I can always know exactly how much I have without having to wonder about the kettle being perfectly level and I don't have to worry about changing volumes based on temperature. I had to find one that didn't have an auto off, so I can keep an eye on the weight at all times without having to reset it. Also, I have not yet plumbed the carbon water filter into it yet, which comes off the main hose intake and will go to the kettle. I had it plumbed initially, but didn't realize how high pressure the water was- used silicone tubing which blew up and popped like a balloon.

That's pretty sick man!
 
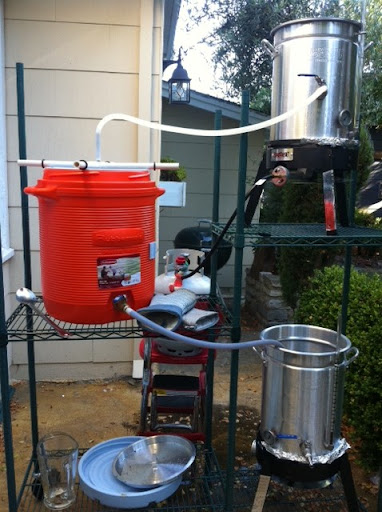
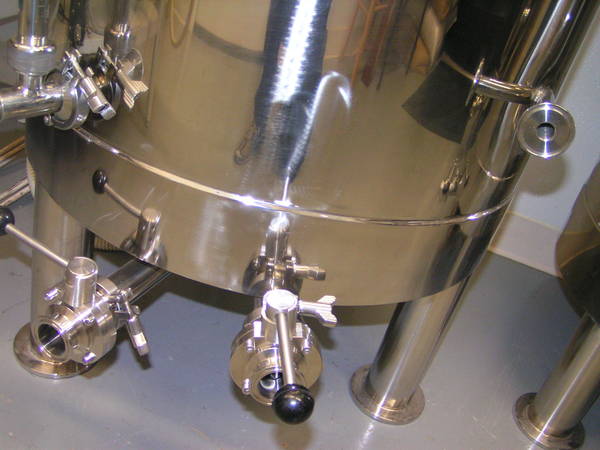
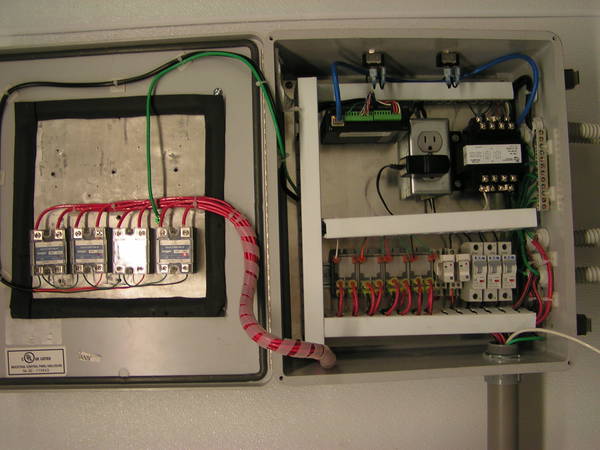
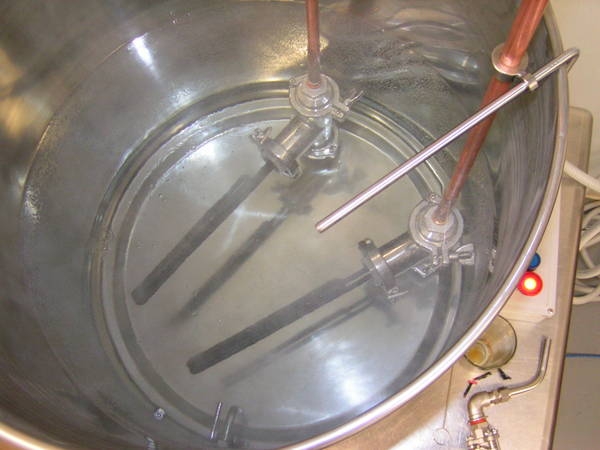
well, here is my brew rig. It is for a biab setup, but i made it big enough that i can expand to a 3 vessel system if i ever decide it will be better. The control panel is also capable of a 3 vessel system, should i choose to do that. I wanted all the plumbing to be compact and everything to be super easy to assemble and disassemble. I also wanted to to be quite tall so it can gravity drain into the fermentor. I bake my rims tube (without the element) and chiller between batches to turn any possible gunk into ash between runs, especially as i opted to not bother with a bypass of the chiller. It is constantly getting recirculated and has never clogged (there is a homemade hopstopper in the kettle that has been cogged, though), so i figured i could just keep recirculating through it. The extra pid at the bottom of the controller is a 4-20ma control pid, and it runs the orange valve which controls the outflow temperature (by limiting the flow rate) when cooling the wort. The black valve is a standard irrigation valve and controls the flow of chilling water. I am not showing the optional hopback. I base all of my brewing on weight, and have a scale under my kettle- this way i can always know exactly how much i have without having to wonder about the kettle being perfectly level and i don't have to worry about changing volumes based on temperature. I had to find one that didn't have an auto off, so i can keep an eye on the weight at all times without having to reset it. Also, i have not yet plumbed the carbon water filter into it yet, which comes off the main hose intake and will go to the kettle. I had it plumbed initially, but didn't realize how high pressure the water was- used silicone tubing which blew up and popped like a balloon.

72ltu2

iuci24

t688z4

zuyavv
amazing!
 
This thread blew me away! Amazing rigs here, the information is invaluable to newbies like myself.

A question to all you cooler MLT users out there: has anyone tried taking the wheels off of a rolling cooler and use the axle as a hinge point for a tippy dump setup? I am sure someone has done this, I just haven't seen any pictures of it.

Thanks for the inspiration. I hope to get my rig on this thread sometime this year!
 
318597_10100272613138110_22925584_50915707_1305116342_n.jpg


305365_10100272614939500_22925584_50915749_837623650_n.jpg


Just about done. I have yet to brew on it. I am going to do a run through with hot water tomorrow.
 
Jcmccoy said:
Just about done. I have yet to brew on it. I am going to do a run through with hot water tomorrow.

Runnin propane in your kitchen on top of a wood table? Hope you have ventilation and a fire extinguisher close by.
 
Jcmccoy said:
FIXED That is outside in a porch attached to my garage. and the table is very sturdy!

That's cool. Makes more since that way. lol. Love the fittings. Wish I would have sprung for stainless instead of brass. But I'm a cheap @ss.
 
This thread blew me away! Amazing rigs here, the information is invaluable to newbies like myself.

A question to all you cooler MLT users out there: has anyone tried taking the wheels off of a rolling cooler and use the axle as a hinge point for a tippy dump setup? I am sure someone has done this, I just haven't seen any pictures of it.

Thanks for the inspiration. I hope to get my rig on this thread sometime this year!

Interesting! I am not sure a 10G cooler is heavy enough for most people to really need this option. But there might be some who use a larger cooler, or who have physical limitations that would make that a very nice feature to have!

Good idea!

Well, my summer is practically gone and I have still not designed my system, let alone started building it. I better get cracking!
 
I have been waiting a long time to be able to post my rig on this thread, and I thank every one who helped me out along the way. She has two batches under her belt and so far I couldn't be happier.

Thanks again,
Pat

ForumRunner_20110908_193410.jpg


ForumRunner_20110908_193513.jpg


ForumRunner_20110908_193558.jpg


ForumRunner_20110908_193653.jpg
 
Finally got my new system up and running, after more than a year of not brewing.

The stand is made out of kitchen-style heavy duty wire shelving. Turkey fryers for HLT and Boil Kettle, with sight glasses, valves, and thermometers. Mash tun is a 10 gallon cooler with a false bottom.

First brew day went fantastic. Only real problems was that the propane hose to the top burner isn't long enough.

photo%2B%252811%2529.JPG
 
After drooling after the systems in this thread and being ashamed of my bits and pieces build, I dropped the cash and built myself a single tier.

Saturday was the first brew day and everything went as planned. Still having various issues with getting the pump primed but it's getting better. This photo was taken after the boil while I was recirculating the wort for chilling.
 
neumann said:
After drooling after the systems in this thread and being ashamed of my bits and pieces build, I dropped the cash and built myself a single tier.
https://cdn.homebrewtalk.com/gallery/showphoto.php?photo=47344&title=img-00453&cat=500
Saturday was the first brew day and everything went as planned. Still having various issues with getting the pump primed but it's getting better. This photo was taken after the boil while I was recirculating the wort for chilling.

Nice build! Is ur stand bolted together? Looks like the top is. I'm a little discouraged w the whole welding issue.
 
Mpavlik22 said:
Nice build! Is ur stand bolted together? Looks like the top is. I'm a little discouraged w the whole welding issue.

The whole thing is welded. My brother-in-law helped me with that (by "help" I mean he did all of the welding)
 
Okay, I'm in the process of welding my stand together and have been reading TONS of threads looking for a reasonable caster to fit my 2" square tube. the tube is 3/16" thick.

ANYONE have any idea what i should be looking at? I looked up the casters on caster city and there is no way i'm going to pay over 80 bucks for casters.... I know someone out there has found some casters to fit inside for MUCH cheaper then that.

Please help me out here, my back would really appreciate it. :)

Not sure if they deliver to the US, but in canada try Busy Bee Tools ( www.busybeetools.com )

Dan
 
Still having various issues with getting the pump primed but it's getting better.

Just a suggestion would be to move the pump to the lowest point of your plumbing and it will help with priming issues. That long line on your inlet will collect air. Support that above your pump. Just a thought.
 
Just received kettles from conical-fermenter.com. Its a 2 bbl HERMS, all electric, with 5500 watt heatsticks. Haven't finished adapting everything to tri-clamp, but its close to functional.
PICT00311.JPG

PICT0029.JPG

PICT00271.JPG

140_amp_control_panel.JPG

heatsticks.JPG

You wouldn't have a thread detailing your system would you and if not would you consider doing one? I think that would be some major beer porn :mug:
 
enaz32: I like your direct fired cooler. It's for preheating the cooler, right? Just kidding, I am considering a 3 tier as well. Your setup is simple and sturdy, I like it. I assume you move your BK to the ground while sparging. Is this correct?
 
ShelterPupsBrew said:
enaz32: I like your direct fired cooler. It's for preheating the cooler, right? Just kidding, I am considering a 3 tier as well. Your setup is simple and sturdy, I like it. I assume you move your BK to the ground while sparging. Is this correct?

Haha thanks! Yep I have the BK on the bottom tier and the HLT on the top. I have the BK hooked up to the HLT in the pic because I was marking my new sight glass and then pumping the water up to the HLT. For mashing I just gravity feed from the HLT to the mash tun and then pump to the BK. I way over built the thing with 4x4 and 1/4inch wall. If I did it again I would have probably used 2x2. I love how little the footprint is and how much easier it makes brew days. Go with a tree you won't regret it.
 
I finally finished the control box and hooked up the pilots today. The kettle is heated by a thermostat controlled burner which can be over-ridden by an on switch. The HLT also has a thermostat controlled burner. The mash tun has its temperature controlled by a thermostat controlled pump which recirculates the mash through a heat exchanger in the HLT. I've tested the thermostat controlled burners and pumps, but I have yet to brew on the system. My kettles arrive this week.

I decided to go with an intermittent pilot system from Honeywell. This way, a breeze can't blow out my pilot between calls for heat. It ended up costing a lot more to do it this way, but it made me nervous to think of an automated propane valve opening without a lit pilot. When I get the kettles and tubing fitted I'll post another pic.

Cheers,

Nick

brew5.jpg


brew6.jpg


brewstand.jpg
 
Awesome looking rig, Runtgun! Everything about it looks top-notch.

Not sure locating the controller under your MLT is a good idea, though...

Cheers!
 
very nice build
trippr... the control panel looks to be a NEMA 4 enclosure (weather proof) but... if he stirs anything like me...
 
very nice build
trippr... the control panel looks to be a NEMA 4 enclosure (weather proof) but... if he stirs anything like me...

Yeah, I was just thinking of gooey stuff dripping all over the poor thing ;)

Folks put shields over their pumps for the same reason...and they don't look anywhere near as pretty as that controller...

Cheers!
 
I decided to go with an intermittent pilot system from Honeywell. This way, a breeze can't blow out my pilot between calls for heat. It ended up costing a lot more to do it this way, but it made me nervous to think of an automated propane valve opening without a lit pilot. When I get the kettles and tubing fitted I'll post another pic.

Cheers,

Nick

I'm planning on using the same Honeywell intermittent setup. Could you give me a little insight into the parts and cost? Looks like a really great rig. :mug: Thanks Mike
 

Latest posts

Back
Top