I have a 15 gal. keg that has a foam/plastic coating all over it. I was thinking of using it for my primary fermentor. However, I have a couple of questions. First, I cannot figure out how to get the stem out. There is a fitting on top with slots that looks like it should turn but I can't seem to turn it. Also, at what hieght should I drill the hole for the drain. I don't want gunk but I don't want to leave any of my beer behind. My other question is cleaning it after I keg my beer. Would Oxyclean - rinsing and sanitizing do the trick? Thanks.
You are using an out of date browser. It may not display this or other websites correctly.
You should upgrade or use an alternative browser.
You should upgrade or use an alternative browser.
Sanke Fermentor?
- Thread starter Gonefishin
- Start date

Help Support Homebrew Talk - Beer, Wine, Mead, & Cider Brewing Discussion Forum:
This site may earn a commission from merchant affiliate
links, including eBay, Amazon, and others.
Is this a miller keg?
Have fun..
https://www.homebrewtalk.com/f35/ho...ded-keg-valve-not-retained-spiral-ring-76393/
You can't use that keg over a turkey burner as I am sure you are well aware of. Best put a 1" hole in it and do this.
https://www.homebrewtalk.com/f170/weldless-water-heating-element-keggle-237037/
Have fun..
https://www.homebrewtalk.com/f35/ho...ded-keg-valve-not-retained-spiral-ring-76393/
You can't use that keg over a turkey burner as I am sure you are well aware of. Best put a 1" hole in it and do this.
https://www.homebrewtalk.com/f170/weldless-water-heating-element-keggle-237037/
JuanMoore
Getting the banned back together
I wouldn't drill any holes in it if it were me. A hole and fittings is just going to add crevices for nasties to hide in. You can easily transfer with pressure through the spear or with a racking cane/autosiphon just like you would with a carboy. This also allows you to use the keg as a serving vessel if you ever want to.
I wouldn't drill any holes in it if it were me. A hole and fittings is just going to add crevices for nasties to hide in. You can easily transfer with pressure through the spear or with a racking cane/autosiphon just like you would with a carboy. This also allows you to use the keg as a serving vessel if you ever want to.
Actually I was referring to him using the keg as a boil kettle. You are correct if used as the OP mentioned as a fermenter.
dutchoven
Well-Known Member
Check out brewershardware.com ... they have an adapter for converting a keg into a fermenter.
As for stem removal, post some pics ... once we know the type, we can help.
As for stem removal, post some pics ... once we know the type, we can help.
There are three ways to accomplish what you want.
1) The brewershardware.com kit is one of them, though pricey.
2) You can heat up a plain old orange carboy cap and stretch it over the lip and use an airlock.
3) Use a modified keg coupler. Replace the beer out hose barb with one of these from Midwest Brewing. You also have to remove the backflow preventing little ball and the Gas check valve plastic piece to make all this work properly. Super easy, though.
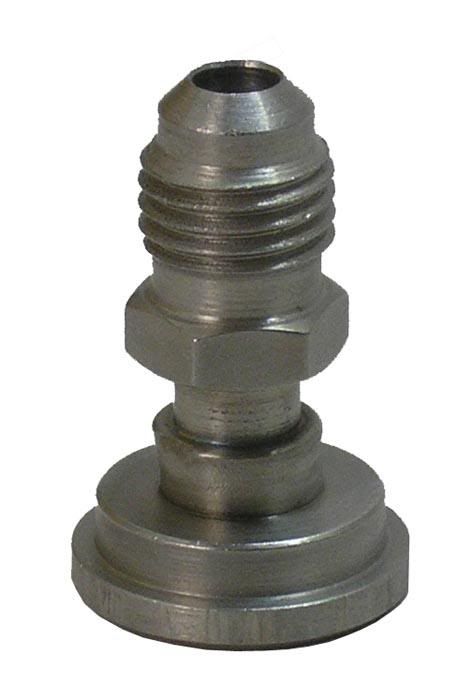
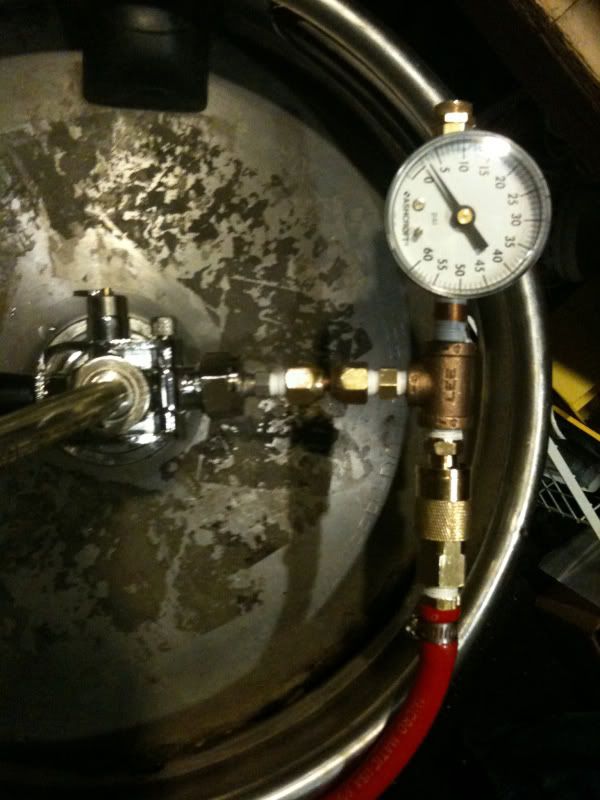
You can then make your coupler into a "spund" valve. Which can release pressure as your yeasties do their work. Or, some people like to ferment under pressure and carb naturally. Either way, you can push the fermented beer out with CO2. Here's mine, although Midwest now makes this even simpler by selling a FFL x NPT fitting instead of the FFL x FFL in this version.
It's a great way to ferment. Oxyclean easily gets the sanke clean for the next brew.
Check out THIS THREAD for more information
1) The brewershardware.com kit is one of them, though pricey.
2) You can heat up a plain old orange carboy cap and stretch it over the lip and use an airlock.
3) Use a modified keg coupler. Replace the beer out hose barb with one of these from Midwest Brewing. You also have to remove the backflow preventing little ball and the Gas check valve plastic piece to make all this work properly. Super easy, though.
You can then make your coupler into a "spund" valve. Which can release pressure as your yeasties do their work. Or, some people like to ferment under pressure and carb naturally. Either way, you can push the fermented beer out with CO2. Here's mine, although Midwest now makes this even simpler by selling a FFL x NPT fitting instead of the FFL x FFL in this version.
It's a great way to ferment. Oxyclean easily gets the sanke clean for the next brew.
Check out THIS THREAD for more information
Duckfoot
Well-Known Member
There are three ways to accomplish what you want.
1) The brewershardware.com kit is one of them, though pricey.
2) You can heat up a plain old orange carboy cap and stretch it over the lip and use an airlock.
3) Use a modified keg coupler. Replace the beer out hose barb with one of these from Midwest Brewing. You also have to remove the backflow preventing little ball and the Gas check valve plastic piece to make all this work properly. Super easy, though.
...
And the fourth option:
A #11 drilled stopper with an airlock... Been using one for about a year now...

OP
OP
onthekeg, thanks for the link. I was really beginning to question my abilities. Who the hell would invent something like that? Its no wonder I hate Miller!
Jaunmoore, I want the drain to be above the level of the yeast cruface, to transfer the clear beer to secondary carboys or kegs. Wouldn't cleaning and sanitizing remove concerns about contamination? Thanks for all the help.
Jaunmoore, I want the drain to be above the level of the yeast cruface, to transfer the clear beer to secondary carboys or kegs. Wouldn't cleaning and sanitizing remove concerns about contamination? Thanks for all the help.
And the fourth option:
A #11 drilled stopper with an airlock... Been using one for about a year now...
So brilliant it didn't cross my mind.

Duckfoot
Well-Known Member
So brilliant it didn't cross my mind.
Well, let's not go that far... I ain't exactly the smartest peanut in the turd...
How are you going to install and secure a drain on a Sanke with only the spear hole?
Not to say it can't be done, but honestly, the easiest approach is one of the previously listed options...
Personally, I ferment, rack off with an autosiphon, rinse out, fill with Oxyclean and water, invert it with a solid #11 stopper... After a few days, drain, and rinse well... When using it the next time, rinse again, put 1 gallon of Star San mix in, put in the stopper and shake the crap out of it to coat all the surfaces....
Knock on wood, no issues so far...
onthekeg, thanks for the link. I was really beginning to question my abilities. Who the hell would invent something like that? Its no wonder I hate Miller!
Jaunmoore, I want the drain to be above the level of the yeast cruface, to transfer the clear beer to secondary carboys or kegs. Wouldn't cleaning and sanitizing remove concerns about contamination? Thanks for all the help.
If you are making a fermentor, no need for a valve. Just trim your dip tube if you're worried about trub. I suppose you could drill a hole and weld on a valve. But why? Use gas to transfer.
OP
OP
dgonza, great info. I was thinking if I cut the outlet tube on the valve (after getting it apart) I should be able to adapt the valve to a hose for CO2 release. But I never thought of fermenting and carbonating all in on step. What would happen to carbonation when I xfer to kegs? I would only use this method on my stouts and porters as I would xfer to a secondary my lighter brews. Thanks, again.
JuanMoore
Getting the banned back together
Jaunmoore, I want the drain to be above the level of the yeast cruface, to transfer the clear beer to secondary carboys or kegs. Wouldn't cleaning and sanitizing remove concerns about contamination?
Not sure how you plan on sanitizing, but it's very difficult to sanitize small crevices. Since you're trying to remove the spear I'm assuming you're not cutting the top off, in which case you're going to run into logistical issues installing a valve since you can't reach inside the keg. Even more so since the connection needs to be sanitary. There are numerous ways to rack the beer off without disturbing the yeast cake. Cutting 1/2" off the spear and transferring with CO2 works great BTW.
dgonza, great info. I was thinking if I cut the outlet tube on the valve (after getting it apart) I should be able to adapt the valve to a hose for CO2 release. But I never thought of fermenting and carbonating all in on step. What would happen to carbonation when I xfer to kegs? I would only use this method on my stouts and porters as I would xfer to a secondary my lighter brews. Thanks, again.
If you counterpressure transfer you shouldn't lose any carbonation. Yeast start to mutate at pressures above ~15 psi, so if you want to ferment under pressure it's best to set your spunding valve at or below 15 psi for the majority of active fermentation. Once fermentation is slowing down you can turn it up to the appropriate pressure required for your desired carbonation level, and let it carb up. Any particular reason you'd transfer your lighter beers? I'm guessing for clarity, but FWIW I get better clarity by leaving things in the primary and then cold crashing before transfer to serving kegs.
not sure how you plan on sanitizing, but it's very difficult to sanitize small crevices. Since you're trying to remove the spear i'm assuming you're not cutting the top off, in which case you're going to run into logistical issues installing a valve since you can't reach inside the keg. Even more so since the connection needs to be sanitary. There are numerous ways to rack the beer off without disturbing the yeast cake. Cutting 1/2" off the spear and transferring with co2 works great btw.
If you counterpressure transfer you shouldn't lose any carbonation. Yeast start to mutate at pressures above ~15 psi, so if you want to ferment under pressure it's best to set your spunding valve at or below 15 psi for the majority of active fermentation. Once fermentation is slowing down you can turn it up to the appropriate pressure required for your desired carbonation level, and let it carb up. Any particular reason you'd transfer your lighter beers? I'm guessing for clarity, but fwiw i get better clarity by leaving things in the primary and then cold crashing before transfer to serving kegs.
+1
OP
OP
Man I love this site. Just when I think I have it figured out you guys step up to humble me again, and again. I have read about cold crashing but have not really understood the reasons for it or the principles behind it. It sounds like maybe it would save me days or weeks between primary and drinking my brews. Which is the longest period of time since the continents moved 3 f'n meters! Sounds good to me! Thanks again to all you brew junkies. You just make me a better brewer. GF
For what it is worth I use short/standard 1/4bbls and 1/2bbls to ferment in. I serve/force carb from tall 1/4 and 1/6bbl sanke kegs, since my keggerator came set up for sanke kegs. I use the orange carboy cap method, but 1 day may try the spunding value/pressurized fermentation setup.
I like my setup because it is cheap! I use 2 SS racking canes, 2 carboy caps a length of silicon tuning and can do a sealed transfer without all the expensive hardware. Not to mention all the equipment is able to be autoclaved.
I built a "carboy cleaner" with a pump and blue "carboy dryer" they are all over the DIY section just search and the sanke kegs drop right onto it. Let it run for a few hours with oxyclean free, giving it a partial twist, hit it with a carboy brush, rinse well and sanitize it. I even recently got a small inspection mirror to inspect them but have not done so yet.
I love my all sanke system! The only thing I have not done is switch over to the 2" snap rings instead of the standard coil ring that holds the spears in. I can get into all my kegs in under 1 minute anyways(lots of practice)so I may never switch over...
I even got my hands on a Euro keg that I had to cut the top off of and am now in the process of creating a top that I can open for easy secondary and cleaning but will be air tight and allow for the same low pressure transfers! It has been a logistical nightmare but I got REALLY lucky with the hole size and I am now just trying to engineer some clamps...I need it to be fully operational in under 2 weeks...lol but I will post up it's own thread for that!
Another thing to add...with a keggle system you can easily do 12-13 gallon batches which mates up nicely to a 1/2bbl and likewise a 6 gallon batch for 1/4 bbls!
OP
OP
I got the stem out! there was a spring washer in the top of the valve stem. I removed the washer and then turned the stem to line up the key/slots and out it came.
Zamial, what do you do about the trub that settles to the bottom of the barrel? Are you transfering between primary and cold crashing? I think I missed something there. Also, what is an "orange carboy cap"? Keep us up to date on your new fermentor. I was wanting to cut a larger hole in my keg for cleaning purposes but I havent figured out how to properly seal a large hole. Good luck.
Zamial, what do you do about the trub that settles to the bottom of the barrel? Are you transfering between primary and cold crashing? I think I missed something there. Also, what is an "orange carboy cap"? Keep us up to date on your new fermentor. I was wanting to cut a larger hole in my keg for cleaning purposes but I havent figured out how to properly seal a large hole. Good luck.
Similar threads
- Replies
- 3
- Views
- 415
