Converting the Frigidaire 7.2 cu ft Chest Freezer

Homebrew Talk - Beer, Wine, Mead, & Cider Brewing Discussion Forum

Help Support Homebrew Talk - Beer, Wine, Mead, & Cider Brewing Discussion Forum:

This site may earn a commission from merchant affiliate links, including eBay, Amazon, and others.
What's the lengths of those beer shanks? I've been searching for 3 inch stainless shanks or one piece nipple shanks and I cannot find anyone that has them in 3/16" bore. My beverage line is 3/16", so I thought that I need 3/16" bore. I see a lot that are 1/4" bore.

Just use the 1/4-inchers.... that's what I and most others use. If it's too tight to push the line on, just hold it under hot water for awhile... she'll slide right on...
 
Is that the Frigidaire 7.2cf freezer? I got my frigidaire yesterday, and I can fit 4 cornys (snugly) on the bottom, and 2 additional on the hump.

Four on the floor, really? I know mine can not hold that many on the floor. There must be something that is different with your setup. Perhaps you have a larger model Frigidaire?
 
What's the lengths of those beer shanks? I've been searching for 3 inch stainless shanks or one piece nipple shanks and I cannot find anyone that has them in 3/16" bore. My beverage line is 3/16", so I thought that I need 3/16" bore. I see a lot that are 1/4" bore.

I use 1/4" bore shanks with 3/16" beer line. I had the same concern as you do, but it turned out OK. I serve at about 10 psi through 10' beer lines and there is minimal foaming. At 12 to 14 psi, the first glass of the day will have more foam but the second glass will be just right. Temperature will be a factor also. I will typically keep it in the low 40's.

Heating the tubing in very hot water makes it easy to slide it on the hose barb.

By the way, thanks for the compliment in you earlier post. :mug:
 
Four on the floor, really? I know mine can not hold that many on the floor. There must be something that is different with your setup. Perhaps you have a larger model Frigidaire?

I got the 7 cuft model here: http://www.pcrichard.com/catalog/product.jsp?modelNo=FFC0723GB

Here are some pictures to show you how everything fits. I only have 1 corny currently, so cardboard cutouts resemble the others.

index.php


index.php
 
Time for a few updates.

First off is a minor update to the wiring of the Love temperature controller. I used the green wire in a three-conductor cable to carry switched power from terminal 9 down to the compressor power input. In case you wonder, it is perfectly fine to use the green conductor for other purposes than ground. It still complies with code with the provision that you mark the green wire so that it will not be confused by ground by someone working on the wiring in the future. So the update is that I have added a piece of black electrical tape to mark the green wire, and a similar marker goes at the other end as well. We may as well comply with code when it is as simple as this, right? I'd be interested to hear any comments you have on this topic.

 
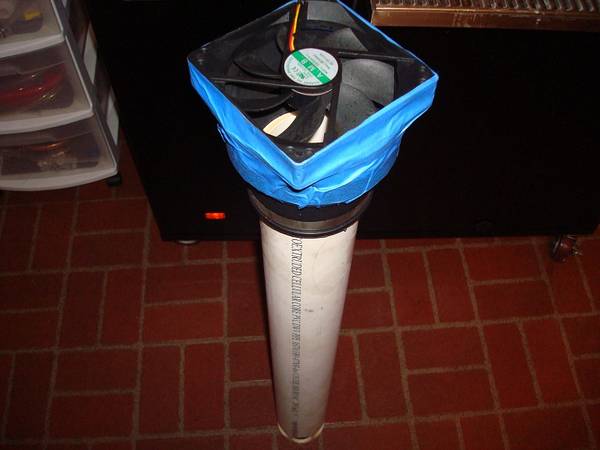
After trying a few ways to use the computer fan, I ended up mounting it on a three-inch PVC pipe. It is attached to the pipe via a rubber plumbing adapter for 3" to 5" (I think) PVC pipe. The fan is a bit too big to fit the 5" end, so I temporarily fastened it with wide masking tape while I'm thinking of a permanent way to mount it. It is working so well, though, that I have put off changing it indefinitely.

At the bottom I used a hole saw to cut as many 1" holes I could fit around the perimeter. The pipe is just standing on the bottom of the freezer, wherever it will fit, sucking up the coldest air from the floor and blowing it out a few inches below the lid. This helps preventing cold air from collecting at the bottom and warmer air at the top around the taps and hoses.

I wish I could remember who to credit for this idea, because I saw or read about it first here on HBT.

 
I have found a simple way to avoid having to lift heavy kegs into the kegerator. I put the carboy on a table and an empty sanitized keg in the kegerator. Then I wheel the kegerator over to the table and rack right into the keg. I use a couple of phone books under the carboy to gain a couple of inches. It is probably not necessary, but I want to make sure that the siphon does not stall before the end. Brown Ale with homegrown hops in the carboy.

 
anyone wanting to attach a drip try might want to consider gluing special earth magnets to it , should stick nice and snug to the side!
 
After trying a few ways to use the computer fan, I ended up mounting it on a three-inch PVC pipe. It is attached to the pipe via a rubber plumbing adapter for 3" to 5" (I think) PVC pipe. The fan is a bit too big to fit the 5" end, so I temporarily fastened it with wide masking tape while I'm thinking of a permanent way to mount it. It is working so well, though, that I have put off changing it indefinitely.

At the bottom I used a hole saw to cut as many 1" holes I could fit around the perimeter. The pipe is just standing on the bottom of the freezer, wherever it will fit, sucking up the coldest air from the floor and blowing it out a few inches below the lid. This helps preventing cold air from collecting at the bottom and warmer air at the top around the taps and hoses.

I wish I could remember who to credit for this idea, because I saw or read about it first here on HBT.

I supplied 2" PVC with a 2 1/2" SQ muffin fan up from the corner of a keezer, added two 90's plus a stub up inside the coffin. This on a neighbors keezer that now has a second 2 1/2" muffin at the bottom of the coffin blowing downward helping the other undersized muffin. Parts at hand on the cheap and ugly but works great.
I like your drilled holes idea as we used a bandsaw notching teeth out on the bottom, rather funky.
 
Time for a few updates.

First off is a minor update to the wiring of the Love temperature controller. I used the green wire in a three-conductor cable to carry switched power from terminal 9 down to the compressor power input. In case you wonder, it is perfectly fine to use the green conductor for other purposes than ground. It still complies with code with the provision that you mark the green wire so that it will not be confused by ground by someone working on the wiring in the future. So the update is that I have added a piece of black electrical tape to mark the green wire, and a similar marker goes at the other end as well. We may as well comply with code when it is as simple as this, right? I'd be interested to hear any comments you have on this topic.


Unfortunately, electricity is not my strongest suit, but I motorized my grain mill and I completely wired my wood shop, so I could probably tackle this as well. Hopefully, I can use you as a consultant to get this right. I just ordered all of my parts last night. I had already purchased the frezzer over the summer when I first read your thread, but now I'm getting serious. :)
 
Unfortunately, electricity is not my strongest suit, but I motorized my grain mill and I completely wired my wood shop, so I could probably tackle this as well. Hopefully, I can use you as a consultant to get this right. I just ordered all of my parts last night. I had already purchased the frezzer over the summer when I first read your thread, but now I'm getting serious. :)

Sounds great! Here are lots of knowledgable people that can help, so you will be fine. Your wiring experience should make this easy.
 
What do you guys think about these tap handles? I love the looks of them and I was contemplating getting them for my keezer build. My only concern is the 11.5" height and it's height above the keezer lid. I was going to get black and silver to match the Frigidaire black freezer. Also, I could create my own labels. A good picture is located in this thread, three posts down: https://www.homebrewtalk.com/f51/custom-tap-handle-search-124797/

Also, they are at http://taphandles.myshopify.com/pro...k-pub-tap-handle-with-silver-rectangle-shield

It is the large pub handle in silver/black with the rectangle emblem.
 
Time for a few updates.


Quaffer,

Nice looking build.

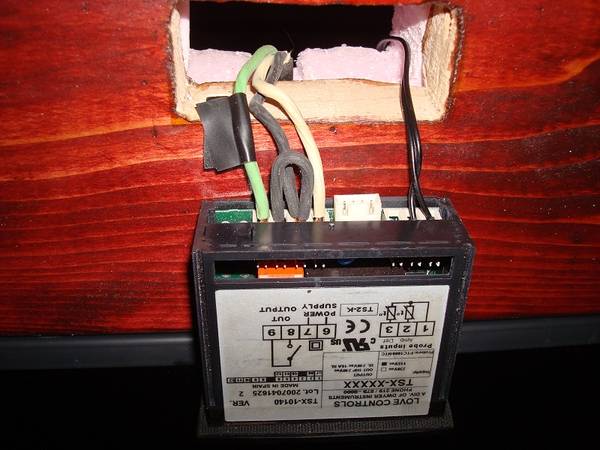
With a collar that thick, how are you mounting the Love controller and keeping it tight against the collar? I have tried putting the clips backwards on mine, but still don't like how loose they fit, and my collar is only a 1x8 with no insulation (yet).
 
Quaffer,

Nice looking build.

With a collar that thick, how are you mounting the Love controller and keeping it tight against the collar? I have tried putting the clips backwards on mine, but still don't like how loose they fit, and my collar is only a 1x8 with no insulation (yet).

I crept up on the hole with a rasp, testing the fit every ten seconds or so until I had a snug interference fit. I have to push on the back to get the controller out of the collar. This collar is 1.25" thick.
 
Thanks Quaffer. I think I am just going to shim mine from the inside a bit to snug it up, and leave the clips loosly attached so it cannot fall out if somebody tries to mess with it too much.
 
I ordered the Dwyer TSX-10140 a couple of days ago and I went online to check the status on the Dwyer website. I was shocked that it has a May 17th delivery date!!! Did everyone else have a really long wait for this controller? They have the celsius model in stock, so I might have to reconsider with a same day delivery. Cole Parmer has the TS-13010. Any other sources? What should I do and has anyone else run into this?
 
I called dwyer and talked to tech support.
they suggested an alternative that was in stock for about same price.
got it in three days
 
I called dwyer and talked to tech support.
they suggested an alternative that was in stock for about same price.
got it in three days


I called Grainger and they had three in stock, so I ordered one from them. My only concern is that their picture looks like an older unit (red buttons instead of blue buttons), and if so, I'm guessing the wiring is different. What alternate did Dwyer suggest as a replacement for the TSX-10140?

Grainger: http://www.grainger.com/Grainger/LOVE-Temperature-Switch-2HMF9

So, far, I built a base frame with casters and maple trim. It looks nice as I inset the casters so you really cannot see them and it appears that the freezer (soon to be keezer) is floating just off the floor. I needed to inset them far enough so they could freely swivel without hitting the base trim. I also cut the sections for the collar, but I also have ordered 1/8" birdseye maple that I plan to adhere on the face. I'll post pictures when I have a few more steps complete. I'll create another thread to not highjack this one.
 
do you happen to have the origianl wiring diagram so one could compare the two? or is it just the black controller wire that replaced the yellow wire from the thermostat? then all the neutrals tied into the the neutral on the light?
 
do you happen to have the origianl wiring diagram so one could compare the two? or is it just the black controller wire that replaced the yellow wire from the thermostat? then all the neutrals tied into the the neutral on the light?

You got it. Also, the 6VDC supply input is connected in parallel with the compressor.
I do not have a wiring diagram before modification. On the first page are two pictures of the wiring in the compressor compartment, before and after. That might help.
 
yeah i went back to look at those, do you think that you could use a terminal block instead of the spliced connections of the neutrals, pretty much replacing the stock termianl block giving extra connections for the controller, i'm just thinking that i would like to be able to return the wirning back to the origial way it came at some point if i wanted.
 
yeah i went back to look at those, do you think that you could use a terminal block instead of the spliced connections of the neutrals, pretty much replacing the stock termianl block giving extra connections for the controller, i'm just thinking that i would like to be able to return the wirning back to the origial way it came at some point if i wanted.

Sure, you can do that.
I can return the wiring to like original by cutting off the white controller wire and white DC supply wire from the white splice and taping it up again, then removing the wire nut for the yellow compressor cable and reattach it to the original thermostat. It will be functionally identical, but not visually identical.

However, I think the freezer has increased in value as a kegerator so there would be no reason to return it to its original state.
 
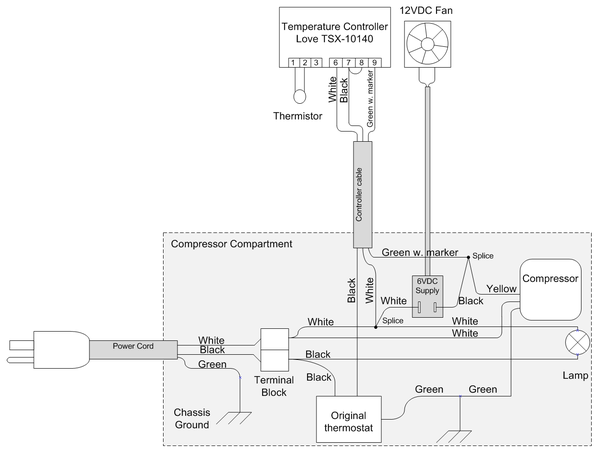
On popular request I have made a wiring diagram for the kegerator. Please let me know what you think, suggestions welcome.


1) Is the Love temp controller just for the fan? Or was the yellow wire to the compressor originally connected the original thermostat? [Walk me through the theory of operation.]
2) Are those objects outside the compressor compartment; cable, controller, thermistor, fan, and fan cable, protected from user touch?
3) Is the compressor compartment secure from user touch?

Clark, thanks for checking this out.

1. The thermostat used to feed the yellow wire of the compressor, you are correct. You could say that I inserted the Love controller in series with the thermostat so that we can control the temperature in the 40's (thermostat won't go above freezing), and still use the on/off function of the thermostat to shut down the system. The fan runs only when the compressor runs. This is so to avoid adding unnecessary heat inside the kegerator.

2. The fan can be touched by the user. It's gonna sting a bit (mechanically), but nobody gets injured. Fan cable can also be touched by the user, but it has only 7VDC or so in it; not dangerous. A crafty user with a thin knitting needle could perhaps poke the controller so to get a chock, but it is about as well protected as a standard wall outlet. I have the thermistor submerged in a glass of water to slow down its response to the user opening the door and similar events, so yes it is touchable but in my opinion harmless.

3. The compresor compartment is wide open in the rear but otherwise not touchable by the user. However, there's no exposed electrical wiring to touch. Everything is insulated. In this regard it is no different than the unmodified freezer.
 
one more question? Am I correct that you are using the the controller to switch the power to the wall wort verses useing a relay to switch the output of the wall wort?
 
one more question? Am I correct that you are using the the controller to switch the power to the wall wort verses useing a relay to switch the output of the wall wort?

That's correct. The controller can easily handle the wall wart in addition to the compressor.
 
Back
Top