it's a brutus 10!

Homebrew Talk - Beer, Wine, Mead, & Cider Brewing Discussion Forum

Help Support Homebrew Talk - Beer, Wine, Mead, & Cider Brewing Discussion Forum:

This site may earn a commission from merchant affiliate links, including eBay, Amazon, and others.

midnightbrewing

Active Member
Joined
Jun 4, 2011
Messages
36
Reaction score
6
Location
Boise
about 18 months ago, a late night searching the forums here led me to this thread: J Landin brutus 10 build and my jaw dropped. This has everything I want!

Months of head scratching, saving, spending and designing followed - and as of a couple days ago I have a fully functioning brutus 10-style brewing rig!

The original forum above is 38 pages of (mostly) terrifically helpful ideas. the non-helpful ideas are my lame question posts which, looking back, I'm like - duh!!! why did I have to ask that!?

Anyway... some pictures and descriptions follow of what I did to make it my own.

8124064525_a393bbd3de_z.jpg


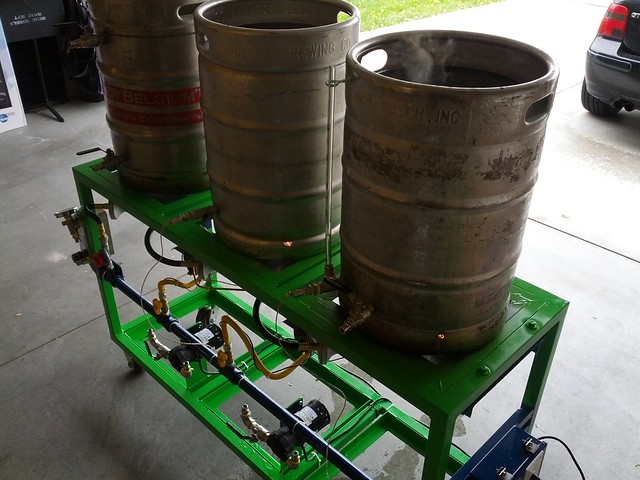
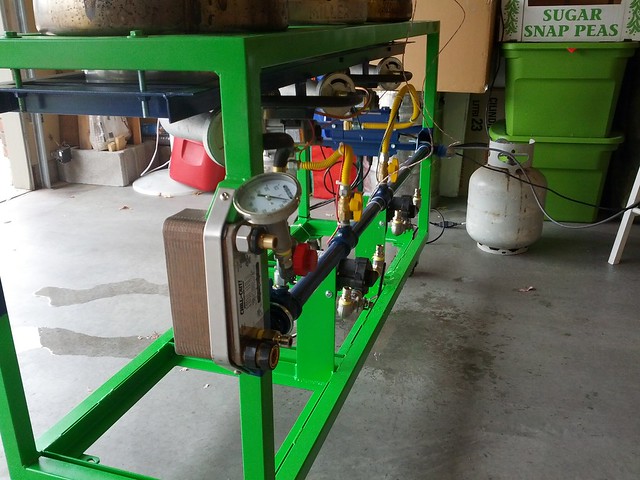
Loved the idea of storing pots under the stand... so the dimensions and direction of the angle iron were with that in mind. 20x30x60

my welding buddy bought some of the stuff new, but we used a lot of scrap he had laying around - and that was a terrific $ saver.

He and I were both comfortable going with 1" gas pipe instead of welding a manifold shut. we welded wings onto the frame, and fit the pipe in with U-bolts. plenty of rectorseal and away we went.

8124085860_fd31ae9d2d_z.jpg


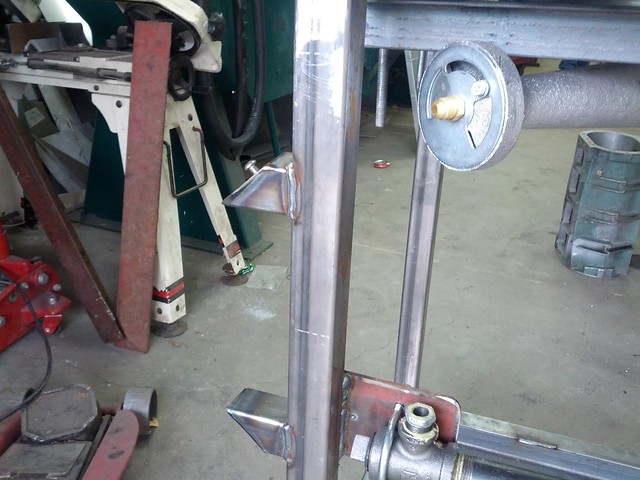
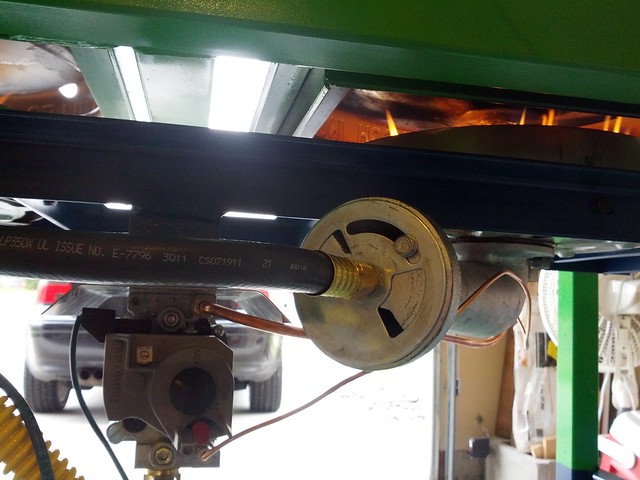
Notice the triangle wings on the outer left of the frame. those come in real handy later. Those are the BG-14 kickass banjos. very affordable from agrisupply, but the wait was over 4 months on backorder. not a problem for me building this sucker 3-4 pieces at a time.

8124063345_85e900bb67_z.jpg


Those are high-pressure, so as others have done I drilled out a larger hole in the oriface. 2.3mm was the size I liked. take it slow. I broke 2 tiny drill bits on 3 burner inlets because I was impatient. If I want to go back to natural gas, I just need to drop $20 or so for some new inlet adapters.

8047932219_b569936007_z.jpg


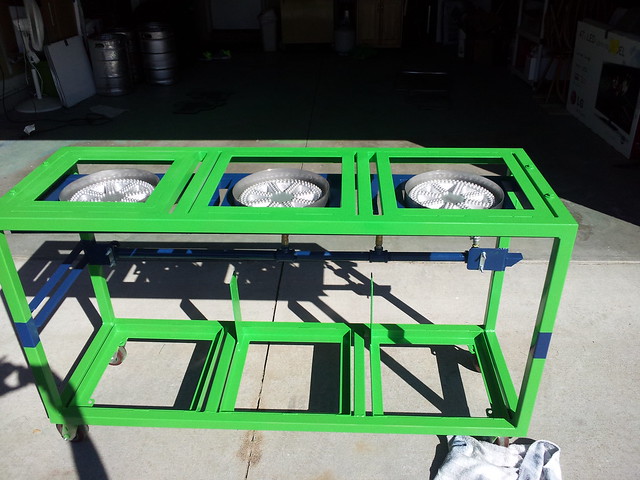
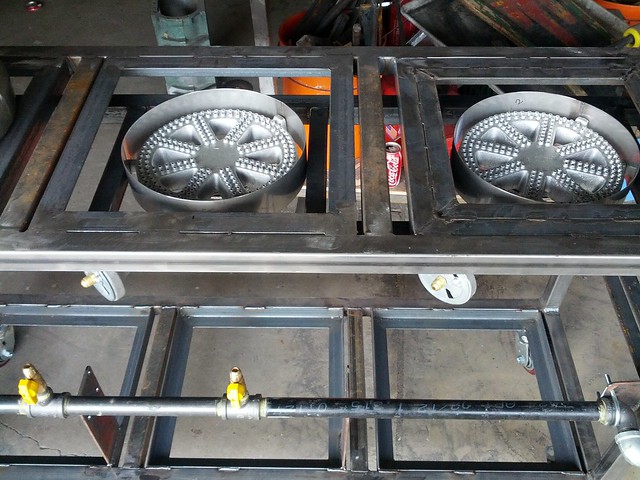
paint job! I used header paint from a local autoparts store. 8 cans in all, 3 primer, 3 green and 2 blue. The paint looked great initially, but scratches easily and discolored quite severely around the burners during the first burn.

8124060415_23a81ddd9b_z.jpg


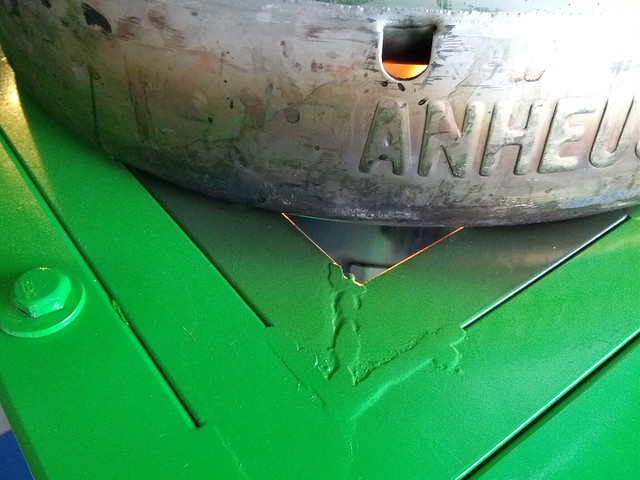
that was after about 20 minutes. it's MUCH darker now. but it's a burner... it is what it is. I might take another shot with a different style paint later but for now I'll be brewing beer not winning beauty contests. If the Seahawks win the super bowl or something... that will probably tip the scales for a touch-up on the paint.

more on the way.
 
time for the controller:

8124084744_a789c1b257_z.jpg


I laid mine out a little differently than many others I've seen here. it goes horizontal, with the 2-way switches going up (with a red LED) for manual fire, and down (with yellow LED) for PID control. My stand goes right-to-left for no other reason than that's how my cobbled together previous setup went.

the red rockers control the two pumps and I placed them on the box relative to where they are on the stand compared to the burners. I'm not a big fan of labels, so I'll probably just put two on the top for MT and HLT.

The other thing you don't see is a whole bunch of connectors. I had some multi-pin cables laying around and decided to go with a 15-pin d-sub connector at the control box.

I'd hoped to run the voltage for the PIDs over this cable as well (engineers at work showed me examples of up to 45v running over small gauge cable) but this idea came before realizing the auber PIDs required full 110v power. So my single-cable control box idea was gone - but 2 cables was better than 7 (including 2 full size pump plugs) so I went with that.

8124083994_01d9eecd47_z.jpg


I picked up a hinged metal box at a local used electronics/gadget/stuffyou'dnevereverneedbutisreallyfreakingcool store. If there's one of those in your area - check it out. I got most of the little component pieces for the stand there and it was pretty inexpensive.

8124080264_0a16c70757_z.jpg


in the control box lives the 24vac transformer, the 2 PIDs, switches, LEDs etc. It's not really pretty but it's tied together via terminal strips. That just made it really easy to tie down the loose ends of the multi-pin cable.

The pumps both came with finished plugs on the end, and I didn't want to cut those off to wire them directly in so I picked up a couple of 24vac relays and use those to trigger the pumps.

The junction box on the brew stand has the double-plug for the pumps, the 2 relays, the main power switch/fuse (old computer power supply plug) and a single outlet on the main face which powers the control box.

I used a 4-pin CB microphone connector and combined the cables to both gas valves into one connector. I got the panel mounts for the RTD sensors and those are in the junction box as well.

Other than the PITA to source the pinout of the scrapped multi-pin cable, which really only took 20 minutes after I got going, the problem I ran into with the electronics was that the LEDs weren't passing the voltage on to the gas valves when wired in series. My 2-way switches were DPDT so I just wired the LEDs to the second pole and kept the 24vac direct to the valve or the PID separate from the LEDs. Other than that - the wiring was pretty straightforward.

8124060911_b906dcce1b_z.jpg


8124062659_fdce7dcbde_z.jpg


I used 1/2" gas line to the valves, and 3/8" from the valve to the burner b/c that's the size that came with the Banjos. after converting the valves to LP (and finding the conversion spring after I thought I'd thrown it out and ordered new kits) and adjusting the intake pressure I got a pretty nice mostly orange flame. opening the air intake changed it entirely to blue, and in my boil test I was getting about a 5-degree increase every 90 seconds or so on 4 gallons of water.

I got a 1-30 psi regulator for the boil burner - but I think that's the one thing I'll change. The regulator orifice is 1/8" in and out, and there isn't as much control of the flame as I'd thought. Many folks have just used a regular valve and dialed back to reduce the flame. don't know if I'll go that route yet.

the entire burner rack is adjustable, and I found about 2.5" to work pretty well. the gas valves are mounted on L-brackets made out of 2" angle, and so they sit pretty deep. There actually isn't much more room I could drop the rack away from the burner and still be able to get the keggles in underneath. The windshields work well, but If I'm brewing on a windy day, I'll probably drop the flame a little bit with the yellow gas ball valves and raise the rack a little bit.

The pilot lights are screwed into a piece of stainless welded to the windshields. I didn't want to cut into the banjos.

8124061457_6d7476b26b_z.jpg


remember those triangle wings from the first post? along with a bent stainless strap and a couple rubber grommets, they make the perfect fit for the plate chiller... and it's easy to get on and off for cleaning/sanitizing.

Other notes: the gas pipe isn't exactly flush with the front of the stand, and so it prevented the pump in/out from sitting horizontal. Didn't really bother me, but I did have to buy a couple more 304 elbows than I'd planned to.

I'd also spring for some locking wheels. I went with some 4" rollers from secasterco on ebay - but I didn't get the ones with the wheel locks because apparently I was asleep at the wheel. Think I'll be investigating some add-on locks in the future.

This was a really fun project. time consuming and spendy. The boil test went terrifically... I can't wait for the first brew day!
 
speer: LP after drilling the burner orifices and converting the gas valves intake pressure springs with the kit.

I think I got the pictures worked out. Took me a bit to realize photos from flickr couldn't just be linked in with the IMG tag. I'm still kind of a rookie forum poster. :)
 
2BeerSpeer said:

Grr. They showed up on my screen when I posted but now looking from a different CPU, it's blank placeholders. I'll try again later. No time now. #showoffFAIL

{edit}

got em. had been copy/pasting the wrong link. Guess it's been longer than I thought since my web coding days in HS. Thanks for not flaming me over the broken links (even though I deserved it!)
 
You could put them in a set on Flickr and post the URL for the set in the short term. We want to see your set up!
 
What size tubing did you use? 1.5" square for most of it I assume since your outside dimensions were 23x30x60 and you need room for a 16" keg inside. Also, what wall thickness did you use? I was thinking teetering between the 1/8" and 1/16" wall thicknesses. I would think it would be plenty strong even with 1/16" 1.5" SQ tube since its only holding a static load of a little over 500#. As soon as my infant son decides to give me time...something along these lines will be my new brew stand. Great job BTW.
 
I am in the process of building my gas system for my brutus with 1/2 pipe. Will the honeywell vr8200 screw onto the 1/2 " pipe? I was wanting to use the gas beam to support the honeywells and run flex pipe to the bg14.

ForumRunner_20121030_132811.jpg
 
Carl,

It's 1.5" tube, at (I'm pretty sure) 1/8" thickness. This project goes back quite a while, and I did it with a friend who fabs stuff who took some of what he had laying around in his garage, and bought what was needed to match it.

I designed mine to be built to handle keggles, or possibly 1/2 barrel pots down the road. Those wouldn't fit underneath for storage, obviously... but if I "need" to brew on that scale I'll probably have converted most of the garage and space won't be as much an issue as it is now. :) My designs (for the weight of a 1/2 barrel brew) were what he based the material off of, and I'm 99% positive it was 1/8" thick. If I hear different, I'll update this post.
 
Hall,

yes, the VR8200 valve can sit on a rigid piece of gas pipe. The unit comes with an adapter for that. That's not a bad idea, actually - but I don't know if I'd want my valves down that low.

edit note: It might be a little late now, but if your unit will be on LP you might be far better served with 1" main pipe. That's what I did, and the reduction to 1/2" happens at the T. BG14 connectors are 3/8" so I used a reducing street elbow for the output of the valves.
 
hall85296, I like the simplicity of the top of your stand where it holds the keggles...but I'm wary of a cantilevered design for my own stand as my welding isn't the greatest and I think the diagonal keggle supports that make a diamond shape look stronger. What kind of weight would these support...I'm looking at making mine out of 11Ga or 1/8" wall tubing. If this design is plenty strong I might go this route or something similar with the cantilever coming off of the middle of the tubes versus the corners. Attached is my design with 1.5" square 1/8" tube and is 60"W x 30"H x 20"D. Let me know what you think.

brewstand.jpg
 
Hall,

yes, the VR8200 valve can sit on a rigid piece of gas pipe. The unit comes with an adapter for that. That's not a bad idea, actually - but I don't know if I'd want my valves down that low.

edit note: It might be a little late now, but if your unit will be on LP you might be far better served with 1" main pipe. That's what I did, and the reduction to 1/2" happens at the T. BG14 connectors are 3/8" so I used a reducing street elbow for the output of the valves.

1/2" black pipe is more than adequate for running LP to the BG-14 burners. Here is a picture of my set up that has been up a running for about a year now.

13 Burners.jpg
 
How does everyone seem to know how to set up or even what the electrical panels do? Is there an awesome guide/resource to read up on that anyone is fimiliar with? These all seems interesting but very complex to me.
 
Drew,

I did a lot or research, but I have a pretty solid background in basic electrical work through theater, A/V and physics classes (15 years ago, ha). most of this stuff is pretty straight-forward low-voltage DC circuits.

think of your switches and receptacles as 'in' and 'out' pass-throughs... where one end of your transistor feeds the in, and the out returns to the other transistor cable. it's a one-way flow.

This is the basic schematic for something like this: https://www.homebrewtalk.com/f51/my-new-brew-system-brutus-10-some-nice-modifications-172927/index9.html#post2065929

I invested in a digital multi-meter for reading current/voltage years ago. Great tool for projects like this: that way you can see what sort of juice you're passing to a certain point without risking burning out your equipment if you wired it wrong and just turned it all on.


At the end of the day... don't do anything you're uncomfortable with electrically. Too much risk of ruining your gear or yourself.
 
Love the stand and the colors! I'm working on a stand of the my own and getting ready to start wiring the internals for the control panel. What connectors are you using to send the 24v to the solenoid? I'm having a hard time finding something to you use and it would be very helpful if you could outline the the type of connector.
 
I went with a 4-pin audio connector from radio shack. it's for a HAM radio typically, but I wanted it for the 4 ports. that plugs in to the box on my stand carrying BOTH valve signals.

I did this because I had some cable laying around which was 2-wire and 2-wire molded together. you know, the kind you can pull apart separately like old school stereo headphones (but bigger gauge).

so a single cable leaves the connector, one side gets pulled off for the first valve connection and the other side goes a little further.

basically, you can use whatever sort of connection fits the design you want: 2-pin, 6-pin with only 2 or 4 in use, etc. low voltage makes it pretty adaptable.

Good luck!

Thanks! After talking with the guy at my local electronics store I can use just about anything. as you mentioned the low voltage makes it adaptable. For ease of use and installing I with a 3.5mm (headphone type) connector and panel mount.
 
Back
Top