Love Controllers

Homebrew Talk - Beer, Wine, Mead, & Cider Brewing Discussion Forum

Help Support Homebrew Talk - Beer, Wine, Mead, & Cider Brewing Discussion Forum:

This site may earn a commission from merchant affiliate links, including eBay, Amazon, and others.

The Pol

Well-Known Member
Joined
Feb 12, 2007
Messages
11,390
Reaction score
117
Anyone use them? Anyone know anything about them? I need some controllers, the JC controllers are $90, the Love controllers are $45 and look better in a control panel. Pros, Cons? I need to run a march pump off one, still trying to find a way to get a propane burner running off one as well.
 
Seems to be the controler of choice, I just got two for my next upgrade and I use one for a lagering fridge.
 
I am about to order two for my brewery. I don't know much about them, but you might want to check out Brutus 10 build in November '07 BYO. Lonnie Mcallister uses them with Asco solenoid valves and standing pilot to control burners. More info on this in other threads.
 
I use one on my Lagerator, and I am adding one to my kegerator. They really do have a nice look to them when installed. I like Ranco the best, but these look like they belong/were bought installed. I was kinda pissed though, I ordered one thinking it would say Love with the heart on it and it didn't. They sale to a lot of secondary companies, and I assume that is where mine came from. My mom's maiden name is Love, and I have boxes and stuff from the Love box company in Oklahoma City, so I thought it would be cool, but hey, it works just fine. I highly recommend them.
 
Where can I find information about the pilot and solenoid to control a burner. I have been searching all morning, must not be used very widely!
 
The Pol said:
Where can I find information about the pilot and solenoid to control a burner. I have been searching all morning, must not be used very widely!

The best place is BYO issue complete with schematic, drawings, and photos. Here is a link to Brutus 10 site. He uses thermowells (more beer) in the kettle lids for the probe of the controller which should not be submerged. The pilot is a drilled plug, teed off the gas line in front of the Asco valve and regulated with a gas ball valve. Try searching asco on this board for more information.

http://www.alenuts.com/brutus.htm
 
Let me know how these work. I am trying to set up an electric heat element to my HLT so I do not have to het a 3rd burner. I have spent all day at Lowes and Home Depot and I am getting pissed. All the thermostats only go to 150 degrees and I can't get all the parts together to install the element.

I think I am just going to strait weld the thing into my keggle and direct wire it to a controler like a Ranco; just trying to find a cheaper way
 
beeraggie said:
Let me know how these work. I am trying to set up an electric heat element to my HLT so I do not have to het a 3rd burner. I have spent all day at Lowes and Home Depot and I am getting pissed. All the thermostats only go to 150 degrees and I can't get all the parts together to install the element.

I think I am just going to strait weld the thing into my keggle and direct wire it to a controler like a Ranco; just trying to find a cheaper way

here is a thread on electric hlt's.

https://www.homebrewtalk.com/showthread.php?t=44509&highlight=heating+element
 
beeraggie said:
Let me know how these work. I am trying to set up an electric heat element to my HLT so I do not have to het a 3rd burner. I have spent all day at Lowes and Home Depot and I am getting pissed. All the thermostats only go to 150 degrees and I can't get all the parts together to install the element.

I think I am just going to strait weld the thing into my keggle and direct wire it to a controler like a Ranco; just trying to find a cheaper way

I just did the Ranco thing and hot water element to my HLT.

https://www.homebrewtalk.com/showthread.php?t=49928
 
I like my TS-13010. The instructions with it aren't that great, but once you figure it out, it's not that bad. I like that I can use it for both heating and cooling.

controller.jpg

http://brewing.lustreking.com/gear/tempcontroller.html
 
kladue said:
Here are a couple pictures of pilot burner assemblies mounted on burners, ignition is by a Honeywell S87D 1004 ignition module. http://picasaweb.google.com/kevin.ladue/PilotLights, here is the ignition module and valves http://picasaweb.google.com/kevin.ladue/IgnitionModuleAndMassflowController/photo#5157701513186974322

kladue, i have been studying your pics in another thread. I really love the idea of the iignition system, but this is beyond my capabilities. If one wanted to have this kind of work done. what type of professional should one hire? i will probably opt for the standing pilot unless I can find someone to turnkey it for me.
 
How can I make a standing pilot without blowing myself up? That is my only option if I want to place an LP gas solenoid controlled by a JC Controller on my keggle... that would rock. How do you make a pilot, could you simply modify a small propane torch head? I would simply make a "Y" in the gas supply tubing and use a separate valve to control the size of the pilot...

Hmmmm
 
The Pol said:
How can I make a standing pilot without blowing myself up? That is my only option if I want to place an LP gas solenoid controlled by a JC Controller on my keggle... that would rock. How do you make a pilot, could you simply modify a small propane torch head? I would simply make a "Y" in the gas supply tubing and use a separate valve to control the size of the pilot...

Hmmmm

Dig this from colplink: "Hi ......
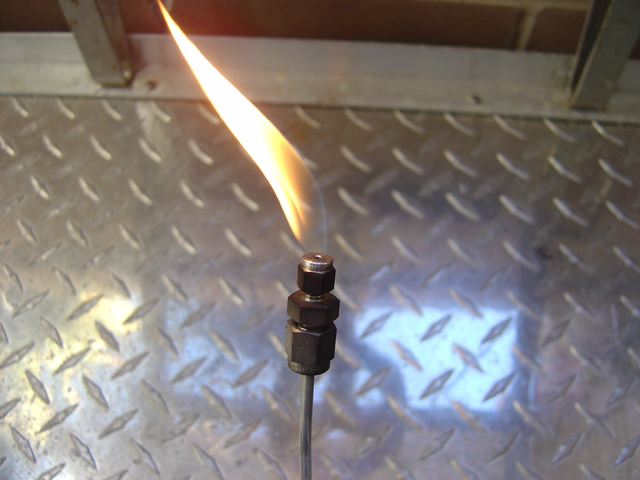
You know when I built Brutus 5, I had high pressure burners and a single capillary tube plumbed to the burner with a fitting and a single hole for the pilot. I had it positioned just a bit below the burner because when the burner lit it would snuff the flame out on the pilot. Once I found the right position for the single pilot it worked GREAT with my high pressure burner!

Look at Brutus Ten carefully and you can see that running the pilot is very easy in spite of the fact that I may have talked it up, and it will work for you. You simply need to get a small adjustable flame next to your burner. It may take a little fiddling, but it works… "

"Mine was a very small dia SS tube with a swagelok fitting."


pilotlite.jpg
 
that is sweet, how did you get it reduced like that to such a small tube?, how do you control something so minute??
 
If I have a JC controller, can I simply wire my solenoid leads ino it, to the posts?
 
The Pol said:
that is sweet, how did you get it reduced like that to such a small tube?, how do you control something so minute??

It's not my work, so i can't say for sure, but this looks very easy. Tee your line, nipple to 1/2" gas cock, 1/2" M.I.P. X ?" Tube Swagelok adapter.
 
Here are a couple suggestions and cautions, yes you can operate the solenoid valve directly from the controller-but if pilot light is out and you are not there to shut it down, probably would go boom when it lights off from something else. Would recommend using a factory made pilot burner as it might be a bit more blow out proof than a drilled plug, you can find them on ebay for about $17-$18 or less in the auctions. Most will have larger orifices for NG so it would burn better if the orifice was switched to the smaller LP orifice, cost is between $10-$15 each. If you are using high pressure burners you should use a needle valve in the supply line to the pilot to regulate flame size. If you purchase the pilot burner with the ignition/flame sense electrode you can always wire it up later when you get an ignition module.
 
kladue said:
Here are a couple suggestions and cautions, yes you can operate the solenoid valve directly from the controller-but if pilot light is out and you are not there to shut it down, probably would go boom when it lights off from something else. Would recommend using a factory made pilot burner as it might be a bit more blow out proof than a drilled plug, you can find them on ebay for about $17-$18 or less in the auctions. Most will have larger orifices for NG so it would burn better if the orifice was switched to the smaller LP orifice, cost is between $10-$15 each. If you are using high pressure burners you should use a needle valve in the supply line to the pilot to regulate flame size. If you purchase the pilot burner with the ignition/flame sense electrode you can always wire it up later when you get an ignition module.

thanks for this post. You have me sufficiently spooked to go the extra mile and do this right. Now, to find someone to rig this up for me with an ignition module.
 
If you're interested, I have a Love 16010 Temp/process controller I bought on eBay but have never used. Part of a project I was too ambitious on.
 
The Pol said:
I cannot find that model in the net just yet... hows this one look? for $45!!

http://www.coleparmer.com/catalog/large_image.asp?img=9352010.jpg

Anyone ever wired up a Love controller? The power cord I am not worried about wiring in a pigtail, BUT what about the output? Can this connect directly to a solenoid? March pump? If so, that would be great.

That's the one I bought (actaully I bought two. I bought one to replace a thermostat on the dorm fridge we keep wine in. This is wired to a receptable like shown earlier in the thread. The second one is assembled and installed , but never used, is in my fermentation chiller, controling the fan. I haven't needed it as I switched from Belgians to lagers as my basement cooled off. It's now at 52F so I haven't needed the chamber. I'll test it out once it gets warmer. This controller is DIRECTLY wired to the fan

The controller on the fridge seems to very a bit. The readout will go +/- 2 F over the set point. The probe is just setting in the open. I think it would work better if enclosed in a container to slow temp swings. Plus, I hardly need the fridge now that the basement is only a couple degrees F over the set point.

Now wiring was a pain. They have programming instructions, but not wiring. The unit was labelled well enough so I wired it up as the post labels led me to believe, and it looked like it was working. I could program it. But it wasn't switching. I finally found this thread on the BrewBoard that explained the proper wiring.
http://www.brewboard.com/index.php?showtopic=53357&hl=love+controller
Basically it is a switch so only one of the power lines goes through the controller. The BrewBaord thread explains it very nicely.
 
Awesome link, very helpful, these controllers are so sexxy!
 
pjj2ba said:
The controller on the fridge seems to very a bit. The readout will go +/- 2 F over the set point. The probe is just setting in the open. I think it would work better if enclosed in a container to slow temp swings. Plus, I hardly need the fridge now that the basement is only a couple degrees F over the set point.

Yes, they do actually vary by 2 degrees, even with the probes tightly insulated, if you have the differential set to 1 degree, which is the smallest that it can be set at. I am using mine to heat my fermenters with a Fermwrap, so my temps go +/- 2 UNDER the set point. Which sorta makes sense; it is set at 66 degrees, and 66 minus 1 = 65. So it turns on the moment it hits 64 because 65 is still within one degree. Then it is on until it heats thru 66, and turns off as soon as it hits 67. A differential of 0 would probably give you an actual 1 degree range, but that is not available.

Another thing to keep in mind is that, like any thermometer, be sure to check for accuracy. Both of mine read 2 degrees warmer than 3 other calibrated thermometers. You can program for the difference with the P1 parameter in set up.
 
Back
Top