hey folks i just ordered a 7 cu ft chest freezer and while i'm waiting for it to be delivered I started going through the keezer threads. I'm new to kegging so couple questions about the conversions. I see most people added wood to the top of the freezer to give more headspace room, is this necessary? can i not just drill 4 tap holes through the side of the fridge? And if i do put the wood on top, i see how the door is attached, but how are you all attaching the wood to the rest of the freezer??
You are using an out of date browser. It may not display this or other websites correctly.
You should upgrade or use an alternative browser.
You should upgrade or use an alternative browser.
just ordered a 7 cu ft chest freezer...need help converting
- Thread starter dahray02
- Start date

Help Support Homebrew Talk - Beer, Wine, Mead, & Cider Brewing Discussion Forum:
This site may earn a commission from merchant affiliate
links, including eBay, Amazon, and others.
If you try to drill through the freezer you will hit the coils that are in the sides and make your freezer a huge piece of junk suitable only as a anchor. You can attach the wood to the freezer with caulking, when dry the stuff holds well. Others have used liquid nails.
hey folks i just ordered a 7 cu ft chest freezer and while i'm waiting for it to be delivered I started going through the keezer threads. I'm new to kegging so couple questions about the conversions. I see most people added wood to the top of the freezer to give more headspace room, is this necessary? can i not just drill 4 tap holes through the side of the fridge? And if i do put the wood on top, i see how the door is attached, but how are you all attaching the wood to the rest of the freezer??
You could, but why ruin it and void the warranty?
Put the wood collar on it. In case you need to have it serviced, quickly put it back to stock condition so that the service man won't tell you your warranty is no longer valid because you f'ed it up or used a temperature controller to run it as it has been documented in another thread here.
After the warranty runs out, then everything is fair game.
This is how I'd handle it.
Congrats and have fun with the new project/toy :rockin:
GulfCoastGirl
Well-Known Member
I see most people added wood to the top of the freezer to give more headspace room, is this necessary?
I think a lot of people do this so they don't have to worry about drilling into the refrigeration lines. Maybe not as much a worry if you got the freezer for free..... but a whole other story if you paid a few hundred dollars for it
")
Your taps would also be on the low side. Unless you are really short or built a platform to raise it up a bit, you would be bending over to fill up a glass.
If you don't want to put a wood collar on it you might want to take a look at some of the setups where they run taps out the top ( I think they call this "coffin style").
Here's a link to one of my favorite build threads. I love the keezer this guy built. https://www.homebrewtalk.com/f51/my-basement-bar-build-216039/
Think of the collar as the "tool belt" of the keezer. It's where you can hook up everything you need both internally and externally to your freezer, WITHOUT damaging or needing to modify the freezer itself. Many of us even use silicone caulk rather than glue, that way we can return the freezer back to normal, for instance if we need it repaired and it's under warranty.
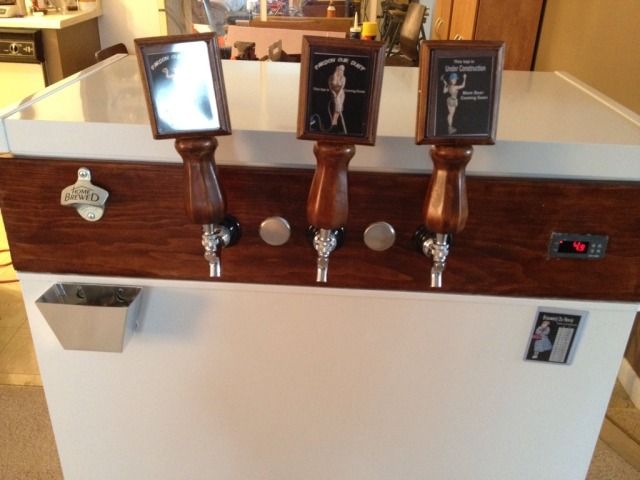
I'm in the process of finishing mine today. Here's pics of the outside and inside of the collar to give you an idea WHY a collar is a good idea.
The bottle cap holder, and the drip tray (which should be delivered on Monday) are held on by 3M "damage free" picture hangers.
The front with taps, bottle cap opener and temp controller.
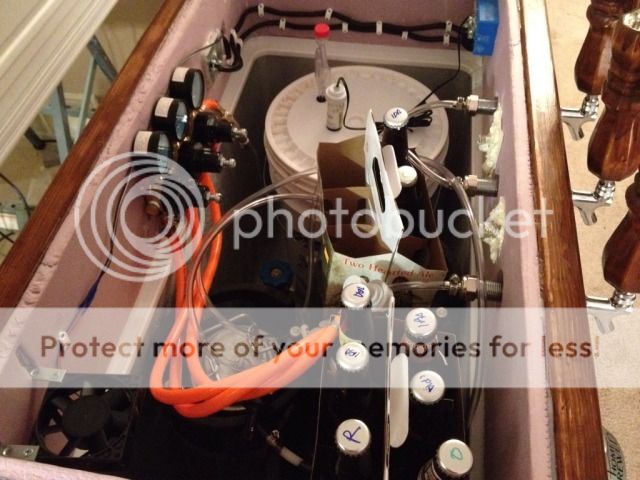
The guts, tap shanks, secondary regulator, and electrical- the temp controller, the temp probe (sitting in water inside the pill bottle on the fermenter bucket) and the power outlet in back.
The rear, where the freezer and fan plug into.

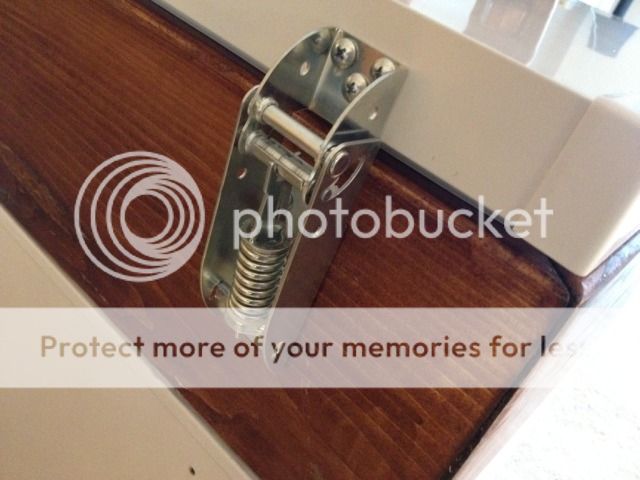
The hinges for the lid.
The fan to circulate air.

I'm in the process of finishing mine today. Here's pics of the outside and inside of the collar to give you an idea WHY a collar is a good idea.
The bottle cap holder, and the drip tray (which should be delivered on Monday) are held on by 3M "damage free" picture hangers.
The front with taps, bottle cap opener and temp controller.
The guts, tap shanks, secondary regulator, and electrical- the temp controller, the temp probe (sitting in water inside the pill bottle on the fermenter bucket) and the power outlet in back.
The rear, where the freezer and fan plug into.
The hinges for the lid.
The fan to circulate air.
wfowlks
Well-Known Member
I see most people added wood to the top of the freezer to give more headspace room, is this necessary?
No it's not necessary, however, if the freezer is not tall enough to store the number of kegs you want in it, it gives you some extra head room to work with. Also the compressor adds a hump to the inside, and it lets me put kegs on the hump where you wouldn't normally be able to.
can i not just drill 4 tap holes through the side of the fridge?
You could but as other people mentioned you could end up drilling through the cooling coils in the walls of your freezer, and render it useless... So why risk it.
If you build the collar correctly, it will fit snugly on there, I put a skirt on mine that tightly fits, and then put a little layer of the sticky weather stripping on there to keep the seal tight.And if i do put the wood on top, i see how the door is attached, but how are you all attaching the wood to the rest of the freezer??
I have opt'ed to build a pretty tall collar because I myself am pretty tall. I put a 1 foot collar on mine, and I like it so that I don't have to bend over to far when working on it.
Here is the link: https://www.homebrewtalk.com/f51/taller-collar-keezer-build-313157/
thanks for the quick answer...i'll go with making the collar....i dont have any experience working with wood nor do i have all the right tools...i'll have to figure that out, i think i'm going to get all the parts i need first then start working, i expect this to be spread across a couple paychecks
thanks for the quick answer...i'll go with making the collar....i dont have any experience working with wood nor do i have all the right tools...i'll have to figure that out, i think i'm going to get all the parts i need first then start working, i expect this to be spread across a couple paychecks
You don't have to go all fancy and use mitered joints like mine, which I had a brew buddy's dad do on a table saw.
The Northern brewer video shows how they did a very rudimentary keezer collar. They didn't even stain it.
You could do it with a hand saw, and you just also really need a drill, which can also use as a screwgun.
Bobby M's video helped me a lot as well, except he mounted his collar onto the lid.
It gave me some good ideas as to plumbing.
I also learned a ton from reading Carlisle Bob's posts in various keezer threads.
I know what you mean about spreading it between paychecks. Well, I'm over a grand into my keezer, (utilizing the collar design) including the $180 for my 7 cu chest freezer. It's got 3 taps though it can hold 5 kegs. I bought 4 kegs for about $140, Spent about $360 on on the co2 tank and regulator, and all the stuff necessary for the gas and liquid lines (including tap hardware and lines,) I spent about $160 for a secondary regulator. $30 for my Ebay Temp controller. The stuff for making my own taps (in THIS thread.) Everything else was lumber, stain, insulation, sealer, silicone, and all the miscellaneous hardware and crap from home depot and harbor freight, including the electrical stuff for the temp controller..
I also ended up buying an orbital hand sander and a saws-all from Harbor Frieght, and assorted drill bits and such..
I spent $44 on a 12" drip tray, and another $30 for old time bottle opener and cap catcher for decoration.
It came out to be much more than I expected, but I'm happy with it.
Last edited by a moderator:
wfowlks
Well-Known Member
thanks for the quick answer...i'll go with making the collar....i dont have any experience working with wood nor do i have all the right tools...i'll have to figure that out, i think i'm going to get all the parts i need first then start working, i expect this to be spread across a couple paychecks
When I did my collar, I had 0 tools (4 months ago). As I had just got my first place out of college. My landlord had a circular saw, which I used. You can also go to Home depot and have them cut the pieces exact if you know the dimensions.
If you post the external dimensions of the freezer, I can help you with figuring out the wood piece sizes. The only thing that is really tricky, is remembering that the wood takes up some width too.
this is the one i ordered....i can post dimensions once i get it and come back from my honeymoon, getting married next saturday
http://www.homedepot.com/buy/applia...-chest-freezer-25017.html#product_description
http://www.homedepot.com/buy/applia...-chest-freezer-25017.html#product_description
Photopilot
Well-Known Member
wow those videos makes this seem super easy...i'm way less concerned now
Yes it is not that hard. Mine was much harder to do because I have lots of tools and wanted to use them all.
You've gotten some good advice so far but want to throw a few more suggestions out there. The cheapest way to tool up is to get a circular saw. I payed $25 for one from CL when I lived in Austin 7 years ago that is still holding on strong. I payed as much to upgrade the blade for a 60 tooth blade which means cleaner cuts and less sanding later. A speed square will help you make clean straight cuts with the circular saw.
If you are going to buy an inexpensive drill get a corded one, it will last longer. If you are willing to spend $125 a corded drill, like the one shown will be your favorite tool. Get something like a quick change drill driver for the drill. This will allow you to make a tapered hole for the screw before screwing it in, guaranteeing the wood won't split and the screw is countersunk.
If you want to stain it, you are going to want to sand it, so a Random Orbital Sander will make it so you don't hate woodworking after your first project.
I doubt they rent circular saws but some of the other tools my be available at Home Depot.
The hinge on this freezer looks just like mine. If so there is a hole in there that you can insert a long nail that will keep the hinge from springing up if you are doing it solo. The hinge also has keyhole slots so you don't need to remove the screws all the way but can just loosen them then slide the lid up and off.
Consider using a taller collar, using 2x6 or 2x8s, if your freezer has a compressor hump like the one in the video. A couple inches more in height may allow you to use the space over the hump for another keg or CO2 tank.
Have fun on your honeymoon. Good luck with your build.
wfowlks
Well-Known Member
Consider using a taller collar, using 2x6 or 2x8s, if your freezer has a compressor hump like the one in the video. A couple inches more in height may allow you to use the space over the hump for another keg or CO2 tank.
Have fun on your honeymoon. Good luck with your build.
+1 to the honeymoon ... I am walking the plank in October
I went 1 foot with my collar and I am very happy, you just need a good fan inside, I experienced that when my kegs froze. But I have yet to have that problem once I upgraded my fan
Photopilot
Well-Known Member
One more thought. Not sure how many taps you are putting on initially. Measure your freezer and compute its capacity. If it can hold 6 kegs drill that many holes. I started out with a $50 freezer. I determined it can hold 8 kegs. Even though I only owned 5 taps at the time, I laid out and pre-drilled for 8 tap holes. I then used some wood filler (you can also use glue and saw dust from your cuts or sanding) to fill the small pre-drilled holes I did not use. Pre-drilling means before you take final sized drill bit which may walk and wander if you don't predrill, start with a small drill maybe 1/8" to make the first hole, then work your way up to larger drill bits. If your final drill bit is a spade you won't need to work your way up, go straight to it after predrilling.
My collar is 6", I don't have a fan and never had a problem. The walls freeze up but never a problem with the keg. Seems like most add a fan, so maybe I just got lucky.
My collar is 6", I don't have a fan and never had a problem. The walls freeze up but never a problem with the keg. Seems like most add a fan, so maybe I just got lucky.
chumpsteak
Well-Known Member
I used 3/4 or 5/8" plywood with 2" foam insulation I had leftover from my fermentation chamber build. Mine sits in my garage, looks halfway decent, and is fully functional. My collar is not attached to the freezer at all other than with hinges. I bought some weather strip at Lowes for the bottom and the freezer lid already had weather strip. The collar is attached to the freezer using the original hinges and I bought a couple of cheap hinges to attach the lid. The benefit of the double hinge setup is that you can open the top lid for quick checks and pressure adjustments, and you can also lift up the collar and taps to get all the hardware and lines out of the way when you want to lift the kegs out.
Anyway, here's my getto garage keezer....oh, and I don't have a temp controller, I just tweaked the spring on the freezer's thermostat and I can maintain anywhere from 32 to 45 degrees.
Anyway, here's my getto garage keezer....oh, and I don't have a temp controller, I just tweaked the spring on the freezer's thermostat and I can maintain anywhere from 32 to 45 degrees.
Photopilot
Well-Known Member
My collar is 1x6 and has insulation on only 3 sides. My concern with 1x10 would be cupping a from of board warping if you don't seal it properly. I'd say you would be better with 2x material or plywood.
I used 3/4x10 and had no warp or cupping issues. I have had the kegerator in service for 2 years so that should not be a problem. I did poly the collar inside and out. The benefit of thinner material is weight since my collar is hinged to the freezer and lifts with the lid.
GulfCoastGirl
Well-Known Member
this is the one i ordered....i can post dimensions once i get it and come back from my honeymoon, getting married next saturday
http://www.homedepot.com/buy/applia...-chest-freezer-25017.html#product_description
I just bought the same freezer at Home Depot on sale for $178.00. It will be delivered this week. I'm going to order some SS perlick faucets today and I already have the Johnson temperature controller, kegs and regulator.
I'm really excited about this as I don't like the picnic tapped kegs in my garage fridge. I'm still a little confused about all the little odds and ends (connectors, washers and other do-dads) but I'm sure I'll figure it all out.
I'm planning on putting 4 kegs in mine

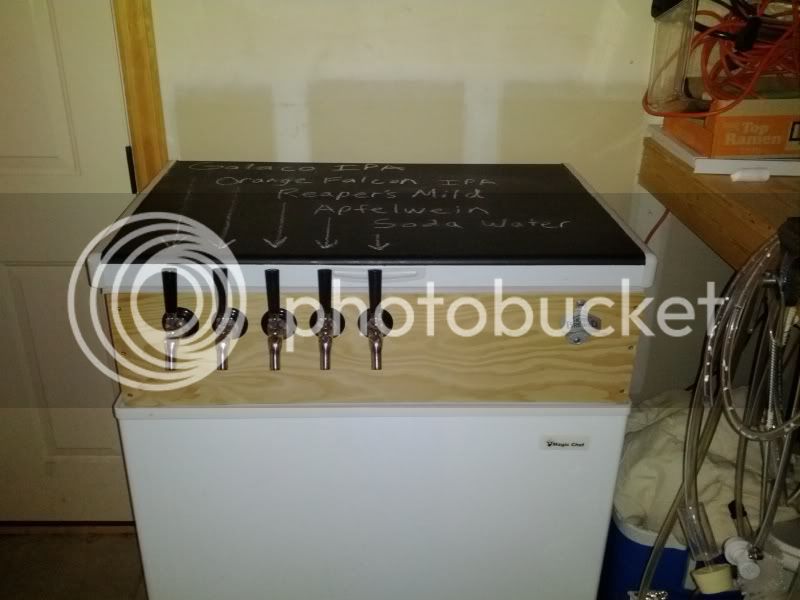
back from the honeymoon...so far all i've done so far is paint my freezer black...i just got back in town last night. I'm going to go get some wood for the collar, any suggestions on what type?
edit...i plan on using poplar. Here's what it looks like so far and the three paints i used. Chalkboard on the lid, i put a longhorn sticker over the silver then painted over it with black and removed the sticker


edit...i plan on using poplar. Here's what it looks like so far and the three paints i used. Chalkboard on the lid, i put a longhorn sticker over the silver then painted over it with black and removed the sticker
wfowlks
Well-Known Member
did you decide how tall the collar is going to be yet?
Photopilot
Well-Known Member
dahray02 said:Yeah i did 8 inches...and i used cedar instead of poplar....just cuz of the huge price diff
Good choice cedar is nicer looking to me, poplar is kind of green and stains funny. Surprised the cedar is cheaper. Is it knotty?
wfowlks
Well-Known Member
How thick is the board?
With the 8 Inches high collar, I would suggest getting some of the 2" EPS (Expanded polystyrene foam) from Home Depot/Lowes to line your collar, anything less you will be losing a lot of cold, hence costing more in electricity.
With the 8 Inches high collar, I would suggest getting some of the 2" EPS (Expanded polystyrene foam) from Home Depot/Lowes to line your collar, anything less you will be losing a lot of cold, hence costing more in electricity.
How thick is the board?
With the 8 Inches high collar, I would suggest getting some of the 2" EPS (Expanded polystyrene foam) from Home Depot/Lowes to line your collar, anything less you will be losing a lot of cold, hence costing more in electricity.
board is 1" thick...thanks for the suggestion for the foam


GulfCoastGirl
Well-Known Member
What is the chain on the side for?

wfowlks
Well-Known Member
Ah the Perlick Faucets. I remember dropping a cool $250 on the 4 of them with shanks, just a few months ago. Not a fun wallet day

Niiiice!!!!!
Daddy_Hawk
Member
Looks really nice, always good to see something "custom" on it to make it your own! Like the longhorn
pedimac said:Hook 'em! My wife and I are both Texas alums, and your pics just convinced her to let me build a keezer. I salute you.
Good to hear!
Similar threads
- Replies
- 4
- Views
- 433
- Replies
- 0
- Views
- 1K
