5 Gallon Brew Rig - Now with DIY Tippy Dump!

Homebrew Talk - Beer, Wine, Mead, & Cider Brewing Discussion Forum

Help Support Homebrew Talk - Beer, Wine, Mead, & Cider Brewing Discussion Forum:

This site may earn a commission from merchant affiliate links, including eBay, Amazon, and others.

-TH-

Well-Known Member
Joined
Oct 22, 2008
Messages
913
Reaction score
110
Location
Zeeland, Michigan
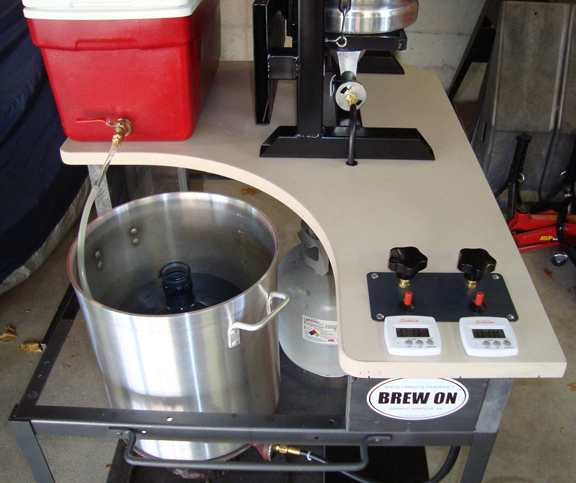
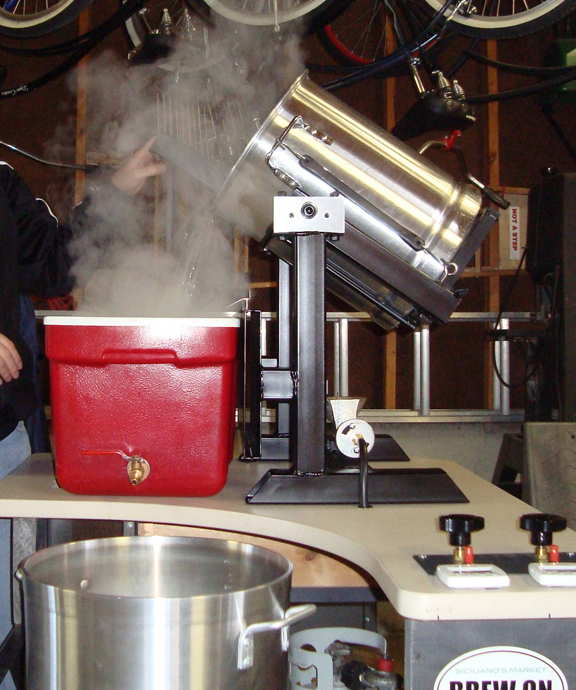
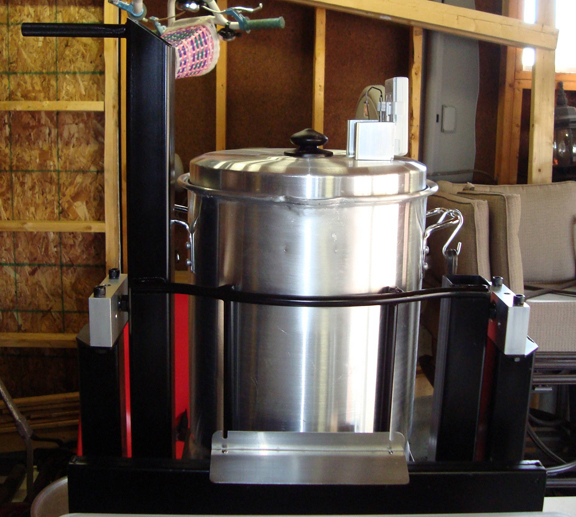
My ever-changing rig has been modified again. This time I built a tippy dump for it. I really like it for batch sparging, and I also use it to dump the grains when doughing in which makes it easier to stir at the same time. Also having a 2nd burner is nice too. Of course it has a piezo igniter just like the main burner. Enjoy the pics...
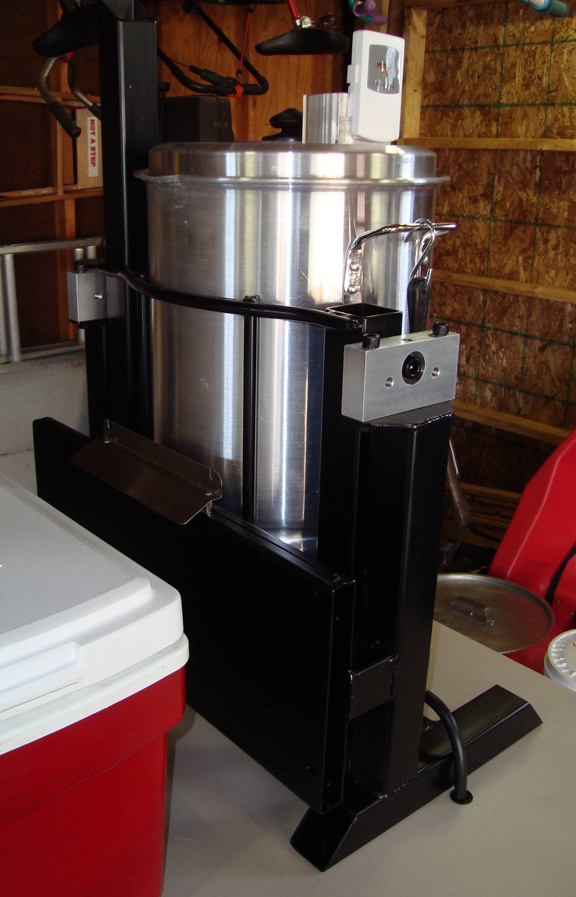
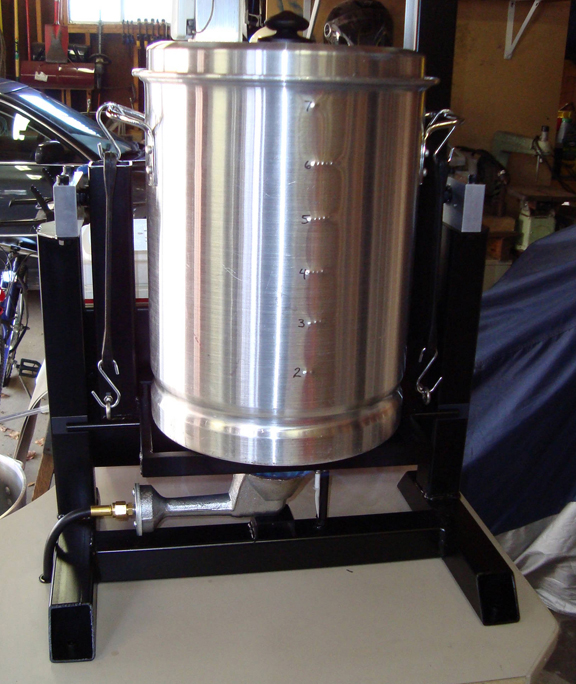
STAND15.jpg


STAND26.jpg


POUR1.jpg


POUR2.jpg


TD1.jpg


TD2.jpg


TD3.jpg


TD4.jpg


TD5.jpg


TD6.jpg
 
I've always wanted a tippy dump, ever since I saw them on morebeer. I love the idea- you can add your grains easily! I stand on a stepstool with a bucket in one hand and a mash paddle in the other and I always wish there was a better way.
 
That's the first time I've seen a tippy dump HLT. All the others I have seen have been tippy dump mash tuns, to dump the spent grains that is. I'd be just a tiny bit concerned dumping all the hot water towards you though.

Kind of make me wonder WTF, but hey if you can build it (and use it safely), then why not...
 
I totally dig your set up... I have seen pics of it before and think its pretty much perfect.


I have a small garage that I brew in and thats like the prefect set up.
 
... I'd be just a tiny bit concerned dumping all the hot water towards you though...

I know it looks that way in the picture but it feels very safe - much safer than when I used to pour it in manually. I spent a lot of time planning the pivot point so that it would be nice and stable when upright but yet not too heavy to pour. The long lever arm works great for that. Also, it needed to tilt in a way that the lip of the pot stayed in as much of a vertical plane as possible so that water would fall nicely into the MLT when it first starts to pour all the way through the tilt (not sure if that makes sense). I had to experiment on AutoCAD a bit until it looked like it would pour good (is that better?). After I trying it out I would say the final product exceeded my expectations.

Excellent craftsmanship! Nice hinges, and I like the powdercoat!

Thanks, but I only wish it was powdercoated. I sprayed it with a can of high-temp engine paint.

That is pretty awesome. I mean, it's total overkill for 5-gallon batches, but what the hell -it's awesome!

No doubt - total overkill. But that's how I roll.

I was originally going to wait to build the tippy dump until this rig was doing 10 gallons but that might be a while due to cost of replacing the BK and MLT, plus my only option for cooling during the winter is to lug the hot wort down to the basement where I hook up my chiller to the utility sink.

The whole tippy dump was pretty cheap project, I spent about $30 on steel, $10 or so on a burner, and a few bucks here and there like paint and rubber straps, etc. A few parts like the bearing blocks were scrap or used parts from work.
 
Awesome idea and design. After looking at all your DIY projects, you should make a book, "DIY for Dummies" and do some of these designs. I'm sure many people here would put them into action.
 
Nice work TH - well done! I like the table & cutout for the boil kettle too. The layout works well for a gravity fed system.

Kal
 
With those skills, I think you should turn the table into a milling station/grain storage and get busy designing a stand. You could go totally custom....IIWY I'd do something like THIS MOREBEER SCULPTURE and do some kind of CIP setup.

P.s. How did you weld/fabricate your stand?
 
Nice work TH - well done! I like the table & cutout for the boil kettle too. The layout works well for a gravity fed system.

Kal

Thanks, the table came in that shape because it was a work-surface which is normally used in a cubicle corner. I live in the same town as Herman Miller HQ and they have a company outlet store with all kinds of parts and stuff. That work-surface was $5.

P.s. How did you weld/fabricate your stand?

The key is in the design;) (can you tell I'm an engineer by trade?) I used 3 kinds of steel: 2" sq tubing, 1/2" x 1" bar, & 1/2" dia round. I can use my work's shop tools after hours which includes a horizontal band saw and a nice MIG welder. The curved 1/2" dia round piece I bent in a vice (took a few tries & pieces to get it right). The bearing pillow blocks were taken from a used machine that I saved from the trash. I welded large hex-nuts on to the tilt frame and then put socket head cap screws through the bearings and into the nuts.

Got any more info on this part?
controlsw.jpg

Custom made of course. Piece of sheet metal with 4 holes drilled in it (well 8 if you count the mounting screw holes). A hose from the propane tank attaches to a tee which is in between 2 flow-control valves. The stems of the flow-control valves stick up through the sheet metal (I replaced the knobs with different ones). On the output of each valve is a 90° elbow and then hoses that go to each burner. The igniters are just BBQ igniters I bought at Menards.
 
I've always wanted a tippy dump, ever since I saw them on morebeer. I love the idea- you can add your grains easily! I stand on a stepstool with a bucket in one hand and a mash paddle in the other and I always wish there was a better way.

I spent a day in our local brewery last week watching their process. To get the grain from the crusher to the kettle they have a flexible auger. A quick google shows these are used for feed systems. A few feet might not be that expensive.
 
Custom made of course. Piece of sheet metal with 4 holes drilled in it (well 8 if you count the mounting screw holes). A hose from the propane tank attaches to a tee which is in between 2 flow-control valves. The stems of the flow-control valves stick up through the sheet metal (I replaced the knobs with different ones). On the output of each valve is a 90° elbow and then hoses that go to each burner. The igniters are just BBQ igniters I bought at Menards.

Cool! I'm building a non-automated Brutus and having the control of my burneres handy would make brew day easier! I googled Flow control valves and kept getting industrial applications. Where did you get yours or what is the brand/type of yours?

So if I'm correct you have the LP coming to the system at high pressure and then those control valves are used to meter the burners? Thanks for the help!

Yes. There is a high pressure regulator w/ shut-off at the tank still that came with my turkey-fryer burner. I leave that wide open all the time and turn the tank valve off when not in use. So on brew day I just open the tank valve, then when I'm ready to fire up a burner I just turn the control knob a little and click the igniter.

I got the flow-control valves (it looks like the better search term would be "needle valve" instead of flow control valve - my bad) from our junk-drawer at work because we have tons of brass valves, etc. since we do a lot with hydraulics. I don't recall the brand but it looked something like this before I put diff knobs on it:
http://www.protanksupply.com/brass-propane-fittings_detail.asp?ID=3040

Before buying one I would make sure you can panel mount it.

Edit: another possibility?: http://www.bayouclassicdepot.com/nv108p_propane_burner_part.htm
 
Love your set up, have you done any other updates to it? I'm about to make the leap from extract and mini mash to all grain. What size cooler are you using for an MLT and are you using braid or PVC or brass pipe pick up ( cant remember what they are called right off hand ) in your MLT. Oh, and I noticed in your pics you were also pouring from a bucket, what kind of sparging ar you doing?

Sorry for all the questions, just really like your set up over the others I've seen.

I just realized that this thread is 2 years old

Hey thanks! Yes it has been in use for the last 2 years pretty much as shown (up until this month - which I will get into in a minute...) and I absolutely love it. Be aware that I tend to build things a bit unconventional, mostly due to the tools and materials I have available to me. My MLT is however quite conventional and is (or was) a 34 Qt rectangular cooler which worked fine but started to show its age and was a tad small for some of the batches I did. I picked up a 72 Qt cooler which is a bit overkill but I wanted to get into doing the no-sparge method. Before that I did batch sparging. In the bottom of the cooler I use a CVPC manifold with slots cut into the bottom of it, which is one of many common ways to go about that. I use the tippy setup to pour water from my HLT, but I also will put a bucket on there filled with my milled grains for when I dough in.

So anyway on to the present, I am in the process of going all electric and moving my stuff indoors. I have disassembled my stand in order to move the tippy contraption to its new location. I'll be sure to post once its complete...

Cheers!
 
TH, I appreciate the info. For some reason your "unconventional" method makes more sense to me. I'm in the process of modifying a store room in my garage into a brew room and was looking into a set up. I was going to make my HLT electric but was going to make my BK run off natural gas. I like the ease of gas for cooking, but the accuracy of electric for the HLT. Look forward to see the improvements you made.
 
I love this idea! Thanks for sharing. I'm curious about the 2 white controllers on the tabletop. Since it looks like your setup doesn't control for mash temps, what are these things? Are they remote digital thermometers for your boil kettle and HLT? I didn't see any temp probes running to those kettles though so I wasn't sure. Thanks again!
 
I love this idea! Thanks for sharing. I'm curious about the 2 white controllers on the tabletop. Since it looks like your setup doesn't control for mash temps, what are these things? Are they remote digital thermometers for your boil kettle and HLT? I didn't see any temp probes running to those kettles though so I wasn't sure. Thanks again!

They are just a couple of kitchen timers!!!

BTW I've since moved this setup to my basement and converted it to electric. Here's the thread: https://www.homebrewtalk.com/f170/th-s-somewhat-unconventional-e-brewery-384219/
 
The bearing pillow blocks were taken from a used machine that I saved from the trash. I welded large hex-nuts on to the tilt frame and then put socket head cap screws through the bearings and into the nuts.
.

What are the dimensions for the bolts/screws?
I am thinking about something similar using mounted bearings and struts but not yet sold on the size of the "shaft bolt".
 
What are the dimensions for the bolts/screws?
I am thinking about something similar using mounted bearings and struts but not yet sold on the size of the "shaft bolt".

I think they are 1/2" dia. alloy steel socket head screws which is more than big enough for what I'm using them for. What size are the ones you are considering?
 
I am thinking to use as shoulder screw this one: https://www.mcmaster.com/#91273a317/=15915vm
and as bearing: https://www.mcmaster.com/#7930k13/=15915hk

Bearing being mounted on strut-based "arms" and hold a 11gal Bayou Classic MLT with a pivoted swing.
Sorry I am not an engineer and grew up metric.

Yes that setup will be plenty strong enough. I see each bearing is rated at 1000 lbs dynamic load and probably a higher static load. A 1/2 SS screw has a shear strength of about 7500 lbs. So you could easily use those for 111 gal let alone 11.

The socket head screws I used are only partially threaded so they have a solid 1/2 shaft where there are no threads which work quite well as a "shoulder". 1/2" alloy steel screws have a shear strength of almost 20,000 lbs each. But I'm guessing you want stainless and like I said they will be plenty strong.

Feel free to post a pic when you're done!
 
That is some nice work. I love the overkill.

But, the tippy dump is on the wrong piece of equipment. A valve is easier, and probably safer, for transferring the mash water. Dry grain doesn't weigh very much. Where I would have put the tippy dump is on the mash tun to get rid of the spent grain. But, for a 5 gallon batch, even the biggest grainbill, when wet, is not that heavy. I just carry the cooler to the compost heap and dump it. Besides that after you dump it you still have to carry the spent grain somewhere.

Definitely overkill - is there any other kind? You're absolutely right about spent grain,etc. - I use a cooler so no need to tip that mechanically. As I mentioned in an earlier post, I moved the tippy dump to my electric system: https://www.homebrewtalk.com/showthread.php?t=384219

I still like pouring the HLT because I batch sparge and I don't have the ceiling height to go higher and I do not use pumps. Some day I hope to go bigger and then I would go pumps, recirc mash, etc. but until then this still works great for me!
 
That is some nice work. I love the overkill.

But, the tippy dump is on the wrong piece of equipment. A valve is easier, and probably safer, for transferring the mash water. Dry grain doesn't weigh very much. Where I would have put the tippy dump is on the mash tun to get rid of the spent grain. But, for a 5 gallon batch, even the biggest grainbill, when wet, is not that heavy. I just carry the cooler to the compost heap and dump it. Besides that after you dump it you still have to carry the spent grain somewhere.

But is soooo shiny ;-) :mug: :mug:
I am thinking more down the road as in "skip scooping grain piece by piece" and dump straight into trash bag or wheel barrow for composting.
 
Back
Top