Stc-1000 wiring

Homebrew Talk - Beer, Wine, Mead, & Cider Brewing Discussion Forum

Help Support Homebrew Talk - Beer, Wine, Mead, & Cider Brewing Discussion Forum:

This site may earn a commission from merchant affiliate links, including eBay, Amazon, and others.
I don't have the STC (using the love TSS2) but with any controller -

use a couple of lamps - and have some warm water and ice water - then move the probe from one to the other and see if the lamps come on appropriately - that way you're not hard-cycling your compressor during the test/troubleshoot phase.

Was this advice directed at me? Of course I was using a lamp to test it.
 
Ah, I didn't know that. How long is the delay?

As Bugs Bunny would say, "What a Maroon!"

I, too, was a ******* today. Finally figured out the bloken engrish of the instructions, and waited the required 3 mins, heard a click, saw a light, got power to the plug! All is well, hope that is your only problem as well.
 
As Bugs Bunny would say, "What a Maroon!"

I, too, was a ******* today. Finally figured out the bloken engrish of the instructions, and waited the required 3 mins, heard a click, saw a light, got power to the plug! All is well, hope that is your only problem as well.

Yeah, that was the issue. I tested it again after finding that out and it worked like a charm. Now I feel stupid for wasting all that time trying to fix a problem that didn't exist.
 
Mine is wired up to have one set of sockets always on, so I'm not tying up my wall socket all the time. I can run the vacuum if I want. Then one 2-sided outlet for heater and one 2-sided outlet for cooling.

Wiring_Diagram_copy.jpg


this diagram is excellent and extremely helpful, as i plan on giving both the hot side and cold side their own set of sockets, as well as an 'aways on' set of sockets. one question though:
how could i add a switch to ONE of the 'always on' sockets? i'd like to have some rope lighting in my fermentation chamber that i can turn on with an external switch.

at the very least, i know i need to break the plate between hots on the 'always on' set of sockets, i'm just not positive whatelse needs to be done to add the switch.

anyone have a diagram for this addition? is this possible?
 
Stupid question, but in an install like this, you are plugging in the chest freezer to the cooling outlet, and the lamp/heating to the hot right? I was thinking about trying to mount it all internally and have the compressor just run right from the STC, and then heat from an outlet, or maybe even wire in a wall mounted light socket directly from the inside.
 
Stupid question time: Does this automatically cycle back-and-forth between heating/cooling depending on the temp the probe is exposed to, or does it requier a manual switch to change it back and forth? Seems like it would be stupid and not worth it if it ISN'T automatic...and I am 99% sure that is exaclty what was being discussed with the 3 minute delay...but I didn't see it explicitly stated (admittedly I only read piecs of the thread) and the descriptions online are terribly written. I am hoping this is "set-it and forget-it", as I might actually start making plans to make one...but if it doesn't work automatically it is definitely not going to work for me.
 
LowNotes said:
Stupid question time: Does this automatically cycle back-and-forth between heating/cooling depending on the temp the probe is exposed to, or does it requier a manual switch to change it back and forth? Seems like it would be stupid and not worth it if it ISN'T automatic...and I am 99% sure that is exaclty what was being discussed with the 3 minute delay...but I didn't see it explicitly stated (admittedly I only read piecs of the thread) and the descriptions online are terribly written. I am hoping this is "set-it and forget-it", as I might actually start making plans to make one...but if it doesn't work automatically it is definitely not going to work for me.

It is automatic. But I would suggest a longer delay just to save your compressor. I insulate and strap the temp probe to the side of what I am fermenting. In my keezer I have the probe in a 8oz water bottle filed with vodka just in case it did go below freezing for to long. I also don't have heat in my keezer. I hope this helps.
 
Stupid question time: Does this automatically cycle back-and-forth between heating/cooling depending on the temp the probe is exposed to, or does it requier a manual switch to change it back and forth? Seems like it would be stupid and not worth it if it ISN'T automatic...and I am 99% sure that is exaclty what was being discussed with the 3 minute delay...but I didn't see it explicitly stated (admittedly I only read piecs of the thread) and the descriptions online are terribly written. I am hoping this is "set-it and forget-it", as I might actually start making plans to make one...but if it doesn't work automatically it is definitely not going to work for me.

It controls heating and cooling simultaneously, so there's no need to switch between heating mode and cooling mode or anything like that. This has nothing to do with the delay feature though, which AFAIK is only related to the cooling side. The delay simply prevents the refrigerator compressor from short cycling by making sure there's a minimum time between when it was last running and when it's able to turn on again. As mentioned, it's usually best to max the delay setting out at 10 min.
 
Thanks for the response everyone, sounds like this should be just what I need...and I have until enxt winter to get it put together!
 
Using Revvy's diagram, would it be possible (and safe) to omit the heating outlet from the wiring? I am going to use my temp controller in my keezer, so I only need the cooling and always-on fan outlets. Does anyone have a diagram that would fit my needs?

Thanks!

Edit: Ok guys, this is a diagram that I just put together based on Revvy's with the heating outlet removed. Does this look correct?

wiring.png
 
I don't have the STC (using the love TSS2) but with any controller -

use a couple of lamps - and have some warm water and ice water - then move the probe from one to the other and see if the lamps come on appropriately - that way you're not hard-cycling your compressor during the test/troubleshoot phase.


Good piece of advice here
 
Using Revvy's diagram should I wire directly to the screws of the outlets or use the holes underneath? Also, wherever same color wires cross and there is not a "squiggle" should I use wire connectors there? Is it ok to have two sets of wires going to the same outlet terminal?

Thanks in advance
 
toestothesun said:
Using Revvy's diagram should I wire directly to the screws of the outlets or use the holes underneath? Also, wherever same color wires cross and there is not a "squiggle" should I use wire connectors there? Is it ok to have two sets of wires going to the same outlet terminal?

Thanks in advance

In order:
I was taught to side wire all outlets (wrap around the screws) because it's a more secure connection. After seeing many many loose backwired outlets doing remodeling, and very few loose side wired, I suggest side wiring. Back wired aluminum wires actually started a fire that burned a condo I was living in to e ground. That had more to do with the aluminum wiring than how they were connected though.

Yes.

If you backwire the outlet (use the holes instead of wrapping around the screw), and the wires are the same size, then you can connect two of them to the same outlet terminal. Otherwise you'll need to connect them together with a pigtail, and then connect the pigtail wire to the terminal.

Juan, please excuse my ignorance but what exactly do you mean by pig tailing before connecting to the terminal? Is this simply wrapping the two ends of wires together? If this is what you're referring to, I did this and the wire becomes too thick to tighten down with the screw. I'm using 14 gauge power cord wire. Thanks bud
 
Juan, please excuse my ignorance but what exactly do you mean by pig tailing before connecting to the terminal? Is this simply wrapping the two ends of wires together? If this is what you're referring to, I did this and the wire becomes too thick to tighten down with the screw. I'm using 14 gauge power cord wire. Thanks bud

The pig tail is using a short section of wire to connect a group of wires together at one end of the short section, then use the other end for the terminal.
wirenutR.jpg
 
toestothesun said:
Juan, please excuse my ignorance but what exactly do you mean by pig tailing before connecting to the terminal? Is this simply wrapping the two ends of wires together? If this is what you're referring to, I did this and the wire becomes too thick to tighten down with the screw. I'm using 14 gauge power cord wire. Thanks bud

Pigtailing is taking two or more wires, and connecting them together along with a short piece of wire (the pigtail) using a wire nut. You can then connect the pigtail to whatever terminal or connection you wanted the multiple wires to connect to.

Edit: Hah! I'm a bit too slow this morning.
 
So will my red wire (14 gauge - believe) wire nuts work or will I have to get a different size?
 
Great thread here guys, the diagrams are super helpful. I needed to temp control a mini fridge that I use for fermenting. Would love to see some picks of what you all do with the boxes once wired up. Mount them to the fridge/freezer, mount to a wall, leave em loose?
 
Hey guys,

I'm thinking of using an STC1000 (240v/12V) in the UK to control the temperature of an insulated area of my shed for fermentation.

Can the relays be used to switch a 12V supply? I am thinking of using a 12V PC fan and a 12V heater blanket to control the temperature of the area. The aim eventually would be to have these run from a small scale solar panel feeding into a car battery.

I know this may not be the cheapest or easiest solution but what do you all think? I'm in it for the learning experience and challenge as well! Would it be better to simply run a solution from the mains?

Cheers,
Phil

Should work fine. You'll still need to supply the controller with 240v, but the relays can switch any voltage as long as the draw isn't excessive, which shouldn't be an issue with a pc fan and small heating blanket.
 
Should work fine. You'll still need to supply the controller with 240v, but the relays can switch any voltage as long as the draw isn't excessive, which shouldn't be an issue with a pc fan and small heating blanket.

Had a change of plan, going to use a simple 60w lightbulb to heat the small insulated compartment of the shed. Cheap, easy to install and available everywhere (until new EU regulations come into play anyway...).

Had some great success quickly testing the plan with the ambient temperature in the compartment rising from 14oC (57oF) to 23oC (73oF) in about 10 minutes.

Will up some photos once the STC arrives and it's wired up.

Cheers,
Phil
 
A lot of us just use a "replacement power tool cord" or even cut apart an extension cord. I usually buy larger that I need, so I can cut a few feet off to use to actually wire it.

PartsIsParts.JPG


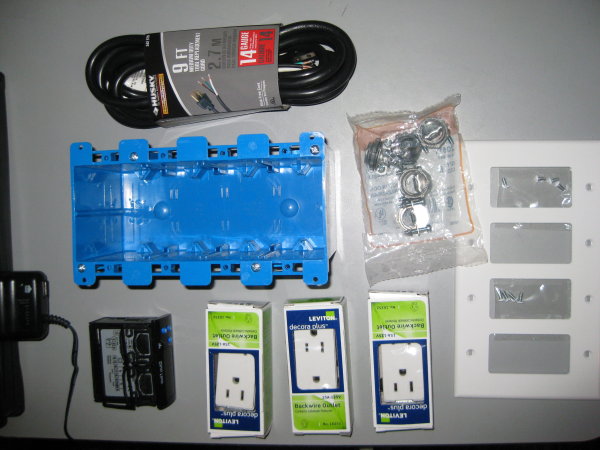
Here's a basic parts list....

R62-16252-0WS Leviton 15-Amp White Decora Plus Duplex Outlet (as many as needed)
R52-PJ264-00W Leviton White Midway Nylon Wallplate (As many "gangs" (Slots as needed)
AW62632 Husky 9 Ft. 14-3 Power Tool Replacement Cord
B468R CARLON Electrical Wall Box (As many "gangs" as needed)
20511 Halex No. 20511, 3/8 In. Pack of 5 Twin Screw Clamp Connector
STC 1000 Dual stage temperature Controller w/probe

I based mine on Tom's design...His thread is good, I have only the slightest knowledge of doing this stuff. I can switch out a bad wall socket but that's about it. And I really didn't have trouble doing this.

In fact I just wired one up with only 3 gangs (Not an always on) and did it without a diagram.
Hey Revvy, what are the screw clamp connectors used for? Is that what's coming out of the side of the box?
 
answering for Revvy...

strain relief is always a good idea in an electrical situation where a tug on a cord could result in an internal short.
 
Is it possible to attach a 120mm computer fan so that the fan only runs when the controller tells the freezer to run?
 
Is it possible to attach a 120mm computer fan so that the fan only runs when the controller tells the freezer to run?

Sure, but a computer fan won't run off of 110V AV, so you'll need an adapter. If you wire up an outlet for "cooling" mode, just wire a second (or don't break the tab and forgo heating) and plug a 12V DC wall wart in.

This is what I do for my fan, but I leave it on all the time, I run a 12V line into the fridge through the same hole as the temp probe. This powers the fan that blows cold air into the draft tower as well as an Arduino I use to keep track of gas pressure and keg capacity (still working on that).

The outlet in the first pic is wired as always on, rather than the cooling/heating split that most people have. I wired the compressor directly to the STC-1000 cooling, and left the heating disconnected.

WP_20131121_010.jpg


WP_20131121_011.jpg
 
Has anyone used this controller for any length of time? I bought a different model and three times as much and it lasted for a year.
 
Has anyone used this controller for any length of time? I bought a different model and three times as much and it lasted for a year.
They should last longer than that. Without knowing the model, it might be lower quality, or your compressor may be overloading the relay when it kicks on causing it to fail after a while (the compressor probably only uses a few amps when running, but could pull 15 or more when it starts). Try running the compressor through a separate relay rated for a higher current and maybe that will fix the problem.
 
Thanks, that is a great idea. I should have known better with the other one because the reviews said they would quit after about a year. I'll try this one. At this price it is worth replacing every year. I just thought maybe someone had used one for an extended time.
 
Thanks, that is a great idea. I should have known better with the other one because the reviews said they would quit after about a year. I'll try this one. At this price it is worth replacing every year. I just thought maybe someone had used one for an extended time.

I have several, and the oldest has been going strong for just shy of 4 years now. The other ones have all been working for over 2 years.
 
JuanMoore said:
I have several, and the oldest has been going strong for just shy of 4 years now. The other ones have all been working for over 2 years.

Thanks! That's the info I needed to make me feel better about my purchase. I am thinking of getting a second one for keg temp control before the price goes up. This one is for fermentation freezer kit.
 
Back
Top