Structure Build Help

Homebrew Talk - Beer, Wine, Mead, & Cider Brewing Discussion Forum

Help Support Homebrew Talk - Beer, Wine, Mead, & Cider Brewing Discussion Forum:

This site may earn a commission from merchant affiliate links, including eBay, Amazon, and others.

Dog House Brew

Supporting Member
HBT Supporter
Joined
Jun 10, 2008
Messages
2,140
Reaction score
1,835
Location
Indiana
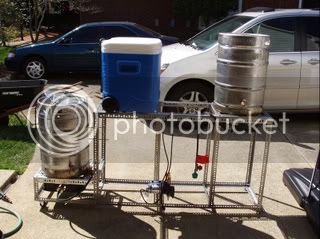
I need a bit of help on building my structure. I do 12 gallon batches, batch sparge, and have a few questions. My boil pot is 25 gallon custom pot I had given to me. It is 17" in diameter and 26 inches tall. I use a 100qt extreme cooler mlt. I'm going to use a converted keg for my hlt. I do have a march pump that hasn't been used. I use an immersion chiller that I thought I could wirlpool like Jamil. My question is can I use the pump to pump my runnings from the cooler to the boil kettle? If so how do you vorloph? If I go 3 tier I'm 54" to the top of my keg. I'm not too worried, but don't want to be on a ladder all the time. It would put the top of my cooler at 47", too high to be mixing. Would you build a 2 tier and gravity from hlt to mash tun and pump to boil kettle? Have never used a pump and will be my first multiple burner set up. I have 2-200,000 btu NG jet burners and want to make one structure, not a build full of regrets. Thanks I knew you would know. :mug:
 
To voraluf pump from the bottom of the mash tun to the top. Once the runnings are clear drain your tun and begin adding sparge waterand mix. Then voraluf again and drain the tun. Those that fly sparge sometimes will recirculate the mash on a continual basis, which provide clear runnings without having to mix it up again for the batch sparge.
 
With your gear I would say to do a 2.5 tier setup. Meaning this. The kettle will be high enough to gravity feed to the fermenter, the MLT will be at the same height as the kettle and the HLT will be high enough to gravity feed to the MLT. I call this a 2.5 because you have only two tiers for the rig but really there is 3 if you figure in the gravity feed to the fermenter.

You don't have to gravity feed to the fermenter but I like being able to. Pumps fail and the last thing I want after a 5+ hour brew day is to not be able to get the wort into the fermenter because a pump died. This setup will also make it so you "could" fly sparge with one pump if you so choose to.
 
You have many options each with their own pros and cons.

I have a 2 tier rig with the MLT (cooler) and HLT 32" high. I use the pump to transfer from HLT to MLT.

The BK is on the lower section 8" high and use gravity to drain the MLT to BK. The pump is used with the IC for recirculating and also to transfer to fermenter.

I use the brass QDs that BobbyM had listed in one of his posts.

Here is a pic:
P1010066-1.jpg
 
I think that's a great 2-tier design. I like the idea of a gravity drain from the MLT because it's a lot easier than pumping. It's tricky stopping the pump at the exact moment the pickup tube starts sucking air. The single tier solution to that problem is using a pump grant, but that's a whole other thing to build. I was originally thinking about raising my HLT up one level so I can do a single pump fly sparge but I'm now considering lowering my BK instead.
 
Single tier stands are the best. Period. End of discussion. All other opinions will be confiscated and burned.

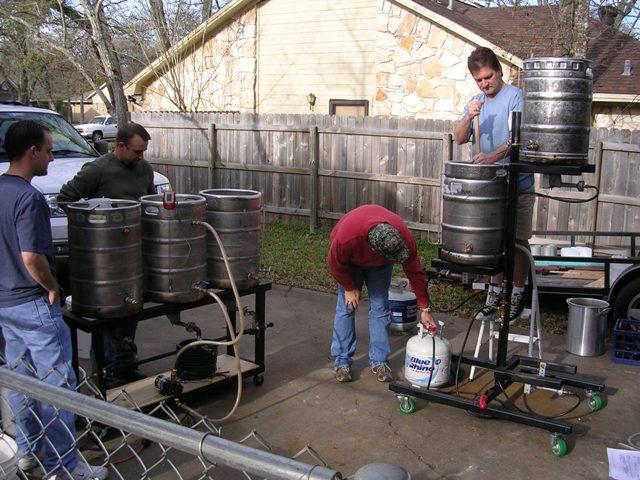
Seriously, I've had a 3 tier and replaced it w/ a single tier. I like it WAY better. If the pump loses prime when swithing hoses, it never takes me longer than ~ 30 seconds to get things re-primed and going. No hassle really. And actually, the problem I forsee w/ the 2-tier setup above is that the BK is so low, it may cause problems when trying to prime the pump. I could be all wrong about that, though.

See the difference in height between my 3-tier and single tier? No more high lifting and step ladders w/ the single tier. Seriously, it's the best setup. All other opinions are flawed. ;)

 
Cool! BobbyM likes my design :mug:

No issues priming the pump from the BK. I almost always do 10 gallon batches so the level in the BK will always be higher than the level of the pump. I specifically positioned the pump (output on top) lower than the height of the BK valve.
 
I do like the single tier fine enough but you really can't get past the requirement of two pump fly sparge requirement if you care about that. Also, I think HLT's up high get a bad rep but you don't have to lift anything. You just hang your water hose over the top to fill it and never touch it again if you have a sight glass (no scrubbing, stirring, etc). Having the BK practically sitting on the ground means that the second tier can be at about the Brutus 10 height. Easily stirrable at the MLT position.

I can also get my pump reprimed in about a minute, but I hate the fact that I don't know when it's about to lose it. Maybe it's a personal annoyance but I do miss the gravity drain.
 
I ended up starting the build yesterday. I decided on going with the 3 tier design. I dropped the height down a bit. I thought I could use the pump when cooling and gravity the rest with all 1/2" ID hose to speed the flow up a bit. Using 1 1/2" x 1 1/2" x 1/8" angle for the build. I was scared it might be too thin, but once welded it feels really strong. I figure I will use 1/8" plate for the burner wind/heat shields. I read the jet burner tip to the pot bottom should be 16" for maximum heat, anyone else hear this?
 
Yeah, I designed the chiller stand to get it up off the ground and above the top of the fermenter. I built it with some scrap 1/2" copper pipe and fittings I had laying around. It works well and it's lightweight. The cross pipe in the center makes a convenient handle for moving it around. Works even better than I originally imagined it would:

3388689202_5bedd86a85.jpg


3388689344_62bd286118.jpg


3388689812_f0a7631743.jpg


3387883415_973af8d267.jpg


I originally used an immersion chiller, but changed to the counterflow long ago. It works well for me and if I want to crash cool a la Jamil's method, I just route the output back into the kettle for a similar whirlpool effect.

The four vertical pipes holding the chiller in place also serve as a convenient place to hand hoses to keep them off the ground when not in use or when switching things around. That feature was totally an after thought.
 
Yeah, I designed the chiller stand to get it up off the ground and above the top of the fermenter. I built it with some scrap 1/2" copper pipe and fittings I had laying around. It works well and it's lightweight. The cross pipe in the center makes a convenient handle for moving it around. Works even better than I originally imagined it would:

3388689202_5bedd86a85.jpg


3388689344_62bd286118.jpg


3388689812_f0a7631743.jpg


3387883415_973af8d267.jpg


I originally used an immersion chiller, but changed to the counterflow long ago. It works well for me and if I want to crash cool a la Jamil's method, I just route the output back into the kettle for a similar whirlpool effect.

The four vertical pipes holding the chiller in place also serve as a convenient place to hand hoses to keep them off the ground when not in use or when switching things around. That feature was totally an after thought.[/QUO

What's the small valve on your pump? Bleeder? I will probably go with the CFC. I need to make one and put my pump to use. Immersion is just what I've always used. Everyone I ask says go CFC. Like you set up. This is a great place for deas.
 
[/QUOWhat's the small valve on your pump? Bleeder? I will probably go with the CFC. I need to make one and put my pump to use. Immersion is just what I've always used. Everyone I ask says go CFC. Like you set up. This is a great place for deas.[/QUOTE]

Yes, the small 1/4" valve is a bleeder used to purge any air when priming the pump.

I want to build a new CFC using slightly larger 1/2" OD tubing for the inner copper coil vs. the 3/8" OD the current one has. The reason for the change is that I would like to be able to pump at a higher flow rate when doing the recirculation Jamil method for crash cooling. The 3/8" is too restrictive IMO. It works, but could be faster. I do have some brewing buddies that have abandoned their CFC's in favor of IC's so opinions differ widely on which is the preferred method. I'm seeking the best of both designs in my next one.
 
I want to build a new CFC using slightly larger 1/2" OD tubing for the inner copper coil vs. the 3/8" OD the current one has. The reason for the change is that I would like to be able to pump at a higher flow rate when doing the recirculation Jamil method for crash cooling. The 3/8" is too restrictive IMO. It works, but could be faster. I do have some brewing buddies that have abandoned their CFC's in favor of IC's so opinions differ widely on which is the preferred method. I'm seeking the best of both designs in my next one.[/QUOTE]
Agreed. I guess going to 1/2" in the CFC would help your flow rate. I think this will be the way I go. I've read about wrapping the exterior of the pipe with solid copper wire to create turbulance. Not sure if it is worth the extra time. I'm about functionality, not over killing the build. I guess a CFC works well if your free of trub and can wirlpool well, or will it pass through the pump? Anyway, thanks for your input.
 
Back
Top