Show us your sculpture or brew rig

Homebrew Talk - Beer, Wine, Mead, & Cider Brewing Discussion Forum

Help Support Homebrew Talk - Beer, Wine, Mead, & Cider Brewing Discussion Forum:

This site may earn a commission from merchant affiliate links, including eBay, Amazon, and others.
Made a few changes to my 5 gal rig including a HLT tippy-dump:

DSC04578.JPG


More pictures here:
https://www.homebrewtalk.com/f51/5-gallon-brew-rig-now-diy-tippy-dump-207473/

I like this. Very simple and compact. Nice job.
 

Peterbrau,

What's going on in that toolbox? I see a pump and a RIMS tube, but it's hard to tell if they're mounted or not and what the plumbing situation is. Can you post a closeup or a better description. Do you pull the RIMS out when in use?
 
There are some awesome setups on this thread. I almost feel bad putting mine on here but it does brew some great beer. :drunk:

 
There are some awesome setups on this thread. I almost feel bad putting mine on here but it does brew some great beer. :drunk:


Why would you feel bad posting that?

There are some INCREDIBLE rigs in this thread, but I would bet 90% of home brewers would love to have what you've got. :mug:

Ed
 
Thanks Ed

Every time I see pictures of other guys things online I tend to feel inadequate.:eek:

I guess its not how it looks but how much fun you have using it!:D
 
Thanks Ed

Every time I see pictures of other guys things online I tend to feel inadequate.:eek:

I guess its not how it looks but how much fun you have using it!:D

Hmmm... Makes me wonder if you are still talking about HBT? :D

Sorry, I couldn't resist...
 
Thanks Ed

Every time I see pictures of other guys things online I tend to feel inadequate.:eek:

I guess its not how it looks but how much fun you have using it!:D
Right! It's what you do with it!

I will eventually move up to >5 gal batches and in preparation I bought one of pinup's brew stands. Boiling my second ever 10 gal batch (German Pils) in the pic. Still not sure what sort of automation I'll want. KISS rule rules with me but @ 10 gal batches or more my back won't last long.

Brewstand.jpg
 
^^^ I like your priorities. Screw painting the garage, there's beer to brew!:mug:

Hahaha... yeah, I'm gonna get to that someday... I think :D.

Careful with that... You make it too nice, the SWMBO will be hanging curtains, then soon after it will be "her space". I tell the SWMBO she probably wants to stay clear of my garage cause I've seen rats in there big enough to drag her off.
 
Right! It's what you do with it!

I will eventually move up to >5 gal batches and in preparation I bought one of pinup's brew stands. Boiling my second ever 10 gal batch (German Pils) in the pic. Still not sure what sort of automation I'll want. KISS rule rules with me but @ 10 gal batches or more my back won't last long.

Brewstand.jpg

AKA "Donkey Chip" 2+2er
 
This is my first post on HBT.

I've been lurking for quite some time, mostly in the DIY forum.
I've been brewing since 1995 usually 10 gallon batches using
different arrangements of 3 tier systems based on everything for
saw horses to step ladders and often hanging kettles from the 2x6 beams
on my patio cover with a come-a-long. I got to give major credit to all
the contributors around here, it really fuels the imagination. I've never
shy about getting in over my head in a project and it's nice to see that
there are a bunch of people just as crazy as I am.
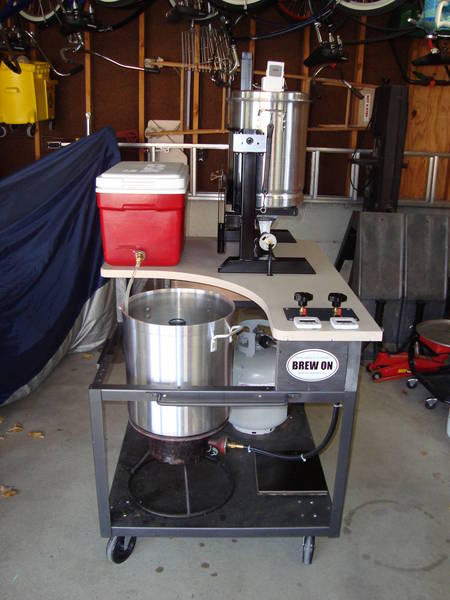
After finding HBT and fueled by "cubicle fever" I have finally made a formal brew stand and here it is:

attachment.php


attachment.php


It's far from complete, but I had to brew so we put it to work last weekend.
It's kind of like a Brutus 10 but low profile so the kettle tops are at working
level rather than the burners like most others. It has 2 10 inch cast burners
converted to 11" propane controlled by Honeywell intermittent units. It has
2 Auber process controllers and 2 March809 motors and Chugger heads. Its
nice that you can get replacement heads for when you drop the box and
break off the plastic pipe fittings like I did. Under the center area where
most systems put a third burner for direct fire of the MLT I put the propane
bottle, water filter and control box with pumps. I plan using it as a HERMS
with the hex in the HLT so I should only need 2 burners. We did a direct
fired mash and just had to slide the kettles around a bit since the HERMS coil
was not ready yet.

Burner automation is working with the Auber units and the pumps can be set
to manual on/off or float switch on/off. I need to build the herms coil, tune
the propane orifices, change the pump fittings for easier use... the to-do list
is pretty long, but even in its current state it was a joy to run and produced
this:

attachment.php


The carboys are not filled equally due to drunkenness, its going to happen.

I'll get some more detailed photos when things are more finalized.

-Pete Sullivan

27Nov10-Stand1.jpg


27Nov10-Stand2.jpg


27Nov10-porter-carboys1.jpg
 
Pete I think you win the longest sight glass award :p

Awesome looking system, I like the way the pumps in the control box look, not sure about the airflow/heatsoak issues it may or may not cause.

Good work.
 
Pete I think you win the longest sight glass award :p

Yeah, I get that a lot, but thanks...

The pumps are now vented out the back of the box and the sight
glasses will have the eye bolts and grommets installed this weekend,
then I will cut them down. Its a pain to flip over the kegs for washing
with the poly tube sticking straight up. It was a case of too much
to do and really needing to brew. I had to invite a dozen friends over
for a bbq just to give myself a deadline to get the build done, otherwise
I would have been re-designing for months.

-Pete
 
When I lived in NY there was a great local source for steel that I used... square, round, angle, etc. Since I moved to the Philly area I'm at a loss. Anyone local recommend some place with a decent selection or a website that doesn't kill you on shipping? I'm itching to build my next brew rig now that I've moved up in size and, uh "fancyness" with pumps, controllers, etc.
 
When I lived in NY there was a great local source for steel that I used... square, round, angle, etc. Since I moved to the Philly area I'm at a loss. Anyone local recommend some place with a decent selection or a website that doesn't kill you on shipping? I'm itching to build my next brew rig now that I've moved up in size and, uh "fancyness" with pumps, controllers, etc.


Check out the local welding shops. They will either sell you some of their stock or point you in the right direction.


Nice job Pete, looks good.
 
Being able to bend round steel tubing is a rare ability among DIYers. I like how it makes your rig look "lighter" and unique. Very nice!
 
Being able to bend round steel tubing is a rare ability among DIYers. I like how it makes your rig look "lighter" and unique. Very nice!

Not "rare" rather easy just the tools that cost so much.
One of these benders in 5/8" with keeping the ID at 1/2" works great, check ebay and save as MSRP is way too expensive. I paid way less for one that's in new condition I got super lucky.
http://www.toolup.com/ridgid_35170_bender-358-58-od-ratche.aspx?gclid=CL2T2biazqUCFQQ-bAod8RX2lQ
 
I think he's talking about Pete's stand which has bent steel tubing on the corners.

I see, that can be bent with hand benders or a Greenlee 555 power bender, that's childs play. IBEW wireman speaking here.
I was thinking a 10" radius end of stand 180 degree bends.
Get into 4" ridgid conduit on a one shot hydraulic bender.
Ask CodeRage about pipe bending.
 
My brother-in-law is a sand rail guy and he picked up a JD-Squared tubing bender and a Miller 140 mig welder over the years. He has been very generous in lending them to me from time to time. I've fabricated stuff for car projects and other things, I don't claim to be good at it but I have bumbled through enough and learned the various skills. I have a harbor freight 12 inch abrasive chop saw and a porter cable 4.5" angle grinder. I have other basic tools like a drill press and sawzall etc. etc. etc. Between all that and enough free weeknights/ends gets the job done.

The hoops of the stand are made from 1.5" x 0.95" wall welded steel tube that I got from Escondido Metal Supply. They sell it in 20 foot pieces for around $15, I'll have to dig out the invoice to know for sure. I bought 2 1.5x095 tubes and had them cut into 5 foot sections. I used the JD2 bender to make 90 degree bends in all 8 pieces with more or less 2 foot and 3 foot legs. When bending, unless your good at it or are doing a lot of pieces its difficult to get them all to have the same leg lengths so I just left slop on either side and made them all the same using my chop saw after the bend. I tacked up 4 trued 90s make the upper hoop and then did the lower. When they were more or less the same (some pounding involved) I welded them up completely. The rest of the stand is made from 1.5 x 0.75 0.062 box tubing. I setup a makeshift notcher on my drill press using some scrap stock and a bi-metal 1.5 inch hole saw. I knocked out the uprights and cross pieces using the chop saw, notcher, and angle grinder and made each piece to fit individually. I tacked them where the went and then went by and filled in the welds for real. Then I put in some time "de-uglifiing" it with a sanding pad on my angle grinder. I would not have had to do this if I actually knew how to weld and good fabricates would rightfully fire me for needing such cleanup but that's how it is. The stand is mostly straight and it is completely straight after 2 pints. The rounded corners also help when you walk into after 6 pints. The internal framing that holds the box, propane bottle, water filter, and kettle supports are made from the same 1.5x0.75 tube. I hung the burners from tabs purchased at Off Road Warehouse in Escondido. Most of what we are "inventing" for basic brew stands has been standard fare for the Off Road guys (who by the way aren't getting a lot of work in this economy and they mostly like beer so ask around, they're everywhere).

I think I may be rambling at this point. Like I said earlier:I'll get better pics when I get more details finished up, perhaps this weekend.

-Pete
 
Warning... Off TOPIC Post BELOW....

<OffTopic>
Pete, I come from the Offroad Scene DezertRangers.com , RaceDezert.com , Dirtunited.com I built a 00 Ford Ranger doing most of the cutting, notching, and fitting myself while I let my buddy would up my cage. I did how ever build my front bumper and light rack 100% myself.

I just wish I had a drill press, chop saw, and welder my self....
my front bumper: http://i5.photobucket.com/albums/y171/flomaster/Blitz/IMGP0241.jpg
my light rack:http://i5.photobucket.com/albums/y171/flomaster/00 ranger/DSC_2519.jpg
CabCage:http://i5.photobucket.com/albums/y171/flomaster/00 ranger/7064b4d6.jpg
ThePig:http://i5.photobucket.com/albums/y171/flomaster/00 ranger/IMGP1385.jpg
FlyingPig:http://i5.photobucket.com/albums/y171/flomaster/00 ranger/DSC_1217WTMK.jpg

</OffTopic>

only if I had the tools I could build my own metal sculpture. maybe renting a welder would be the thing to do. I have a hand grinder I could use that to cut square stock, and weld it all up.


-=jason=-
 
Last edited by a moderator:
I love the simplicity of a network rack. Is that top shelf sagging though?
I guess it looks like it in the picture. Never noticed until you said something. The shelves are held with 8 screws each so I don't think it's going anywhere. I guess it would be wise to find out the weight limitations of the rack. :D
 
Back
Top