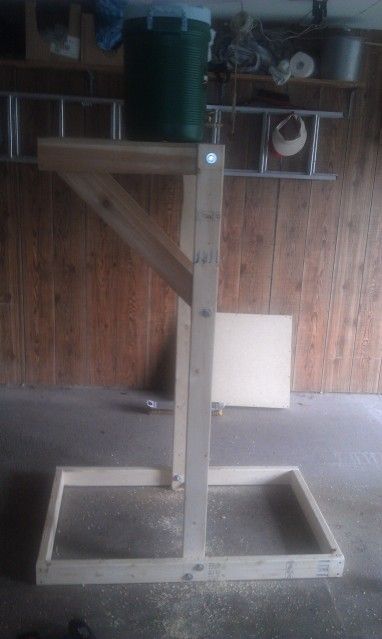
Show us your sculpture or brew rig

Homebrew Talk - Beer, Wine, Mead, & Cider Brewing Discussion Forum

Help Support Homebrew Talk - Beer, Wine, Mead, & Cider Brewing Discussion Forum:

This site may earn a commission from merchant affiliate links, including eBay, Amazon, and others.
blaster_54738 said:
My rig I just finished. About $40 in lumber and hardware. The support arms come off and the tiers fold down, then the bottom comes off for easy storage.

Do you have any plans or more pictures of you rig. I have limited space and this setup would work great.
 
Do you have any plans or more pictures of you rig. I have limited space and this setup would work great.

Kind of hard to see the plans but I'll explain the best I can...

The base is 2x4's and is 4' x 2'6".

The uprights are 2x4's as well and I think I ended up making it 5'6" tall.

The platforms are made with 1x4's and measure 2'x2'.

The side supports are 1x4's I just cut to fit. These have to be removed for it to fold.

I used 1/2"x4" bolts for all of it. Base separates and stores really nice.

One other thing is I was a couple bolts short on the plans, you need 12 of them and then 12 nuts and 24 washers. I couldn't find 1/2" wing nuts so I just used regular bolts

IMAG0287.jpg

001.jpg
 
jcaudill said:
I don't believe I ever posted mine up here - so just a quick action shot during mashing:

Beautiful. Id like to see more pics, I'm thinking of moving to a full 3 vessel system.

Edit: your linked thread is what I was looking for! I'm using BrewTroller as well which is a large part my wanting to upgrade to 3 full vessels. Thanks for posting some inspirational material :)
 
Beautiful. Id like to see more pics, I'm thinking of moving to a full 3 vessel system.

Edit: your linked thread is what I was looking for! I'm using BrewTroller as well which is a large part my wanting to upgrade to 3 full vessels. Thanks for posting some inspirational material :)

Welcome! Let me know if I can be of any help on the Brewtroller setup. That took me a while to nail down!
 
Here is what I have so far. Going to keep using my cooler for mash tun for awhile. It will be on top rack until I get a kettle. Then the top rack will be going away. Next thing is to order some burners this week.

DSC06369.jpg
 
Its still a virgin untill this weekend............
I still need to finish my control box and install the water filter system.

2012-06-20_16-39-10_19.jpg
 
Well...for what it's worth I think it's about time that I posted my rig for all to see. I've been brewing on it steadily for a year now and have no regrets. It's set up in the basement and I enjoy it the most during those long cold winter days. It uses 3 120/20 amp circuits with 3 1500W elements. I only use the 3rd element when performing step mashes or if I need to speed up the time it takes to get to mash out temps. No problems boiling with 2 elements on 5 gallon batches. The system is capable of brewing 10 gallon batches as well, but I usually enjoy doing 5 gallon batches for the variety! I use homemade heat sticks as it simplifies the setup and there's less holes to make and worry about...and they get out of the way for whirlpooling. Well...here it is: enjoy!

elebrew.jpg


iPhonePix 250.jpg


insideBK.jpg


steady150.jpg
 
Here is what I have so far. Going to keep using my cooler for mash tun for awhile. It will be on top rack until I get a kettle. Then the top rack will be going away. Next thing is to order some burners this week.

DSC06369.jpg

warehouse racking, nice! We have some narrow racks here at work that I'd love to get my hands on!
 
blaster_54738 said:
My rig I just finished. About $40 in lumber and hardware. The support arms come off and the tiers fold down, then the bottom comes off for easy storage.

Do you have a side photo you could post?
 
Set a post in the ground and welded burner mounts evenly around so I can gravity fluid down around the center post.


imag0382z.jpg
tbox?id=7463043634[/IMG]
 
Color me jealous Brewer4, 100% of that picture is pure beauty.

My tier is actually a joke. I use my grill for the top, then the pillar burner and then deck and stairs if I have to. Sitting under a covered deck where I can brew 9 months out of the year with the view makes up for it. :rockin:
 
Heres my new system, the kettle was a piece of stainless pipe that i welded a bottom on. I did a 26 gallon batch with it this past monday and it all went pretty good. Got a few more things to tweak and add though.

IMG_3674.jpg
 
The first batch out of the new all grain setup. False bottom worked well, drilled about 1800 holes by hand in lexan.

brewsetup.jpg


falsebottom.jpg
 
I finished my single tier yesterday! (I only need to get some crimp connectors to connect the solenoids then it'll be functional)
af866988.jpg

Here is a close up of the control panel.
8f707dee.jpg

0afd8e55.jpg

and a close up of my gas manifold.
0864ede8.jpg


Once my QD's arrive I can take her out for her first run! Can't wait!
 
That looks awesome! I love the light up switches. Very clean design. I'm not totally familiar with the Brutus 10 design. What do the switches control? I assume the pumps, but is there something else they are used for?
 
That looks awesome! I love the light up switches. Very clean design. I'm not totally familiar with the Brutus 10 design. What do the switches control? I assume the pumps, but is there something else they are used for?

Red is Main power.

Yellow powers the Temp Controllers. Theses switches have stackable contact blocks so I can use 1 switch to feed both TCU's. 1 contact per unit.

The TCU's for the MLT and HLT

Green transfers power through to the solenoid valves for the MLT and HLT burners. The best part of this feature is even when turned on the switches light only comes on when the solenoids are open and the burners are lit. So it's an extra visual so I know what's going on with the system.

Blue are for the pumps.


Tried to make it as clean as possible and have all controls handy from the front. You'll see on the left I put a panel mounted needle valve to control the boil kettle burner. That way I can turn it up to get to a boil and then dial it back easily enough to maintain a boil without scorching the wort.

Can't wait for my first run!
 
MMurray: So if I am looking at this right, you have manual standing pilots for MT & HLT and controlled solinoids on the burners and your BK is all manual?

Nice looking set up. Very clean.
 
I finished my single tier yesterday! (I only need to get some crimp connectors to connect the solenoids then it'll be functional)
af866988.jpg

Here is a close up of the control panel.
8f707dee.jpg

0afd8e55.jpg

and a close up of my gas manifold.
0864ede8.jpg


Once my QD's arrive I can take her out for her first run! Can't wait!

I'm not use to seeing a burner layout like you have set up, is there no safety shutoff on your pilots?

Looks great!
 
MMurray: So if I am looking at this right, you have manual standing pilots for MT & HLT and controlled solinoids on the burners and your BK is all manual?

Nice looking set up. Very clean.

Yes... the Pilots are made of the following: 1/4" needle valve, 3" long 1/4" brass nipple, 1/4" Cap that has been drilled with 1/16" holes (2 holes per pilot). Once Pilot lights are on, the solenoid allows the burners to turn off and on.

Boil Kettle is full manual with the panel mount needle valve on the left.
 
I'm not use to seeing a burner layout like you have set up, is there no safety shutoff on your pilots?

Looks great!

By safety shut off are you talking about automatic shut off if the pilot goes out? That answer is no.

but I do have main shut offs for each propane source on the manifold. My reasoning for that is once I set the needle valves on the MLT, HLT and pilots I won't want to mess with them every time and can simply turn them off or on at the main.
 
I've still have to get some propane hose to hook up the burners to my manifold, as well as a pump but aside from that it's done. Definately not as intricate as some of the others on here but it gets the job done!

brewstand1.jpg


brewstand2.jpg
 
Back
Top