Heatstick of doom! Start with wiring Qs.

Homebrew Talk - Beer, Wine, Mead, & Cider Brewing Discussion Forum

Help Support Homebrew Talk - Beer, Wine, Mead, & Cider Brewing Discussion Forum:

This site may earn a commission from merchant affiliate links, including eBay, Amazon, and others.

nostalgia

Well-Known Member
Joined
Feb 9, 2008
Messages
2,397
Reaction score
114
Location
Port Murray, NJ
No pix yet (parts are still en route) but I've got a wiring question. The heatstick will have two, 4000 watt elements. I've got a soon-to-be-unused 40A sub-panel in my brew house. I'm planning (at least at first) to use the heatstick for my HLT, then move it to the boil kettle.

So I've got two options: wire the two elements to one 40A SSR per leg (presumably in parallel so each element sees the same voltage). This would be a 33.33A load at 240v.

Or I can wire each element's leg to its own 25A SSR, requiring double of everything but showing each SSR only ~17A.

Is there any reason not to go with the first option? If I do go with the second option, one PID can control all 4 SSRs, correct?

I was thinking with the separate wiring I'd be able to turn one element off after reaching the boil, but if I'm using a PID, would that be any different from just lowering the duty cycle of both elements together?

Thanks for any advice,

-Joe
 
If I were you I would wire separate 40amp SSR's and switches. That way you can turn one element off when you just want to maintain a roiling boil. Go with 40a SSR's instead of 25a it will produce less heat and will last longer because you are not getting so close to max. You should still be able to run both from one PID.

In my opinion you don't need two. I have just one 5500w element and it works fine and it is fast. 1 4000w element would even work pretty fast, but as The POL has showed us. Overkill can be fun.
 
Thanks, good advice about using the bigger SSRs. Are you using two SSRs per element - i.e. breaking both legs, or just one?

As for the size, I've been going back and forth on that one. I'm basing my plans on doing a 14 gallon boil for a 10/11 gallon batch. A 5500 watt element will take 46 minutes to go from 100 to 212F according to my calculator. It'll also draw 23A at 240V.

8000 would take 31 minutes. Not that big a difference, so that's not a big deal. But if I decide to do a 15 or 20 gallon batch, 5500 may not be enough.

Also as you say, who doesn't love a bit of overkill? :)

How big a boil are you doing with yours?

-Joe
 
I am doing 10 gallon batches. That sounds about right for getting it up to a boil about 20 minutes I think from mash temps. On my 5500w element I am using two SSR's. One for the leg coming from my PWM and another attached to the switch to cut power to the other leg.

I have a 1500w element in my HLT. I use a normal coil relay to cut the power from a switch and an SSR from the PID. I would have done the same for the second leg of my 5500w element but I was having a hard time finding a rated relay at the same price I paid for the SSR. I am using 12v DC switches.
 
Hm...one element would certainly make my life easier. And then I'd be putting a dedicated element in the HLT.

Ah, the options :)

-Joe
 
Ok, we're going with the 5500 watt element for the heatstick. Now just have to figure out wiring. Looks like a 40A circuit calls for 8 gauge wiring. That's some big stuff!

That was one of the reasons I was originally going with 2, 4000watt elements - each could be on its own 20A breaker with 12gu wire.

I'll have to draw up a wiring diagram and run it by you guys.

-Joe
 
So I've got the 40A subpanel in my laundry room already. I can run 8/4 over to my brew panel and divvy the power up there, as so:

brewery.jpg

Or run 8/3 for the 220 outlets and 12/2 for the 110 ones. Either way the wiring in the brewery panel will be the same, the power will just come from a different place.

Now if I've got things GFCI protected and have access to the breaker, is there a reason to be breaking both legs of the heating element plugs, either with another SSD or a hard switch?

Thanks,

-Joe

edit: fixed the attachment
 
Are you doing two 5500w elements? If not you could do 10/3 and put a 30a breaker for your element. Then run 12/2 for the 110. Yes the breakers will equal more the 40a but you will not be drawing that much on the main leg. If you happen to have a surge it will trip the breaker from the feeder panel. Though If you are drawing a permit, I am not sure if that is kosher.

As for your GFCI question. Yes you will still want to break the other leg for safety. Then you don't have to keep shutting the breaker off. You can just flip the switch on your panel.
 
Are you doing two 5500w elements? If not you could do 10/3 and put a 30a breaker for your element. Then run 12/2 for the 110. Yes the breakers will equal more the 40a but you will not be drawing that much on the main leg. If you happen to have a surge it will trip the breaker from the feeder panel. Though If you are drawing a permit, I am not sure if that is kosher.
Well, the sub panel already has 3, 20A breakers in it. And when I thought about it, my main house sub panel has a lot more amperage worth of breakers than the main breaker, so how's this any different?

But yes, that's exactly what I was considering for the second option. The only reason I might consider going with the 40A feed is so I can run both elements at the same time, e.g. to heat sparge water while I warm up my first runnings in the kettle.

-Joe
 
Note: I'm rewiring the items currently coming off the subpanel so they're no longer on the same circuit.

-Joe
 
Ok the element finally showed up today. Here's how it will look all assembled:

heatstick_assembled.jpg


I decided to go the tri-clamp-and-threads route for several reasons, not the least of which is I like stainless things ;) I didn't want to trust my whole build to JB-Weld sealing the water out, and don't like the idea of those plated plumbing fittings in my wort. But that's just me.

Anyway, it will need some slight bending to fit in my kettle, but that shouldn't be a big deal. It's only about 1/2" too long.

heatstick_inkettle.jpg


-Joe
 
A little more progress. Carefully bent the element around some wood forms to get it short enough to fit in my pot. The rods are *very* hard to bend, so I didn't go crazy trying to get the other half to match. I figure if I ever need to remove it, it'll be bad anyway so I can destroy it to get it off.

heatstick_bent.jpg


Then I added a down tube from copper. I may change this to SS eventually, but I don't have anything against copper in my boil.

heatstick_together.jpg


Fits like a glove! Next we leak test. I'm going to pressurize it with compressed air and bubble test it.

heatstick_doneinkettle.jpg


-Joe
 
Sure, I've been keeping a spreadsheet :) The element, tri-clamps and gaskets, and elbow came from Ebay. The two caps - the one threaded for the element and the one with the 1/2" NPT coupler welded to it - came from Swagman here on HBT

Columns are price/shipping/total
Code:
	Element	$19.95	$8.00	$27.95
	Clamps	$15.00	$9.00	$24.00
	Elbow	$10.00	$5.10	$15.10
	Tri-caps $22.50	$6.00	$28.50
Heatstick total: 	$95.55

-Joe
 
A little update: the clamps I bought came with Teflon and rubber gaskets. I tried the Teflon, since they have the highest temp rating, but they're rock hard plastic. They didn't make a good seal. I guess if I were to put a wrench on the tri-clamp and really gorilla it down it might seal, but I don't think I want to do that.

I switched to the rubber and they seal nice and tight now. I pressurized the whole thing with 90PSI from my compressor and didn't see a single bubble. I dropped it into 15 gallons of water and will check on it tomorrow for any liquid inside.

-Joe
 
Thanks. Do you think 1.5" would be big enough? Now that it's been a while since you built this, how is it working? Would you change anything?
 
No, 2" is barely big enough as it is.

It's working great! It easily brings 12 gallons to a hard boil. The only thing that I changed is the fitting that the element actually threads into. The threaded end cap didn't fit well, so I replaced it with a 1" NPT half-coupler welded into the end cap.

-Joe
 
Joe,
Thanks for your replies, I am looking to build one of these soon. Did you stick with the 1/2" vertical copper pipe and how did you seal it up and make some sort of isulating handle at the top end of the pipe where the wire comes out? Were you able to attach a ground wire somewhere?
 
I'm pretty sure I read elsewhere that you did eventually have a leak. We make a big deal about gfci here, but this is one of those areas where it's an absolute must because all the connections are actually submerged. So what gasket did you eventually go with? I've seen those tufsteel gaskets that are supposed to be immune to "cold flow" (shifting) and they're a lot more expensive, but probably worth it.
 
I did have a leak, yes. The soft rubber gasket from the element squished and wouldn't hold water. I ended up replacing it with a hard rubber one from Home Depot. 4 batches on it so far and holding strong.

And yes, GFCI is not optional for an electric rig. Mandatory.

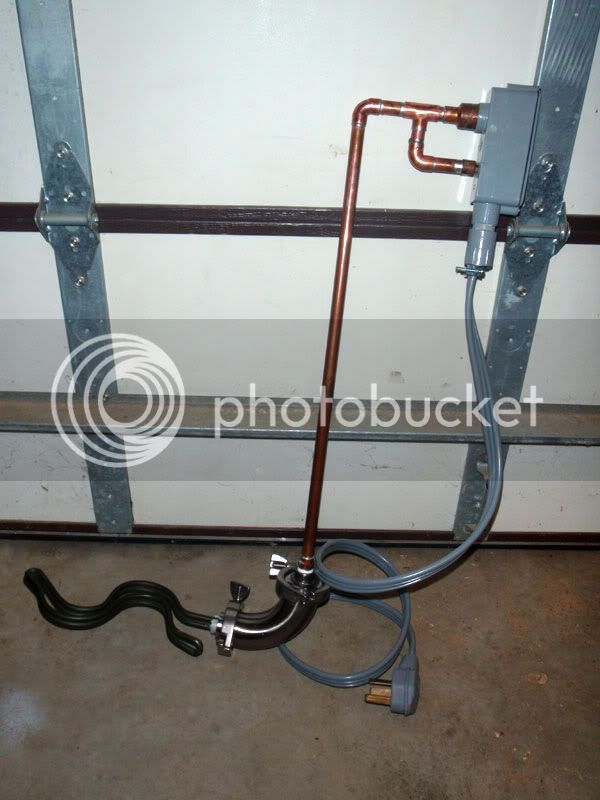
I did stick with the copper pipe. There's a plastic junction box that acts as a convenient handle. I may insulate more of the copper one day, but haven't gotten around to it.

heatstickcomplete.jpg


Pictures and info going forward will be in my electric brewery thread.

-Joe
 
Which gasket did you get at Home Depot?

I did have a leak, yes. The soft rubber gasket from the element squished and wouldn't hold water. I ended up replacing it with a hard rubber one from Home Depot. 4 batches on it so far and holding strong.

And yes, GFCI is not optional for an electric rig. Mandatory.

I did stick with the copper pipe. There's a plastic junction box that acts as a convenient handle. I may insulate more of the copper one day, but haven't gotten around to it.

heatstickcomplete.jpg


Pictures and info going forward will be in my electric brewery thread.

-Joe
 
I just went into the plumbing aisle with the old gasket and found something that looked like it would work. It was actually part of an assortment.

-Joe
 
I don't think so. Those look like fiber gaskets. This had a bunch of rubber gaskets in there. The one I used was orange.

-Joe
 
The gasket that came with the element leaked. After nostalgia's suggestion, I bought a package of gaskets for about $6 from Home Depot. Not sure if it was the same one that he used. It had a few orange gaskets that seemed to be a little bit harder than the original black gasket that came with the element.

Both the original gasket and the new gasket deform and squish out when I tighten the element. This is causing the leak. I am trying to seal a heating element and a 1" coupler. Any ideas where I can get a gasket, o-ring or anything else that will seal this properly?
 
Honestly, the original gasket should seal. Tighten it until it seals, no more. There is no reason to tighten it to the point that it squishes out the sides.
 
Honestly, the original gasket should seal. Tighten it until it seals, no more. There is no reason to tighten it to the point that it squishes out the sides.

That was the first thing that I tried (before tightening it more) and it did not work. The original gasket is now deformed, I would have to get a new one.
 
Weird I've used like 4 different elements and always use the stock gasket. Even in the 212 deg boil kettle. Never had one leak yet.
 
The only thing that I changed is the fitting that the element actually threads into. The threaded end cap didn't fit well, so I replaced it with a 1" NPT half-coupler welded into the end cap.

-Joe

Joe I am looking to build heat stick like you did. Can you elaborate on the way you ended up threading in the element. The elements are NPS threads, how did you get it to work with NPT coupler? I did you mount the coupler on the inside,outside, or middle of the end cap?

Thanks

AJ
 
Joe I am looking to build heat stick like you did. Can you elaborate on the way you ended up threading in the element. The elements are NPS threads, how did you get it to work with NPT coupler? I did you mount the coupler on the inside,outside, or middle of the end cap?
Hey there AJ, sorry for the delay. The NPS element will thread into a 1" NPT coupler. It won't seal on the threads like NPT would, but that's why we have the gasket.

The coupler went through the end cap and was welded somewhere in the middle.

Note that I have had trouble with the gasket sealing on the coupler, so take that into consideration when building yours.

-Joe
 
now thats a heat stick. How does it sit on your brew pot? I'm just curious if it resting on the pipe will make it roll around.
 
Back
Top