Thanks Illin8 I appreciate the response.
You are using an out of date browser. It may not display this or other websites correctly.
You should upgrade or use an alternative browser.
You should upgrade or use an alternative browser.
New 10 Gallon Herms! Pics!
- Thread starter The Pol
- Start date

Help Support Homebrew Talk - Beer, Wine, Mead, & Cider Brewing Discussion Forum:
This site may earn a commission from merchant affiliate
links, including eBay, Amazon, and others.
- Joined
- Feb 11, 2008
- Messages
- 97
- Reaction score
- 0
Doing the wiring on this bad boy tonight/Tuesday. Where does the ground to the HLT element connect? Or did you only use a 2 wire cord?
Thanks,
Scott
Thanks,
Scott
OP
OP
The Pol
Well-Known Member
- Joined
- Feb 12, 2007
- Messages
- 11,390
- Reaction score
- 117
Doing the wiring on this bad boy tonight/Tuesday. Where does the ground to the HLT element connect? Or did you only use a 2 wire cord?
Thanks,
Scott
3 wires, grounded to the steel brew stand. EVERYTHING should be grounded
- Joined
- Feb 11, 2008
- Messages
- 97
- Reaction score
- 0
That is what I thought. Thanks again.
jpold
New Member
Thanks for this thread. I putting my own system together, and although my system isn't exactly like yours, I'm using LOTS of your ideas. I ordered the stirring motor you recommend from McMaster-Carr. I'm assuming you grounded it, but I can't tell from your pictures where you attached the ground wire. Can I just attach a ground wire to one of the screws on the housing?
Thanks again for sharing all this info!
Thanks again for sharing all this info!
BrewBeemer
Well-Known Member
1/2" tubing is key, I agree. the fewer restrictions or hard corners the better it will flow. For those of you think that any bigger hose might be better stick with the 1/2". bigger hose although will flow more down hill or on a straight can cause problems when pumping uphill due to the added head weight
Can you please explain?
I recall a column of fresh water a foot tall at .432 psi or .434 psi per /ft if it's sea water. Same pressure be it a 60" diameter pipe or 1/16" pipe same pressure per / ft. Now each fitting plus changing directions at each fitting adds more restrictions to the flow, also this restriction increases when the GPM thru the hose and fittings are increased.
dantodd
Well-Known Member
Can you please explain?
I recall a column of fresh water a foot tall at .432 psi or .434 psi per /ft if it's sea water. Same pressure be it a 60" diameter pipe or 1/16" pipe same pressure per / ft.
psi = per square inch.
There are more square inches in a 3/4" tubing of a given length than a 1/2" tubing of the same length.
area of a circle is pi*r^2
Using this formula we get 9.42 square inches per foot of 1/2" tubing.
While a 3/4" tube has 21 square inches per foot.
So, using your figure of .432 psi/foot of fresh water it will take
.432*9.42 foot pounds to push fresh water up 1' of 1/2" tubing: or 4.1 ft-lb
and
.432*21 foot pounds to push fresh water up 1' of 3/4" tubing: 9.1 ft.lb
beerocd
Well-Known Member
- Joined
- Nov 27, 2008
- Messages
- 696
- Reaction score
- 5
3 wires, grounded to the steel brew stand. EVERYTHING should be grounded
For the guys who have 4 casters on their rigs that won't work - right? I'm in the process of putting together something with the industrial(food service?) looking chrome carts that can hold up to 800lbs each. I think due to the casters I need to hang a copper braid to contact the ground. Never saw anyone mention doing anything like this - maybe it's just common sense for the guys building the super-rigs; Or maybe I just totally don't know a lick about electricity.
-OCD
BrewBeemer
Well-Known Member
psi = per square inch.
There are more square inches in a 3/4" tubing of a given length than a 1/2" tubing of the same length.
area of a circle is pi*r^2
Using this formula we get 9.42 square inches per foot of 1/2" tubing.
While a 3/4" tube has 21 square inches per foot.
So, using your figure of .432 psi/foot of fresh water it will take
.432*9.42 foot pounds to push fresh water up 1' of 1/2" tubing: or 4.1 ft-lb
and
.432*21 foot pounds to push fresh water up 1' of 3/4" tubing: 9.1 ft.lb
That would make Hoover dam at 280' deep and 800' long pressing Billions of pounds per square inch on the concrete dams face that would be way beyond the laws of physics and of any man made steel com stock run. A 350K metric ton ship would then only need to float on 1/64" of water compared to the size of the Pacific ocean then.
Area does not change pressure only the height in head space does.
Save your math for circle area and just square the diameter then times .7854 for the area.
Do you have any pics of the inside of your HLT? I need to build this.
OP
OP
The Pol
Well-Known Member
- Joined
- Feb 12, 2007
- Messages
- 11,390
- Reaction score
- 117
Do you have any pics of the inside of your HLT? I need to build this.
When I get a chance, I will have to dig it up...
I would also hit up Brrman, we collaborated on how to successfully install the element in his cooler.
Look in my gallery, I have have a photo in there... I will look when I get a moment.
Here it is... obviously before I added the sight gauge. But, it is pretty simple.
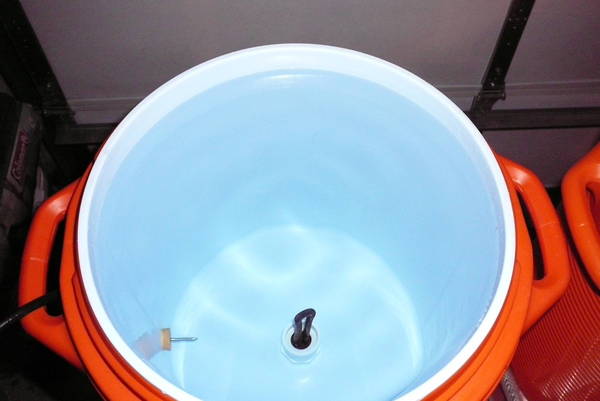
The key is that you MUST reinforce the bottom of the cooler (inner shell) This has been done several ways, but bottom line is that you have to reinforce the area around the hole that you drill with about 1/8" (thick) of material (hard plastic) since the inner shell likes to warp and move when the temps rise in the HLT. If you do this, it wont leak a lick. This has been covered here and I think Brrman was the last to do this build.
I found this:
how are you sealing everything?
Also, do you have a way of measuring how much liquid is transfered between your HLT and Mash/tun?
Edit: oh you beat me to it.
how are you sealing everything?
Also, do you have a way of measuring how much liquid is transfered between your HLT and Mash/tun?
Edit: oh you beat me to it.
OP
OP
The Pol
Well-Known Member
- Joined
- Feb 12, 2007
- Messages
- 11,390
- Reaction score
- 117
You can use a silicone O-ring to seal the element (outside the cooler) and I would recommend getting a 1" straight thread SS nut from BargainFittings.com for tightening it (inside).
I have sight gauges on my HLT and MLT.
I have sight gauges on my HLT and MLT.


To The Pol,
Simply amazing system.
I'd been debating and planning different setups...Gas vs Electric...cooler vs pot...and I'd nearly resigned myself to having to buy a complete system as I just didn't have the wherewithal to pull off rigging LP without blowing myself up and the mysteries of electricity end with "I plugged it in, now what?"
Then I find this tread and think "I CAN DO THAT!"
Now I don't know if I can...but I sure know I will try.
So to you KUDOS!
Now on to my questions:
(And please excuse some of them if they seem dumb...but this electricity thing must trip a reason breaker in my noggin)
1) I found the picture of the HLT lid in your gallery and from what I saw, I didn't see the thermowell...has it been relocated or was it just not in for the picture? I'm assuming (if you didn't move it) it runs to somewhere close around mid-coil?
2) On my lunch break I ran out to HD and grabbed me a 1" threaded PVC coupler and 2000w element and honestly was expecting a bigger thing ("That's what she said"...there ruined it for everyone). Did I get the wrong gadget or are they really THAT small? The thing is only like 7" tall! Also none of them said they were water safe...but the whole section was for Water Heater elements...Item link...should I be concerned?
3) Plugging this stuff in...can I run all three things (pump, HE, stirrer) from the same outlet? Like off a power strip? [at least until I get an e-BK & controller like yours...which is a further future project]
How did you do it before you got the box?
4) On your MLT, you say you got the false bottom from Northern Brewer...assuming the 12" one ...it says it has a 3/8" hose barb on it...did you change to 1/2" or keep it as is?
All I can think of right now...but I'm sure I'll come up with more as I get building.
And if I didn't say it before...this is seriously killer :rockin:
OP
OP
The Pol
Well-Known Member
- Joined
- Feb 12, 2007
- Messages
- 11,390
- Reaction score
- 117
To The Pol,
Simply amazing system.
I'd been debating and planning different setups...Gas vs Electric...cooler vs pot...and I'd nearly resigned myself to having to buy a complete system as I just didn't have the wherewithal to pull off rigging LP without blowing myself up and the mysteries of electricity end with "I plugged it in, now what?"
Then I find this tread and think "I CAN DO THAT!"
Now I don't know if I can...but I sure know I will try.
So to you KUDOS!
Now on to my questions:
(And please excuse some of them if they seem dumb...but this electricity thing must trip a reason breaker in my noggin)
1) I found the picture of the HLT lid in your gallery and from what I saw, I didn't see the thermowell...has it been relocated or was it just not in for the picture? I'm assuming (if you didn't move it) it runs to somewhere close around mid-coil?
The thermowell is a SS tube that the A419 temp probe slides down into. It fits through a hole in the center of the lid, in the center of the HLT and coil.
2) On my lunch break I ran out to HD and grabbed me a 1" threaded PVC coupler and 2000w element and honestly was expecting a bigger thing ("That's what she said"...there ruined it for everyone). Did I get the wrong gadget or are they really THAT small? The thing is only like 7" tall! Also none of them said they were water safe...but the whole section was for Water Heater elements...Item link...should I be concerned?
NO, they ARE that small, which is nice, because then you do not need to maintain a large volume in the HLT to keep the element submerged. Now, realize that you cannot control that element with an A419, you will need a PID and SSR since it is pushing 17A, the A419's max is 16A.
3) Plugging this stuff in...can I run all three things (pump, HE, stirrer) from the same outlet? Like off a power strip? [at least until I get an e-BK & controller like yours...which is a further future project]
How did you do it before you got the box?
Well, if it is a 20A circuit, yes. 17A for the element, <1A for the stirrer and 1.8A for the pump. Now, that is REALLY pushing a 20A circuit and you will want to make sure your power cord can handle 20A. Now this is over the 80% load rule, but that is for continuous loads and yours will not be continuous as the element will cycle on and off. But, you are really pushing it.
4) On your MLT, you say you got the false bottom from Northern Brewer...assuming the 12" one ...it says it has a 3/8" hose barb on it...did you change to 1/2" or keep it as is?
Kept it as is... all my other plumbing is 1/2" though. I cannot fathom a time that the flow restriction there would be an issue.
All I can think of right now...but I'm sure I'll come up with more as I get building.
And if I didn't say it before...this is seriously killer :rockin:
Thanks, hope this answers some questions...
Thanks for letting me know about the 2000w element...didn't realize it was 20a (package doesn't say anything about amps...but hey HD sold it for < $10 same price as the 1500w btw) ... I'll grab a 1500w one and save this one for a future heat stick or brew kettle.
-Jay
-Jay
OP
OP
The Pol
Well-Known Member
- Joined
- Feb 12, 2007
- Messages
- 11,390
- Reaction score
- 117
Thanks for letting me know about the 2000w element...didn't realize it was 20a (package doesn't say anything about amps...but hey HD sold it for < $10 same price as the 1500w btw) ... I'll grab a 1500w one and save this one for a future heat stick or brew kettle.
-Jay
Most things wont list amps... but take wattage/volts= AMPS
1500W/120volts = 12.5 AMPS
and so on.
You should catch one of my brewcasts or see some of my videos on the E HERMS...
They recorded somewhere?
I'd love to watch it happen captain!
I'd love to watch it happen captain!
OP
OP
The Pol
Well-Known Member
- Joined
- Feb 12, 2007
- Messages
- 11,390
- Reaction score
- 117
Here are a couple vids from yesterday...
[ame]http://www.ustream.tv/recorded/2488590[/ame]
[ame]http://www.ustream.tv/recorded/2489302[/ame]
Here are my Youtube "build" videos...
http://iam.homebrewtalk.com/videos.php?u=7954&Video_ID=119#video119
http://iam.homebrewtalk.com/videos.php?u=7954&Video_ID=120#video120
[ame]http://www.ustream.tv/recorded/2488590[/ame]
[ame]http://www.ustream.tv/recorded/2489302[/ame]
Here are my Youtube "build" videos...
http://iam.homebrewtalk.com/videos.php?u=7954&Video_ID=119#video119
http://iam.homebrewtalk.com/videos.php?u=7954&Video_ID=120#video120
BigNastyBrew
Well-Known Member
Finally getting some more time to look into this.
I don't understand how you keep the stoppers in place for the thermometers. Are they just shoved in the holes and they hold up?
I don't understand how you keep the stoppers in place for the thermometers. Are they just shoved in the holes and they hold up?
OP
OP
The Pol
Well-Known Member
- Joined
- Feb 12, 2007
- Messages
- 11,390
- Reaction score
- 117
Finally getting some more time to look into this.
I don't understand how you keep the stoppers in place for the thermometers. Are they just shoved in the holes and they hold up?
Yes, notice that they are inserted from the INside, so the water pressure in the MLT and HLT actually presses the stopper into the hole.
In three years, never had them leak.
My Pol Clone eHLT is built and heating up as I type.
It looks to be taking about 90+ minutes to heat 9g of water to 170 but my facet runs cold this time of year...think I started at 60.
Anyway, I've obviously checked it for leaks [had it sit filled for a day] then plugged it in and didn't blow the fuse or GFI...
Anything else I should look for to make sure there is no shorts?
Also the stirring motor only has two wires and they aren't labeled or colored...but I found that if you switch the wires...the fan moves the other way
So I want to make sure...fan should blow air DOWN onto the motor to cool it off or AWAY from the motor to blow away the hot air?
I currently have it blowing down.
-jay
OP
OP
The Pol
Well-Known Member
- Joined
- Feb 12, 2007
- Messages
- 11,390
- Reaction score
- 117
My Pol Clone eHLT is built and heating up as I type.
It looks to be taking about 90+ minutes to heat 9g of water to 170 but my facet runs cold this time of year...think I started at 60.
Anyway, I've obviously checked it for leaks [had it sit filled for a day] then plugged it in and didn't blow the fuse or GFI...
Anything else I should look for to make sure there is no shorts?
Also the stirring motor only has two wires and they aren't labeled or colored...but I found that if you switch the wires...the fan moves the other way
So I want to make sure...fan should blow air DOWN onto the motor to cool it off or AWAY from the motor to blow away the hot air?
I currently have it blowing down.
-jay
Watch for leaks around the element when it is at operating temp. This is because you have the inner liner really expanding at higher temps. This is overcome by reinforcing the inner liner as stated previously with what amounts to a plastic washer epoxied around the hole.
My fan blows DOWN over the motor... much better cooling than trying to suck air away from the motor. In a year of service, no problems at all.
I just wanted to again say OH MY GOD this system rocks.
Just got mine up and running and it was the first brewday that didn't feel like "work"
I actually had time to work on my keezer while it was doing it's thing.
Amazing Pol amazing....bless you and you brews.
While I still need to get the hang of a few things (like how to keep the fluid in the tube when I QD) I'm longing to make my next batch.
Looks like brewmasterswarehouse is about to get another order, or two....or three.
BigNastyBrew
Well-Known Member
Yes, notice that they are inserted from the INside, so the water pressure in the MLT and HLT actually presses the stopper into the hole.
In three years, never had them leak.
Thanks
Another question: What is 50785k94 part for? I got it from the parts list and it's in the same listing as the any-which-way but I don't see the relationship between them.
Thanks again
OP
OP
The Pol
Well-Known Member
- Joined
- Feb 12, 2007
- Messages
- 11,390
- Reaction score
- 117
Thanks
Another question: What is 50785k94 part for? I got it from the parts list and it's in the same listing as the any-which-way but I don't see the relationship between them.
Thanks again
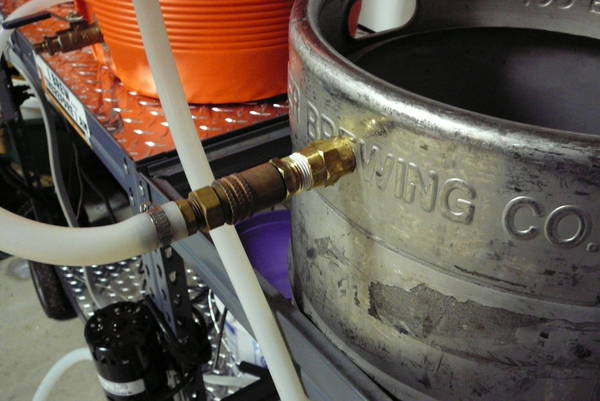
Those HEX couplings are to join (2) 1/2" male threaded ends... like say on a male QD and the threaded end of a LocLine connector.
- Joined
- Nov 6, 2007
- Messages
- 62,016
- Reaction score
- 6,922
Is the flat o-ring that comes with the element not sufficient?You can use a silicone O-ring to seal the element (outside the cooler) ...
This is overcome by reinforcing the inner liner as stated previously with what amounts to a plastic washer epoxied around the hole.
On the outside of the cooler or inside?
ScubaSteve
Well-Known Member
- Joined
- May 21, 2007
- Messages
- 3,673
- Reaction score
- 91
Pol- I know you recently sold this, but what can you say about loc-line after several brews with it?
1)Any off flavors?
2)How did it retain its position with boiling liquids?
3)How was the flow rate with the 1/2" ID?
4)Would you recommend any of the nozzles, or do they get clogged?
Thanks,
Steve
1)Any off flavors?
2)How did it retain its position with boiling liquids?
3)How was the flow rate with the 1/2" ID?
4)Would you recommend any of the nozzles, or do they get clogged?
Thanks,
Steve
OP
OP
The Pol
Well-Known Member
- Joined
- Feb 12, 2007
- Messages
- 11,390
- Reaction score
- 117
Is the flat o-ring that comes with the element not sufficient?
It is sufficient, but it seems everyones results vary.
On the outside of the cooler or inside?
The reinforcement can be on either surface... it is basically to alleviate the issues with the inner liner flexing after heating. It is VERY flimsy, you just need to build it up so that it provides a nice mating surface.
Hope that helps.
OP
OP
The Pol
Well-Known Member
- Joined
- Feb 12, 2007
- Messages
- 11,390
- Reaction score
- 117
Pol- I know you recently sold this, but what can you say about loc-line after several brews with it?
1)Any off flavors?
2)How did it retain its position with boiling liquids?
3)How was the flow rate with the 1/2" ID?
4)Would you recommend any of the nozzles, or do they get clogged?
Thanks,
Steve
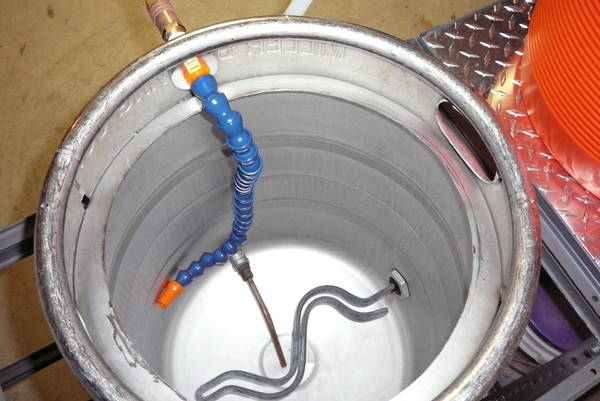
No off flavors... actually boiled it a few times on my stove and there were no "chemical" vapors like you will get from reinforced vinyl tubing.
Held its position perfectly.
I had excellent flow rates... but remember it also depends on what else you are pumping through. When pumping up and through my HERMS coil the flow was about half what it was when I simply recirculated my kettle.
I recommend the simple 1/2" ID orange nozzle. It provides a little pressure to whirlpool the kettle well, but is large enough that I had nothing clog it.
ScubaSteve
Well-Known Member
- Joined
- May 21, 2007
- Messages
- 3,673
- Reaction score
- 91
Suhweet. I'm going back and forth between this and simple silicon tubing. I'm not a fan of kinking/bending, especially when the tubing warms up.
- Joined
- Nov 6, 2007
- Messages
- 62,016
- Reaction score
- 6,922
Thanks for answering my Q's Pol. McMaster Carr due to deliver stir assembly pieces.
OP
OP
The Pol
Well-Known Member
- Joined
- Feb 12, 2007
- Messages
- 11,390
- Reaction score
- 117
Thanks for answering my Q's Pol. McMaster Carr due to deliver stir assembly pieces.
No problem sir... no problem. Soon I will have intimate knowlege of RIMS, so I can help you on your next build.
beerocd
Well-Known Member
- Joined
- Nov 27, 2008
- Messages
- 696
- Reaction score
- 5
No problem sir... no problem. Soon I will have intimate knowlege of RIMS, so I can help you on your next build.
Aw man, I was hoping you were going after the "Merlin" system for brewing. That's where I figured the secrecy all came in. It was mentioned in the latest Zymurgy mag; and they even said they wondered why more homebrewers weren't building these.
jkarp
Well-Known Member
New Belgium uses a Steinecker Merlin boiler. Just saw it in action last week when I took my Dutch friends up for a tour. Would be interesting to see someone scale that down to homebrew size.
CodeRage
Death by Magumba!
New Belgium uses a Steinecker Merlin boiler. Just saw it in action last week when I took my Dutch friends up for a tour. Would be interesting to see someone scale that down to homebrew size.
I had to look it up. Very different process, looks very cool! Doesn't look like the give HSA a second glance though, interesting.
Here is a description if any one is curious
http://www.kronesusa.com/downloads/wuerzekochung_e.pdf
Sorry to dig up an old thread I know this build is years old and since sold BUT,
I am gathering parts for this build, but I wanted to buy all SS fittings. I figured if I should ever evolve and change builds in the future I can always reuse the stainless. Anyways one thing I am in the air about is if I should use a SS HEX or stick to the copper the way done in the build here. I don't think there would be much of an issue with holding mash temperatures using a SS hex, but since I planned on using it to step to mashout temperatures (the same way the OP did) I worry that SS would have a significant impact on step times. I would expect that the step time would be limited by the 1500W heater and not the heat exchange, just wanted to see if anyone had thoughts on it.
I could always still go with copper, but I prefer not to mix metals due to galvanic corrosion. If I had to choose between unreasonable step times and a tiny bit of corrosion I would probably go with the corrosion. Any thoughts are welcome.
OP
OP
The Pol
Well-Known Member
- Joined
- Feb 12, 2007
- Messages
- 11,390
- Reaction score
- 117
Here is my opinion... and that is all that it is.
Use SS.
The heat transfer when you are speaking in terms of the wall thicknesses of copper or SS tubing, are so close... you wont see much difference, if any.
In a HERMS with a large volume HEX, your step time bottle neck IS the heating of the HEX water and the fact that you may only be pumping .5gal/min? SO if your mash consists of 8 gallons of water it will take you 16 minutes JUST to turn over the water once. That alone will not step the mash temp up though as you have to heat all of that grist, not just the water flowing through the HERMS coil.
Id go SS, it cleans well, wont corrode, etc... plus in the future when you get all blingy you will have a cool SS coil to start with.
On my new build I used a 50' SS coil (1/2" OD) and it was CHEAPER than getting the 50' COPPER coil (1/2" OD)
Brocster
Well-Known Member
I just wanted to again say OH MY GOD this system rocks.
Amazing Pol amazing....bless you and you brews.
AMEN! The system is absolutely amazing and you should be proud of that!
Thanks for all the help so far, and I look forward to hearing from you in the future!
Broc

Similar threads
- Replies
- 0
- Views
- 269
- Replies
- 3
- Views
- 969
- Replies
- 2
- Views
- 283