Closed-system pressurized fermentation technique!

Homebrew Talk - Beer, Wine, Mead, & Cider Brewing Discussion Forum

Help Support Homebrew Talk - Beer, Wine, Mead, & Cider Brewing Discussion Forum:

This site may earn a commission from merchant affiliate links, including eBay, Amazon, and others.

What do you guys think about pressure fermentations? Time for a poll.

  • I've done it and I liked it just fine!

  • I've done it, nothing wrong with it, but prefer normal fermentation techniques.

  • I've done it, hate it, and never will do it again!

  • I've never done it, but it is on my list!

  • I've never done anything. I only brew beer in my mind.


Results are only viewable after voting.
So if I am understanding this correctly, if you find a way to cold crash your whole conical you can drink fresh carbonated beer straight from your conical!?!?! Here is what I am thinking:

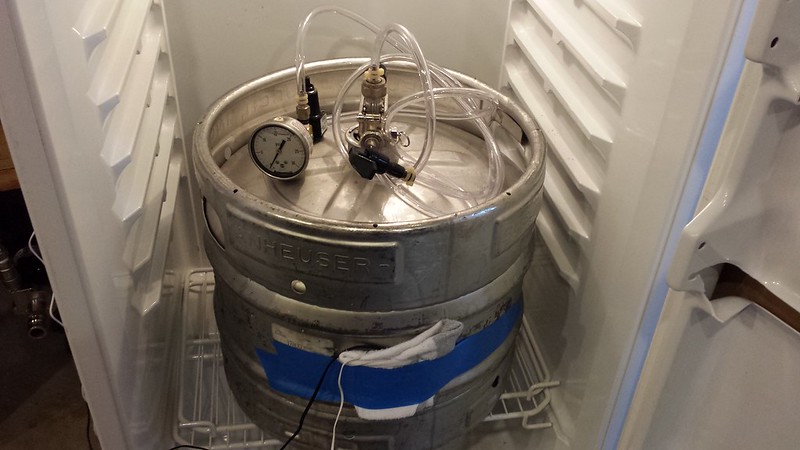
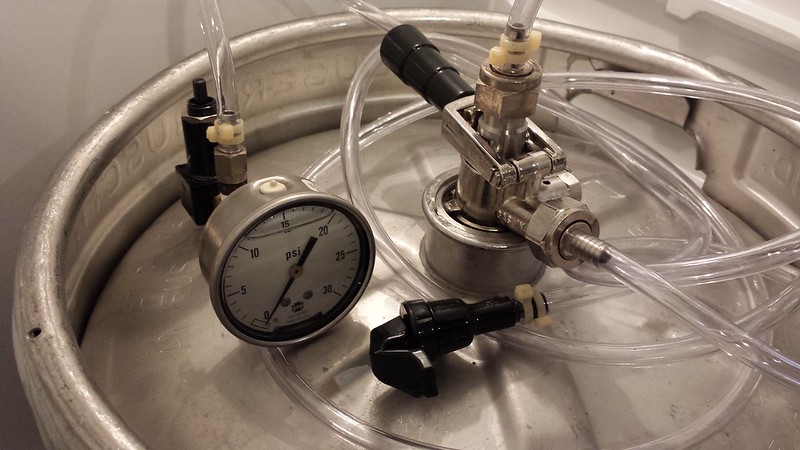
If you have a conical that can pressure ferment such as the Brewhemoth, then why cant you dump the yeast regularly to avoid the packed yeast cake, cold crash the conical, attach your tap to the racking port, and dispense your fresh beer? (This is all after the proper fermentation periods of course). I mean how cool would it be to drink fresh carbonated beer right from your sexy conical?!?!


The Brewhemoth with its spunding valve will allow the brew to self carbonate as it ferments so all that is needed then is to cool the brew and serve right?

I am taking this idea from the Williams Warn Personal Brewery as this is generally how their product works.

What are your thoughts? Has anyone tried this?
 
What is the consensus on pressure profiles? I've heard some say to ramp up pressure a few PSI per day, others say keep it low until you want to carbonate, others say to reduce pressure when you cold crash. I plan to carbonate in the keg, and then transfer to serving keg and/or bottle with counter-pressure filler after cold crashing.

This is what I have going at the moment;
Fermentation Temperature and Pressure schedule:
Pitched: 7-16-2013 at 10:30 AM

Day 1 (0 - 12 hours) - 3 PSI @ 65 F
Day 1 (12 - 18 hours) - 4 PSI @ 65 F
(turned knob 1.5 turns)
Day 1 (19+ hours) - 7 PSI @ 65 F
Day 2 - 7 PSI @ 65 F
Day 3 - 7 PSI @ 65 F
Day 4 - 7 PSI @ 65 F (10 Brix)
Day 5 - 7 PSI @ 67 F (9.4 Brix)
Day 6 - 7 PSI @ 67 F (8.7 Brix)
(turned knob 2.5 turns)
Day 7 - 12 PSI @ 71 F
Day 7 - 16 PSI @ 71 F
(turned knob 2 turns)
Day 8 - 20 PSI (estimated)
Day 13 - 19.5 PSI
7-29-2013 8.7 Brix
(turned knob 1/2 turn, to determine if pressure will increase)
Day 14 -
(turned knob 2 turns)
Day 15 - (estimated as crash chill day)
Day 16 - started crash chill
(pressure was 21.5 psi @ 71 F, 1.74 volumes of CO2)
Day 33 - pressure transferred to serving kegs
(pressure was 10.0 psi @ 33 F, 2.63 volumes of CO2)

OG: 1.068
FG: 1.016
Apparent Attenuation: 76.5%
ABV: 6.8%


From WortMonger;
"I differ in that I hold my beer at 5 - 7 psi during the initial ferment until I am a few points from estimated finish (3-5 days and "estimate" with my refractometer) and then completely un-tap and let the keg fire up to whatever it goes to pressure-wise. After a complete week of primary, I drop to 33* and let sit a week.I differ in that I hold my beer at 5 - 7 psi during the initial ferment until I am a few points from estimated finish (3-5 days and "estimate" with my refractometer) and then completely un-tap and let the keg fire up to whatever it goes to pressure-wise. After a complete week of primary, I drop to 33* and let sit a week."

From lamarguy;
"I find myself fermenting and conditioning ales for 2 - 3 weeks with a generic pressure schedule:
Day 1 - 1 PSI
Day 2 - 2 PSI
Day 3 - 6 PSI
Day 4 - 9 PSI
Day 5+ - 12 PSI
The low pressure (1 - 2 PSI) for the first 48 hours is to allow for normal yeast growth. After that, crank it up."
 
Hi All,
Well after a year of watching this thread and pulling together kegs, taps, a refrigerator that will hold a sanke and other stuff I am finally under pressure.

I might not have picked a great yeast for this first run, WLP090 SDSY, as it is claimed to finish fast so I will have to watch my gravity and probably constantly crank up the pressure.
Made the Caramel Amber Ale with the candi syrup in the recipe section.

I sure hope this beer taste good after all this.

Here is my setup -

9467585269_5503ae70e7_c.jpg


9470363966_6fd0c0ff6a_c.jpg


It lives -

9467565511_84c2373059_c.jpg


thanks Kevin
 
Just came across this on gizmag williamswarm breeding machine.

image-2137409987.jpg

Beer in 7 days, was this a flop or did it really happen?
 
Hi All,
Drew off my first sample this morning.

Did not shake it or anything to degas it... was in a hurry....it read about 1.050... which is what it was when I pitched it and there has been active fermentation for 14+ hours?

So my question is ...
On a carbed up sample (mine was at 5psi and full of yeast) what does that do to the hydro reading?
Make it higher by X or lower than X or?

thanks Kevin

Mine always shows at least 5 points higher than when it is degassed.
I don't do anything fancy to degas it; I just leave it in the sample overnight and hope most of the gas finds its way out so I can read it in the morning.
 
Thanks Juanmoore

I wouldn't use the CO2 produced from the most active stages of fermentation to carbonate other beer. It contains a lot of volatiles and other things that can contribute to off flavors. Even if you wanted to do that, that setup wouldn't work very well, since you'd need the spunding valve (or an additional spunding valve) to be on the exit side of the keg you're trying to carbonate. Simply hooking it up to the line you have now could easily result in dangerous pressures building up in both kegs. If you want to carbonate naturally using the CO2 produced from fermentation, simply crank the spunding valve up to the appropriate pressure once fermentation is winding down.

The only times I increase the pressure is when I want to carbonate the beer using the tail end of fermentation.

I'd work on getting good temperature control rather than trying to compensate for poor temp control in other ways. Fermenting under pressure can reduce some of the off flavors associated with higher temps, but it's very strain dependent, and too much pressure will cause other off flavors.

Yes. Higher pressures during the most active parts of fermentation can stress the yeast and cause them to produce off flavors. Most breweries that ferment under pressure keep things under 15 psi for the first few days of active fermentation. I've also read that it's important to keep the pressure under 35 psi at all times if you plan on harvesting/washing yeast, since the higher pressures can cause unwanted mutations. I've never tested that theory myself, so I'm not sure how much truth there is to it.

Good to know about CO2 from a active stages. Perhaps I'll scrap the CO2 recapture idea for now and use those parts for something else. Maybe some kind of splitter and check valves before the pool filter to allow multiple kegs to ferment at the same time...

It's been about 2 weeks since brewday, checked the gravity 2 days ago and it was approaching terminal gravity, I'll recheck today. I kept it at about 5-7 psi for the first week and then allowed it to ramp up a few psi at a time to about 10psi until 2 days ago when I gave it an extra turn to see where it climbs to. At what point do you typically start cranking up the pressure? I originally planned just carbonating naturally and then finish it off with tanked co2. I don't want to add priming sugar or any of that kind of jazz. At what point would you consider it the 'tail end'?

Yeah I would like to get a dedicated fridge but apartment is too small... On the flip side I live in San Francisco where it's a consistent foggy 65 degrees Fahrenheit so temp is rarely a problem haha.

Also good to know about stressing the yeast, I was thinking 15 psi was high haha.
 
Thanks 1MadScientist.

So when not brewing with a conical fermenter, do you guys rack as normal?

Typically I let it ferment fully and then some. Then I rack to a keg and condition/carbonate it and just serve straight from that keg. My worry is that if I rack too soon I could halt or stunt the yeast process that is carbonating it, would you agree?
 
This is what I have going at the moment;
Fermentation Temperature and Pressure schedule:
Pitched: 7-16-2013 at 10:30 AM

Day 1 (0 - 12 hours) - 3 PSI @ 65 F
Day 1 (12 - 18 hours) - 4 PSI @ 65 F
(turned knob 1.5 turns)
Day 1 (19+ hours) - 7 PSI @ 65 F
Day 2 - 7 PSI @ 65 F
Day 3 - 7 PSI @ 65 F
Day 4 - 7 PSI @ 65 F (10 Brix)
...

Thanks 1MadScientist -- this is very helpful.

My SNPA clone, OG 1.056, fermented at 65F @ 3PSI, dropped all the way to 6 brix per refractometer (see photo below; converts to 1.005 in BS) by day 3 -- way below target final gravity (1.012).

I ramped up to 6PSI by day 5, and still had 6 brix. I also noticed the sample was lightly carbonated.

I was suspecting an infection and measured the PH on day 7 -- 4.35PH, just about what you'd expect for a pale ale so perhaps no infection? No terribly off smells so far. Still 6 brix.

Does the carbonation that occurs during fermentation impact the yeast or the rate of fermentation? More CO2 in solution tends to lower PH, so I could see it having some effect.

Does the carbonation impact refractometer readings? Hydrometer readings? I'm letting a sample de-carbonate now for a hydrometer reading. (EDIT: hydrometer reads 1.010 after temperature correction on a de-gassed sample; still lower than expected FG but getting within measurement error)

I haven't seen this in any of my batches before, but then I've changed a number of things on this batch (new 15G kettle, RIMS, pressurized fermentation) so I'm trying to isolate the cause. (EDIT: perhaps just a case of needing more DWRHAHB)

photo.jpg
 
I would check the calibration on your thermometers; being that you just added a RIMS you probably added a new controller and new thermometer or RTD.
If you mashed at a lower temp than what you think you did; that would give you a more fermentable mash so you would finish lower.
 
Not thinking clearly, I filled a corny keg fermenter too far this Saturday (2nd time I've ever fermented under pressure). I was conservative last time, but now have a clear plastic water filtration housing as krausen trap if things were to get too vigorous. Well, I used both foam control drops and had the trap, so I figured I could fill the keg to within a few inches of the gas-in tube. I was wrong.

48hrs later, I now have a krausen trap filled with about a liter of beer, most of it being yeast slurry...possibly a good majority of the yeast that should still be in the keg doing the fermentation. Should I bring the pressure down to zero, dump out a half-gallon of beer, and pour the yeast back into the keg so it can finish fermenting the bulk of the wort? Or, maybe I'm ok? I'm concerned because there is a *lot* of yeast in that krausen trap right now.

Help!
 
Nah your alright. There is still plenty of yeast in the wort. Just empty the trap to keep it from overflowing. If the trap was cleaned with star sans use it for the next batch.
 
Nah your alright. There is still plenty of yeast in the wort. Just empty the trap to keep it from overflowing. If the trap was cleaned with star sans use it for the next batch.

Thanks EK. Yep, the whole business was sanitized thoroughly before sealing it up. That's a good idea...inadvertently top cropping the yeast :)
 
I had that happen the first time I tried the trap.
Here are the mistakes that I made:

a) I put fermcap in at the beginning of boil but none in the keg.
It is advertised that it eliminates boil over foam and keeps working throughout fermentation. But I found out that it looses some of its strength in the process, I now add fermcap at flameout.

b) I had a leak in the trap, this did not put any head pressure against the foam and allowed it to flow unopposed into the trap.
I now pre-pressure the keg/trap with O2 during aeration, to 5-10psi. This aerates the beer with pure O2 and tests my system for leaks at the same time. Once I am happy with it, I shake it real good to make sure my wort is mixed well with my O2.

If the the fermentation is vigorous I can still get the trap about 1/2 full; but normally I will only get 1" or less. This is usually rich in hop matter and yeast, not sure how useful this is to keep.
 
b)
I now pre-pressure the keg/trap with O2 during aeration, to 5-10psi. This aerates the beer with pure O2 and tests my system for leaks at the same time. Once I am happy with it, I shake it real good to make sure my wort is mixed well with my O2.

Hi,
Please tell me more about this process.
Other than testing your system for leaks, what benefit is it over putting in an oxygen wand, aerate and pitch, then seal up the keg.

(BTW - I am using Sanke keg not corny, so I would need some kind of hose/fitting/adapter to get this to work)

thanks Kevin
 
My keg is leaking at the coupler/spear.
I can see bubbles via starsan and my gauge is going down in pressure....
I only got the gauge up to 12 psi and it did not got higher...now it is going down, as fermentation is over.

I did not get the l snap ring in completely, is maybe the spear oring leaking because of this?
The snap ring was in far enough that I got the coupler on without issue ... so I thought.

Any tips on how to get the snap ring in... completely?
I used vise grips and worked it around the grove best I could.

edit - I meant spiral ring

thanks Kevin
 
My keg is leaking at the coupler/spear.
I can see bubbles via starsan and my gauge is going down in pressure....
I only got the gauge up to 12 psi and it did not got higher...now it is going down, as fermentation is over.

I did not get the l snap ring in completely, is maybe the spear oring leaking because of this?
The snap ring was in far enough that I got the coupler on without issue ... so I thought.

Any tips on how to get the snap ring in... completely?
I used vise grips and worked it around the grove best I could.

thanks Kevin

Snap ring or spiral ring? I quit using the snap rings and went back to the spiral type because I had a couple issues with the snap rings not sealing completely.
 
I'm guessing the leak is related to not getting the retaining ring seated fully, but I'm not sure why it was difficult. Always takes just a light squeeze with pliers to seat mine.
 
Man, so much info in this thread! Thanks for all the contributions, everyone.

I'm about to try this for the first time and wonder if someone could critique my process:

-Make wort!
-Cool wort!
-Put wort in sanitized corny keg
-Add some Fermcap S
-Pitch yeast
-Purge with CO2
-Set spunding set up to 5 PSI
-Ferment at 65* (Or whichever temp for that yeast)
-After approx 3-4 days, turn spunding valve up to 30 PSI
-Wait a week
-Crash Cool to 34*
-Wait a week
-Release most of the pressure via spunding valve adjustments
-Use Cobra tap to clear dip tube/keg of trub/sediment
-When line runs clear, transfer via jumper to cold, waiting corny via a few PSI
-Enjoy!

What says the hive?
-
 
This has probably already been covered, but I don't have the time to read the entire thread and a cursory search didn't yield anything.

What do you guys make of Greg Noonan's assertion that "during the primary fermentation, it is essential that virtually no carbon dioxide remain in solution, since it carries malt and hop debris into the head and sulphur compounds and esters out of the ferment"? (New Brewing Lager Beer, Vol. 2, p. 171).
 
Man, so much info in this thread! Thanks for all the contributions, everyone.

I'm about to try this for the first time and wonder if someone could critique my process:

-Make wort!
-Cool wort!
-Put wort in sanitized corny keg
-Add some Fermcap S
-Pitch yeast
-Purge with CO2
-Set spunding set up to 5 PSI
-Ferment at 65* (Or whichever temp for that yeast)
-After approx 3-4 days, turn spunding valve up to 30 PSI
-Wait a week
-Crash Cool to 34*
-Wait a week
-Release most of the pressure via spunding valve adjustments
-Use Cobra tap to clear dip tube/keg of trub/sediment
-When line runs clear, transfer via jumper to cold, waiting corny via a few PSI
-Enjoy!

What says the hive?
-

What do you do for wort oxygenation, and why are you purging the keg with CO2 before fermentation has started?

This has probably already been covered, but I don't have the time to read the entire thread and a cursory search didn't yield anything.

What do you guys make of Greg Noonan's assertion that "during the primary fermentation, it is essential that virtually no carbon dioxide remain in solution, since it carries malt and hop debris into the head and sulphur compounds and esters out of the ferment"? (New Brewing Lager Beer, Vol. 2, p. 171).

It is true that the CO2 carries a lot of nasty stuff out of solution. That's why breweries who use CO2 recapture systems require really high tech filters and scrubbers. Most of those compounds are created in the earlier most active stages of fermentation, and carried away whether you use a spunding valve or not (unless you have it set really really high). I'm sure there are slightly higher levels of those compounds in the beer when more CO2 is left in solution. For many yeast strains the wort being under pressure reduces many of those same undesireable compounds, so in some ways it could counteract the fact that there's more CO2 in solution. I imagine it would be yeast strain dependent.
 
What do you do for wort oxygenation, and why are you purging the keg with CO2 before fermentation has started?

Thanks for the catch, yes, I need to get some oxygen in there, not CO2. Planning on a red oxy bottle from Home Depot connected to a liquid in quick disconnect.

Other than that, how am I looking?
 
Thanks for the catch, yes, I need to get some oxygen in there, not CO2. Planning on a red oxy bottle from Home Depot connected to a liquid in quick disconnect.

Other than that, how am I looking?

Looks good to me. You'll probably find that with the small diameter liquid diptube of a corny keg it will clog with yeast cake one out of 5 times, and you'll either need to bump the pressure or remove the diptube and clean it out before you can transfer.
 
Looks good to me. You'll probably find that with the small diameter liquid diptube of a corny keg it will clog with yeast cake one out of 5 times, and you'll either need to bump the pressure or remove the diptube and clean it out before you can transfer.

Thanks Juan!
 
I'm about to try this for the first time and wonder if someone could critique my process:

-Purge with CO2
-Set spunding set up to 5 PSI
-Release most of the pressure via spunding valve adjustments
Use Cobra tap to clear dip tube/keg of trub/sediment
When line runs clear, transfer via jumper to cold, waiting corny via a few PSI
I'll remark on these 3 points;
-My aeration is done by rolling kegs briskly and burping lids.
-Numerous pressure schedules out there, I have one posted 2 pages back.
-Try pressure transferring and keep all/most of the pressure you have on transfer day. Example, this is what I had in my fermenting corny at the time - Day 33 - pressure transferred to serving kegs
(pressure was 10.0 psi @ 33 F, 2.63 volumes of CO2)

For a more detailed description of pressure transferring to discard the first bit of yeast coming through the lines, let me know and I'll do a separate post.

One more thing; hop debris WILL clog your poppets.

You can view my photos at the link provided below. Hope this helps!

Thanks MS! My settings show 40 posts/page so I'll have to find out which one you're referring to. I use a 40 mesh Hop Spider so no hops in the fermenter for me =)
 
My keg is leaking at the coupler/spear.
I can see bubbles via starsan and my gauge is going down in pressure....
I only got the gauge up to 12 psi and it did not got higher...now it is going down, as fermentation is over.

I did not get the l snap ring in completely, is maybe the spear oring leaking because of this?
The snap ring was in far enough that I got the coupler on without issue ... so I thought.

Any tips on how to get the snap ring in... completely?
I used vise grips and worked it around the grove best I could.

edit - I meant spiral ring

thanks Kevin

In case anyone needs help in the future.

I pulled out the coupler and used 3 small vise grips, as clamps to get the spiral ring all the way down and around and seated.
The 3rd vise grip was the key, I would probably use 4 next time, as it held ring in place while I worked it in the grove and did NOT come out as I worked in place, as previously.

Thus stopping the leak around the spear.

thanks Kevin
 
I've got my spunding setup complete now, woohoo! One snag: I installed the glycerine-filled gauge into a brass T, and on the gauge there is a rubber cap on top with a sticker next to it that says "After Installation Cut Top As Shown" It's basically a tiny rubber nipple that you snip off with scissors. So I snipped it, and now the dang thing leaks glycerine from there! What was the purpose of cutting that nip off, does anyone know? If this thing leaks and goes dry, will it be effected? Here is the gauge in question: http://www.amazon.com/dp/B004IRCADG/?tag=skimlinks_replacement-20
 
Last edited by a moderator:
A quick google search revealed this:IMPORTANT - All pressure gauges sealed for the purpose of liquid-filling have a device to assure atmospheric compensation. A sticker on the case shows how to cut off or pierce a hole into the rubber placed at the top of the gauge after installation. If the rubber device is not opened, in addition to false pressure reading, sever personal damage may be resulted.

I think it'll be fine; it must have been equalizing.

Thanks Pickles, your GoogleFu was way better than mine this morning!
 
Would someone mind posting their transfer-to-serving keg technique? That's the biggest problem that I'm having. I didn't shorten my dip tube, and of course, yeast is coming over. Do any of you guys filter under counter-pressure? If so, is it still a complete mess (nucleation sites on the filter membrane and carbonated beer)?
 
Would someone mind posting their transfer-to-serving keg technique? That's the biggest problem that I'm having. I didn't shorten my dip tube, and of course, yeast is coming over. Do any of you guys filter under counter-pressure? If so, is it still a complete mess (nucleation sites on the filter membrane and carbonated beer)?

Here are some quotes from WortMonger;
"I transfer to my serving keg at as close to 32*F as I can get, and at counter-pressure. I pressure up to 15 psi (15 psi = 103 KPa) in my target keg, then transfer with 15 psi (15 psi = 103 KPa) bottle gas out of the primary fermenter keg. With my spunding valve on my target keg set to 15 psi (15 psi = 103 KPa), I then up the bottle pressure a little to try and have a slow flow to the target keg. This insures I don't have a lot of sediment entering the target keg. I like the true counter-pressure transfer, and the spunding valve makes that easy. I like my target kept at the pressure I want it to end up at, and raise the pressure in the first keg as control. It [takes] about 10 minutes [to complete a 5 gallon (5 gal = 18.9 L) transfer].

I do have my target at a little lower than sending keg pressure to start the transfer, but with my spunding valve set to my wanted ending pressure. This insures I don't get a blast of CO2 into my sending keg before beer starts to flow into the target keg and stir up sediment (which happened while learning my system)."

Here is one of my pics showing the 'first runnings' of the yeast being pushed into an empty corny. Blue handle is the receiving corny.

Gently pushing first 'runnings' into 'catch can'. I don't want the yeast carried over into my serving keg.

3/2/2013 by Mad Scientist Brewhaus, on Flickr
 
Thanks MadScientist :) I would never have thought about the problem of the receiving keg burping back into the primary and the calamity that would result. You have surely saved me some frustration, I'm sure!

I got to thinking a little more about "racking". A corny keg dip tube is approx the same diameter as an acrylic racking cane. I wonder if by simply utilizing one of the racking cane ends secured to the dip tube, the flow of beer might be less apt to disturb the yeast/trub cake at the bottom of the vessel? Simple idea, but if it helps in a normal racking transfer...

racking-tube-replacement-tip.jpg
 
GNBrews said:
Thanks MadScientist :) I would never have thought about the problem of the receiving keg burping back into the primary and the calamity that would result. You have surely saved me some frustration, I'm sure!

I got to thinking a little more about "racking". A corny keg dip tube is approx the same diameter as an acrylic racking cane. I wonder if by simply utilizing one of the racking cane ends secured to the dip tube, the flow of beer might be less apt to disturb the yeast/trub cake at the bottom of the vessel? Simple idea, but if it helps in a normal racking transfer...

That would work swimmingly except for the little bit in the racking cane end piece. I wouldn't worry about that little bit of yeast at all. I thought of doing the same thing for a sanke but haven't found anything that would work yet.
 
Any updates from people using the technique latey?

I'm enjoying the results of my first brew with the technique, which I have to say is my best batch yet out of 7-8 batches.

What I like / worked well:
- Fermenting in a sealed keg. Don't have to worry about infection, light, O2. Easy to pull samples.

- Fermenting in keg in a kegerator. Easy temperature control. Can cold-crash in fermentor.

- Keg spear removal tool made life much easier.

- DIY keg cleaner using 5 gallon bucket, submersible pump, PVC pipe and metal CIP ball

- Pressurized transfer to serving keg (for half the batch).

What I'm not so excited about / didn't work well:
- Fermenting under pressure. Not sure if it buys you anything.

- "Natural" carbonating in fermentor. It turns out my spunding valve has a slow leak somewhere; I think in the gauge itself. I ended up attaching the valve only to take readings in the end, but was never able to get up to proper carbonating pressure. I ended up force-carbing while cold crashing.

- Counter-pressure bottle filling for half the batch. It worked in the end, but what a pain and what a mess.
 
I'm planning on brewing my 1st lager (I've got 8 brews under my belt and 2 of those we're with a spunding valve). My question, could someone post their fermentation and lagering schedule ie days, temperature, pressure. I know this has been posted/discussed before but I can't seem to find it. Thanks
 

Latest posts

Back
Top